
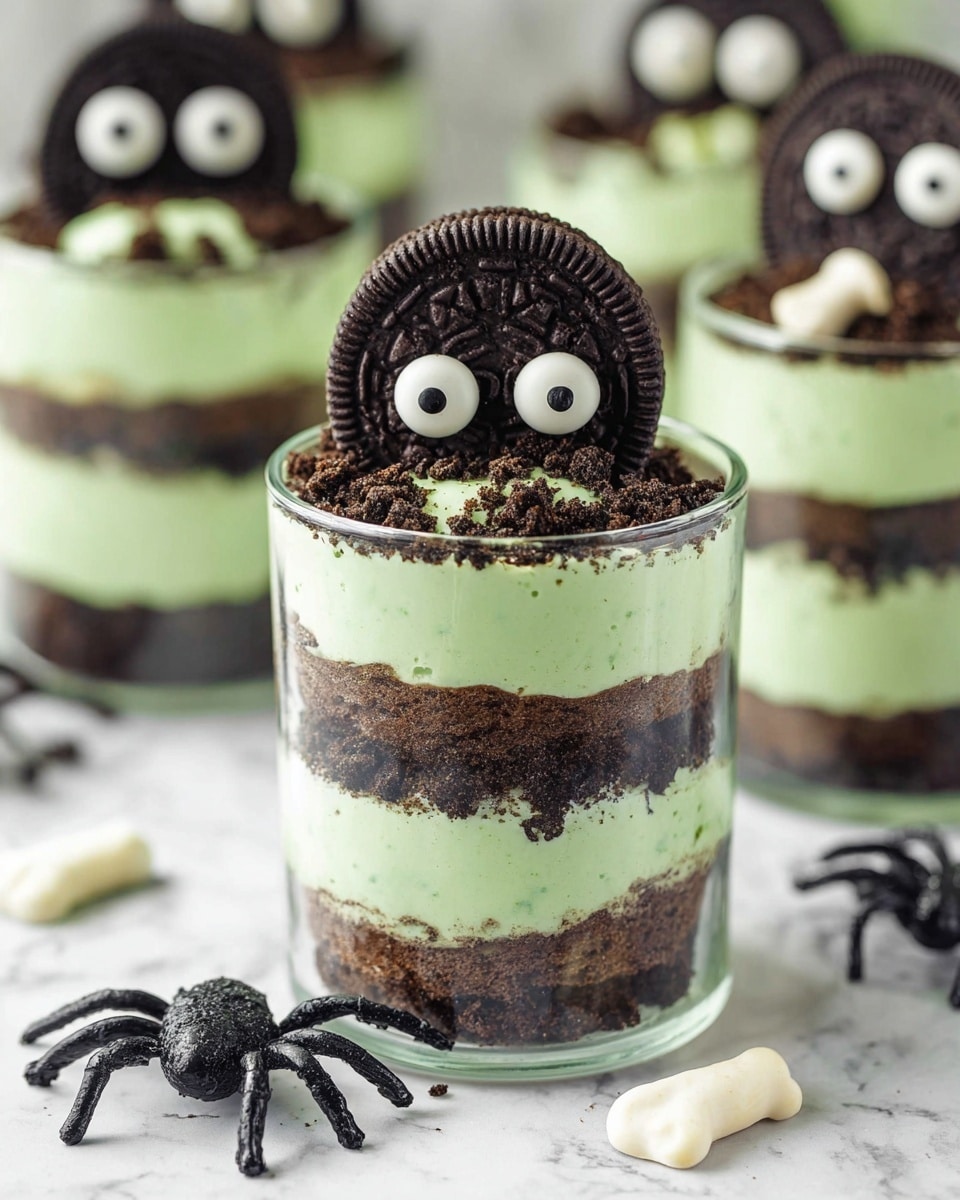
If you’re looking for a crowd-pleaser that’s as fun to make as it is to eat, then you’re going to want to stick around for this one. I’m talking about my Zombie Dirt Pudding Cups Recipe—a spooky, creamy treat layered with chocolatey cookie crumbs and topped with the cutest candy eyeballs. It’s one of those desserts that never fail to get a giggle and an enthusiastic “more, please” from guests. Whether you’re whipping these up for Halloween or just craving a playful dessert, this recipe is foolproof, downright delicious, and honestly, kind of addictive!
Why You’ll Love This Recipe
- Super Simple Prep: You don’t need fancy skills or ingredients to get these pudding cups just right.
- Perfect for Entertaining: These are a guaranteed hit with both kids and adults, adding playful fun to the party.
- Customizable Layers: You can tweak the pudding colors or mix-ins to match any theme or occasion.
- Delicious Texture Combo: Creamy pudding meets crunchy cookie “dirt” for a dessert that’s as fun to eat as it is to make.

Ingredients You’ll Need
Getting this Zombie Dirt Pudding Cups Recipe just right means grabbing a few special ingredients that combine for maximum spooky flavor and texture. Mint Oreo cookies add that perfect chocolate-mint dirt feel, while green-tinted pudding sets the eerie vibe. Here’s what you’ll want on hand and why each matters.
- Mint Creme Oreo Cookies: These minty Oreos give that dark chocolate “dirt” look and a refreshing mint flavor that’s so good against the creamy pudding.
- White Chocolate Instant Pudding Mix: White chocolate pudding thickens beautifully and tones down the mint with a gentle, sweet richness.
- Half and Half or Whole Milk: Using half and half is my secret for a pudding that sets thick and creamy—milk works, but stick with full-fat options for best texture.
- Green Gel Food Coloring: Gel food coloring gives you a bright, vivid green without watering down your pudding.
- Cool Whip (Thawed): This lightens the pudding and adds silky smoothness that’s irresistible.
- Candy Eyeballs (Large and Small): These are the stars of your zombie-cup toppers—super cute and easy to find around Halloween!
- Halloween Mix Sprinkles (Optional): Add a little extra spooky flair if you want, but the eyes alone steal the show.
Variations
One of the things I love most about this Zombie Dirt Pudding Cups Recipe is how easy it is to switch things up to keep it fresh. Depending on your mood or the occasion, some simple tweaks can add new life to the dessert.
- Color Variations: I often divide the pudding to add orange or purple gel food coloring alongside green for a vibrant, Halloween-themed rainbow effect. It’s fun and makes the cups look extra spooky!
- Dairy-Free Option: Try coconut milk-based pudding and dairy-free whipped topping for a delicious vegan version—just watch the thickening and adjust ingredients as needed.
- Cookie Swaps: Mint Oreos are my go-to, but you can try classic Oreos or other chocolate sandwich cookies if mint isn’t your thing.
- Extra Mix-Ins: For crunch, sprinkle in some chopped nuts or candy pieces in the pudding layers. My family loves when I toss in mini chocolate chips or crushed candy corn.
How to Make Zombie Dirt Pudding Cups Recipe
Step 1: Separate the Oreos Carefully
Start by gently twisting 12 Oreo cookies apart. The key here is to keep the mint filling intact on one side because that’s what we’ll press the eyeballs onto later. It takes a little patience—I like to wiggle the cookies slowly back and forth rather than yanking them apart, which helps avoid breaking the halves. Set the cookie halves with filling aside, and crush the rest for your dirt layer.
Step 2: Crush the Oreos into “Dirt” Crumbs
Use a food processor for the smoothest dirt-like crumbs, but a good ol’ Ziploc bag and rolling pin work just fine too. Crush all the remaining cookie halves (including the ones without filling) into fine, crumbly pieces that won’t overpower the pudding flavors but add just the right amount of texture. Set aside.
Step 3: Whisk the Pudding and Color It
In a medium bowl, whisk together the white chocolate pudding mix, half and half (or whole milk), and 6-8 drops of green gel food coloring. Whisk for 1-2 minutes until the mixture starts to thicken. Then let it rest for 5 minutes to set perfectly. This resting time makes a huge difference—trust me, patience pays off with that velvety texture!
Step 4: Fold in the Cool Whip for Silky Smoothness
Gently fold in the thawed Cool Whip until it’s fully combined and luscious. This step lightens the pudding and gives it that creamy mouthfeel that makes eating these cups feel like a little indulgent treat.
Step 5: Layer the Dirt and Pudding in Cups
Grab your small clear plastic cups (I recommend 5-9 ounces, depending on how generous you want your servings). Start with about 2 tablespoons of Oreo crumbs in the bottom, then a layer of pudding, then more crumbs, and keep alternating till you finish with a top layer of cookie crumbs. These layers look so cool and give you that classic “dirt cup” vibe.
Step 6: Chill and Set
Once assembled, cover and chill the cups for at least one hour. This allows the pudding to firm up and the flavors to meld beautifully. I’ve found that skipping this step makes the cups too runny, so give your zombies time to rest!
Step 7: Create Your Zombie Cookie Toppers
When you’re ready to serve, press one large and one small candy eyeball into each Oreo half with filling—these are your zombie faces! Then stand each decorated cookie upright on top of each pudding cup, eyes facing front. It’s such a fun finishing touch and always gets the biggest smiles.
Step 8: Add Optional Sprinkles and Serve
If you want to go all out, sprinkle some Halloween-themed confetti, bones, or skeleton sprinkles around the edges. But honestly, just the “eyes” cookie on top steals the spotlight every time.
Pro Tips for Making Zombie Dirt Pudding Cups Recipe
- Keep Those Oreos Intact: When separating Oreos, don’t hurry—twist gently to keep the filling on one half so your zombie faces look clean and neat.
- Use Gel Food Coloring: Liquid food coloring can thin your pudding, but gel gives vibrant colors without affecting texture.
- Chill Fully: Give the pudding cups at least an hour in the fridge; it really helps the layers set for perfect scooping and presentation.
- Customize Serving Size: Choose your cup size wisely—the recipe adapts well to smaller servings if you want more zany zombie cups for everyone.
How to Serve Zombie Dirt Pudding Cups Recipe
Garnishes
I like to keep it simple and stick to the candy eyeballs for the zombie faces, but sometimes I toss some tiny edible spiders or bone-shaped sprinkles around for extra creep factor. Fresh mint leaves don’t really fit the theme but add a nice color contrast if you’re serving adults who appreciate a hint of fresh flavor.
Side Dishes
Because the Zombie Dirt Pudding Cups are pretty rich and sweet, I pair them with light, refreshing options like sliced fruit or a crisp apple salad. They also work great alongside savory finger foods or your Halloween party snacks like deviled eggs or mini sandwiches to balance the meal.
Creative Ways to Present
For parties, I’ve used mini mason jars or glass terrariums to give the dirt cups a “real” garden look. You could even nest them inside faux gravestones made of cardboard or serve in hollowed-out mini pumpkins for a seasonal twist. A fog machine nearby definitely amps up the spooky vibe!
Make Ahead and Storage
Storing Leftovers
I usually cover leftover pudding cups tightly with plastic wrap and keep them refrigerated. They stay fresh and creamy for up to 3 days, but the cookie “dirt” on top starts to soften a bit, so it’s best to add the cookie toppers fresh each time.
Freezing
Freezing these isn’t my favorite because the texture of pudding changes when thawed—and the cookie crumbs get soggy. If you must freeze, do so without the cookie toppers and only for about a month. Thaw overnight in the fridge before serving.
Reheating
This dessert is best enjoyed cold, so reheating isn’t really recommended. If you want to soften the pudding slightly, let it sit at room temperature for 10-15 minutes, but don’t microwave as it’ll ruin the texture.
FAQs
-
Can I use regular Oreos instead of Mint Creme Oreos for this Zombie Dirt Pudding Cups Recipe?
Absolutely! While Mint Oreos add a refreshing mint flavor and the perfect dark crumb texture for the “dirt,” regular Oreos work just as well. You’ll lose the minty twist, but the classic chocolate creme cookies still create that dirt-like effect for your pudding cups.
-
What type of cups are best for serving Zombie Dirt Pudding Cups?
Small clear plastic cups between 5 and 9 ounces are ideal. They showcase the layered “dirt” and pudding beautifully and create perfectly portioned servings. You can adjust the size based on how many servings you want or how hungry your crowd is!
-
How long does it take to make and chill this dessert?
The prep time is about 15 minutes if you have everything ready to go, and chilling the cups for at least 1 hour is essential for the pudding to set properly. So plan for roughly 1 hour and 15 minutes from start to finish.
-
Can I prepare the Zombie Dirt Pudding Cups a day in advance?
Yes! In fact, making them a few hours or even a day ahead helps the flavors meld and the pudding set nicely. Just add your cookie toppers and eyeballs right before serving to keep everything looking fresh and fun.
Final Thoughts
This Zombie Dirt Pudding Cups Recipe is one of those desserts that’s just pure joy to make and share. It’s playful, easy, and always brings a smile to faces around the table — especially with those adorable candy eyeballs staring up at you! I still remember the first time I made these for a Halloween party; my niece was utterly fascinated by the “zombie” cookie toppers and kept asking for seconds. If you want to impress your friends or family with something that’s both delicious and a little bit fun, give these pudding cups a try. I’m betting you’ll come back to this recipe for years to come—because honestly, who can resist dessert that looks this cool and tastes this good?
Print
Zombie Dirt Pudding Cups Recipe
- Prep Time: 15 minutes
- Cook Time: 0 minutes
- Total Time: 1 hour 15 minutes
- Yield: 12 servings
- Category: Dessert
- Method: No-Cook
- Cuisine: American
Description
These Zombie Dirt Pudding Cups are a fun and spooky dessert perfect for Halloween or any themed party. Made with Mint Creme Oreo cookies, white chocolate instant pudding, Cool Whip, and candy eyeballs, these layered treats mimic dirt cups with creepy zombie cookie toppers. They are creamy, crunchy, and visually festive, combining easy-to-make layers of pudding and crushed cookies for a delightfully eerie snack.
Ingredients
Cookies
- 1 package (18.7 oz) Mint Creme Oreo Cookies (family-size)
Pudding
- 1 box (3.3 oz) white chocolate instant pudding mix
- 2 cups half and half (or whole milk)
- 6-8 drops green gel food coloring
- 8 ounces Cool Whip, thawed
Decorations
- 12 large candy eyeballs
- 12 small candy eyeballs
- Bone, skeleton, or Halloween mix sprinkles (optional garnish)
Instructions
- Separate Oreos: Gently twist one side off each of 12 Oreo cookies, making sure the filling remains intact on one side. Set aside the 12 cookie sides with the exposed filling for later use as zombie toppers.
- Crush remaining Oreos: Crush the remaining Oreo cookies, including the unseparated halves, into fine dirt-like crumbs using a food processor, food chopper, or by placing them in a Ziploc bag and pounding with a rolling pin. Set crumbs aside.
- Prepare pudding: In a medium bowl, whisk together the white chocolate instant pudding mix, half and half (or whole milk), and green gel food coloring for 1-2 minutes until it begins to thicken. Allow the pudding to sit for 5 minutes to thicken fully.
- Combine with Cool Whip: Stir the thawed Cool Whip into the pudding until fully incorporated and smooth.
- Assemble pudding cups: Into small clear plastic cups (5-9 oz), sprinkle about 2 tablespoons of the crushed cookie crumbs at the bottom. Add a generous layer of the prepared pudding. Repeat layering of crushed cookies and pudding, finishing with a layer of crumbs on top.
- Chill cups: Cover the assembled pudding cups and chill in the refrigerator for 1 hour to allow the layers to set and thicken.
- Prepare zombie toppers: Just before serving, gently press one large and one small candy eyeball into the exposed Oreo filling halves to create the zombie faces.
- Top and garnish: Place each zombie cookie (eyeballs and frosting up) standing upright on top of each pudding cup. Optionally, sprinkle with bone, skeleton, or Halloween-themed sprinkles for added decoration.
Notes
- Pudding Cup Size: Use small clear cups between 5 to 9 ounces. Serving count may vary depending on cup size.
- Milk Choice: Half and half is preferred for thick, creamy pudding. Whole milk is an acceptable alternative. Do not use milk with fat content lower than whole milk for best results.
- Serving Size: The recipe yields 12 cups with typical sizing; adjust cookie separation accordingly if making fewer cups.
- Pudding Color Variations: Use neon gel food coloring for other themed colors like orange or purple to customize the look. You can also layer multiple colors for a fun effect.
- Zombie Cookie Toppers: Only separate as many Oreo halves as needed based on how many pudding cups you make.
Nutrition
- Serving Size: 1 pudding cup (approx. 6 oz)
- Calories: 310
- Sugar: 28g
- Sodium: 210mg
- Fat: 15g
- Saturated Fat: 8g
- Unsaturated Fat: 6g
- Trans Fat: 0g
- Carbohydrates: 39g
- Fiber: 1g
- Protein: 3g
- Cholesterol: 25mg


