
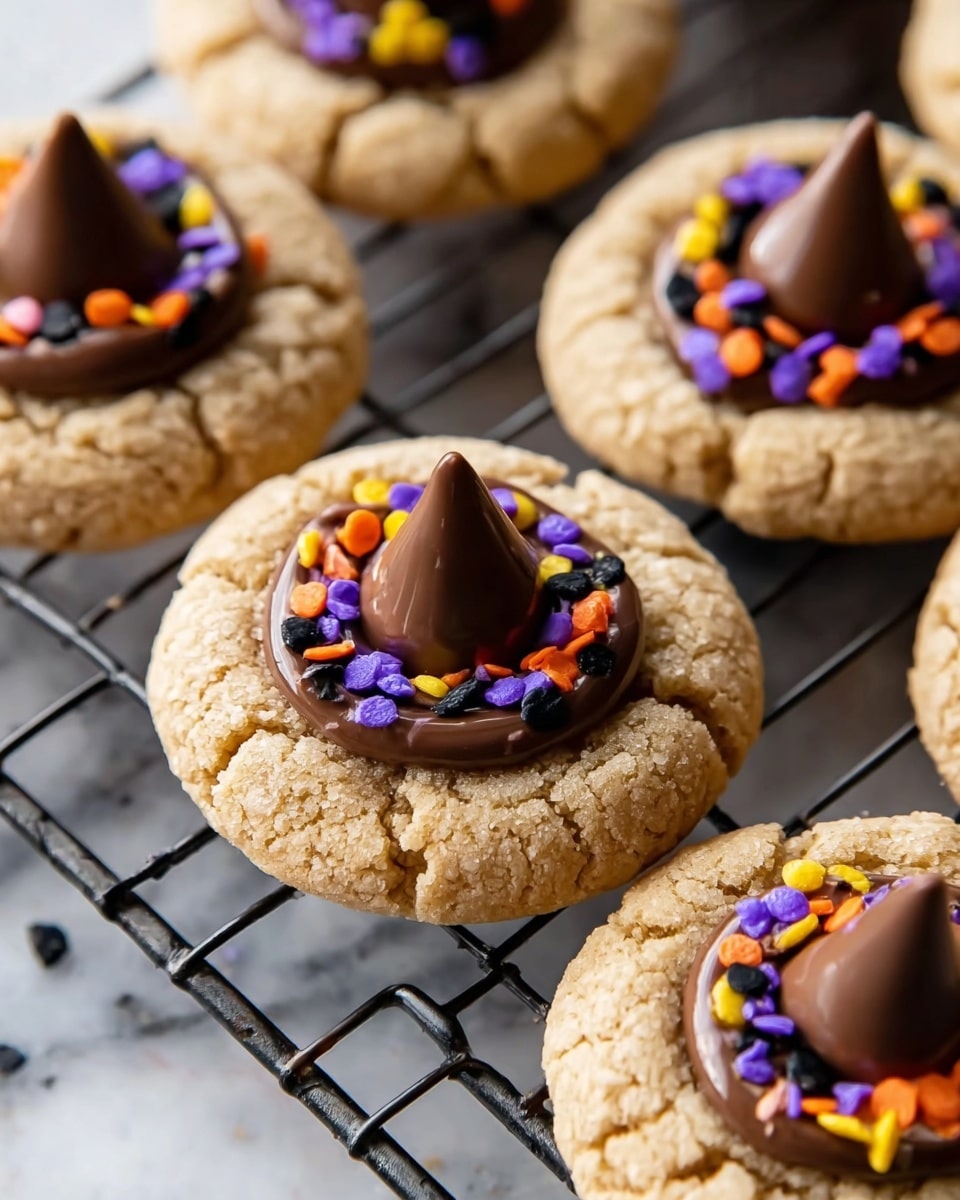
If you’re on the hunt for a fun, festive treat that’s as delightful to make as it is to eat, you’re going to love this Witch Hat Cookies Recipe. Picture crispy, peanut butter-infused cookies topped with melty chocolate and vibrant, colorful frosting that really bring those witch hats to life. I promise this recipe will bring a magical touch to your kitchen and have your friends and family asking for seconds!
Why You’ll Love This Recipe
- Nostalgic Flavors: The combo of peanut butter and chocolate is a classic that never fails to please.
- Eye-Catching Halloween Fun: These aren’t just cookies—they’re wearable mini witch hats that add whimsy to any party.
- Simple Yet Impressive: You don’t need to be a pro baker to nail this look and flavor combo.
- Customizable Frosting: Vibrant food coloring lets you get creative with your spooky designs.

Ingredients You’ll Need
For these Witch Hat Cookies, the ingredients come together beautifully to create that perfect texture and flavor—soft, peanut buttery cookies topped with smooth chocolate and bright frosting. I always recommend using quality peanut butter and fresh baking soda for best results.
- All-purpose flour: The base for the cookie dough, providing structure and softness.
- Baking soda: Helps the cookies rise and become light without spreading too much.
- Salt: Balances the sweetness and enhances the peanut butter flavor.
- Granulated sugar: Adds that subtle sweetness and crunch—plus you’ll roll the dough balls in it for a nice sparkle.
- Light brown sugar: Brings moisture and a hint of caramel flavor to the cookies.
- Creamy peanut butter: Use no-stir for ease; it lends richness and that iconic nutty taste.
- Unsalted butter: Room temperature for easy creaming and buttery flavor.
- Large egg: Binds everything together and adds tenderness.
- Pure vanilla extract: Just a splash to deepen the flavor.
- Chocolate melting wafers: These are perfect for creating the cake brim, but melted chocolate works if you can’t find them.
- Confectioners’ sugar: For the silky, smooth frosting base.
- Heavy cream or whole milk: Controls the frosting’s consistency.
- Gel food coloring: Orange, purple, and green are festive colors to bring your witch hats to life.
- Chocolate kisses: Unwrapped, to top the hats with that iconic pointy peak.
- Sprinkles: For fun, decorative accents on the frosting.
Variations
I love tweaking recipes to fit the mood or dietary needs—feel free to get creative with this Witch Hat Cookies Recipe. It really lends itself well to customization, so you can make it your own while still keeping that festive charm.
- Nut-Free Version: I swapped peanut butter for sunflower seed butter once for an allergy-friendly batch—just as delicious and kid-approved.
- Chocolate Lovers’ Upgrade: Try using dark chocolate wafers or adding a pinch of cocoa powder to the cookie dough if you want a richer chocolate-peanut combo.
- Colorful Frosting Mix: Besides traditional Halloween colors, I’ve experimented with metallic gel food colors for a funky glam vibe.
- Mini Cookies: Make smaller versions for bite-sized party treats that disappear fast!
How to Make Witch Hat Cookies Recipe
Step 1: Prepare Your Cookie Dough
Start by preheating your oven to 375º F and lining a baking sheet with parchment paper. In a bowl, whisk together all-purpose flour, baking soda, and salt—that’s your dry mix ready to go. In your mixer, cream together the granulated sugar, brown sugar, butter, and peanut butter until fluffy—this usually takes about 2 minutes and makes a huge difference in texture. Then, beat in the egg and vanilla until just combined. Finally, with the mixer on low, slowly incorporate your flour mixture until the dough just comes together. Overmixing here can make the cookies tough, so go easy!
Step 2: Shape and Bake the Cookies
Grab about a tablespoon of dough for each cookie and roll it into a neat 1-inch ball. You’ll want to roll these balls in some extra granulated sugar to get that sweet, slightly crunchy outer shell. Place them about 1½ inches apart on your prepared baking sheet and gently press down to slightly flatten—this helps the cookie bake evenly. Bake for 10 minutes, or until the edges start turning a light golden brown.
Step 3: Add the Melting Chocolate Wafers
Right after pulling the cookies from the oven, press one chocolate melting wafer on top of each warm cookie. The heat from the cookie melts the wafer just enough so you can spread it gently with the back of a spoon, creating the wide brim of your witch hat. It’s a neat trick I discovered that saves time and mess compared to melting chocolate separately. Let the cookies cool on a wire rack so the chocolate hardens nicely.
Step 4: Whip Up the Frosting and Decorate
While the cookies cool, make your frosting by beating softened butter until creamy, then gradually add sifted confectioners’ sugar. Mix in vanilla, a pinch of salt, and heavy cream one tablespoon at a time until the frosting is just right—smooth but able to pipe nicely. Divide your frosting into bowls and tint each with your chosen gel food colors. Using piping bags with round tips, frost the bottom of an unwrapped chocolate kiss and gently press it onto the hardened chocolate wafer on your cookie, making the “point” of the witch hat. Add sprinkles for that fun extra touch. You’ll notice the frosting squeezes out just enough to keep the kiss steady and look like a hatband.
Pro Tips for Making Witch Hat Cookies Recipe
- Use No-Stir Peanut Butter: I prefer Skippy Natural because it blends smoothly and gives the best texture—no oily mess!
- Press Wafers Immediately After Baking: This helps the chocolate melt just right without cracking or breaking apart.
- Don’t Overmix the Dough: Overworking can make cookies tough; mix just until combined for tender results.
- Leftover Frosting Hack: Any frosting left can jazz up cupcakes or even be used as a sweet dip for fruits.
How to Serve Witch Hat Cookies Recipe
Garnishes
I personally love a light sprinkle of edible glitter or tiny Halloween-themed sprinkles right on top of the frosting—it gives just the right pop of color and sparkle. Sometimes a tiny dusting of powdered sugar looks like magical fairy dust on the hats.
Side Dishes
These cookies go perfectly with a simple glass of cold milk or a rich hot chocolate, especially when you’re cozying up during chilly October evenings. I also serve them alongside some spiced pumpkin cupcakes for a full Halloween spread.
Creative Ways to Present
Once, I arranged the cookies on a platter lined with faux autumn leaves and mini pumpkins for a party centerpiece that doubled as snacks. Another fun idea is to place them on black cupcake liners to make individual witch hats “stand” tall on a dessert table.
Make Ahead and Storage
Storing Leftovers
Store your Witch Hat Cookies in an airtight container at room temperature, where they stay fresh and delightful for up to one week. I usually layer them with parchment paper to prevent sticking and keep those chocolate peaks intact.
Freezing
I find freezing the unbaked dough in pre-portioned balls works great—just thaw in the fridge before baking. Baked cookies freeze well too; just let them cool completely, then store airtight. They thaw quickly at room temperature and taste almost like fresh.
Reheating
If you want to warm these cookies up, I gently microwave them for about 10 seconds just to soften the peanut butter and chocolate slightly—be careful not to overdo it, or the frosting may melt too much.
FAQs
-
Can I use crunchy peanut butter instead of creamy in this Witch Hat Cookies Recipe?
You can, but using creamy peanut butter helps the dough mix smoothly and gives a uniform texture. Crunchy might add an interesting crunch, but it can also make rolling and spreading the dough a bit trickier.
-
What if I can’t find chocolate melting wafers?
No worries! Melt some chocolate chips or baking chocolate and spoon a dollop onto each warm cookie after baking—it works just as well for the brim of the hat.
-
How long does it take to make these Witch Hat Cookies?
From start to finish, expect about 55 minutes including prep, baking, cooling, and decoration. The cooling step is key to let the chocolate harden before frosting.
-
Can I make the frosting ahead of time?
Absolutely! You can make and store the frosting in the refrigerator for up to 2 days—just bring it to room temperature and give it a quick whip before decorating.
Final Thoughts
Honestly, this Witch Hat Cookies Recipe has become a staple in my Halloween baking arsenal—it’s a crowd-pleaser that’s as fun to make as it is to eat. I love how the colors pop and the peanut butter-chocolate combo always gets rave reviews. If you’re looking for a way to impress at your next party or just want to treat yourself with a little seasonal magic, I can’t recommend this recipe enough. So grab your mixer, gather those ingredients, and let’s make some festive witch hats that taste as good as they look!
Print
Witch Hat Cookies Recipe
- Prep Time: 15 minutes
- Cook Time: 10 minutes
- Total Time: 55 minutes
- Yield: 30 cookies
- Category: Dessert
- Method: Baking
- Cuisine: American
Description
Delightfully festive Witch Hat Cookies featuring a peanut butter cookie base topped with a melting chocolate wafer brim, a chocolate kiss hat top, and colorful creamy frosting perfect for Halloween celebrations.
Ingredients
Cookies
- 1 ¾ cup (218 g) all-purpose flour
- 1 teaspoon baking soda
- ¼ teaspoon salt
- ½ cup (100 g) granulated sugar, plus more for rolling cookies in
- ½ cup (100 g) light brown sugar
- ½ cup (128 g) no-stir creamy peanut butter
- ½ cup (113 g or 1 stick) unsalted butter, room temperature
- 1 large egg, room temperature
- 1 teaspoon pure vanilla extract
- 30 chocolate melting wafers
Frosting
- ½ cup (113 g or 1 stick) unsalted butter, room temperature
- 1 ¼ cups (150 g) confectioners’ sugar, sifted
- 1 teaspoon pure vanilla extract
- Pinch salt
- 1-2 Tablespoons heavy cream or whole milk, room temperature
- Gel food coloring (orange, purple, green)
Decoration
- 30 chocolate kisses, unwrapped
- Sprinkles
Instructions
- Prepare Dry Ingredients: Preheat your oven to 375º F and line a baking sheet with parchment paper. In a medium bowl, whisk together the all-purpose flour, baking soda, and salt, then set aside.
- Mix Cookie Dough: In the bowl of a stand mixer or using a hand mixer, combine granulated sugar, brown sugar, unsalted butter, and creamy peanut butter. Beat on medium speed until fluffy, about 2 minutes, scraping down the bowl as needed. Add the egg and vanilla extract, and beat until fully incorporated, about 30 seconds.
- Combine Dry and Wet Ingredients: Lower the mixer speed and gradually add the flour mixture to the wet ingredients. Mix just until combined to avoid overworking the dough.
- Shape and Bake Cookies: Scoop a tablespoon of dough and roll into 1-inch balls. Roll each ball in additional granulated sugar and place them 1 ½ inches apart on the prepared baking sheet. Gently press the balls slightly flat. Bake for 10 minutes, or until the cookies are light golden brown.
- Add Chocolate Wafer Brims: Remove cookies from the oven and immediately press a chocolate melting wafer on top of each cookie. Let the wafer melt from residual heat, then use the back of a spoon to spread it wider than the base of the chocolate kiss. Transfer cookies to a wire rack to cool and allow chocolate to harden.
- Prepare Frosting: In a clean mixing bowl, beat unsalted butter with a mixer fitted with the paddle attachment until creamy, about 2 minutes. Gradually add sifted confectioners’ sugar on low speed until fully combined. Increase speed to medium, then add vanilla extract, 1 tablespoon of heavy cream or milk, and a pinch of salt. Mix until smooth, adding an additional tablespoon of cream for thinner consistency or more sugar for thicker frosting.
- Color the Frosting: Divide the frosting equally into separate bowls and mix in gel food coloring (orange, purple, green) to each until desired shade is reached.
- Decorate Cookies: Transfer each colored frosting into piping bags fitted with round tips. Frost the bottom of each chocolate kiss and press the kisses firmly onto the hardened chocolate wafer brim of each cookie, allowing some frosting to peek out. Add sprinkles on top for extra festive decoration.
- Serve and Store: Serve immediately or store the decorated cookies in an airtight container at room temperature for up to one week.
Notes
- Use no-stir creamy peanut butter like Skippy Natural for best texture and flavor.
- If chocolate melting wafers are unavailable, melt chocolate chips and spoon onto the cookies after cooling to create the hat brim.
- Extra frosting can be saved for decorating Halloween cupcakes or other treats.
- Cookie dough can be frozen for up to 3 months; thaw in refrigerator before baking.
- Baked cookies can be frozen for up to 3 months for future enjoyment.
Nutrition
- Serving Size: 1 cookie
- Calories: 202
- Sugar: 17g
- Sodium: 87mg
- Fat: 11g
- Saturated Fat: 6g
- Unsaturated Fat: 4g
- Trans Fat: 0.2g
- Carbohydrates: 24g
- Fiber: 1g
- Protein: 3g
- Cholesterol: 25mg


