
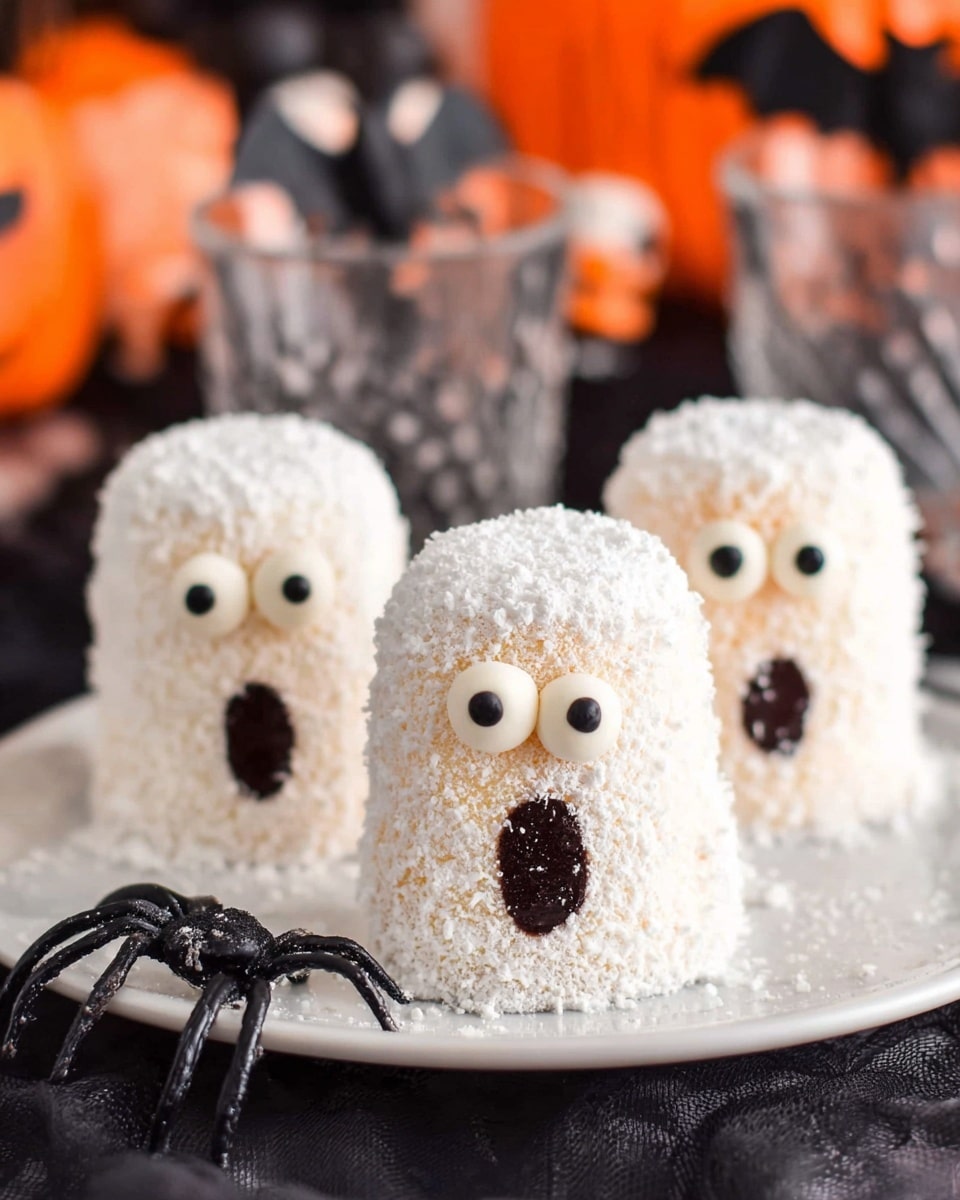
If you’re looking for a spooky, silly, and absolutely adorable Halloween treat, you’re going to love this Twinkie Ghosts Recipe. I first made these for a Halloween party, and my family went absolutely crazy for how cute and simple they were! Plus, they come together so quickly—perfect when you want a fun dessert without a ton of fuss. Keep reading, because I’ll share my favorite tips to get these ghostly goodies looking just right every time.
Why You’ll Love This Recipe
- Super Simple: No baking required—just a few quick steps to spooky perfection.
- Kid-Friendly Fun: Kids love helping with the decorating, making it a great family activity.
- Deliciously Sweet: The creamy Twinkie filling dusted with powdered sugar is a heavenly combo.
- Customizable Looks: You can mix up eye styles and mouth colors to make each ghost unique!

Ingredients You’ll Need
The beauty of this Twinkie Ghosts Recipe is that it uses just a handful of ingredients, and you can pretty much grab everything at your local grocery. These components work perfectly together—the soft, creamy Twinkies, the snowy powdered sugar, and those tiny candy eyeballs that bring these ghosts to life.
- Twinkies: The star of the show; make sure they’re fresh and soft to achieve that perfect ghost shape.
- Black writing gel: Great for drawing mouths with precision; if you can’t find black, any fun color works!
- Powdered sugar: This gives the ghosts that ghostly white coat and a slight sweetness boost.
- Small candy eyeballs: They add the perfect touch of spooky personality—if you can’t find these, no worries, I’ll share alternatives.
Variations
I love switching up this Twinkie Ghosts Recipe depending on the occasion or who I’m serving. You can easily make these gluten-free by finding certified gluten-free Twinkies or try a different ghostly twist with flavors like pumpkin or chocolate dust!
- Eye Alternatives: When I couldn’t find candy eyeballs, I’d just dot black writing gel or use mini chocolate chips for eyes—works like a charm.
- Flavor Variations: Sprinkling cinnamon sugar with the powdered sugar adds a warm autumn vibe I discovered last fall, and the kids loved it!
- Colorful Mouths: Using orange or green writing gel instead of black gives a fun pop and makes the ghosts look more whimsical.
- Mini Ghosts: Try cutting the Twinkies into thirds instead of halves to make bite-sized ghosts for a party tray.
How to Make Twinkie Ghosts Recipe
Step 1: Prep and Slice Your Twinkies
First, unwrap each Twinkie and slice it in half widthwise. This way, you get two adorable little ghosts per Twinkie. It can get a bit sticky, so a sharp serrated knife works best to get a clean cut without squashing your snack. You’ll end up with 20 mini ghost shapes ready to be decorated.
Step 2: Draw the Mouths
Using your black writing gel, draw a circular mouth on each ghost where you want it. I like making the circle a bit generous because the powdered sugar will cover it slightly, and we’ll clean it up next. Draw the mouth before adding powdered sugar because the gel won’t stick well after dusting.
Step 3: Dust with Powdered Sugar
Next, carefully insert a fork or wooden skewer into the creamy center of each Twinkie ghost so you can hold it easily. Using a powdered sugar shaker or a dusting wand, shake a generous coat of powdered sugar over each ghost until completely covered and the yellow Twinkie is hidden. This is what really makes the ghost look ghostly white!
If you don’t have a shaker, you can spoon powdered sugar gently, but I found using a dusting tool gives a more even layer and saves you from clumps.
Step 4: Clean Up the Mouths
Here’s a trick I discovered that makes the mouths pop perfectly: use a toothpick to lightly trace around the black gel mouth in gentle circular motions, and the powdered sugar will brush away, revealing the mouth again. Just be sure to keep your tracing shape the same size so you don’t accidentally erase the circle!
Step 5: Add the Eyes
Finally, put a tiny dot of black writing gel on the back of each candy eyeball (this helps them stick) and gently press them onto your ghost near the top. Now your Twinkie ghost looks alive and ready to spook!
Step 6: Repeat and Enjoy
Repeat the steps for all your Twinkie halves, and before you know it, your spooky snack lineup is complete! These little ghosts are perfect for Halloween parties, classroom treats, or just a fun family dessert.
Pro Tips for Making Twinkie Ghosts Recipe
- Sharpen Your Knife: A serrated knife makes slicing through Twinkies cleaner and less squishy—trust me, it’s worth it!
- Use a Dusting Wand: A powdered sugar shaker or fine-mesh sieve makes an even, light coating that looks much nicer than spooning it on.
- Draw Mouths Before Dusting: I learned the hard way that the gel won’t stick on powdered sugar, so plan ahead and you’ll save frustration.
- Be Gentle with Eyes: Dotting the back with gel helps the candy eyes stick so they don’t roll off during display or transport.
How to Serve Twinkie Ghosts Recipe
Garnishes
I usually keep garnishes simple—sometimes adding tiny sprinkles around the plate for a festive touch or even edible glitter for a little magic sparkle. The eyes and mouth are really the stars, so no need to overdo it here. Fresh mint leaves nearby add a pretty contrast if you want some greenery.
Side Dishes
Pair these Twinkie Ghosts with hot chocolate or a cold glass of milk for the perfect Halloween dessert experience. I also like serving alongside simple snacks like popcorn or caramel apples to complete the spooky snack spread.
Creative Ways to Present
For a party, I’ve arranged these ghosts on a bed of crumbled Oreo “graveyard dirt” or placed them sitting up in clear cups with a little whipped cream ‘cloud’ around. Once, I even made a ghostly tower by stacking them on skewers wrapped lightly with white cheesecloth—fun, festive, and a real conversation starter!
Make Ahead and Storage
Storing Leftovers
Since these Twinkie Ghosts are best enjoyed fresh, I recommend storing leftovers in an airtight container at room temperature for up to two days. The powdered sugar can absorb moisture and get a little sticky if stored longer, so plan your serving accordingly.
Freezing
I haven’t tried freezing these because I prefer them fresh and fluffy, but if you need to freeze, wrap each Twinkie ghost individually in plastic wrap and place in a freezer bag. Thaw gently in the fridge before dusting with fresh powdered sugar and decorating.
Reheating
Since this recipe doesn’t involve baking or cooking, reheating isn’t necessary. Just serve directly at room temperature. If you want to warm them slightly, I’d suggest a few seconds under a warm lamp to soften cream—but honestly, they’re best cold or at room temp.
FAQs
-
Can I use homemade Twinkies for this Twinkie Ghosts Recipe?
Absolutely! Homemade Twinkies will work beautifully here as long as they’re sturdy enough to hold their shape when sliced. The creamy filling is key to inserting the fork or skewer for dusting, so make sure your homemade version has a nice center filling.
-
What if I can’t find candy eyeballs?
No stress! You can easily replace candy eyeballs with mini chocolate chips or simply use the black writing gel to dot eyes directly onto the powdered sugar. I’ve even used black cookie icing with great results.
-
Will the powdered sugar melt or get sticky?
If you dust the powdered sugar right before serving, it stays perfectly white and powdery. If left out for hours or stored in humid conditions, it can absorb moisture and become sticky, so keep that in mind depending on your timing.
-
Can I make these in advance?
You can prep the Twinkies and mouths the day before, but I recommend adding powdered sugar and candy eyes just before serving for the freshest look and best texture.
Final Thoughts
I absolutely love how this Twinkie Ghosts Recipe brings smiles and laughter every time I serve it! It’s such a delightful mix of easy prep, cute presentation, and delicious flavor. Whether you’re making it with the kids or prepping for a last-minute party, these little ghosts add instant festive charm. Give it a try—you’ll find it’s one of those simple recipes you return to year after year.
Print
Twinkie Ghosts Recipe
- Prep Time: 20 minutes
- Cook Time: 0 minutes
- Total Time: 20 minutes
- Yield: 20 ghosts
- Category: Dessert
- Method: No-Cook
- Cuisine: American
Description
These whimsical Twinkie Ghosts are a fun and easy Halloween treat perfect for parties or festive gatherings. Made by dusting Twinkie halves with powdered sugar and decorating with candy eyeballs and black writing gel, they’re spooky, sweet, and sure to delight kids and adults alike.
Ingredients
Twinkie Ghosts
- 10 Twinkies
- Powdered sugar (for dusting)
- 20 small candy eyeballs
- Black writing gel (for mouth and eye details)
Instructions
- Prepare Twinkies: Unwrap each Twinkie and cut each one in half widthwise. You will end up with 20 Twinkie ghosts.
- Draw Mouths: Using the black writing gel, draw a circle where you’d like the mouth to be on each ghost.
- Dust with Powdered Sugar: Insert a fork or wooden skewer into the cream part of a Twinkie to hold it steady. While holding it, gently shake powdered sugar over the Twinkie until it’s completely covered and no yellow remains. A powdered sugar shaker or dusting sifter wand works best for an even coat. It’s okay if the mouth gets covered in powdered sugar; this will be fixed in the next step.
- Clear Mouth Area: Use a toothpick to carefully trace along the black gel mouth, swirling gently in a circular motion to remove the powdered sugar from the mouth area and reveal the black gel beneath. Be sure to maintain the original shape of the mouth.
- Attach Eyes: Place a small dot of black gel on the back of each candy eyeball for adhesion, then gently press the eyes onto the Twinkie ghosts in your desired position.
- Repeat: Repeat the dusting, mouth clearing, and eye attaching steps for all remaining Twinkie ghosts until complete.
Notes
- Serving Size: A standard box at the grocery store contains 10 Twinkies, which is why this recipe calls for 10. Adjust quantity as needed.
- Eye Alternatives: If candy eyeballs are unavailable, use black gel to draw eyes, black cookie icing, or mini chocolate chips as substitutes.
- Gel Color Options: You can use other gel colors such as orange or green if black gel is not available. Any color works for a creative twist.
- Mouth Drawing Tips: Draw the mouth circle wide enough so it won’t close in once the powdered sugar is applied.
- Tracing Technique: When clearing powdered sugar from the mouth area with a toothpick, maintain the circular shape to avoid distorting the mouth design.
Nutrition
- Serving Size: 1 Twinkie ghost (half a Twinkie)
- Calories: 150
- Sugar: 15g
- Sodium: 120mg
- Fat: 7g
- Saturated Fat: 3g
- Unsaturated Fat: 3g
- Trans Fat: 0g
- Carbohydrates: 22g
- Fiber: 0g
- Protein: 1g
- Cholesterol: 15mg

