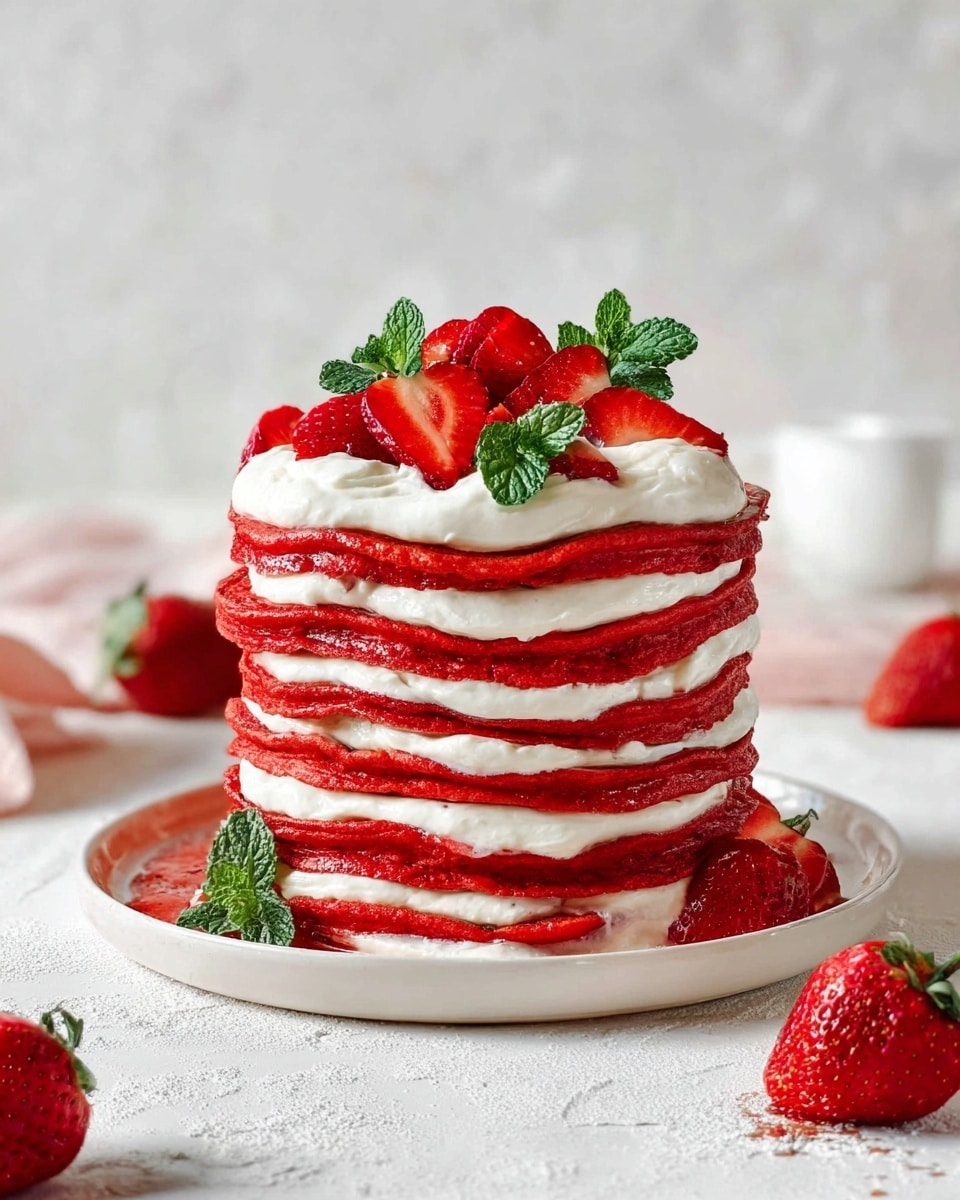
I absolutely love how this Red Velvet Pancakes Recipe turns out every single time—fluffy, tender, and with that unmistakable hint of cocoa and sweet tang from the buttermilk. These pancakes are perfect for special weekend breakfasts or when you want to surprise your family with a little extra color and flavor in the morning. The red hue always sparks a little joy, and you’ll find that they’re just as much fun to make as they are to eat.
When I first tried this recipe, I was amazed at how easy it was to get that perfect red velvet taste without a complicated process or fancy ingredients. It’s a wonderful twist on traditional pancakes that works beautifully for holidays, birthdays, or just a cozy brunch at home. Plus, you’ll love that this Red Velvet Pancakes Recipe uses ingredients you probably have in your pantry right now, making it both convenient and impressive.
Why You’ll Love This Recipe
- Vibrant, Festive Flavor: This recipe balances cocoa and buttermilk for that signature rich red velvet taste you’ll crave.
- Easy to Make: Simple ingredients and quick steps mean you’ll have the perfect pancakes ready in about 10 minutes.
- Versatile Serving Options: Enjoy them plain, with cream cheese frosting, or with a high-protein Greek yogurt topping.
- Great for Special Occasions: The bright red color and flavor make your breakfast extra special without extra fuss.

Ingredients You’ll Need
These ingredients come together in harmony to create pancakes that are fluffy, moist, and delightfully red. Using buttermilk gives the pancakes a lovely tang and helps activate the baking soda for a light texture, while cocoa adds just the right depth for that authentic red velvet flavor.
- All Purpose Flour: Make sure you sift it for the fluffiest pancakes and to avoid lumps in the batter.
- Sugar: Adds just the right amount of sweetness without overpowering the cocoa taste.
- Salt: Enhances all the flavors, balancing the sweetness and cocoa.
- Baking Soda and Baking Powder: These work together to give your pancakes that perfect rise and tenderness.
- Buttermilk: Adds moisture and a slightly tangy flavor—if you don’t have buttermilk, I’ll share a quick DIY trick below.
- Eggs: Use room temperature eggs for better mixing and fluffier texture.
- Red Food Coloring: The star of the show! I recommend gel food coloring for the richest color with less liquid.
- Cocoa Powder: Use unsweetened cocoa powder to get that classic subtle chocolate flavor.
Variations
I like to switch things up and make this Red Velvet Pancakes Recipe my own, depending on the season or who I’m cooking for. Don’t hesitate to experiment with toppings or ingredient swaps to suit your taste or dietary needs—this recipe is really flexible!
- Gluten-Free Version: I tested this recipe with gluten-free all-purpose flour (like Bob’s Red Mill) and it turned out just as fluffy—just be sure your blend contains xanthan gum for structure.
- Vegan Twist: For a vegan-friendly take, try almond milk with apple cider vinegar as a buttermilk substitute and use flax eggs instead of real eggs.
- Extra Fudgy: Add a handful of mini chocolate chips into the batter for that gooey surprise everyone loves.
- Spiced Variation: Mix in a pinch of cinnamon or chili powder for a warm, unexpected flavor boost that pairs beautifully with cream cheese frosting.
How to Make Red Velvet Pancakes Recipe
Step 1: Mix Dry Ingredients Gently
Start by sifting together your flour, sugar, baking powder, baking soda, cocoa powder, and salt into a large bowl. This prevents lumps and ensures your cocoa gets evenly distributed, which is key for that consistent red velvet color and texture. Making a well in the center will make it easier to add your wet ingredients shortly.
Step 2: Combine Wet Ingredients and Fold In
In a separate bowl, whisk your buttermilk, eggs, vanilla, and red food coloring until everything is well combined. Pour this into the dry ingredients’ well and gently stir until just combined—but don’t overmix! The batter should be thick and slightly lumpy for the fluffiest pancakes.
Step 3: Let the Batter Rest
Letting your batter sit for 2 to 3 minutes helps it thicken and gives the baking powder and soda time to activate. I usually use this few-minute break to preheat my griddle or pan, so everything is ready to go when I start cooking.
Step 4: Cook Your Pancakes
Heat a non-stick pan over medium heat and add a little oil to keep the pancakes from sticking. Scoop out about ¼ cup portions of the batter, placing them carefully in the skillet. Cover the pan with a lid—this helps trap the heat and steam so your pancakes cook evenly and stay beautifully fluffy. Cook for about 2-3 minutes per side, flipping once you see bubbles forming on the surface.
Step 5: Serve Warm and Enjoy
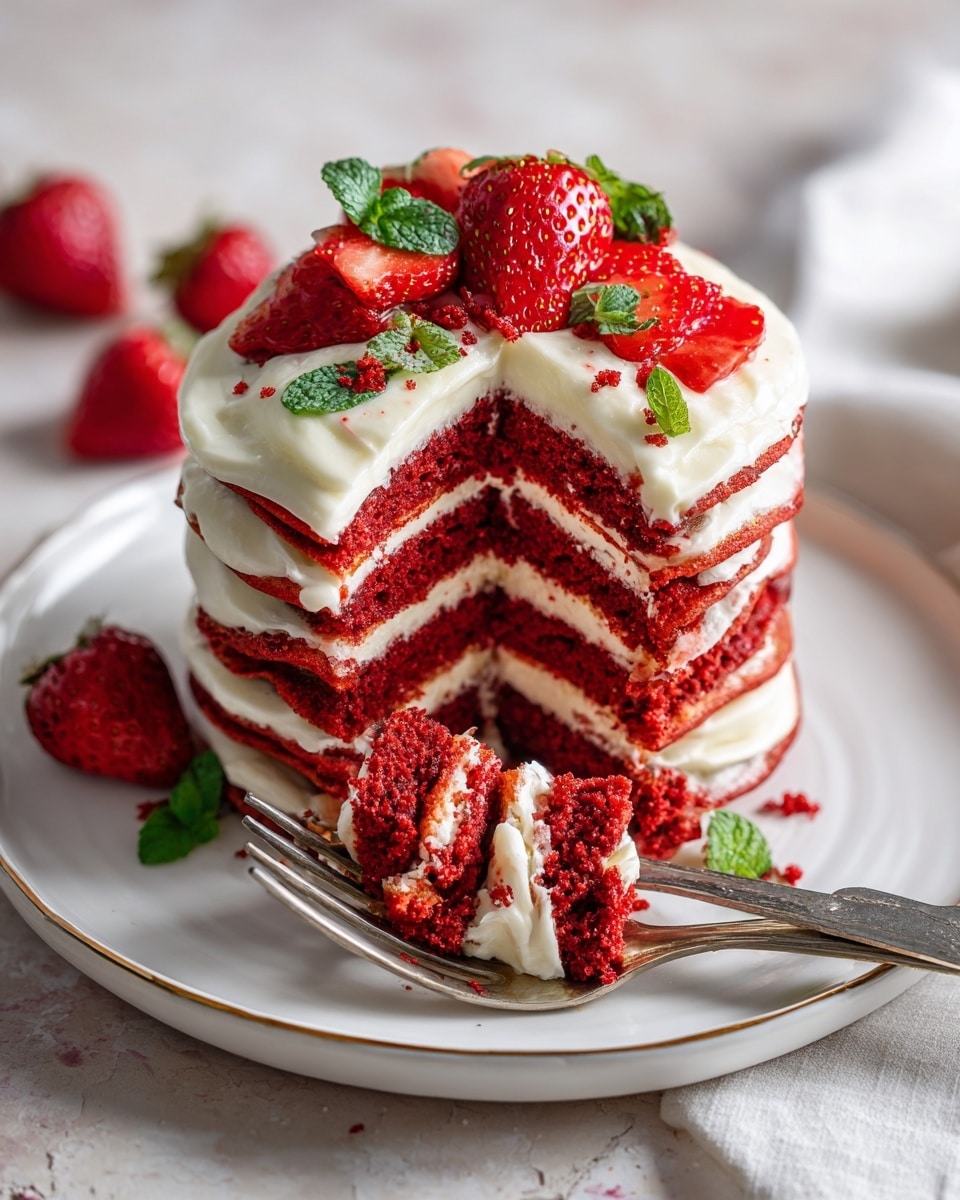
Once all your pancakes are cooked, stack them high, add your favorite toppings, and dig in. I love these with a quick smear of cream cheese frosting or just a pat of butter and maple syrup for the classic combo. They’re best enjoyed fresh, but leftovers also reheat wonderfully.
Pro Tips for Making Red Velvet Pancakes Recipe
- Use Gel Food Coloring: It gives a deeper red without adding too much liquid that could thin the batter.
- Don’t Overmix the Batter: Leaving a few lumps ensures tender pancakes, not tough ones.
- Let the Batter Rest: Resting allows the leavening agents to start working, yielding fluffier pancakes.
- Cover Your Pan: Trapping steam while cooking keeps the pancakes moist and helps them cook evenly.
How to Serve Red Velvet Pancakes Recipe
Garnishes
I usually top mine with a light cream cheese frosting because it mimics the classic red velvet cake vibe and pairs beautifully with the cocoa flavor. But if that’s not your thing, a dollop of Greek yogurt mixed with a touch of honey works wonders. Fresh berries add a pop of brightness and color that’s as lovely as it is tasty.
Side Dishes
To round out the meal, I enjoy serving these pancakes with crispy bacon or sausage for some savory contrast. Fresh fruit salad or a simple green smoothie can also help balance the indulgence with a burst of freshness.
Creative Ways to Present
For birthdays or Valentine’s Day breakfasts, I stack the pancakes into a tall tower and drizzle warm white chocolate sauce over them—everyone always goes crazy for the dramatic look and sweet finish. You can also make mini heart-shaped pancakes using a cookie cutter for extra charm.
Make Ahead and Storage
Storing Leftovers
After they’ve cooled, I store leftover pancakes in an airtight container in the refrigerator—they keep well for up to 3 days. Just make sure they’re not stacked with any wet toppings to prevent sogginess.
Freezing
I like to freeze leftover pancakes individually on a baking sheet before transferring them to a freezer bag. This way, you can grab as many or as few as you need without them sticking together. They freeze beautifully for around 3 months.
Reheating
To reheat, the toaster or a hot skillet works best to bring back that crisp exterior and warm inside—microwaving tends to make them a bit gummy, so I only use that as a last resort. Just a minute or two on each side in a non-stick pan does the trick.
FAQs
-
Can I use regular milk instead of buttermilk for this Red Velvet Pancakes Recipe?
Yes! If you don’t have buttermilk on hand, you can make a simple substitute by adding one tablespoon of lemon juice or vinegar to one cup of regular milk. Let it sit for 5 minutes, and you’ll have a similar tang and acidity that reacts with the baking soda for fluffy pancakes.
-
How much red food coloring should I use for the best color?
A half teaspoon of gel red food coloring usually provides a rich, vibrant color without adding too much liquid to the batter. You can adjust slightly if you want a deeper red or a lighter hue.
-
Can I make these pancakes gluten-free?
Absolutely! I’ve had great results swapping the all-purpose flour for a gluten-free blend containing xanthan gum. Bob’s Red Mill brand worked well for me, but results may vary with other blends, so be sure to test your particular flour first.
-
What’s the best way to store leftovers?
Once cooled, store the pancakes in an airtight container in the refrigerator for up to 3 days. To keep the texture fresh, avoid stacking them with wet toppings until you’re ready to serve.
Final Thoughts
This Red Velvet Pancakes Recipe has become a staple in my kitchen because it’s fun, fast, and festive all at once. They never fail to impress guests or add a little extra joy to an ordinary morning. Trust me, once you’ve tried making these, you’ll find yourself reaching for this recipe whenever you want to bring a smile to your breakfast table. Give it a try—you won’t regret it!
Print
Red Velvet Pancakes Recipe
- Prep Time: 5 minutes
- Cook Time: 5 minutes
- Total Time: 10 minutes
- Yield: 4 servings
- Category: Breakfast
- Method: Stovetop
- Cuisine: American
Description
Delicious and fluffy Red Velvet Pancakes made with cocoa powder and a hint of red food coloring, perfect for a festive breakfast or brunch. These pancakes are easy to prepare and can be enjoyed on their own or with cream cheese frosting or Greek yogurt for added flavor and protein.
Ingredients
Dry Ingredients
- 2 cups all-purpose flour, sifted
- 1/4 cup sugar
- 1/2 teaspoon salt
- 1 teaspoon baking soda
- 2 teaspoons baking powder
- 2 tablespoons cocoa powder
Wet Ingredients
- 1 cup buttermilk
- 2 large eggs, room temperature
- 1/2 teaspoon red food coloring
Instructions
- Mix Dry Ingredients: In a large bowl, combine the sifted flour, sugar, baking soda, baking powder, salt, and cocoa powder. Stir them together to ensure even distribution of the leavening agents and cocoa powder.
- Add Wet Ingredients: Make a well in the center of the dry mixture and pour in the buttermilk and eggs. Whisk the ingredients until they form a thick batter without lumps. Stir in the red food coloring evenly, blending the batter to a vibrant red hue.
- Rest Batter: Allow the batter to sit for 2-3 minutes to thicken slightly, which helps achieve fluffy pancakes.
- Preheat and Oil Pan: Heat a non-stick pan over medium heat and add a bit of oil to coat the surface, preventing sticking and helping to develop a nice crust on the pancakes.
- Cook Pancakes: Pour 1/4 cup portions of the batter onto the hot pan. Cover the pan with a lid to trap heat and cook for 2-3 minutes. Flip the pancakes halfway through cooking to brown both sides evenly and ensure the inside is cooked through.
- Repeat: Continue the cooking process with the remaining batter until all pancakes are cooked and golden brown.
Notes
- Layering: These pancakes taste great plain, but are delicious when topped with a simple cream cheese frosting or Greek yogurt for extra protein.
- DIY Buttermilk: To substitute buttermilk, add 1 tablespoon of lemon juice or vinegar to 1 cup of milk and let it sit for 5 minutes.
- Storage: Store leftover pancakes in the fridge covered for up to 3 days or freeze for up to 3 months.
- Gluten-Free Option: Use gluten-free all-purpose flour with added xanthan gum (Bob’s Red Mill works well) to make these pancakes gluten-free. Other gluten-free flours may vary in results.
Nutrition
- Serving Size: 1 serving (approx. 3-4 pancakes)
- Calories: 280
- Sugar: 8g
- Sodium: 320mg
- Fat: 7g
- Saturated Fat: 1.5g
- Unsaturated Fat: 5g
- Trans Fat: 0g
- Carbohydrates: 45g
- Fiber: 2g
- Protein: 8g
- Cholesterol: 70mg

