
If you’re on the hunt for a dessert that’s both stunning and utterly irresistible, you’ve come to the right place. This Red Velvet Cheesecake Recipe is a total showstopper — imagine the lush, velvety tang of cheesecake combined with the rich, chocolate-y depth and vibrant red hue of classic red velvet cake. I absolutely love how this turns out every single time. Whether for a special celebration or a fancy weekend treat, you’re going to want to keep this recipe close!
Why You’ll Love This Recipe
- No-Bake Wonder: You won’t have to heat up your kitchen with an oven — it sets in the fridge!
- Bold Flavor Fusion: The mix of deep cocoa, cream cheese, and rich chocolate is simply mouthwatering.
- Creamy & Light Texture: It melts in your mouth without being too heavy, thanks to whipped cream and gelatine stabilization.
- Impress Your Guests: That stunning red pop and silky finish make it the star of any dessert table.

Ingredients You’ll Need
The beauty of this Red Velvet Cheesecake Recipe comes from simple, quality ingredients that work harmoniously. From Oreo cookies forming that rich base to luscious cream cheese and luscious dark chocolate in the filling — each piece plays its part perfectly. Just make sure to pick a good quality cream cheese and high-percentage chocolate for that extra depth.

- Oreo cookies: Using the classic Oreo gives a wonderfully chocolatey and slightly crunchy crust base.
- Unsalted butter: Melt it gently — it binds the crust, giving that perfect firm base.
- Gelatine powder: Essential to help the cheesecake set beautifully without baking.
- Water: Used to bloom the gelatine for smooth incorporation.
- Heavy/thickened cream: Cold is best here to whip up fluffy and stable cream layers.
- Cream cheese: Softened to avoid lumps and ensure velvety texture.
- Caster sugar/superfine sugar: Sweetens the filling without grit — superfine dissolves best.
- Vanilla extract: The secret warmth that lifts the flavors beautifully.
- 70% dark chocolate: Adds a fudgy richness with just enough bitterness to balance sweetness.
- Red food colouring: The iconic vibrant color — I recommend gel food coloring for intensity without watering down.
- Shaved or grated dark chocolate (optional): For garnish, adding a touch of elegance and more chocolate goodness.
Variations
I love making this cheesecake as written, but I also enjoy mixing it up depending on the occasion or what I have on hand. Feel free to personalize the recipe to your taste — that’s part of the fun!
- Chocolate Lovers’ Delight: Swap the red food coloring with a bit more melted chocolate for a double chocolate no-bake cheesecake variation — my family goes crazy for this richer twist!
- Berry Infusion: Swirl in some raspberry or strawberry puree for a fruity contrast that brightens the dessert.
- Dairy-Free Version: Use vegan cream cheese and coconut cream; I’ve tried this and it’s delicious though the texture is slightly different.
- Layered Cake: Add a thin layer of red velvet cake at the base beneath the Oreo crust for a hybrid cake-cheesecake experience.
How to Make Red Velvet Cheesecake Recipe
Step 1: Prepare Your Pan and Crust Like a Pro
Start by flipping the base of your 20cm (8-inch) springform pan upside down — this little trick makes removing your cheesecake a breeze later on without the pan lip getting in your way. Lightly butter the base, then press a square piece of baking paper on top. Clip the sides of the springform pan onto the base and butter them plus line with baking paper as well, leaving excess paper hanging over the edges for easy removal. Next, crush your Oreo cookies finely — either in a food processor or wrapped in a clean towel and pounded with a rolling pin — then mix with the melted butter. Press this mixture evenly into the base of your prepared pan, firm but don’t over-press or it’ll be rock hard to cut.
Step 2: Bloom the Gelatine and Whip the Cream
Sprinkle your gelatine powder over cold water and let it bloom for about 5 minutes; this step is key to avoid clumps and achieve a silky set cheesecake. Meanwhile, whip 1¼ cups of cold heavy cream with 3 tablespoons of caster sugar and the vanilla extract until it holds soft peaks — you want it fluffy but not over-whipped or it’ll become grainy.
Step 3: Mix the Cream Cheese and Chocolate Filling
In a large bowl, beat the softened cream cheese with sugar and vanilla extract until super smooth and creamy. Gently melt your dark chocolate — I use a double boiler method to avoid scorching — then combine it with the cream cheese. Warm your bloomed gelatine gently until completely dissolved (a quick microwave blast or stovetop in a small pot) and mix it into the cream cheese-chocolate blend. Now, add 6 teaspoons of red food coloring for that signature red velvet pop; I usually add this gradually and stir well to get a consistent and vibrant color.
Step 4: Fold in the Whipped Cream and Assemble
Carefully fold the whipped cream into the cream cheese mixture, preserving all that luscious airiness — this will give you the light-yet-rich texture I love about this cheesecake. Pour the filling over your chilled Oreo crust, smoothing the surface with a spatula. Cover with cling film and refrigerate for at least 6 hours, but overnight is best to let it set properly.
Step 5: Garnish and Serve
Before serving, peel away those baking papers from the sides and carefully unclasp your springform pan. Top your cheesecake with a generous sprinkle of shaved dark chocolate — I swear this finishing touch makes me swoon every time! Slice with a hot knife (dip it in warm water and wipe dry) for clean edges.
Pro Tips for Making Red Velvet Cheesecake Recipe
- Use Room Temperature Cream Cheese: Cold cream cheese can clump up, so let it sit out until soft for the smoothest filling.
- Gelatine Precision: Bloom gelatine just as instructed — skipping this can cause lumps or uneven setting.
- High-Quality Chocolate Matters: I’ve found 70% dark chocolate strikes the perfect balance; avoid anything too sweet or it muddies the flavor.
- Avoid Over-Whipping Cream: Stop as soon as soft peaks form; overwhipped cream can turn buttery and ruin texture.
How to Serve Red Velvet Cheesecake Recipe

Garnishes
I’m a huge fan of keeping it classic with a generous sprinkle of dark chocolate shavings on top — it gives such an elegant touch and a nice contrast to the creamy cheesecake. Sometimes I add a few fresh raspberries or a light dusting of cocoa powder around the edges for a pop of color and tartness that complements the richness.
Side Dishes
This cheesecake pairs beautifully with a cup of strong black coffee or creamy chai latte — those warm beverages really balance the cool, velvety texture. For a special brunch, slice it alongside fresh berries or a fruit salad to add freshness and offset the decadent sweetness.
Creative Ways to Present
If you’re celebrating a birthday or holiday, I’ve had great fun dusting the top with edible gold flakes and piping cream rosettes around the edge with a star tip. Another idea is to layer the cheesecake topping in a clear glass trifle bowl, alternating with crumbled red velvet cake and cream layers for a stunning, deconstructed look that guests adore.
Make Ahead and Storage
Storing Leftovers
I store leftover cheesecake tightly wrapped in plastic wrap and then stored in an airtight container in the fridge. It stays fresh and creamy for up to 4 days. Just be sure not to leave it out at room temperature for too long due to the cream cheese and cream content.
Freezing
Freezing works pretty well with this cheesecake! I slice it into portions, wrap each piece tightly in plastic wrap, then pop in a freezer-safe bag. When you want some, thaw overnight in the fridge. The texture remains surprisingly good, though the whipped cream topping may be a little softer after thawing.
Reheating
Since this cheesecake is no-bake and served chilled, I recommend enjoying it cold straight from the fridge (or after thawing). If you want to bring it closer to room temp, let it sit out on the counter for about 15 minutes before serving — this really opens the flavors without compromising texture.
FAQs
-
Can I use regular cream instead of heavy cream for this cheesecake?
Heavy cream (also called thickened cream) is important here as it whips up to provide structure and lightness to the filling. Regular cream generally doesn’t have enough fat content to whip properly, so it won’t give the same fluffy, creamy texture.
-
Is there a substitute for gelatine in this recipe?
If you prefer a vegetarian or vegan alternative, agar-agar can sometimes be used, but it behaves differently. I recommend testing small batches first as agar needs boiling liquids and sets quite firmly, unlike gelatine’s soft, smooth set.
-
Why is my cheesecake not setting properly?
Not blooming or fully dissolving your gelatine is the most common culprit. Make sure to sprinkle gelatine evenly over cold water and let it sit to bloom, then gently heat it until completely liquid before mixing with the filling to avoid lumps or weak setting.
-
Can I make this cheesecake ahead for a party?
Absolutely! In fact, it’s perfect for making a day before, giving it plenty of time to set and the flavors to meld. Just keep it chilled until serving and add any garnishes last minute for the freshest look.
-
How do I get that vibrant red velvet color?
I recommend gel-based red food coloring for the most vivid and rich red, especially if you’re in the UK where some brands differ. Add gradually and mix well to reach your desired shade without adding too much liquid.
Final Thoughts
This Red Velvet Cheesecake Recipe has become one of my go-to desserts when I want to impress without the fuss of baking a layered cake. It’s elegant, rich but still airy, and those bold red tones always get compliments. I love sharing it with friends because it’s not only delicious but so fun to make together. Trust me, once you try this, it will become your favorite indulgence — it’s truly special and worth every bite!
Print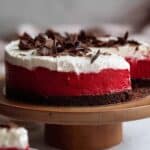
Red Velvet Cheesecake Recipe
- Prep Time: 30 minutes
- Cook Time: 0 minutes
- Total Time: 4 hours (including chilling time)
- Yield: 12 to 16 servings
- Category: Dessert
- Method: No-Cook
- Cuisine: American
Description
This Red Velvet Cheesecake is a stunning no-bake dessert that combines the bold, striking color and flavor of classic red velvet cake with the rich, creamy decadence of cheesecake. The filling is a beautifully chocolatey blend that is rich yet light with a velvety texture that melts in your mouth. Perfect for impressing guests, this cheesecake features a crunchy Oreo cookie base and a luscious red velvet cream cheese filling topped with whipped cream and optional dark chocolate shavings.
Ingredients
Base
- 200g / 7oz Oreo cookies (approximately 1.5 standard packs)
- 60g / 4 tbsp unsalted butter, melted
Cheesecake Filling
- 2 tsp unflavoured gelatine powder
- 2 tbsp water
- 1 cup heavy/thickened cream, cold from fridge
- 500g / 1 lb cream cheese, softened (block form)
- 3/4 cup caster sugar / superfine sugar
- 1 tsp vanilla extract
- 150g / 5 oz 70% dark chocolate
- 6 tsp red food colouring (especially for UK readers)
Whipped Cream Topping
- 1 1/4 cups heavy/thickened cream, cold from fridge
- 3 tbsp caster sugar / superfine sugar
- 1 tsp vanilla extract
- Optional: 2 tbsp shaved or grated dark chocolate for decoration
Instructions
- Prepare the Pan Base: Flip the base of a 20cm / 8″ springform pan upside down to help in easy removal later. Lightly butter the pan base and press a square sheet of baking paper on it. Attach the pan sides onto the base, allowing excess paper to stick out for easy removal. Butter and line the pan sides with baking paper as well.
- Make the Oreo Base: Crush the Oreo cookies finely until they resemble fine crumbs. Combine the crushed Oreos with the melted unsalted butter until the mixture looks like wet sand. Press this mixture firmly into the lined pan base to form an even crust. Chill in the fridge to set while preparing the filling.
- Bloom the Gelatine: Sprinkle the gelatine powder over 2 tablespoons of cold water in a small bowl to soften and bloom. Set aside to swell for a few minutes.
- Whip the Cream for Filling: In a clean bowl, whip 1 cup of cold heavy cream until soft peaks form. Set aside.
- Prepare the Chocolate: Gently melt the 150g dark chocolate using a double boiler or microwave in short bursts, stirring frequently to avoid burning. Allow it to cool slightly but remain pourable.
- Make the Cheese Mixture: In a large mixing bowl, beat the softened cream cheese with the caster sugar and vanilla extract until smooth and creamy. Add the melted chocolate and mix until fully combined. Add the bloomed gelatine and stir well to incorporate evenly.
- Add Red Food Colouring: Add 6 teaspoons of red food colouring to the cream cheese mixture and mix until the color is vibrant and uniform.
- Fold in Whipped Cream: Gently fold the whipped cream into the red velvet cream cheese mixture in batches to preserve the lightness and create a velvety texture.
- Assemble the Cheesecake: Pour the cheesecake filling over the chilled Oreo base in the springform pan and smooth the top with a spatula. Refrigerate for several hours or overnight to allow the cheesecake to set firmly.
- Whip the Topping: Before serving, whip the remaining 1 1/4 cups cold heavy cream with 3 tablespoons caster sugar and 1 teaspoon vanilla extract until stiff peaks form. Optionally, stabilize the cream as desired to prevent it from deflating.
- Decorate: Spread or pipe the whipped cream topping evenly over the set cheesecake. Garnish with shaved or grated dark chocolate if desired.
- Serve: Carefully remove the springform pan sides by pulling the excess baking paper. Slice and serve chilled to enjoy the creamy, chocolatey, and vibrant red velvet cheesecake.
Notes
- Watch the recipe video for a step-by-step guide to making this no-bake cheesecake.
- This no-bake cheesecake is a stunning showstopper combining the classic red velvet flavor with creamy cheesecake texture.
- The filling is rich yet light, with a velvety texture that melts in your mouth.
- The bold red color comes from red food coloring; adjust amount for desired vibrancy.
- Using cold cream and softly whipped cream helps achieve the perfect light texture in the filling and topping.
- Gelatine is used to help the cheesecake set firmly without baking.
- The Oreo cookie crust adds a delicious chocolate crunch that complements the creamy filling.
- Make sure to chill well for the best texture and slicing results.
Nutrition
- Serving Size: 1 slice (assuming 12 slices)
- Calories: 540 kcal
- Sugar: 29 g
- Sodium: 210 mg
- Fat: 43 g
- Saturated Fat: 25 g
- Unsaturated Fat: 14 g
- Trans Fat: 0.2 g
- Carbohydrates: 37 g
- Fiber: 2 g
- Protein: 6 g
- Cholesterol: 103 mg

