
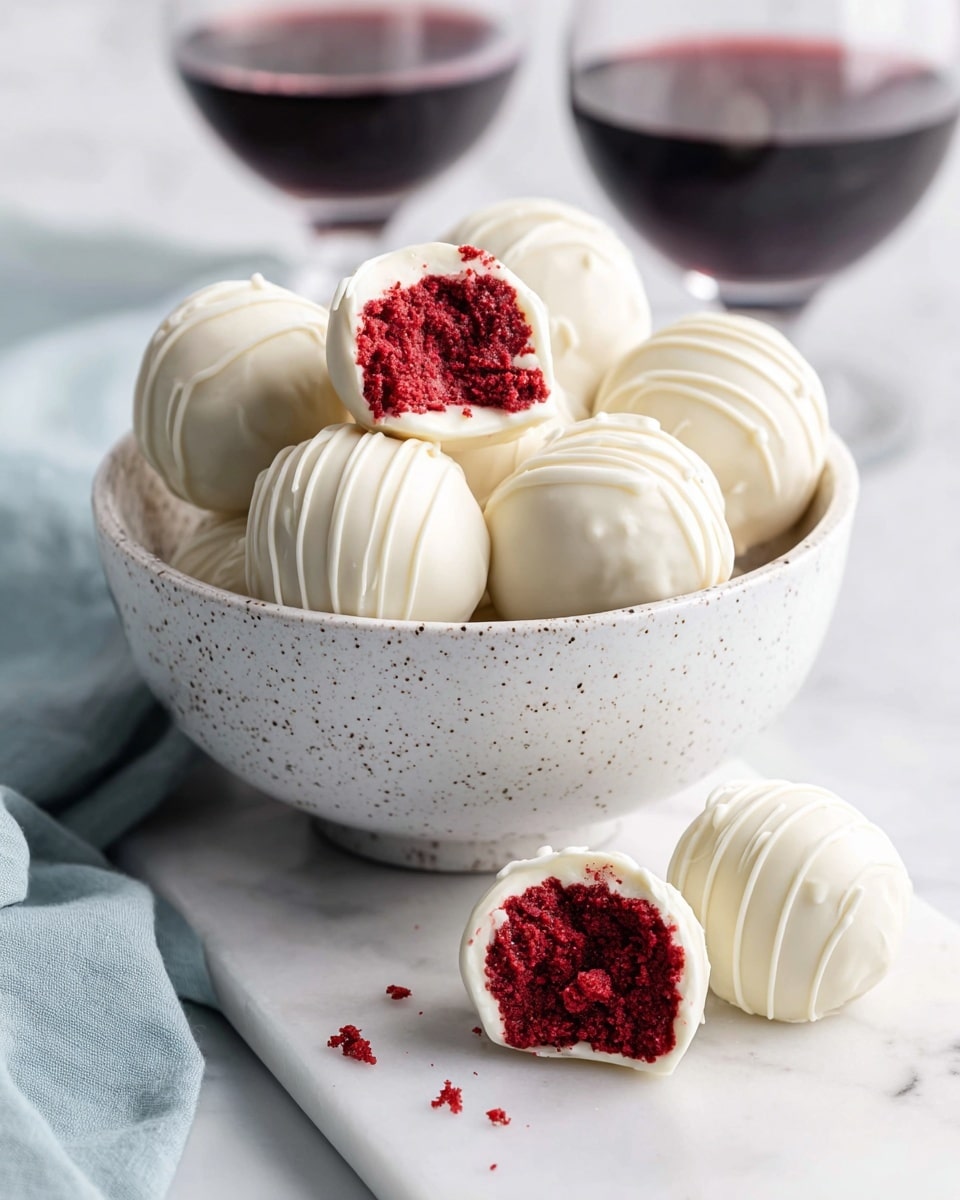
If you’ve been searching for an adorable, bite-sized treat that packs all the luscious flavor of a classic dessert, you’re going to absolutely love this Red Velvet Cake Pops Recipe. They’re charming little balls of moist red velvet cake wrapped in a creamy, tangy coating—perfect for parties, gifts, or just sneaking one (or three) when no one’s watching. I promise, once you try this recipe, it’ll quickly become one of your go-to crowd-pleasers!
Why You’ll Love This Recipe
- Perfectly Bite-Sized: These cake pops give you all the red velvet flavor without the fork and plate hassle.
- Easy to Make: No fancy equipment needed — just simple ingredients and a little love.
- Make-Ahead Friendly: Prepare them days in advance and keep them fresh in the fridge or freezer.
- Family Favorite: When I first shared these, my family couldn’t get enough. Trust me, they’ll be a hit with yours too!

Ingredients You’ll Need
You’ll want to gather these friendly ingredients that balance moist cake with creamy filling and a sweet coating. The key is fresh cream cheese and quality chocolate for that irresistible finish.
- Flour: Use all-purpose flour and make sure it’s scooped lightly or sifted for the right texture.
- Unsweetened cocoa powder: Adds the subtle chocolatey depth that makes red velvet, well, velvet.
- Baking soda: Gives a gentle lift so the cake isn’t dense.
- Salt: Balances sweetness and enhances flavors.
- Canola oil: Keeps the cake moist without a heavy texture.
- Sugar: Sweetens just enough without overpowering the cocoa or cream cheese.
- Buttermilk: Tangy moisture that tenderizes and adds richness.
- Egg white: Helps bind and lighten the batter.
- Red food coloring: Classic red velvet’s signature pop—adjust the amount based on your color preference.
- Vanilla extract: Deepens the flavor profile gently.
- White vinegar: Reacts with baking soda for extra fluffiness and a subtle tang.
- Cream cheese (softened): The creamy heart of the pops that makes them taste like indulgent cheesecake bites.
- Powdered sugar: Smooth sweetness for the cream cheese mixture.
- Almond bark or white chocolate: Perfect for a smooth, flawless coating on each pop–chop into chunks for easy melting.
Variations
One of the things I adore about this Red Velvet Cake Pops Recipe is how easy it is to make your own with little twists. I often swap the coating or add flavors to the cream cheese mix—don’t hesitate to experiment and make it your own!
- Chocolate Coating: Sometimes I ditch the white chocolate for dark chocolate almond bark—gives a richer, more intense taste that my kids surprisingly love!
- Nutty Boost: Adding crushed nuts to the cake pop mixture adds a fun crunch and balances the sweetness beautifully.
- Festive Colors: Swap red food coloring for purple or pink during holidays to match the season or event you’re hosting.
- Diet-Friendly: For a lower sugar version, I reduce powdered sugar slightly and use sugar-free chocolate coatings—turns out just as tasty.
How to Make Red Velvet Cake Pops Recipe
Step 1: Mix and Bake the Cake
Start by preheating your oven to 350°F (175°C) and lining four cupcake molds with liners arranged around the edges of the tin. Then, sift together the flour, baking soda, salt, and cocoa powder in a small bowl. In a separate one, whisk the canola oil, sugar, buttermilk, egg white, red food coloring, white vinegar, and vanilla extract until combined. Slowly add the dry ingredients to the wet mixture and blend gently to avoid tough batter. Divide the batter evenly into your cupcake liners — even though it’s just four cupcakes, these tiny cakes are super rich. Bake for 20 to 22 minutes until a toothpick comes out clean, then cool completely on a wire rack. Patience here pays off, because crumbs are way easier to work with when the cake is fully cooled.
Step 2: Make the Cream Cheese Mixture & Form Balls
Once the cupcakes are cool, crumble them into fine crumbs in a large mixing bowl. Then, soften your cream cheese to room temperature—you don’t want lumps here. Combine the cream cheese and powdered sugar until smooth and creamy, then fold in the cake crumbs thoroughly. Now for the fun part: scoop a heaping tablespoon of mixture and roll it between your palms to form neat balls. Place them on a plate or parchment paper, then chill in the fridge for at least 4 hours (overnight is even better). This chilling step is key—it helps the pops hold their shape and improves the chocolate coating process.
Step 3: Coat the Cake Pops
Chop your almond bark or white chocolate into roughly 1-inch chunks and microwave them in a microwave-safe bowl on medium power in 30-second bursts. Stir well between each round until fully melted and smooth. Now it’s dipping time: using a fork, dunk each chilled cake ball quickly into the melted coating, swirling to cover all sides, then let the excess drip off before setting it on wax or parchment paper to dry. If the coating thickens too much during dipping, just nuke it for another 10-15 seconds to loosen it back up. These not only look impressive but have a lovely smooth shell that snaps just right when you bite in.
Pro Tips for Making Red Velvet Cake Pops Recipe
- Perfect Crumb Texture: Let the cake cool completely before crumbling; warm crumbs will get mushy and make the mixture too sticky.
- Chill Enough: Refrigerate the cake balls for at least 4 hours; this helps them stay firm and prevents cracking when dipping.
- Melting Almond Bark: Heat in short bursts and stir well to avoid burning—burnt chocolate ruins everything!
- Quick Dipping: Don’t linger too long dipping each ball to avoid them absorbing moisture and falling apart.
How to Serve Red Velvet Cake Pops Recipe
Garnishes
I love topping these pops with simple sprinkles or crushed freeze-dried raspberries for a pop of color and tangy contrast. Another favorite of mine is drizzling contrasting chocolate over the coating for an elegant touch—easy and fancy!
Side Dishes
These cake pops are a sweet star on their own, but I often pair them with a cup of hot coffee or a light fruit salad to balance the richness, especially during brunch or afternoon tea.
Creative Ways to Present
I’ve had fun arranging these on cake pop sticks inserted into a decorative foam block covered with tissue paper—perfect for birthday parties or holiday gatherings. You can even package a batch in mason jars as cute, edible gifts that show you care.
Make Ahead and Storage
Storing Leftovers
Red Velvet Cake Pops store beautifully in an airtight container in the fridge for up to 3 days. I wrap them individually in parchment paper to keep the coating from sticking and they stay fresh and delicious.
Freezing
I’ve frozen these pops successfully by placing them in a single layer on a baking sheet first, then transferring them to a freezer-safe bag once firm. They keep well for about a month, making them perfect for prepping ahead.
Reheating
Because these are cold treats, I usually let frozen pops thaw in the fridge for a few hours before serving. This maintains the texture of the coating and the creamy center—skip microwaving, which can ruin the smooth coating.
FAQs
-
Can I use store-bought cake instead of baking the cake from scratch?
Absolutely! Using store-bought red velvet cake is a quick shortcut. Just crumble it finely and mix with cream cheese as the recipe suggests. The pops might be less moist but still delicious and much faster.
-
What if I don’t have almond bark or white chocolate?
You can substitute with any melting chocolate like milk or dark chocolate chips. Just be sure to temper or melt the chocolate gently to get that smooth coating without streaks or clumps.
-
How do I prevent my cake pops from falling off the sticks?
A great trick is to dip the tip of each stick into melted coating before inserting it halfway into each cake ball. Chill them fully after this step to set the design before dipping the whole pop.
-
Can I make these gluten-free?
Yes! Swap regular flour for a gluten-free blend that works for cakes, and check that all other ingredients are gluten-free. The texture might shift slightly, but these pops will still be a hit.
Final Thoughts
Honestly, this Red Velvet Cake Pops Recipe holds a special spot in my heart because it turns a classic cake into fun, irresistible bites that everyone—kids and adults alike—can enjoy without any fuss. Whether you’re hosting a party, needing a quick dessert fix, or just wanting to impress your loved ones, these pops never disappoint. Give them a try in your kitchen and I bet you’ll be hooked as much as I am. Happy baking and, more importantly, happy snacking!
Print
Red Velvet Cake Pops Recipe
- Prep Time: 1 hour
- Cook Time: 22 minutes
- Total Time: 1 hour 22 minutes
- Yield: 10 truffles
- Category: Dessert
- Method: Baking
- Cuisine: American
Description
Delightful Red Velvet Cake Pops combine moist red velvet cake with creamy cream cheese frosting, coated in a smooth almond bark coating. Perfect for parties and special occasions, these bite-sized treats are easy to make and impress with their vibrant color and rich flavor.
Ingredients
Cake Batter
- 1/3 cup plus 1 tablespoon flour
- 2 teaspoons unsweetened cocoa powder
- 1/8 teaspoon baking soda
- 1/8 teaspoon salt
- 1/4 cup canola oil
- 1/4 cup sugar
- 2 tablespoons buttermilk
- 1 egg white
- 1 teaspoon red food coloring
- 1/4 teaspoon vanilla extract
- 1/8 teaspoon white vinegar
Filling & Coating
- 3 ounces cream cheese, softened
- 1/2 cup powdered sugar
- 12 oz. almond bark (or white chocolate), for coating
Instructions
- Prepare Oven and Ingredients: Preheat your oven to 350°F (175°C). Place four cupcake liners around the outer edge of a cupcake tin. Gather all ingredients so they are ready for use.
- Mix Dry Ingredients: In a small bowl, sift together the flour, baking soda, salt, and unsweetened cocoa powder to ensure an even mixture without lumps.
- Mix Wet Ingredients: In a separate bowl, beat the canola oil, sugar, buttermilk, egg white, red food coloring, white vinegar, and vanilla extract together using an electric mixer until well combined.
- Combine Batter: Gradually add the dry ingredients into the wet ingredients, mixing slowly to form a smooth batter without overmixing.
- Bake Cake: Divide the batter evenly among the four cupcake liners and bake at 350°F for 20-22 minutes or until a cake tester inserted into the center comes out clean. Remove from oven and cool completely on a wire rack.
- Crumble and Mix Filling: Once cooled, crumble the cupcakes into fine crumbs. In a bowl, blend the softened cream cheese with powdered sugar until smooth, then fold in the cake crumbs thoroughly to create a moldable mixture.
- Form Cake Balls: Scoop a heaping tablespoon of the cake mixture and roll it between your hands into a ball shape. Place each ball onto a plate and refrigerate for at least 4 hours to firm up.
- Melt Coating: Chop the almond bark into 1-inch chunks and place in a microwave-safe bowl. Heat on medium power in 30-second increments, stirring between each, until completely melted and smooth.
- Coat Cake Pops: Quickly dip each chilled cake ball into the melted almond bark using a fork to turn it for full coverage. Transfer coated balls onto wax paper to set and dry completely.
- Storage: Cake pops can be stored in the refrigerator for up to 3 days before serving, making them ideal for preparing in advance.
Notes
- Recipe can be easily doubled and baked in a 6-inch round cake pan to make about 20 truffles instead of 10.
- Ensure the cake balls are well chilled before dipping to prevent them from falling apart in the coating.
- You can substitute almond bark with white chocolate or candy melts for variety in flavor and color.
Nutrition
- Serving Size: 1 truffle
- Calories: 180
- Sugar: 15g
- Sodium: 110mg
- Fat: 11g
- Saturated Fat: 5g
- Unsaturated Fat: 5g
- Trans Fat: 0g
- Carbohydrates: 18g
- Fiber: 1g
- Protein: 2g
- Cholesterol: 20mg


