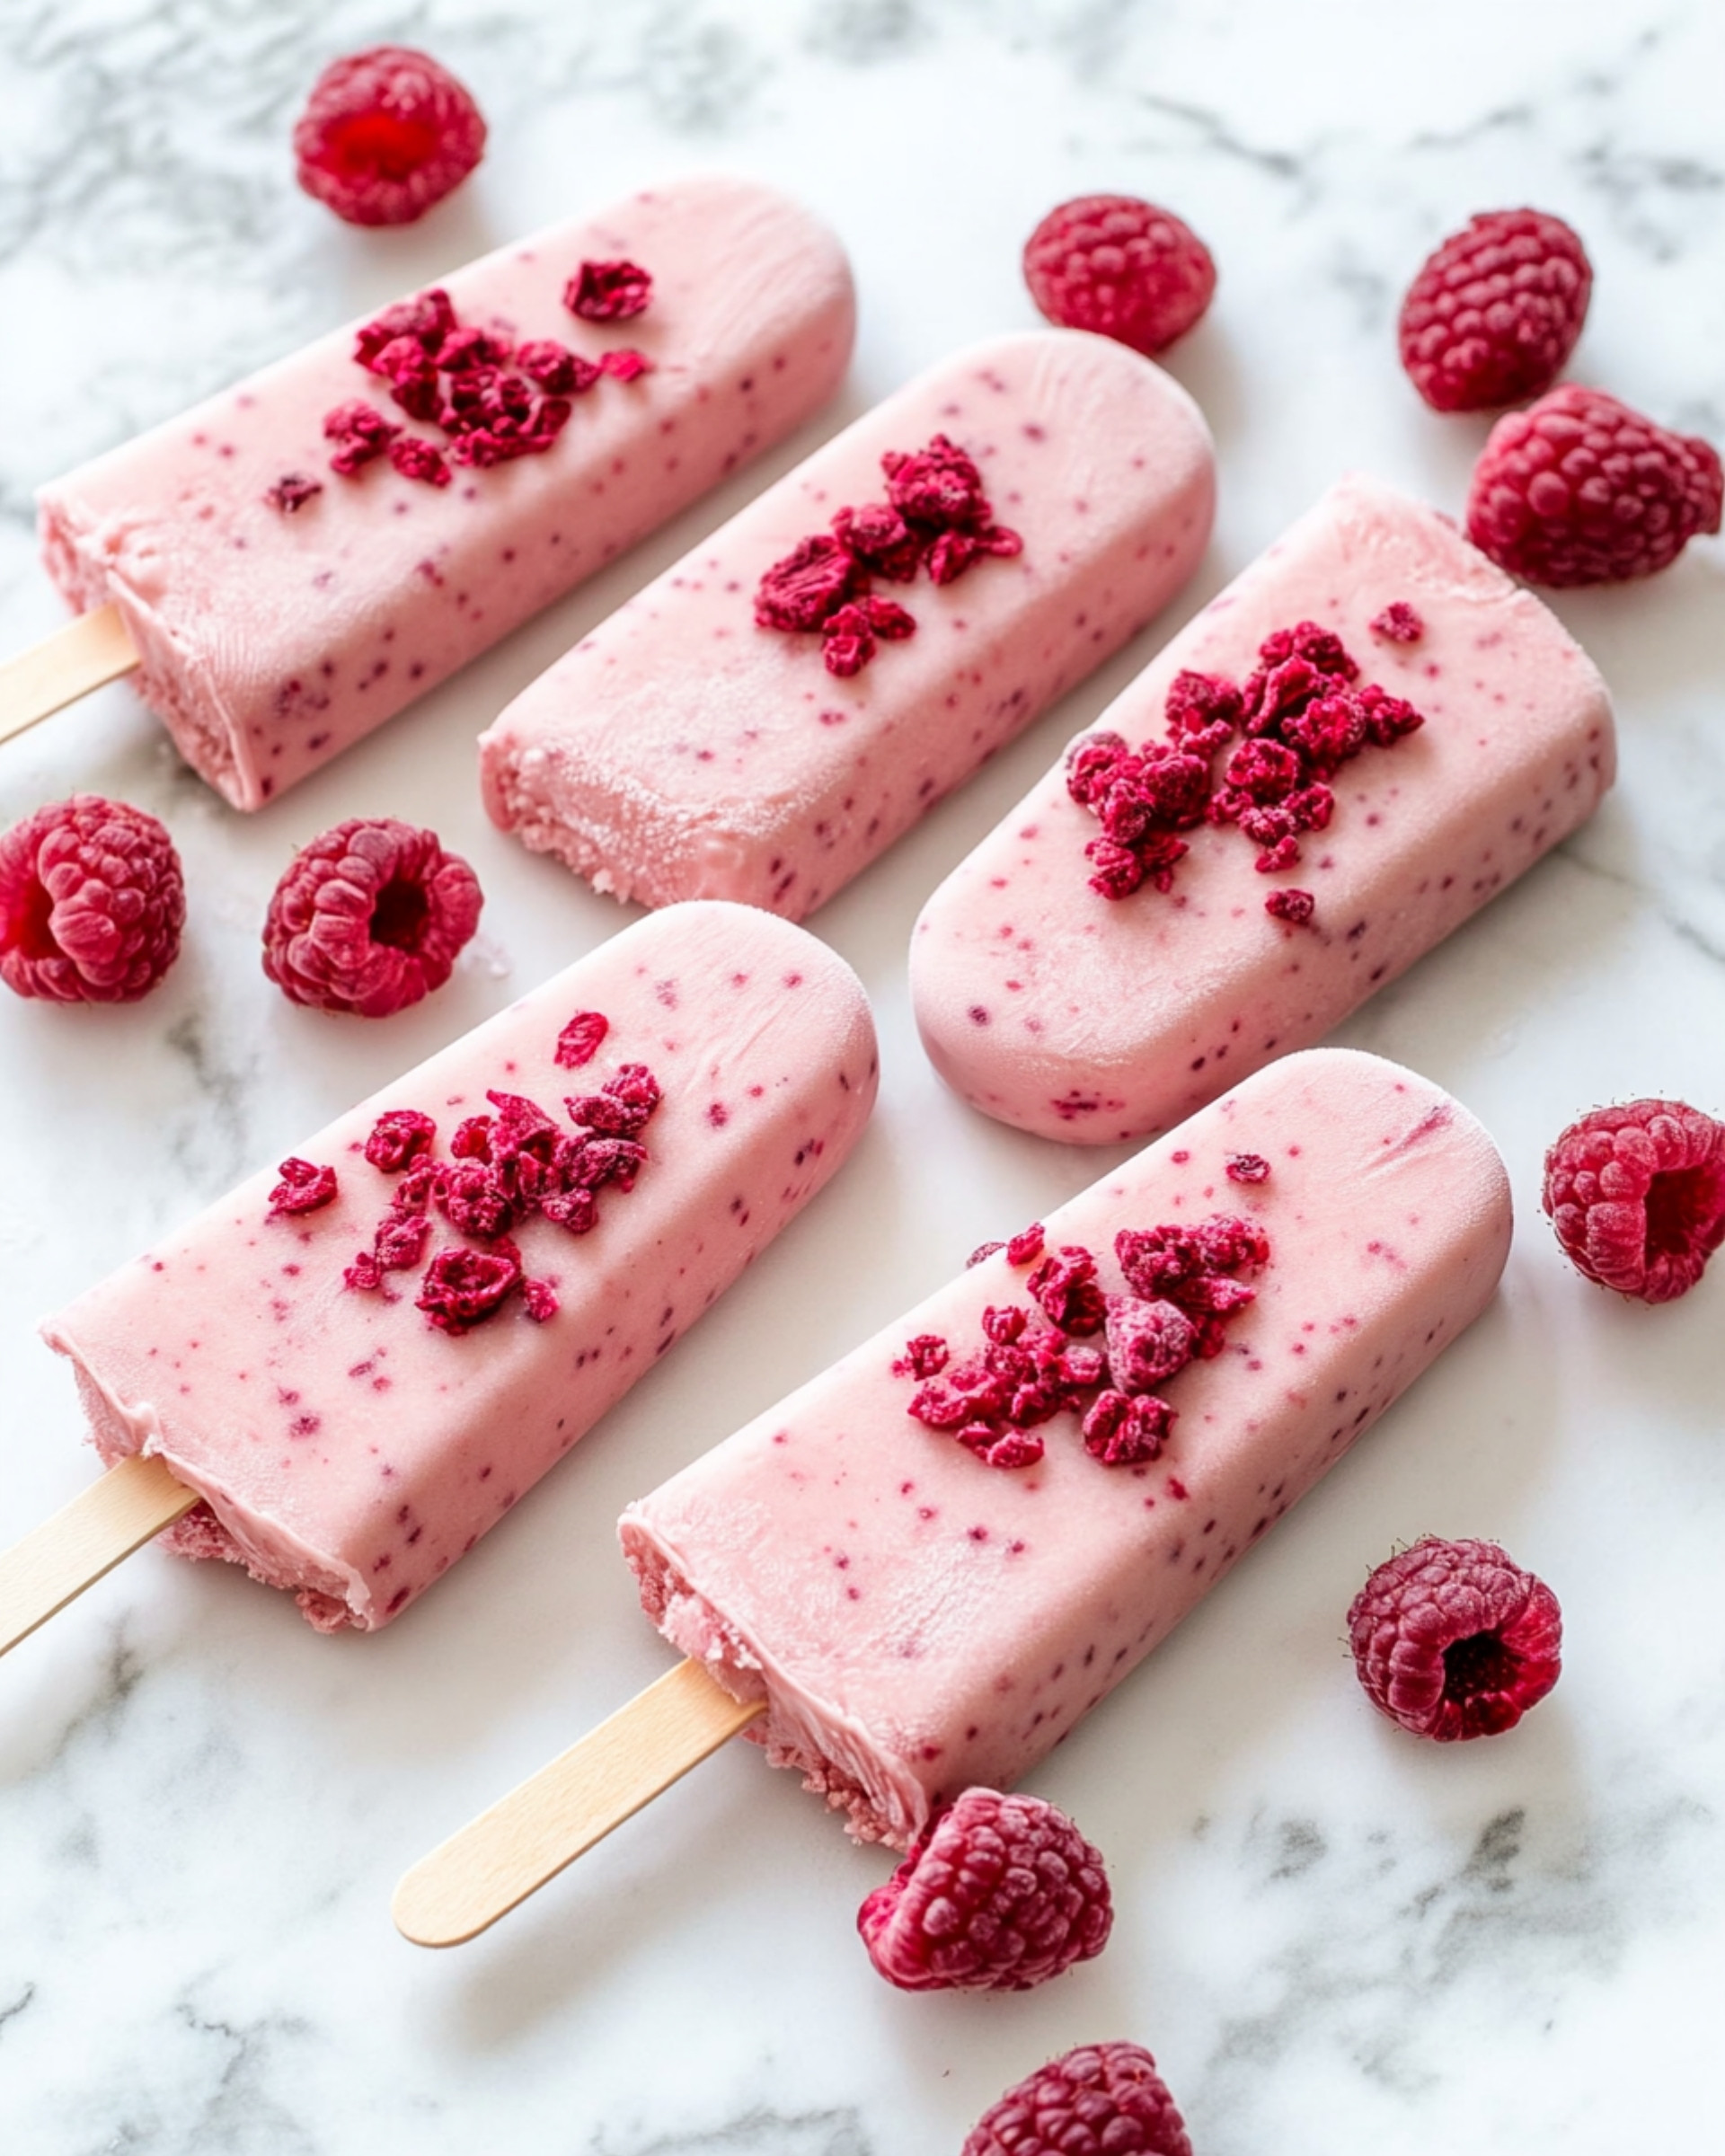
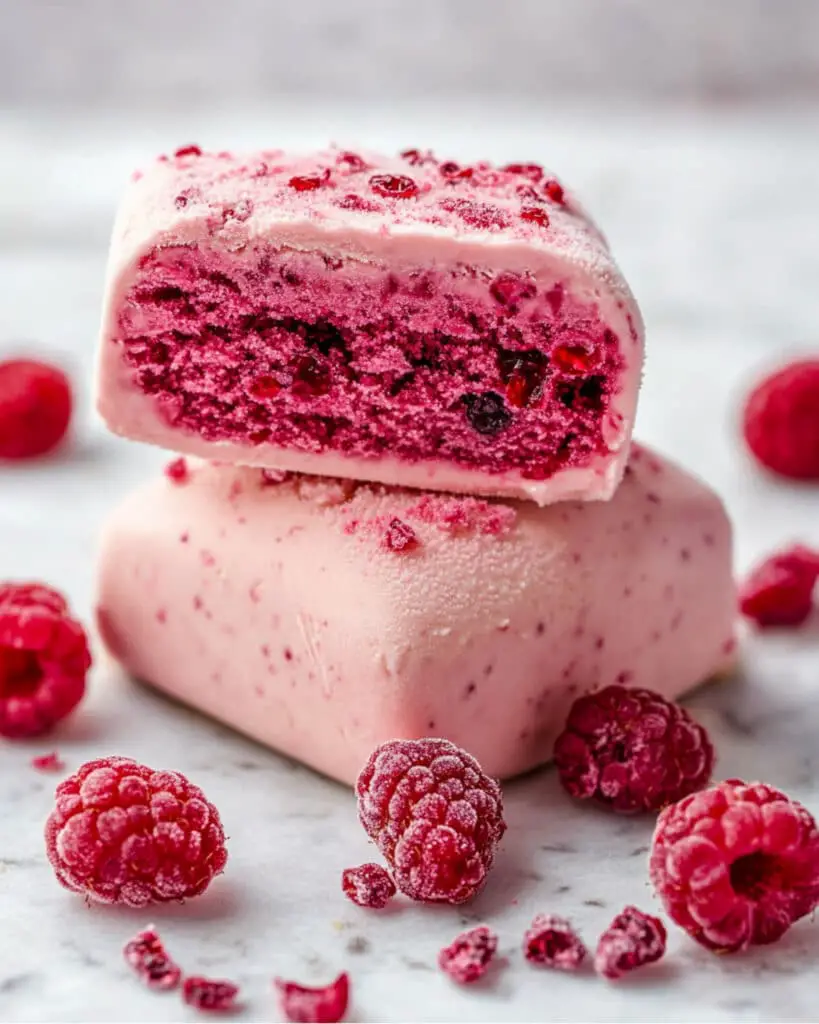
If you’re dreaming of a dessert that’s both eye-catching and absolutely luscious, these Raspberry White Chocolate Ice Cream Pops are everything you could wish for! They’re supremely creamy and fruity, dressed in a shimmering shell of white chocolate with a hint of bright berry tang. The best part? The process is streamlined and simple, making these pops perfect for busy weeknights, weekend treats, or any time you want a bit of frozen bliss without fuss. Whether you’ve got fresh raspberries or a bag of frozen ones in your freezer, this recipe transforms everyday ingredients into a gourmet treat that feels truly special. Expect vibrant, tart-sweet flavors paired with a velvety smooth finish—plus, who can resist the visual pop of ruby-red raspberry flakes on snowy chocolate?
Why You’ll Love This Recipe
- Ridiculously Easy: Hands-on time is minimal! Mix, chill, pour, and let your freezer do most of the work.
- Stunning Flavors: Each bite bursts with juicy raspberries mellowed by rich, creamy white chocolate. The tang from buttermilk gives a light, refreshing finish that keeps you reaching for more.
- Perfect for Any Occasion: These are special enough for entertaining but simple enough for a quick family treat after dinner.
- Customizable: There’s room to play—swap fruit, tweak the coating, or choose how creamy you want your pops to be, all with stellar results.
- Make Ahead Friendly: Keep a stash in the freezer for when dessert cravings strike, guests pop by, or you need a cool reward at the end of a long day.
Ingredients You’ll Need
- Raspberries (fresh or frozen): Delivers a punch of juicy, tart flavor and gorgeous color. No need to thaw if frozen—just use straight from the bag.
- Lemon Juice: Brightens the berries and highlights their tang, making every bite vibrant.
- Granulated Sugar: Sweetens and balances the tartness of the fruit.
- Vanilla Bean or Extract/Paste: Adds floral, aromatic depth (if you can find real vanilla bean, use it—nothing compares!).
- Heavy Whipping Cream: Brings irresistible richness for that silky, ice-cream-shop texture.
- Buttermilk: This is the secret to the pops’ gentle tang and soft, creamy texture. No buttermilk? See variations for substitutes.
- White Chocolate (finely chopped): Creates a sweet, creamy shell and a visually stunning finish.
- Cocoa Butter or Vegetable Shortening: Ensures the chocolate stays silky smooth for the perfect dipping consistency.
- Freeze Dried Raspberries: Intensifies berry flavor in the coating and gives a stunning, crunchy garnish.
Tip: If you’re new to working with chocolate, cocoa butter guarantees glossy, crackly coatings—but vegetable shortening works in a pinch!
Note: You’ll find the complete list of ingredients, along with their exact measurements, in the printable recipe card at the bottom of this post.
Variations
There’s plenty of room to make these your own:
- Berry Swap: Try blackberries, strawberries, or even blueberries instead of raspberries for your own twist.
- Dairy-Free: Use coconut cream for the heavy cream and substitute buttermilk with non-dairy yogurt and a splash of lemon juice.
- Dark Chocolate Lovers: Ditch the white chocolate for a deep, bittersweet chocolate shell.
- Nutty Crunch: Roll freshly-dipped pops in finely chopped pistachios or toasted almonds before the chocolate sets.
- Extra Swirl: Add a swirl of raspberry puree into the white chocolate for a marbled effect.
How to Make Raspberry White Chocolate Ice Cream Pops
Step 1: Make the Raspberry Base
Toss raspberries, lemon juice, sugar, and vanilla into a saucepan. Warm gently, mashing the berries as everything simmers into a juicy, fragrant concoction. Strain—pressing for every last drop—so you end up with a seedless, glossy raspberry syrup. Let it cool to room temp.
Step 2: Mix and Chill
Once cool, stir in heavy cream and buttermilk until fully combined. Lay plastic wrap right on the surface (this keeps skin from forming) and chill thoroughly—three hours at least, or overnight if you like to prep ahead.
Step 3: Freeze the Pops
If you own an ice cream maker and crave extra creaminess, churn the mixture until softly set, then spoon it into silicone popsicle molds. For a speedier route, just pour the base directly into your molds—creamy, quick, and still delicious! Insert sticks and let them freeze solid overnight.
Step 4: Prep the Chocolate Coating
Before unmolding your pops, get the shell ready: Melt white chocolate with cocoa butter (or shortening) until completely smooth. Meanwhile, blitz half of your freeze dried raspberries into powder and stir into the chocolate for a pink, berry-flecked finish. Crush the rest for garnishing.
Step 5: Dip and Garnish
Remove pops from molds and line them up on a parchment-lined, frozen baking tray. Working fast, dip each into the melted chocolate—letting the excess drip off—then sprinkle with crushed freeze dried raspberries. The shell sets quickly, so don’t dawdle!
Step 6: Final Freeze
Return the finished pops to the freezer for another hour or two, giving the chocolate time to set and the centers to firm up.
Pro Tips for Making the Recipe
- Use Silicone Molds: Churned ice cream is softer and won’t release easily from hard plastic. Silicone is a must for clean, easy unmolding.
- Freeze Pops until Rock Solid: This makes dipping neater and helps the chocolate set instantly.
- Work Fast with the Coating: White chocolate can set in seconds on the cold pops—have your garnishes ready!
- Chopping Chocolate: A fine chop ensures quick, even melting. Don’t rush and overheat, or your chocolate can seize.
Note: If you don’t have freeze dried raspberries, try a sprinkle of crushed, freeze-dried strawberries or simply skip the garnish—it’s still delicious.
How to Serve
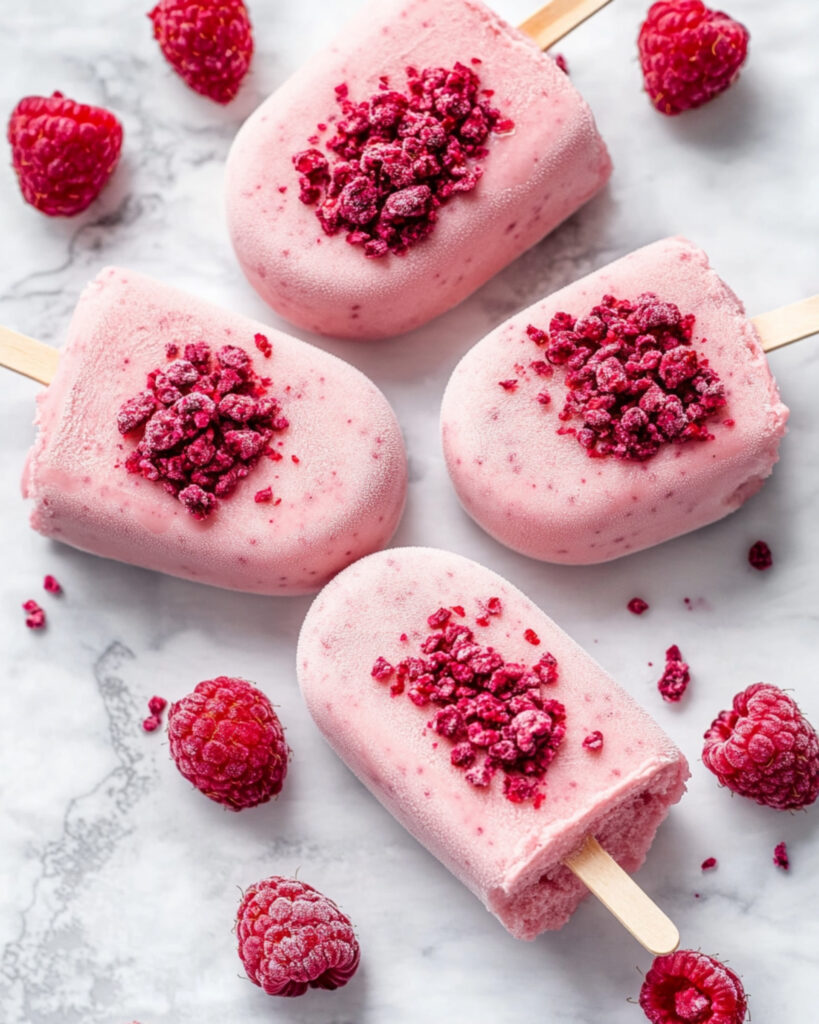
Serve Raspberry White Chocolate Ice Cream Pops straight from the freezer—no need to thaw. For a fancier presentation, set each pop in a cupcake liner. Pops pair beautifully with a glass of iced tea, a drizzle of extra berry sauce, or a scattering of fresh berries and mint on the plate. For parties, stand pops in a bed of crushed ice to keep them at their best.
Make Ahead and Storage
Storing Leftovers
These pops keep impeccably in the freezer. For best results, line them up in an airtight container or wrap each pop individually in plastic wrap—this wards off freezer burn and preserves that snap-in-your-mouth coating.
Freezing
Wrapped pops stay fresh for up to 2 weeks. The chocolate seals in moisture and flavor, making them perfect for make-ahead treats.
Reheating
No need to reheat! If the pops are extra hard, leave them at room temperature for 3-5 minutes before enjoying—that’s plenty to soften them slightly for the perfect bite.
FAQs
-
Can I use frozen raspberries instead of fresh ones?
Absolutely! Frozen raspberries work perfectly and are sometimes even more flavorful. There’s no need to thaw; just toss them into the saucepan and proceed as written.
-
Can I make these without an ice cream maker?
Yes! You can pour the chilled raspberry mixture directly into popsicle molds without churning. The pops will be a bit more ice-like rather than ultra-creamy, but the flavor is still outstanding.
-
Why does the chocolate shell set so quickly?
The popsicles are very cold, so the melted chocolate solidifies in seconds. Make sure to have your garnishes ready, and work with one pop at a time for best results.
-
What can I use if I don’t have buttermilk?
You can substitute with an equal amount of whole milk mixed with a teaspoon of lemon juice or white vinegar. Let it sit for 5 minutes before using—this mimics buttermilk’s tang and helps keep the mixture creamy.
Final Thoughts
Nothing says joy like the first bite of a Raspberry White Chocolate Ice Cream Pop—creamy, tart, sweet, and beautifully crisp. It’s a dessert that feels both playful and indulgent, yet is wonderfully simple to make at home. If you’re looking for a way to brighten up your dessert routine or want a project that brings the whole family into the kitchen, these pops are unbeatable. Happy freezing—and, even happier tasting!
Print
Raspberry White Chocolate Ice Cream Pops Recipe
- Prep Time: 30 minutes
- Cook Time: 10 minutes
- Total Time: 24 hours
- Yield: 5 to 6 popsicles 1x
- Category: Desserts
- Method: Freezing
- Cuisine: American
- Diet: Vegetarian
Description
These homemade Raspberry White Chocolate Ice Cream Pops pair tangy raspberries with creamy vanilla and are encased in a luscious white chocolate coating finished with a sprinkle of freeze-dried raspberries. Creamy, refreshing, and bursting with berry flavor, these popsicles make for a delightful summer dessert or a beautifully presented treat for special occasions.
Ingredients
Raspberry Ice Cream Base
- 1 1/2 cups (7 ounces) fresh or frozen raspberries
- 1/2 teaspoon lemon juice
- 3/4 cup (5 1/4 ounces) granulated sugar
- Seeds of 1 vanilla bean, or 1 teaspoon vanilla bean extract or paste
- 1/2 cup heavy whipping cream
- 1/2 cup buttermilk
Chocolate Coating
- 12 ounces white chocolate, finely chopped
- 1 tablespoon cocoa butter or vegetable shortening
Toppings
- 1/2 cup (about 1/2 ounce) freeze dried raspberries
Instructions
- Make Raspberry Mixture: In a saucepan, combine raspberries, lemon juice, sugar, and vanilla bean seeds or extract. Bring to a simmer over medium heat, mashing the berries as they cook to release their juices. Continue simmering until the mixture is juicy and the berries are thoroughly mashed.
- Strain and Cool: Pour the berry mixture through a fine mesh sieve, pressing to extract as much liquid as possible. Discard the seeds and let the strained mixture cool to room temperature.
- Add Cream and Chill: Stir in the heavy whipping cream and buttermilk. Cover the mixture, pressing plastic wrap directly onto the surface to prevent a skin from forming. Refrigerate for 3-4 hours, or overnight, until completely chilled.
- Churn or Pour Mixture: For a creamier texture, pour the chilled mixture into an ice cream maker and churn according to its instructions. Spread the churned mixture into silicone molds (note, standard popsicle molds may not be suitable for churned ice cream). Alternatively, you can pour the chilled mixture directly into popsicle molds for a slightly less creamy result, yielding about 5 popsicles instead of 6.
- Freeze: Insert sticks into the molds and freeze overnight, or until completely firm. Once frozen, carefully remove the pops from the molds and place them on a frozen, parchment-lined baking sheet. Return the pops to the freezer while you prepare the chocolate coating.
- Prepare White Chocolate Coating: In a double boiler or in the microwave (using short intervals at half power), gently melt the white chocolate with the cocoa butter or vegetable shortening. Remove from heat before the chocolate is fully melted and stir until smooth, allowing residual heat to finish melting.
- Prepare Freeze-Dried Raspberries: Grind about half of the freeze-dried raspberries in a small food processor or spice grinder to make a fine powder (about 1 1/2 tablespoons). Stir the powder into the melted white chocolate. Coarsely crush the remaining freeze-dried raspberries; these will be used for garnish.
- Dip and Garnish Pops: Transfer the chocolate coating to a tall glass. Working quickly, dip each frozen pop fully into the white chocolate mixture, then set on the lined baking sheet and immediately sprinkle with crushed freeze-dried raspberry pieces. You have about 20 seconds to garnish before the coating sets.
- Final Freeze: Once all pops are dipped and garnished, return them to the freezer for 1–2 hours to fully set. Optionally, individually wrap pops in plastic wrap once firm for longer storage. Serve directly from the freezer as a cool, creamy treat.
Notes
- For best results, use silicone molds, especially if churning the ice cream base.
- Churning yields creamier popsicles, but non-churned pops are still delicious.
- Work quickly when dipping and garnishing, as the white chocolate sets rapidly.
- Individually wrapping finished pops helps prevent freezer burn and extends shelf life up to 2 weeks.
- Replace vanilla bean with vanilla extract if needed for convenience.
Nutrition
- Serving Size: 1 pop
- Calories: 380
- Sugar: 32g
- Sodium: 45mg
- Fat: 22g
- Saturated Fat: 13g
- Unsaturated Fat: 7g
- Trans Fat: 0g
- Carbohydrates: 42g
- Fiber: 1g
- Protein: 3g
- Cholesterol: 25mg


