
If you’re craving a festive, melt-in-your-mouth treat that’s as beautiful as it is delicious, you’re going to adore this Peppermint White Chocolate Bark Recipe. I absolutely love how it balances the creamy sweetness of white chocolate with the refreshing zing of peppermint and the slight crunch of crushed candy canes. It’s perfect for holiday gifting, parties, or just sneaking a bite when no one’s watching — trust me, everyone who tries this ends up asking for more.
Why You’ll Love This Recipe
- Simple Ingredients: You only need a few pantry staples that come together beautifully.
- Customizable Layers: Love chocolate combinations? This bark lets you play with white and semi-sweet chocolate layers.
- Perfect for Gifting: Wrapped up nicely, it makes a charming and impressive homemade gift.
- Festive & Fresh: The peppermint and candy canes add that seasonal crunch and cool flavor we all crave around the holidays.

Ingredients You’ll Need
This Peppermint White Chocolate Bark Recipe combines creamy white chocolate with a touch of semi-sweet for depth, all brightened up by peppermint and crunchy candy canes. When shopping, look for good-quality chocolate that melts smoothly and real peppermint extract for the brightest flavor.

- White chocolate: Choose good-quality white chocolate chips or bars that melt easily and don’t seize up.
- Semi-sweet or bittersweet chocolate: I like bittersweet for a richer contrast, but semi-sweet works perfectly too.
- Vegetable or coconut oil: This gives the chocolate a smoother sheen and prevents it from thickening while melting.
- Peppermint extract: Fresh, real peppermint extract makes all the difference in flavor — avoid artificial ones if possible.
- Candy canes: Crushing your own lets you control the size and freshness of the pieces, and I love how they add crunch and minty bursts.
Variations
I love mixing things up with this Peppermint White Chocolate Bark Recipe depending on the occasion or my mood. Feel free to personalize it — the base is forgiving and welcomes your creative twist.
- Dark Chocolate Layer: I sometimes swap out the semi-sweet for dark chocolate for a more intense, less sweet bark — it’s a big hit with my family.
- Nutty Crunch: Adding chopped almonds or pistachios on top along with candy canes gives a delightful extra texture and flavor layer.
- Extract Experiments: Try adding a drop of vanilla or almond extract for a subtle twist on the classic peppermint flavor.
- Dairy-Free Version: Use dairy-free white and dark chocolate to make this treat suitable for friends with dietary needs — it still turns out creamy and festive!
How to Make Peppermint White Chocolate Bark Recipe
Step 1: Prep Your Pan and Chocolate
Start by lining an 8- or 9-inch square pan (or a baking sheet if you want a thinner bark) with parchment paper or foil. Make sure to smooth out any wrinkles — that’ll help your bark come out cleanly later. Then, chop your chocolates roughly so they’ll melt evenly and quickly. Prepping everything up front saves you from scrambling once the melting begins.
Step 2: Melt Your Bottom White Chocolate Layer
I find the microwave method easiest: place 6 ounces of the white chocolate in a heatproof bowl, stir in half a teaspoon of oil, and melt in 20-second bursts. Stir well between each round to avoid overheating, since white chocolate is sensitive and can seize easily. Once silky smooth, stir in 1/4 teaspoon peppermint extract. Pour into your pan and spread evenly with an offset spatula or the back of a spoon. Refrigerate for 10–15 minutes, but don’t let it set completely — you want those layers to stick together nicely.
Step 3: Add the Semi-Sweet Chocolate Layer
Repeat the melting process with the semi-sweet chocolate: 6 ounces, half a teaspoon of oil, melting in short bursts while stirring. Once smooth, fold in the remaining 1/4 teaspoon peppermint extract and spread over the slightly set white chocolate layer. Pop it back in the fridge for another 10–15 minutes until it’s nearly set again.
Step 4: Finish with More White Chocolate and Candy Canes
Finally, melt the remaining 6 ounces of white chocolate with the last 1/2 teaspoon of oil (no peppermint here), pour it over the top, and smooth it out. While it’s still soft, sprinkle crushed candy canes evenly on top. Crushing candy canes in a zip-top bag with a rolling pin is quick and fun, plus it keeps cleanup to a minimum. Refrigerate for about an hour until everything is set solid.
Step 5: Break, Batter, Enjoy
Once hardened, lift the bark from the pan using the edges of the parchment or foil. Breaking it by hand creates charming rustic pieces, but you can slice it if you want neat squares. If it’s been longer than a few hours chilling, let it sit out for 10–15 minutes so it doesn’t crack or separate when breaking.
Pro Tips for Making Peppermint White Chocolate Bark Recipe
- Melting Chocolate Gently: Always use 20-second intervals and stir in between — overheating is the biggest pitfall with white chocolate.
- Layer Adhesion: Chill layers until almost set but not totally firm to keep the bark layers from separating later.
- Crushing Candy Canes: Use a sealed zip-top bag and rolling pin for even-sized pieces and less mess.
- Easy Removal: Line your pan well with parchment or foil extending over edges so you can easily lift the whole slab out without breakage.
How to Serve Peppermint White Chocolate Bark Recipe

Garnishes
I like to add a sprinkle of crushed pistachios or toasted coconut flakes on top alongside the candy canes sometimes — it adds color and a little extra texture that makes the bark pop visually and flavor-wise.
Side Dishes
This peppermint bark is perfect alongside a hot cup of coffee, cocoa, or even a glass of cold milk. I’ve also served it at holiday brunches next to cinnamon rolls or gingerbread cookies — it’s a nice minty counterpoint to heavier pastries.
Creative Ways to Present
For holiday parties, I like to package bark pieces in clear cellophane bags tied with festive ribbons or arrange them on a pretty platter with sprigs of fresh pine or holly for a cozy seasonal vibe — it doubles as decor and dessert!
Make Ahead and Storage
Storing Leftovers
Store leftover bark in an airtight container in the refrigerator for up to three weeks. I usually separate layers with parchment to keep pieces from sticking together. Just bring it out 10–15 minutes before serving to let it soften slightly for best texture.
Freezing
Freezing works well! I wrap pieces tightly in plastic wrap and place them in a freezer-safe bag. When you want some, just thaw in the fridge overnight or at room temperature for about 30 minutes. The texture stays great, and it’s a handy way to keep your stash lasting longer.
Reheating
This bark doesn’t need traditional reheating since it’s best served chilled or at room temperature. But if for some reason it’s too firm, letting it sit out a bit will do the trick without melting the candy cane crunch.
FAQs
-
Can I use chocolate chips instead of chocolate bars in this Peppermint White Chocolate Bark Recipe?
Yes, chocolate chips can work fine, but be mindful that some chips contain stabilizers that might affect melting texture. If possible, use high-quality chips or chop baking chocolate bars for smoother melting results.
-
What’s the best way to crush candy canes for the bark topping?
Place unwrapped candy canes in a sealed zip-top bag and gently roll or tap them with a rolling pin or meat mallet. This lets you control the size of pieces — from coarse shards to fine bits — without a sticky mess.
-
How do I prevent the layers from separating when making peppermint bark?
Chill each chocolate layer until it’s nearly set but still a bit tacky before adding the next. This slight softness helps the layers bond well rather than creating a gap between them.
-
Can I make this Peppermint White Chocolate Bark Recipe dairy-free?
Absolutely! Use dairy-free white and semi-sweet chocolates and ensure your peppermint extract and candy canes are free from dairy ingredients. The texture might be slightly different but still delicious.
-
How long does this bark keep at room temperature?
In cooler months, it can stay at room temperature for a few days before softening too much. For longer storage and best texture, refrigeration is recommended.
Final Thoughts
This Peppermint White Chocolate Bark Recipe has become one of my absolute favorites around the holidays — it’s quick, looks gorgeous, and so indulgently tasty. I love sharing it with friends and family because it always earns compliments and requests for the recipe. If you try it out, I’m pretty sure you’ll find yourself making it again and again, whether to gift or just treat yourself. So go ahead, grab some chocolate and candy canes, and make your kitchen smell like peppermint heaven!
Print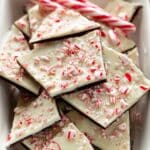
Peppermint White Chocolate Bark Recipe
- Prep Time: 30 minutes
- Cook Time: 15 minutes (melting and layering time, cumulative)
- Total Time: 1 hour 45 minutes
- Yield: Just over 1 lb (about 12 servings)
- Category: Dessert
- Method: No-Cook
- Cuisine: American
Description
This Peppermint Bark recipe features layers of creamy white and semi-sweet chocolate infused with peppermint extract and topped with crushed candy canes for a festive, delightful treat. Perfect for holiday gifting or enjoying as a cool, crunchy dessert, the bark combines silky chocolate layers with refreshing peppermint and a satisfying crunch.
Ingredients
White Chocolate Layers
- 12 ounces (339g) white chocolate, coarsely chopped and divided
- 1 and 1/2 teaspoons vegetable oil or coconut oil, divided
- 1/2 teaspoon peppermint extract, divided (3/4 tsp total: 1/4 tsp in first white chocolate layer, 1/4 tsp in semi-sweet chocolate, no peppermint in last white chocolate layer)
Semi-Sweet Chocolate Layer
- 6 ounces (170g) semi-sweet or bittersweet chocolate, coarsely chopped
Topping
- 2-3 regular-size candy canes (24-36g total), crushed
Instructions
- Prepare Pan: Line the bottom and sides of an 8-inch or 9-inch square baking pan with parchment paper or aluminum foil, smoothing out any wrinkles. Alternatively, use a lined baking sheet. Set aside.
- Bottom White Chocolate Layer: Place 6 ounces of white chocolate and 1/2 teaspoon oil in a small heatproof bowl or liquid measuring cup. Melt in the microwave in 20-second increments, stirring vigorously after each, until smooth and fully melted. Stir in 1/4 teaspoon peppermint extract. Pour into the prepared pan and spread into a thin, smooth layer with an offset spatula or spoon. Refrigerate for 10–15 minutes until almost set but not fully hardened to prevent separation.
- Semi-Sweet Chocolate Layer: Place the semi-sweet chocolate and 1/2 teaspoon oil in a heatproof bowl. Melt using the same microwave method. Stir in 1/4 teaspoon peppermint extract. Pour over the white chocolate layer and spread evenly. Refrigerate again for 10–15 minutes until almost set.
- Top White Chocolate Layer: Melt the remaining 6 ounces of white chocolate with 1/2 teaspoon oil using the same method. Do not add peppermint extract to this layer. Pour over the layered chocolates and spread smoothly. Evenly sprinkle crushed candy canes over the top.
- Set the Bark: Refrigerate the completed bark for about 1 hour or until fully hardened.
- Cut and Store: Remove from the pan and peel off the foil or parchment. Break or cut into pieces as desired. If refrigerated longer than 3–4 hours, let sit at room temperature 10–15 minutes before slicing to avoid layer separation. Store leftovers covered in the refrigerator for up to 3 weeks. Bark can sit at room temperature for a few days in cooler months but softens slightly.
Notes
- This recipe is incredibly simple yet yields a festive and delicious peppermint chocolate bark.
- Melting chocolate in short microwave bursts while stirring prevents overheating or burning.
- Do not let the layers fully harden between additions to avoid separation.
- Crushing candy canes can be done by placing them in a sealed bag and using a rolling pin or meat mallet.
- Store bark in the refrigerator to maintain crispness and freshness for up to 3 weeks.
- If bark softens at room temperature, refrigerate before serving.
Nutrition
- Serving Size: 1 piece (~40g)
- Calories: 220
- Sugar: 20g
- Sodium: 15mg
- Fat: 14g
- Saturated Fat: 8g
- Unsaturated Fat: 5g
- Trans Fat: 0g
- Carbohydrates: 22g
- Fiber: 1g
- Protein: 2g
- Cholesterol: 10mg


