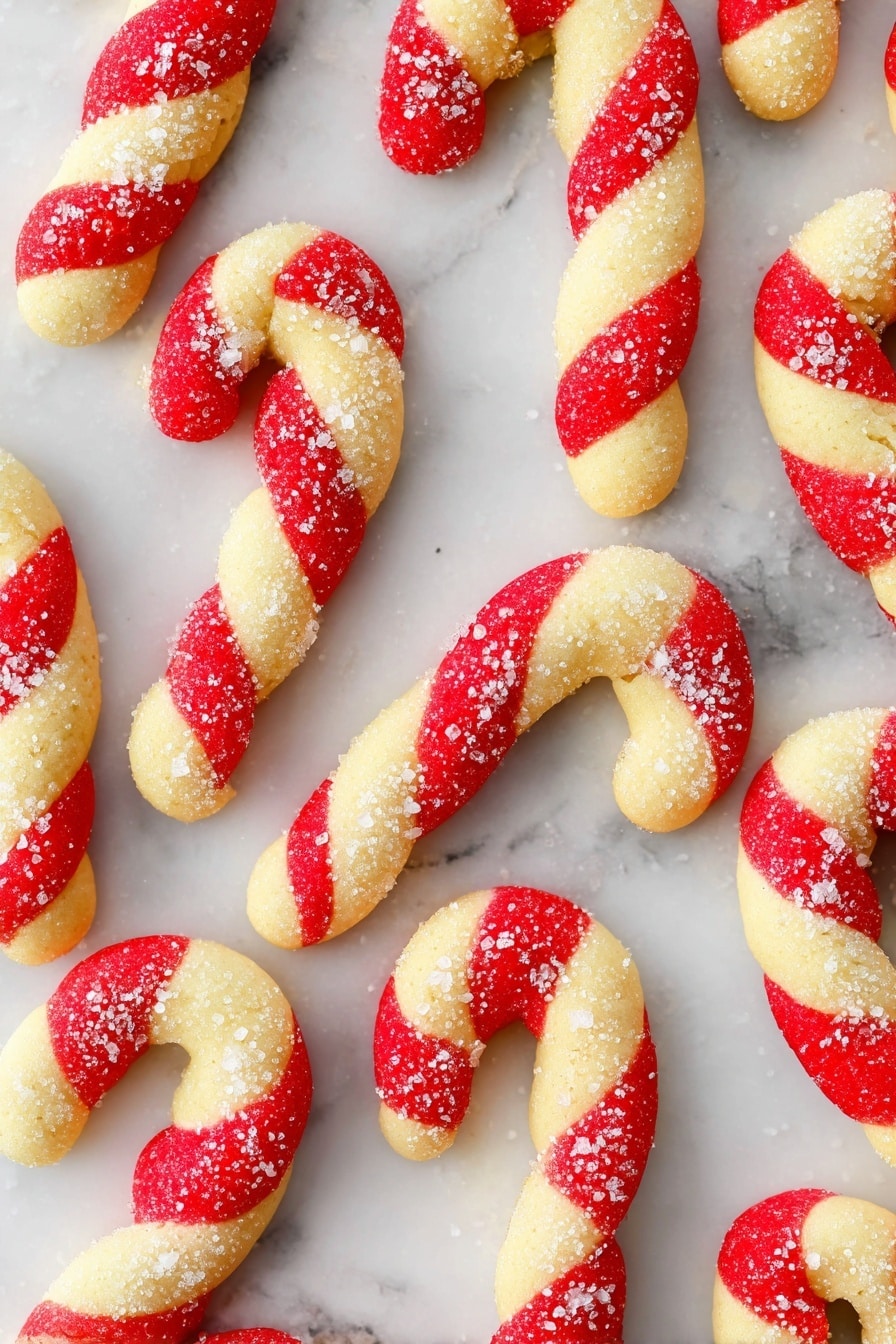
If you love festive and flavorful treats, you’re in for a real treat with this Peppermint Candy Cane Cookies Recipe. These charming cookies are not just adorable—they capture that perfect peppermint flavor with a fun, twisted candy cane shape that feels like a holiday hug in every bite. When I first tried making these, I was amazed at how simple ingredients came together to make something so special, and I can’t wait to share all my tips so you can nail them too!
Why You’ll Love This Recipe
- Festive Appeal: The classic candy cane shape and colors make these cookies a holiday showstopper.
- Perfect Peppermint Flavor: A balanced peppermint extract adds just the right hint of minty freshness without overpowering.
- Easy to Make: Despite the fun shape, you don’t need fancy skills—just a bit of patience and the tips I’ll share.
- Great for Gifting: These cookies keep well and come out beautifully, making them an ideal homemade gift for friends and family.

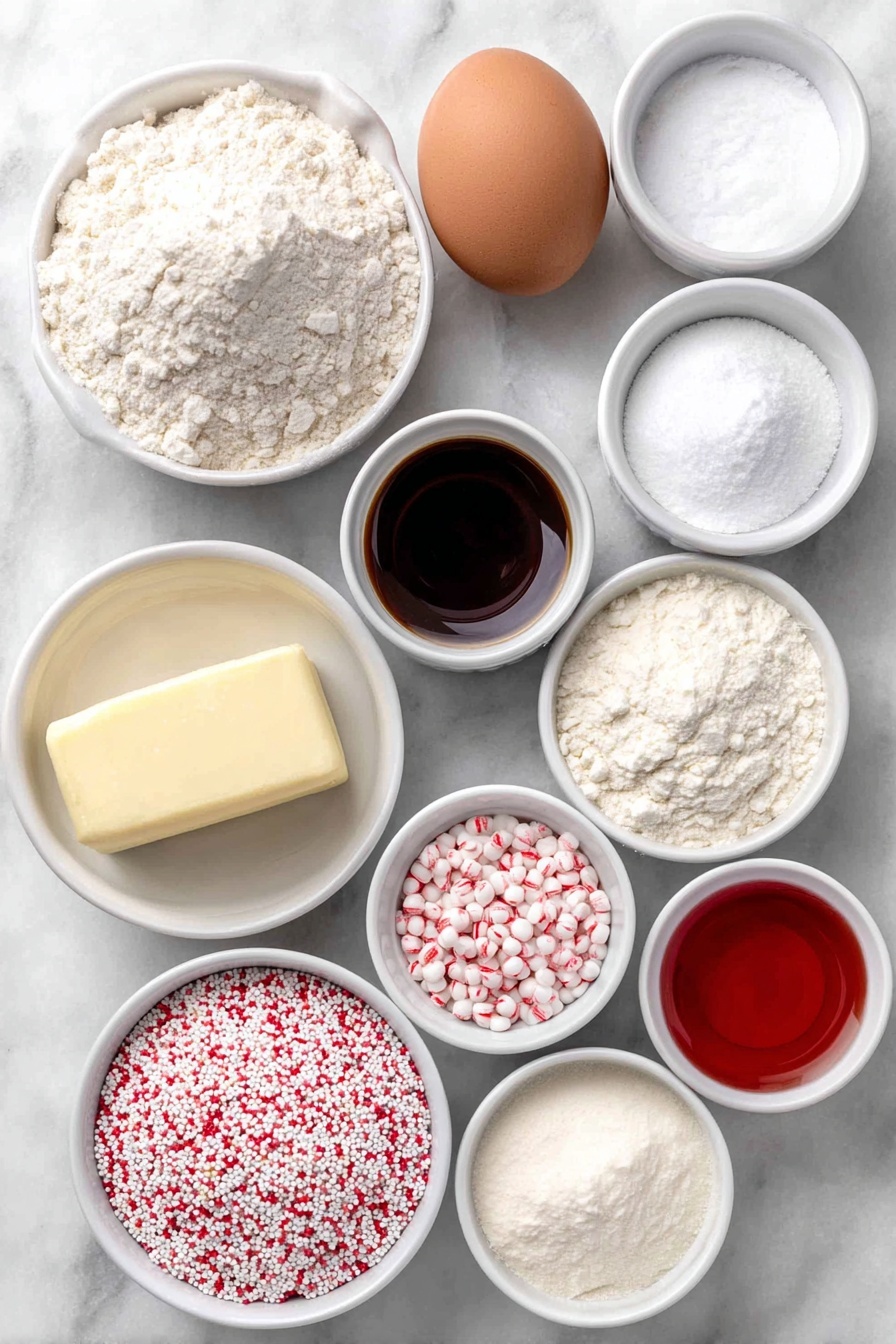
Ingredients You’ll Need
To make your Peppermint Candy Cane Cookies Recipe sing, you’ll want to start with simple pantry staples and just a touch of special ingredients to bring out that classic holiday vibe. The combination of all-purpose flour and cornstarch helps give these cookies a tender, melt-in-your-mouth texture, while peppermint extract gives them just the right festive punch.
- All-purpose flour: The base for your cookie dough; I like to measure carefully with a spoon and level method to avoid dense cookies.
- Cornstarch: Adds softness to your cookies, giving them a delicately light texture I really love.
- Baking soda & baking powder: Both work as leavening agents, but together they help the cookies rise just right—not too fluffy, not too flat.
- Salt: Enhances all the sweet and minty flavors—it’s a game changer even in sweet cookies.
- Unsalted butter: Room temperature is essential here; it creams better with sugar, creating a fluffier dough base.
- Granulated sugar: Be sure to use fine sugar so it dissolves nicely and doesn’t affect the texture.
- Egg: Binds everything together; one egg keeps the cookies tender and cohesive.
- Vanilla extract: Adds depth to the sweetness and pairs beautifully with peppermint.
- Peppermint extract: Your star flavor! I recommend using pure peppermint extract for the best minty kick.
- Red gel icing color: Gel colors give vivid hues without thinning your dough—perfect for those bright red candy cane stripes.
- Sprinkles or peppermint crunch (optional): For a festive touch and a bit of crunch I can’t resist adding.
Variations
I love that this Peppermint Candy Cane Cookies Recipe is so versatile—you can tweak it to make it your own or suit dietary needs. For example, I’ve tried swapping out some of the butter for coconut oil, which adds a subtle tropical twist! Feel free to get creative and enjoy making these yours.
- Vegan version: Replace butter with coconut oil and use a flax egg; I tested this and got a slightly more crumbly but still delicious cookie.
- Chocolate twist: Add a tablespoon of cocoa powder to half the dough for a peppermint-chocolate combo that my family goes crazy for.
- Extra crunch: Mix in crushed candy canes into the dough before shaping for a surprise peppermint bite inside each cookie.
- Gluten-free adaptation: Use a gluten-free all-purpose flour blend; I recommend chilling the dough a bit longer to prevent spreading.
How to Make Peppermint Candy Cane Cookies Recipe
Step 1: Mix Dry Ingredients
Start by whisking together your flour, cornstarch, baking soda, baking powder, and salt in a medium bowl. This ensures everything is evenly distributed and prevents any unwanted salty or chemical pockets in your cookies. Trust me, taking this small step makes your dough way easier to work with later.
Step 2: Cream Butter and Sugar
Using a mixer on medium speed, beat the room-temperature butter and granulated sugar together until they’re pale and fluffy—you’ll notice the color lightening and the texture becoming soft. I love this part because it’s when you can feel the transformation, and it sets the stage for tender cookies.
Step 3: Add Egg and Extracts
Next, beat in the egg, vanilla extract, and peppermint extract until everything’s combined. The peppermint makes these cookies sing holiday tunes, so don’t skip it. A quick tip: make sure your egg is at room temperature, so it blends in smoothly without curdling the butter.
Step 4: Bring It All Together
Slowly add the dry ingredients to your wet mixture, mixing just until the dough comes together. Don’t overdo it here—overmixing can make your cookies tough, and that’s the last thing we want when aiming for soft, melt-in-your-mouth bites.
Step 5: Color and Chill the Dough
Divide the dough into two equal parts. Add the red gel icing color to one half and knead it gently until the color is evenly distributed. One of my favorite tricks is to chill the dough for 2-3 hours; it’s a game changer that makes rolling and twisting the candy cane shapes so much easier and less sticky.
Step 6: Shape Your Candy Canes
Roll teaspoon-sized balls of dough into five-inch ropes. To get consistent lengths, I use a ruler—it sounds overly precise, but it makes the twisting process simpler and your cookies more uniform. Twist one half of the ropes together gently, then twist the other half, rather than trying to twist from just one end. It helped me keep the classic candy cane stripe look, and you’ll love the result!
Step 7: Form the Candy Cane Hook and Bake
Place each twisted rope on your lined baking sheet and carefully curve one end to create that iconic candy cane hook. If you’re feeling festive, press sprinkles or peppermint crunch onto the cookie fronts for extra sparkle and crunch. Bake at 350°F (180°C) for 5-7 minutes—watch closely so they don’t brown too much, as you want soft edges and a tender middle.
Step 8: Cool and Store
Once baked, let your cookies cool on the baking sheet for about 10 minutes before transferring them to a wire rack to cool completely. This resting time prevents breakage and helps the cookies set in their perfect shape. Store them in an airtight container to keep them fresh and flavorful for several days.
Pro Tips for Making Peppermint Candy Cane Cookies Recipe
- Room Temperature Butter: Softened butter whips up better with sugar, giving your cookies a light texture—don’t rush this step!
- Chill the Dough Thoroughly: Chilling not only firms the dough for shaping but also helps the flavors develop more fully.
- Use Gel Food Color: Gel coloring gives you vivid red stripes without altering the dough consistency—liquid colors can make dough too soft.
- Twisting Technique: Twist gently in halves rather than all at once to keep candy cane stripes neat and uniform every time.
How to Serve Peppermint Candy Cane Cookies Recipe

Garnishes
I love pressing crushed peppermint candies or colorful Christmas sprinkles onto the cookies before baking—not only does it add a little extra crunch, but it also gives a joyful sparkle that your guests will notice right away. Sometimes, I even drizzle a little white chocolate on top for an extra layer of festive sweetness.
Side Dishes
These cookies pair wonderfully with a warm cup of cocoa or a glass of cold milk. During holiday parties, I set out a platter alongside peppermint hot chocolate and some fresh fruit for a balanced snack spread. They’re also fantastic with a soft cheese board if you want to elevate your entertaining game.
Creative Ways to Present
For gifts or holiday gatherings, I like to tie a small bundle of these cookies together with red and white baker’s twine and add a sprig of fresh rosemary or pine for a wintery touch. You can also arrange them in a festive cookie jar layered with colorful tissue paper—they look so festive that they become décor as well as dessert!
Make Ahead and Storage
Storing Leftovers
I store my leftover cookies in an airtight container on the counter, and they stay soft and fresh for about 4-5 days—perfect for keeping your holiday vibes going through the week. Just be sure to separate layers with parchment paper to avoid sticking and crumbling.
Freezing
If you want to make these ahead of time, I highly recommend freezing the shaped dough ropes before baking. Wrap them tightly in plastic wrap and pop them in a freezer bag, and they’ll keep for about a month. When you’re ready, just thaw them in the fridge overnight and bake as usual. This trick saved me during busy holiday seasons!
Reheating
To warm up leftover cookies, I like popping them in a 300°F oven for 3-5 minutes. This warms the butter slightly and refreshes the soft texture without making them too crispy—unlike a microwave, which can dry them out fast.
FAQs
-
Can I make Peppermint Candy Cane Cookies Recipe without peppermint extract?
While peppermint extract is key for that classic flavor, you can substitute it with vanilla extract alone, but the cookies won’t have the minty kick. Alternatively, you could add crushed candy canes to the dough for some peppermint flavor without the extract.
-
How do I prevent my candy cane cookies from spreading too much?
Chilling your dough for at least 2 hours before shaping helps firm it up, reducing spreading during baking. Also, using room temperature butter rather than melted butter ensures your dough holds its shape better.
-
Can I use other colors besides red for these cookies?
Absolutely! While traditional candy canes are red and white, feel free to use other gel colors for creative twists—green for a Christmas vibe or even blue for a winter wonderland look. Just be sure to stick with gel colors to maintain dough texture.
-
How long do Peppermint Candy Cane Cookies stay fresh?
Stored in an airtight container at room temperature, these cookies stay fresh for about 4-5 days. Beyond that, their texture might start to change, so freezing leftovers is a great option for longer storage.
Final Thoughts
This Peppermint Candy Cane Cookies Recipe has quickly become one of my favorite holiday traditions because it’s fun to make, smells amazing, and tastes just like Christmas. I hope you enjoy baking these as much as I do because they bring so much joy to family and friends alike. If you’re looking for a way to add magic and peppermint cheer to your cookie platter this season, this recipe is the one to try. Happy baking!
Print
Peppermint Candy Cane Cookies Recipe
- Prep Time: 3 hr
- Cook Time: 40 min
- Total Time: 3 hr 40 min
- Yield: About 60 cookies
- Category: Dessert
- Method: Baking
- Cuisine: American
Description
Delight in these festive Candy Cane Cookies, a classic Christmas treat featuring a soft, peppermint-flavored dough in traditional red and white colors twisted into charming candy cane shapes. Perfectly sweet and buttery, these cookies are easy to make ahead and bring holiday cheer to any gathering.
Ingredients
Dry Ingredients
- 2 3/4 cups (358g) all-purpose flour
- 2 tbsp cornstarch
- 1 tsp baking soda
- 1/2 tsp baking powder
- 1/2 tsp salt
Wet Ingredients
- 1 cup (224g) unsalted butter, room temperature
- 1 cup (207g) granulated sugar
- 1 egg
- 1 tsp vanilla extract
- 1 tsp peppermint extract
Additional Ingredients
- Red gel icing color
- Sprinkles or peppermint crunch, optional
Instructions
- Combine Dry Ingredients: In a medium bowl, mix together the flour, cornstarch, baking soda, baking powder, and salt. Set this mixture aside.
- Cream Butter and Sugar: Using a mixer on medium speed, beat the unsalted butter and granulated sugar in a large bowl until the mixture becomes light in color and fluffy; this usually takes several minutes and indicates proper aeration.
- Add Egg and Extracts: Incorporate the egg, vanilla extract, and peppermint extract into the creamed butter and sugar. Mix until fully combined and smooth.
- Mix Dry Ingredients: Gradually add the dry ingredient blend to the wet ingredients, stirring just until the dough comes together. Avoid over-mixing to ensure tender cookies.
- Color the Dough: Divide the dough into two equal portions. Add red gel icing color to one half and knead gently until the color is evenly distributed.
- Chill the Dough: Refrigerate both portions of dough for 2 to 3 hours to firm up, which will make shaping easier. If you prefer, form teaspoon-sized balls during this time for convenience.
- Preheat the Oven: Set the oven to 350°F (180°C). Line baking sheets with parchment paper or silicone baking mats to prevent sticking and facilitate even baking.
- Shape Cookies: Roll out each dough ball into a 5-inch-long rope, using a ruler for uniformity. Place one red and one white rope side by side and gently twist them together, twisting half from one end then the other to mimic candy cane stripes.
- Form Candy Canes: Position the twisted ropes onto the prepared baking sheet and curve one end of each to create the classic candy cane hook shape.
- Add Toppings: Press chosen sprinkles or peppermint crunch onto the front side of the cookies for added texture and festive appeal.
- Bake: Place the cookies in the oven and bake for 5 to 7 minutes until set but not browned to maintain softness.
- Cool: Let the cookies cool on the baking sheet for about 10 minutes to firm up, then transfer carefully to a wire rack to cool completely and prevent breakage.
- Store: Keep cookies in an airtight container. They stay fresh for 4 to 5 days at room temperature or can be frozen for up to one month.
Notes
- This Candy Cane Cookies recipe is a classic Christmas treat perfect for holiday celebrations.
- Coloring one half of the dough adds festive visual appeal reminiscent of real candy canes.
- Chilling the dough is essential for easier shaping and preventing spreading during baking.
- Using peppermint extract provides a traditional holiday flavor that complements the buttery cookie base.
- Cookies are best enjoyed fresh but can be frozen to preserve their flavor and texture for up to a month.
Nutrition
- Serving Size: 1 cookie
- Calories: 63
- Sugar: 3.4 g
- Sodium: 42.2 mg
- Fat: 3.2 g
- Saturated Fat: 1.9 g
- Unsaturated Fat: 1.3 g
- Trans Fat: 0 g
- Carbohydrates: 8 g
- Fiber: 0.2 g
- Protein: 0.7 g
- Cholesterol: 11.2 mg


