
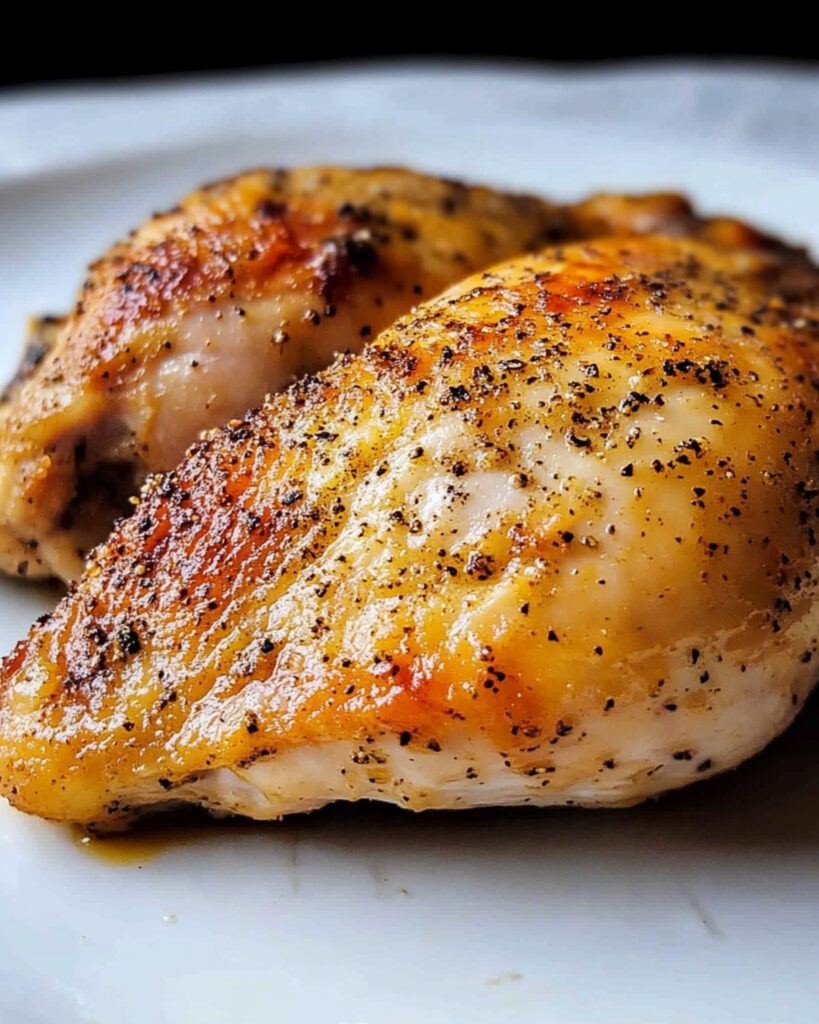
Juicy, tender chicken ready in under 30 minutes? Absolutely. This Pan Seared Oven Baked Chicken Breasts recipe is a reliable weeknight hero. With a beautifully golden crust from a quick sear and a gentle oven finish that ensures every bite stays moist, this method transforms simple ingredients into a flavorful, no-fuss main course. Whether you’re juggling work, homework, or just craving something wholesome and satisfying, this is a go-to recipe that always delivers on taste and ease.
Why You’ll Love This Recipe
- Effortlessly Fast: Everything comes together in about half an hour prep to plate! Perfect when time feels tight but you want a proper meal.
- Flavorful and Moist: The combination of stove-top searing and oven baking guarantees a deliciously crisp outside and juicy center, every time.
- Minimal Ingredients, Maximum Impact: Using pantry staples and your favorite seasoning, you get incredible results with very little effort.
- Customizable: Works with whatever seasoning strikes your mood and pairs wonderfully with all sorts of side dishes.

Ingredients You’ll Need
- Boneless, Skinless Chicken Breasts: The mainstay—look for pieces of a similar size for even cooking. Flatten if thicker than ¾ inch for optimal tenderness and even doneness.
- Oil (Canola, Olive, or Avocado): A touch of oil ensures a perfect sear and prevents sticking. If using butter, watch for scorching; lower the heat if needed.
- Salt and Pepper / All-Purpose Seasoning: Simple but important for flavor; 7:2:1 or 7:2:2 seasoning blends are great no-fuss picks. Avoid sugar-based seasonings or glazes at this stage, as they may burn during the sear.
- Optional: Any additional dried or fresh herbs you love think paprika, garlic powder, rosemary, or thyme.
Note: You’ll find the complete list of ingredients, along with their exact measurements, in the printable recipe card at the bottom of this post.
Variations
- Spicy Cajun: Rub the chicken with Cajun spice or chili powder before searing for a bold, zesty bite.
- Herb-Lover’s: Try Italian seasoning, dried oregano, or thyme for an earthy, aromatic twist.
- Lemon Garlic: Add a sprinkle of garlic powder or fresh minced garlic and a squeeze of lemon just before serving.
- Butter-Basted: Add a knob of butter and a few smashed garlic cloves to the pan during the last minute of searing for luxurious flavor.
How to Make Pan Seared Oven Baked Chicken Breasts
Step 1: Prep the Chicken
Trim the chicken breasts of any excess fat or gristle. If your chicken breasts are thicker than ¾ inch, use a meat mallet or the bottom of a heavy pan to gently pound them to even thickness this helps everything cook evenly and stay juicy.
Pat each breast dry with paper towels. Drying helps the seasonings stick and creates that delicious golden crust.
Step 2: Season Generously
Season both sides with salt and pepper, or your favorite all-purpose seasoning. Don’t be shy seasoning is key to great flavor!
Step 3: Sear in a Hot Pan
Preheat your oven to 375°F if using convection, or 400°F for a conventional oven.
Heat an oven-safe skillet (cast iron is amazing for this) over medium-high heat with a teaspoon of oil. The oil should be shimmering before you add the chicken. Carefully lay the breasts smooth side up in the pan.
Sear the first side for about 3-4 minutes, then flip and sear the other side for another 3-4 minutes. You want a nice, appetizing brown color that’s where the flavor lives.
Step 4: Finish in the Oven
Give the chicken a final flip so the side you want facing up is on top. Slide the whole pan into the preheated oven.
Bake for 15-20 minutes, depending on thickness, until a thermometer inserted into the center reads 165°F. Thinner breasts may need less time, so check early if yours are on the smaller side.
Step 5: Rest and Serve
Let the chicken rest on a plate (tent loosely with foil) for at least 5 minutes before slicing. This little pause lets the juices redistribute, delivering that coveted moistness in each bite.
Pro Tips for Making the Recipe
- Uniform Thickness Is Key: If your chicken is uneven, it’ll cook unevenly. Give it a few gentle smacks with a mallet if needed.
- Hot Pan, Cold Oil, Dry Chicken: This trio is your ticket to a beautiful golden crust that doesn’t stick.
- Invest in an Oven-Safe Skillet: Cast iron works best for searing and can transfer directly from stovetop to oven seamlessly.
- Use a Meat Thermometer: There’s no better way to guarantee perfectly cooked chicken. Guessing often leads to dry results!
How to Serve
This chicken is incredibly versatile! Serve it straight from the oven sliced atop a fresh salad, beside fluffy mashed potatoes, or with a bright vegetable medley. Slice thin for sandwiches, wraps, or meal-prep bowls. For an elegant touch, top each breast with a squeeze of lemon juice, fresh herbs, or a sprinkle of flaky sea salt.
Favorite Pairings:
- Roasted vegetables (like broccoli, carrots, or asparagus)
- Creamy mashed potatoes or risotto
- Steamed rice or pasta tossed with olive oil
- Simple green salad with a citrus vinaigrette
Make Ahead and Storage
Storing Leftovers
Store cooked chicken breasts in an airtight container in the refrigerator for up to 3-4 days. Slice or keep whole for future meals this chicken is fabulous for quick lunches!
Freezing
Cool completely, then wrap tightly in plastic wrap or foil and freeze for up to 3 months. Label with the date to keep track.
Reheating
Reheat gently in the microwave in 30-second bursts, or in a covered pan over low heat with a splash of broth to keep things juicy. Avoid high heat, which can make the chicken dry.
FAQs
-
Can I cook the chicken from frozen?
No, start with fully thawed chicken for best results. Cooking from frozen will lead to uneven doneness and an unpleasant texture.
-
What if I don’t have an oven-safe skillet?
No problem! Sear the chicken in any skillet, then transfer to a baking dish lined with a bit of oil or cooking spray for the oven portion.
-
How do I know when the chicken is done?
A digital meat thermometer is your best friend here 165°F in the thickest part means you’re good to go. The juices should run clear, and the meat should be opaque throughout.
-
Can I use other cuts of chicken?
Absolutely! This method works well with boneless thighs, though you may need to adjust the oven time. Bone-in cuts will need a longer bake, so be sure to check doneness.
Final Thoughts
There’s something deeply satisfying about mastering a weeknight staple like Pan Seared Oven Baked Chicken Breasts. This simple technique gives you control over your dinner, rewarding you with golden, juicy chicken every single time. Give it a try experiment with seasonings, mix up your sides, and enjoy the kind of effortless deliciousness that makes home cooking so rewarding!
Print
Pan Seared Oven Baked Chicken Breasts Recipe
- Prep Time: 10 minutes
- Cook Time: 20 minutes
- Total Time: 30 minutes
- Yield: 2 servings
- Category: Main-course
- Method: Stovetop
- Cuisine: American
- Diet: Low Fat
Description
This pan-seared, oven-baked chicken breast recipe delivers juicy, flavorful chicken in under 30 minutes. Perfect for a quick and healthy main-course, the chicken is first seared for a golden, flavorful crust, then finished in the oven for perfectly cooked, succulent results every time.
Ingredients
-
Chicken
- 2 skinless boneless chicken breasts (about 10 oz each, well trimmed)
-
For Cooking
- 1 teaspoon oil (or butter)
- Salt and pepper, to taste (or 7:2:1 All Purpose Seasoning)
Instructions
- Preheat the Oven: Preheat your oven to 375°F (convection) or 400°F (conventional) to ensure it’s ready as soon as you finish searing the chicken.
- Prepare the Chicken: Trim and pat dry the chicken breasts with paper towels. If any chicken breast is over ¾-inch thick, flatten it using a meat mallet or the bottom of a heavy pan to ensure even cooking.
- Season: Sprinkle the chicken breasts lightly with salt and pepper or your preferred seasoning blend.
- Sear the Chicken: Heat an oven-safe pan (cast iron preferred) over medium-high heat and add 1 teaspoon of oil (or butter). When the oil is hot and shimmering, carefully place the chicken breasts into the pan. Sear both sides for 3-4 minutes each, achieving a deep golden color. Start with the smooth side up, then flip and sear the other side.
- Transfer to Oven: After searing, flip the chicken breasts one final time and transfer the entire pan to the preheated oven.
- Bake: Bake for 15-20 minutes or until the internal temperature reaches 165°F. Thinner breasts typically take 15 minutes, while thicker ones may require up to 20 minutes.
- Rest: Once baked, remove the pan from the oven and let the chicken rest for 5 minutes before slicing or serving. This step ensures maximum juiciness.
Notes
- Do not attempt this recipe with frozen chicken; always thaw fully.
- For best results, use chicken breasts of similar size and thickness. Flatten thicker breasts for even cooking.
- Avoid sugar-based seasonings, as they may burn during searing.
- Always preheat the pan so the oil is shimmering before adding the chicken.
- If your pan isn’t non-stick or well-seasoned cast iron, you may need additional oil.
- Butter can be used, but reduce the heat if it starts to smoke.
- Sear the chicken to the approximate final color you desire.
- Adjust oven time based on the thickness of the breasts, and check for an internal temperature of 165°F.
- Let the chicken rest for a full 5 minutes before serving for optimal juiciness.
Nutrition
- Serving Size: 1 chicken breast (approx. 170g)
- Calories: 220
- Sugar: 0g
- Sodium: 330mg
- Fat: 5g
- Saturated Fat: 1g
- Unsaturated Fat: 3.5g
- Trans Fat: 0g
- Carbohydrates: 0g
- Fiber: 0g
- Protein: 40g
- Cholesterol: 110mg


