
If you’re on the hunt for a cookie recipe that’s irresistibly soft, perfectly buttery, and gloriously chocolatey, then you’re in for a treat with this Nutella Thumbprint Cookies Recipe. I absolutely love these cookies because they’re super easy to make, deliver that melty Nutella center everyone adores, and always impress friends and family alike. Stick around, and I’ll walk you through how to get these sweet little delights just right every single time.
Why You’ll Love This Recipe
- Buttery and Soft Texture: The dough balances butter and flour perfectly for cookies that stay tender and chewy.
- Melty Nutella Center: Each cookie hides a creamy pool of Nutella that makes every bite a little piece of heaven.
- Simple Ingredients: You likely have everything on hand, and the method is straightforward for bakers of any skill level.
- Fun and Customizable: Top with sprinkles, drizzle with chocolate, or add a little sea salt for your own twist.

Ingredients You’ll Need
This recipe uses classic baking ingredients that come together to create the most tender cookie base, while the Nutella brings that dreamy, nutty sweetness. I always recommend using good-quality Nutella or your favorite chocolate hazelnut spread — trust me, it makes a difference!
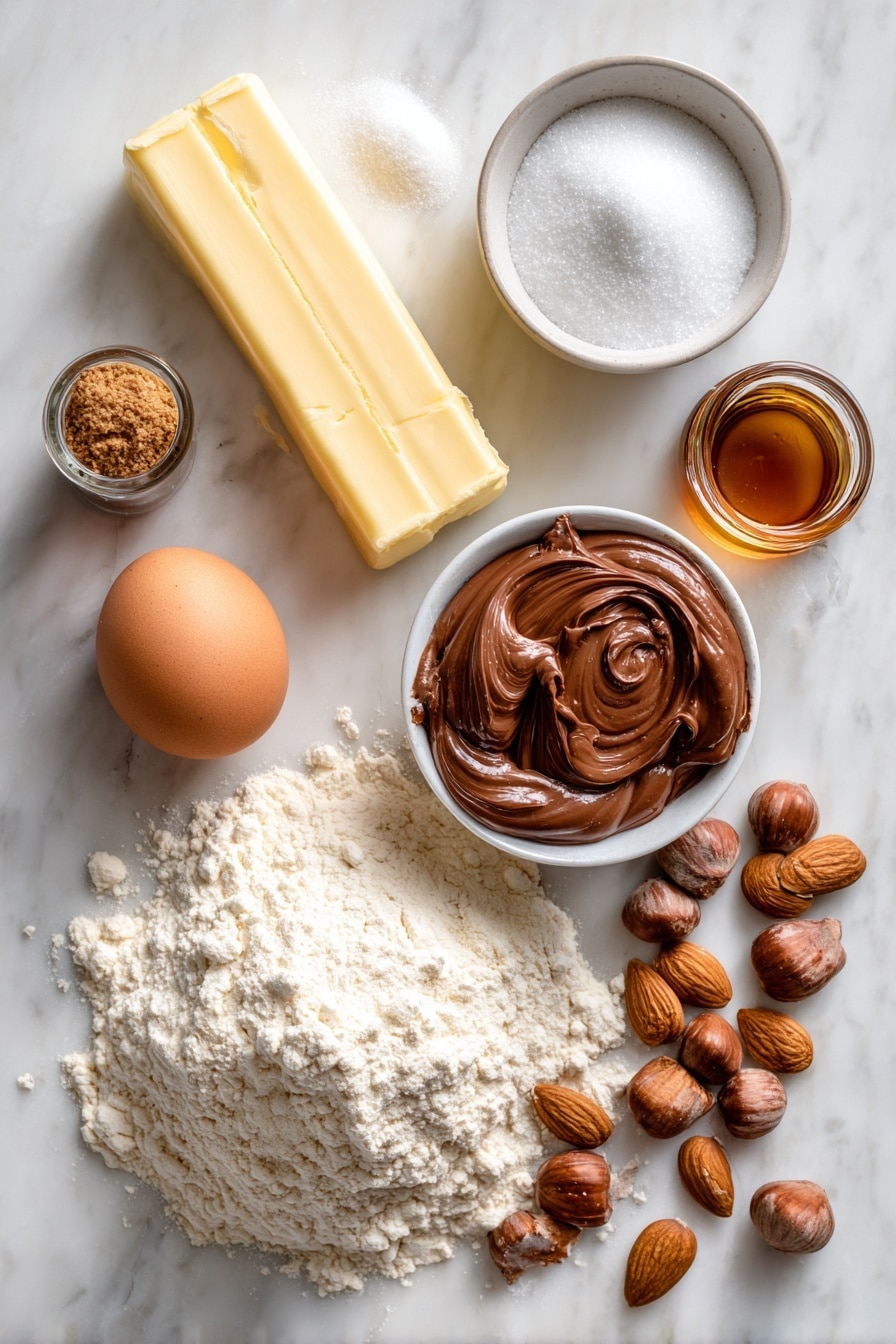
- Unsalted Butter: Softened to room temperature so it creams nicely with the sugars.
- White Sugar: Adds sweetness and helps with the cookie’s structure.
- Brown Sugar: Gives a hint of moisture and a subtle caramel flavor.
- Large Egg: Helps bind the dough and adds richness.
- Vanilla Extract: Brings warmth and depth to the flavor.
- Almond Extract: Just a touch for a lovely, nutty undertone.
- Corn Starch: Keeps the cookies tender and soft, which is a little secret I swear by.
- All-Purpose Flour: Spoon and level for accuracy to avoid dry or dense cookies.
- Baking Powder: Gives a light lift so cookies don’t turn out flat.
- Salt: Enhances the flavors and balances the sweetness.
- Nutella (or your favorite hazelnut spread): The star of the recipe, for filling those classic thumbprint impressions.
Variations
I love how flexible this Nutella Thumbprint Cookies Recipe is. Over the years, I’ve tweaked it to match different tastes and occasions — and you should totally make it your own, too!
- Nut-Free Variation: Swap Nutella for sunflower seed butter with chocolate chips for a safe nut-free option my nephew actually prefers.
- Extra Crunch: Add chopped toasted hazelnuts or almonds to your dough or sprinkle on top before baking for a delightful crunch.
- Chocolate Drizzle: Melt dark or white chocolate and drizzle over the baked cookies—my go-to glam finishing touch for holidays.
- Mini Size: Roll smaller dough balls for bite-sized snacks that are perfect for parties or lunchboxes.
How to Make Nutella Thumbprint Cookies Recipe
Step 1: Cream Butter and Sugars Until Fluffy
Start by beating your softened butter with both the white and brown sugars using an electric mixer. It usually takes about 3 minutes, and you’ll notice the mixture lighten in color and become fluffy. This is one of the keys to soft cookies! If you rush this part, the texture won’t be as tender.
Step 2: Add Egg and Extracts
Once your butter mixture is fluffy, add the egg, vanilla, and almond extract. Beat these in until everything is fully combined. The almond extract is subtle but really elevates the cookie’s profile—definitely don’t skip it!
Step 3: Mix Dry Ingredients Separately
In a separate bowl, whisk together the flour, cornstarch, baking powder, and salt. This ensures the leavening and salt are evenly distributed so your cookies bake consistently.
Step 4: Combine Dry Ingredients Into Wet
Add the flour mixture to your butter mixture slowly—about a third at a time. Beat it just until incorporated after each addition. You’ll want to avoid overmixing here because that can toughen the cookies. If the dough looks crumbly, just gather it with your hands until it sticks together nicely.
Step 5: Form the Dough Balls and Chill
Here’s a trick I discovered: scoop about 1½ tablespoons of dough per cookie (roughly 22 grams), roll each ball in granulated sugar, then press an indentation in the center with the back of a teaspoon or your thumb. This sugar coating gives an extra slight crunch and keeps the cookies from cracking. Pop these dough balls into the fridge for 30 minutes to firm up — baking chilled dough keeps their shape and texture just right.
Step 6: Bake to Perfection
Preheat your oven to 350°F (175°C) and line your baking sheet with parchment paper. Arrange your chilled dough balls spaced apart, and bake for 9-10 minutes. Watch for edges to set and bottoms to turn a light golden brown. The centers might look a bit pale — that’s perfect because you want them soft and chewy, not overbaked.
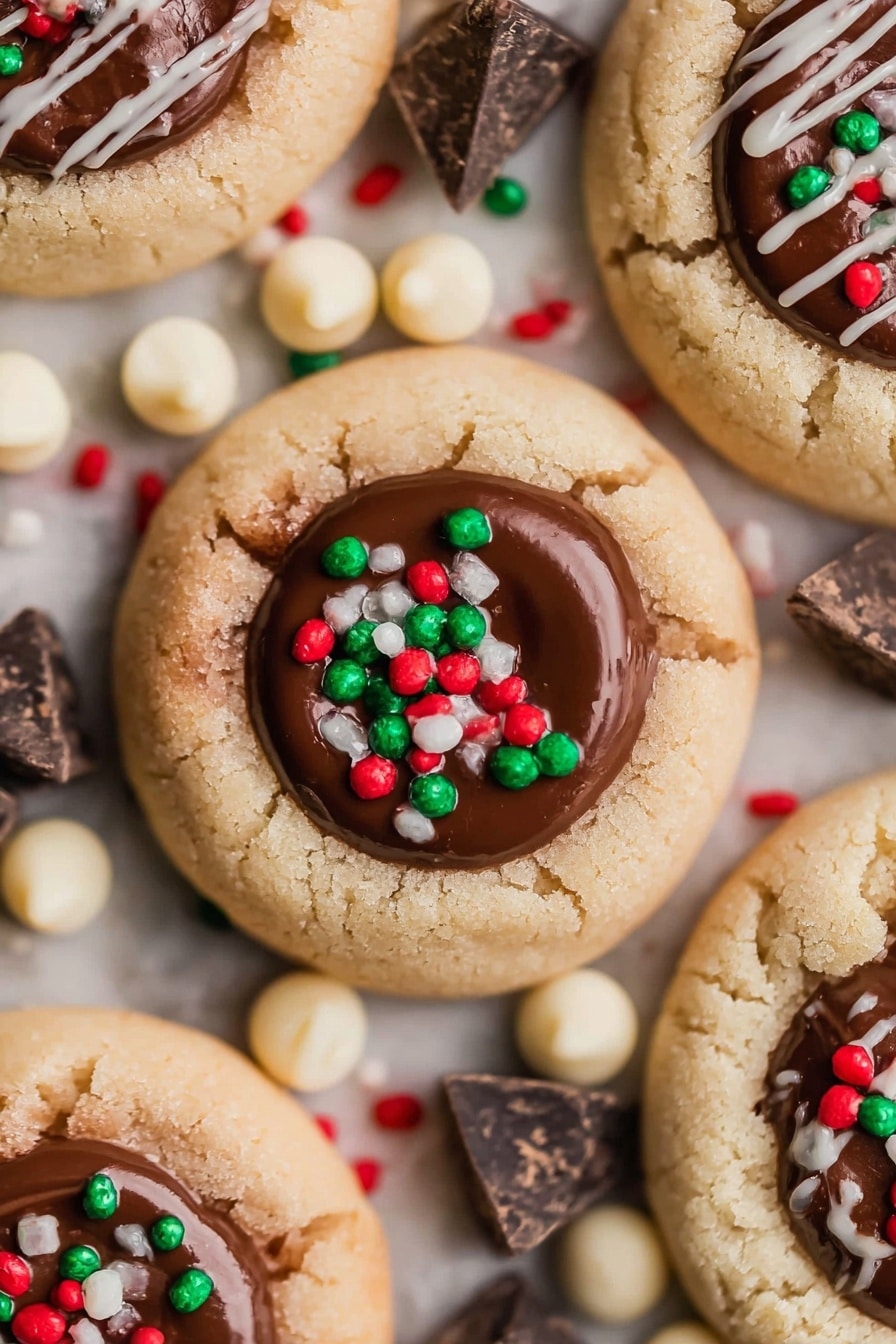
Step 7: Fill the Thumbprints with Nutella
After the cookies cool for 5-7 minutes on the baking sheet, gently fill each indentation with about one teaspoon of Nutella. I usually warm the Nutella slightly for easier spooning, but be careful not to make it too runny. For a little festive flair, this is also the time to add sprinkles or drizzle melted chocolate over the tops. Transfer cookies to a wire rack to cool completely.
Pro Tips for Making Nutella Thumbprint Cookies Recipe
- Room-Temperature Butter: Always soften your butter fully—not melted—for the best creamy texture when creaming with sugar.
- Don’t Overmix Flour: Stop mixing as soon as the flour disappears to keep your cookies tender.
- Chill the Dough: Chilling helps prevent spreading and cracking — a game changer for thumbprint cookies.
- Nutella Filling Timing: Add the Nutella right after partially cooling the cookies to keep it gooey without melting away.
How to Serve Nutella Thumbprint Cookies Recipe
Garnishes
I often keep it simple with a light dusting of powdered sugar or a few rainbow sprinkles over the Nutella for a fun pop of color. Sometimes I drizzle melted white chocolate for a little extra indulgence — it tastes as beautiful as it looks!
Side Dishes
These cookies are fantastic alongside a cold glass of milk or a cozy cup of coffee or tea. For a more festive vibe, serve them with whipped cream or fresh berries to cut through the sweetness.
Creative Ways to Present
I love arranging them in a circular pattern on a pretty cake stand or tiered platter when hosting get-togethers. For holidays, lining the cookie edges with mini marshmallows or crushed candy canes adds a whimsical touch that your guests will ooh and ahh over.
Make Ahead and Storage
Storing Leftovers
Once cooled completely, store your cookies in an airtight container at room temperature. They stay soft for about 4-5 days, but I have to admit: they rarely last that long in my house!
Freezing
If you want to freeze them, I suggest freezing the unbaked dough balls after shaping and making the thumbprints. Just freeze them on a tray first and then transfer to a freezer bag. When you’re ready, bake straight from frozen, adding a couple extra minutes to baking time. Freezing baked cookies with Nutella inside can make the filling tough, so this method preserves that melty goodness best.
Reheating
To refresh leftovers, I pop a cookie in the microwave for about 10 seconds to warm the Nutella center up again. Be careful not to overheat or the cookie can dry out. A quick warm-up really brings back that fresh-baked magic.
FAQs
-
Can I substitute Nutella with another spread for this recipe?
Absolutely! You can use any chocolate-hazelnut spread or even peanut butter if you prefer a different flavor. Just keep in mind some spreads might have different consistencies and sweetness levels, so adjust according to taste.
-
Why do the cookies crack when baking?
Cracking usually happens if the dough is too warm or hasn’t been chilled. Chilling the dough balls helps them hold their shape and prevents cracking. Also, rolling them in sugar before pressing helps form a protective layer.
-
Can I make these cookies gluten-free?
You can swap the all-purpose flour with a gluten-free flour blend suitable for baking. Adding an extra teaspoon of cornstarch can help keep the texture tender. Be aware that results vary depending on the blend used.
-
How do I prevent the Nutella from spreading too much?
Only fill the indentation after baking and cooling the cookies slightly—that way the Nutella stays put. If you spread it before baking, it can melt and run off. Warming Nutella slightly helps it fill the thumbprint smoothly without spreading excessively.
Final Thoughts
This Nutella Thumbprint Cookies Recipe holds a special place in my heart—it’s a simple recipe that consistently produces magic. Whether you’re baking for a holiday, a casual treat, or to impress friends, these cookies deliver every time with that perfect combo of soft dough and melty Nutella goodness. I really hope you give this recipe a try and find as much joy in baking (and eating!) these cookies as I do. Happy baking, friend!
Print
Nutella Thumbprint Cookies Recipe
- Prep Time: 10 minutes
- Cook Time: 10 minutes
- Total Time: 40 minutes
- Yield: 36 cookies
- Category: Dessert, Cookies
- Method: Baking
- Cuisine: American
Description
These Nutella Thumbprint Cookies are a delightful treat featuring a soft, buttery base crowned with a rich, chocolatey Nutella center. Perfectly portioned and slightly chewy, these cookies are ideal for any occasion, from holiday gatherings to everyday indulgences. The subtle almond extract adds a lovely depth of flavor, making each bite irresistibly delicious.
Ingredients
Cookie Dough
- 1 cup unsalted butter, softened (228 g, 2 sticks)
- 3/4 cup white sugar (166 g)
- 1/4 cup brown sugar (53 g)
- 1 large egg
- 1 tsp vanilla extract
- 1/4 tsp almond extract
- 1 tsp corn starch
- 2 3/4 cups all-purpose flour, spooned and leveled (343 g)
- 1/2 tsp baking powder
- 1/4 tsp salt
Filling
- 3/4 cup Nutella or your favorite chocolate hazelnut spread
Instructions
- Prepare the dough: Using an electric hand mixer or stand mixer, beat the softened butter and both sugars together until light and fluffy, about 3 minutes. Then add the egg, vanilla, and almond extract and beat until fully combined.
- Mix dry ingredients: In a separate small bowl, whisk together the flour, corn starch, baking powder, and salt. Gradually add about one-third of the flour mixture to the wet ingredients, beating just until incorporated each time. Once all flour is added, gently pull the dough together if it’s too crumbly.
- Shape cookies: For best results, take approximately 1 1/2 tablespoons (22 g) of dough per cookie and roll into balls. Then roll each ball in sugar to coat. Press the back of a round teaspoon or your thumb into the center of each ball to create an indentation, forming the classic thumbprint shape.
- Chill dough: Place the formed cookie dough balls on a parchment-lined baking sheet and chill in the refrigerator for about 30 minutes to prevent cracking during baking.
- Bake: Preheat your oven to 350°F (175°C). Bake the chilled cookies for 9–10 minutes or until the edges are set and the bottoms turn a light golden brown. The edges may not brown much, which is normal.
- Add Nutella filling: Allow the cookies to cool on the baking sheet for 5–7 minutes so they firm up slightly. Then spoon about 1 teaspoon of Nutella into the center indentation of each cookie. Optionally, decorate with chocolate drizzle or sprinkles if desired.
- Cool completely: Transfer the cookies to a wire rack to cool completely before serving, allowing the Nutella to set.
Notes
- These cookies are soft and chewy with a rich Nutella center, making them a perfect treat for Nutella lovers.
- Add a drizzle of white or dark chocolate or sprinkle festive toppings on the Nutella for extra flair.
- Chilling the dough before baking helps prevent cracking and keeps the cookies thick and tender.
- Ideal for holiday cookie exchanges or as a sweet gift for friends and family.
Nutrition
- Serving Size: 1 cookie
- Calories: 138 kcal
- Sugar: 9 g
- Sodium: 22 mg
- Fat: 7 g
- Saturated Fat: 5 g
- Unsaturated Fat: 1.3 g
- Trans Fat: 0.2 g
- Carbohydrates: 17 g
- Fiber: 1 g
- Protein: 2 g
- Cholesterol: 18 mg


