
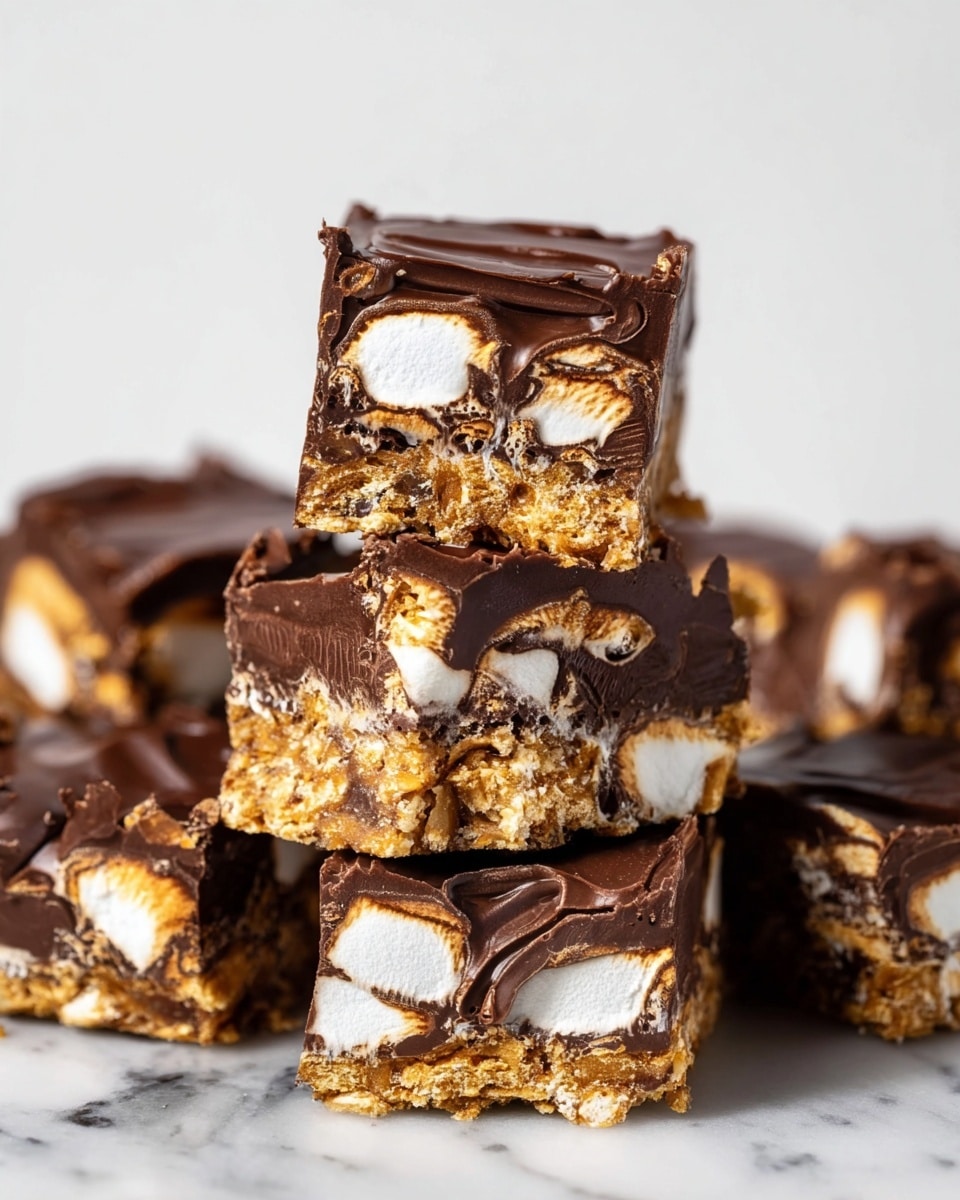
If you’re on the hunt for an easy, crowd-pleasing dessert that brings all those campfire vibes indoors, you’re going to adore this No Bake S’mores Bars Recipe. It’s one of those recipes that feels fancy but comes together faster than you can say “sweet tooth satisfied.” I absolutely love how these bars combine chocolate, marshmallow, and graham crackers in a chewy, gooey bite without ever needing to turn on an oven. Keep reading because I’m sharing all my best tips to help you nail this simple but irresistible treat every time!
Why You’ll Love This Recipe
- No oven needed: Perfect for hot days or when you don’t want to heat up the kitchen.
- Super quick to make: Ready in under 15 minutes of hands-on prep time.
- Kid-friendly and fun: Great activity and treat for little hands and bite-sized mouths.
- Flexible ingredients: Easy to customize with whatever chocolate or add-ins you love.

Ingredients You’ll Need
The magic of this No Bake S’mores Bars Recipe comes down to a handful of simple, pantry-friendly ingredients that create that classic s’mores flavor with minimal fuss. Let me walk you through the essentials and share a few tips on picking the best options.
- Chocolate chips: I usually go for semi-sweet, but milk chocolate works just as well if you prefer it sweeter. You want good-quality chips that melt smoothly.
- Crisco shortening or vegetable oil: This helps melt the chocolate evenly and gives the bars a lovely glossy finish.
- Mini marshmallows: The smaller ones help distribute gooey sweetness in every bite. Fresh ones melt better than the stale, so check that bag!
- Golden Grahams cereal: I’ve tried this with regular graham crackers crumbled up, but Golden Grahams hold their crunch so nicely and mix perfectly with the chocolate and marshmallows.
Variations
I love adapting this No Bake S’mores Bars Recipe depending on what I have on hand or who I’m making it for. It keeps things fresh and fun — plus, you can tweak it to suit dietary needs or just try out new flavor combos.
- Add nuts or seeds: Toss in chopped walnuts or sunflower seeds for a bit of crunch and nuttiness — my family loves the extra texture.
- Swap cereals: For gluten-free options, puffed rice cereal works great or even gluten-free graham cracker crumbs.
- Use different chocolates: Dark chocolate adds a rich depth, white chocolate brings sweetness, and peanut butter chips add a nutty twist.
- Make it festive: Add colorful sprinkles or mini candy pieces on top before chilling for parties or holidays.
How to Make No Bake S’mores Bars Recipe
Step 1: Prep Your Pan
Start by lining an 8×8-inch pan with foil. Don’t skip this step! It makes lifting out the bars so much easier once they’re set. Give the foil a quick spray with cooking spray to prevent sticking — trust me, this little prep saves you from a messy cleanup later.
Step 2: Melt the Chocolate
Place your chocolate chips and shortening (or oil) in a large microwave-safe bowl. Microwave in 30-second bursts, stirring thoroughly between each, until everything is melted smooth and glossy. Keep a close eye on it to avoid burning — stirring frequently is key here. You’ll love how creamy this mixture gets, making the bars wonderfully fudgy.
Step 3: Combine and Mix
Stir in your Golden Grahams and mini marshmallows until they’re evenly coated in that luscious chocolate. This part can get a bit sticky and messy, so I suggest using a sturdy spatula or just dive in with clean hands if you’re feeling bold. The mix should be well combined but not overly smashed — you want some texture!
Step 4: Press and Chill
Pour the mixture into your prepared pan and press it down firmly to compact everything. This step is crucial for getting bars that hold together without falling apart. Since the mixture is sticky, use a piece of parchment paper on top to press it down cleanly. Then pop it in the fridge for a couple of hours until it’s fully set and firm.
Step 5: Slice and Enjoy
Once chilled, lift the foil out of the pan and place on a cutting board. Slice into squares, and voilà — you have perfectly chewy, chocolatey No Bake S’mores Bars! I like to let mine sit at room temperature for 5-10 minutes before eating to soften up just slightly. They’re pure bliss.
Pro Tips for Making No Bake S’mores Bars Recipe
- Use good melting chocolate: I learned that cheap chocolate can seize or grain, so going semi-sweet or milk chocolate chips from trusted brands gives a glossy, smooth finish.
- Don’t skip the shortening: It helps stabilize the melted chocolate and gives bars a snappy texture.
- Press firmly but gently: Too hard and the marshmallows lose their fluff; too soft and bars fall apart.
- Keep bars chilled: They melt easily, so refrigeration is your friend for best texture and storage.
How to Serve No Bake S’mores Bars Recipe
Garnishes
I like sprinkling a few mini marshmallows or crushed graham crackers on top right after pressing the mixture in the pan—it makes the bars look extra inviting. If you’re feeling fancy, a drizzle of melted white chocolate or a dusting of cocoa powder adds a lovely finishing touch.
Side Dishes
These bars are sweet enough on their own, but pairing them with a scoop of vanilla ice cream or fresh berries turns dessert into a party. They also go great beside a cup of rich, hot coffee or creamy milk — just like the classic s’mores experience!
Creative Ways to Present
For birthdays or get-togethers, I like cutting these bars into fun shapes using cookie cutters—stars or hearts are perfect. Stacking them on a pretty platter with colorful napkins makes for an eye-catching dessert table. Plus, wrapping individual squares in parchment paper makes a delightful grab-and-go treat for parties.
Make Ahead and Storage
Storing Leftovers
Leftover No Bake S’mores Bars store beautifully in an airtight container in the fridge. I usually keep mine for up to a week, and the bars retain their chewy, melty charm. Just remember, they do tend to get a little firmer when chilled, so pulling them out for a few minutes before serving makes a big difference.
Freezing
Freezing these bars works great! I’ve wrapped them tightly in plastic wrap and placed them in freezer bags for up to 3 months. When I’m ready to enjoy, I thaw them overnight in the fridge and then bring them to room temperature. They keep their flavor and texture surprisingly well.
Reheating
Since these are no bake, reheating isn’t really necessary, but if you like your bars extra gooey, a quick 10-second zap in the microwave does the trick. Just be careful — too long and they’ll melt into a puddle. Let them cool a moment before digging in.
FAQs
-
Can I use other cereals instead of Golden Grahams in the No Bake S’mores Bars Recipe?
Absolutely! While Golden Grahams are my favorite for their perfect graham cracker flavor and crunch, you can substitute with other cereals like Rice Krispies, gluten-free cereal, or even crushed graham cracker crumbs. Just keep in mind that the texture and flavor will vary slightly, but it’ll still be delicious.
-
Can I make No Bake S’mores Bars Recipe vegan or dairy-free?
Yes! Use dairy-free chocolate chips and a plant-based shortening or coconut oil instead of Crisco. Also, make sure your marshmallows are vegan (there are several brands out there). The cereal is usually safe, but double-check the packaging to be sure.
-
Why do I need to add shortening or oil when melting chocolate?
The shortening or oil helps smooth out the melted chocolate and keeps it from seizing, which can make it grainy or too thick. It also helps the bars set with a nice, firm texture without being hard or brittle.
-
How long should I chill the bars before slicing?
I usually chill them for at least 2 hours, but you can leave them longer if you want a firmer bar that’s easier to cut. Just make sure they’re completely set, or they’ll be too sticky to slice cleanly.
-
Can I double this No Bake S’mores Bars Recipe?
For sure! Just double all the ingredients and use a 9×13-inch pan instead of the 8×8. The chilling time might increase slightly, so keep an eye on the bars before cutting.
Final Thoughts
This No Bake S’mores Bars Recipe holds a special place in my dessert rotation because it’s deceptively simple yet so satisfying—like a little nostalgic hug in bar form. I still remember the first time I made it on a lazy summer afternoon, and my family couldn’t stop sneaking bites before dinner! If you want a sweet treat that’s quick, fuss-free, and utterly delicious, give this recipe a try. I promise, once you do, it’ll become one of your go-to favorites, just like it did for me.
Print
No Bake S’mores Bars Recipe
- Prep Time: 15 minutes
- Cook Time: 0 minutes
- Total Time: 2 hours 15 minutes
- Yield: 25 squares
- Category: Dessert
- Method: No-Cook
- Cuisine: American
Description
Delicious and easy No Bake S’mores Bars that combine gooey marshmallows, crispy Golden Grahams cereal, and melted chocolate into a perfect treat that requires no oven time. Ideal for a quick dessert or snack, these bars are set in the fridge and offer all the classic campfire s’mores flavors in a convenient bar form.
Ingredients
Ingredients
- 1 12 ounce bag chocolate chips, semi-sweet or milk
- 1 tablespoon Crisco shortening or vegetable oil
- 2 cups mini marshmallows
- 2 cups Golden Grahams cereal
Instructions
- Prepare the pan: Line an 8×8 inch pan with foil and spray it with cooking spray to ensure easy removal of the bars later.
- Melt the chocolate: Place the chocolate chips and shortening or vegetable oil in a large microwave-safe bowl. Heat in 30-second increments, stirring after each, until the chocolate mixture is fully melted and smooth, about 1 to 2 minutes total in an 1100W microwave.
- Mix the ingredients: Stir the Golden Grahams cereal and mini marshmallows into the melted chocolate mixture thoroughly to evenly coat all pieces.
- Set the bars: Pour the mixture into the prepared pan and press down firmly to compact the bars; this step can be a bit messy but is important for shaping.
- Chill and serve: Refrigerate the pan until set, about 2 hours. Once firm, slice into squares and serve. For best texture, allow the bars to sit at room temperature for a few minutes before eating. Store leftovers in an airtight container in the fridge for up to one week.
Notes
- Use foil and cooking spray for easy removal from the pan.
- Melting the chocolate gradually prevents burning or seizing.
- The bars are best stored refrigerated and enjoyed after a few minutes at room temperature.
- Pressing firmly helps the bars hold together without falling apart.
- These bars melt easily like candy, so handle with care in warm conditions.
Nutrition
- Serving Size: 1 square
- Calories: 120
- Sugar: 11g
- Sodium: 45mg
- Fat: 6g
- Saturated Fat: 4g
- Unsaturated Fat: 2g
- Trans Fat: 0g
- Carbohydrates: 16g
- Fiber: 1g
- Protein: 1g
- Cholesterol: 0mg


