
If you’re on the hunt for a snack that’s both delicious and easy to whip up, I’m excited to share my all-time favorite No Bake Peanut Butter Granola Bars Recipe. This recipe is super quick to make, requires no oven, and delivers chewy, peanut buttery bars that my family just can’t get enough of. Plus, it’s customizable and perfect for breakfast, a midday treat, or whenever you need a little energy boost. Stick around—I’ll walk you through everything so you can nail it the first time!
Why You’ll Love This Recipe
- No Oven Needed: You get chewy granola bars that come together effortlessly without turning on the oven or heating up your kitchen.
- Simple Ingredients: Using pantry staples means you can make these granola bars anytime you’re craving something homemade and wholesome.
- Customizable Add-Ins: Whether you love chocolate chips, peanut butter chips, or shredded coconut, you can tweak this recipe to fit your cravings.
- Kid-Approved: These bars are a family favorite and freeze well for quick lunches or after-school snacks.

Ingredients You’ll Need
I love how these simple ingredients come together to create a perfect balance of creamy, chewy, and just a hint of sweet. Choosing good quality peanut butter and honey really makes a difference here, and the old-fashioned oats lend a satisfying texture that holds everything nicely. Here’s what you’ll want to have ready before you start:

- Peanut butter: I usually go for creamy because it blends smoothly, but if you prefer a bit of crunch, chunky peanut butter works great too.
- Honey: Look for raw or pure honey for natural sweetness without overpowering the peanut flavor.
- Old fashioned rolled oats: This is essential for that authentic granola bar chew — instant oats are too fine and won’t give you the same texture.
- Shredded coconut: Adds a subtle tropical flair and a little extra texture; unsweetened works best if you want to control the sugar.
- Mini chocolate chips: A touch of chocolate is pure magic. I sometimes mix in peanut butter chips or swap for dried cranberries to switch things up.
- Melted chocolate: Totally optional but highly recommended if you want a pretty finishing touch that tastes fantastic.
Variations
I love how flexible this No Bake Peanut Butter Granola Bars Recipe is—you can make it your own depending on what you have or your dietary needs. I often play with different mix-ins and flavors, so don’t be afraid to get creative!
- Nut-Free Variation: Replace peanut butter with sunflower seed butter to accommodate allergies; it still tastes rich and creamy.
- Extra Crunch: Add chopped nuts like almonds or walnuts for a satisfying crunch, especially if you like chunky texture.
- Flavor Twists: Swap shredded coconut for dried fruit like cherries or raisins to introduce a fruity pop.
- Vegan Version: Use maple syrup instead of honey, and make sure your chocolate chips are dairy-free to keep it fully vegan.
How to Make No Bake Peanut Butter Granola Bars Recipe
Step 1: Melt Peanut Butter and Honey Together
Start by placing your peanut butter and honey in a microwave-safe bowl. Heat in 20-second bursts, stirring in between, until the peanut butter is completely melted and the mixture is smooth. I find this gentle heating prevents overheating and keeps the peanut butter creamy, which helps everything bind together perfectly later on.
Step 2: Mix in Dry Ingredients
Once your peanut butter and honey mix is ready, add in the rolled oats and shredded coconut. Stir with a sturdy spoon or spatula until all the oats are well coated and the mixture looks thick and sticky. This is the fun part—it starts to come together like a no-bake dough.
Step 3: Fold in Chocolate Chips
Gently fold in your mini chocolate chips (and mini peanut butter chips if you have them) so they’re evenly distributed. If you try to mix too vigorously, the chocolate chips can break or start melting, so take it easy here.
Step 4: Press Mixture into Pan
Line an 8×8 inch square pan with wax paper, letting some hang over the edges for easy removal later. Dump the mixture into the pan, then firmly press it down using your hands or the flat base of a measuring cup. The tighter and more even you pack it, the better your bars will hold together when sliced.
Step 5: Refrigerate Until Firm
Cover the pan with plastic wrap or foil and refrigerate overnight—or at least for a few hours—until the bars are set and firm. I used to rush this step, but letting it chill properly makes cutting the bars so much easier without crumbling.
Step 6: Cut Bars and Optional Chocolate Drizzle
Once chilled, lift the bars out using the wax paper edges and transfer to a cutting board. Use a sharp knife to slice them into squares or rectangles. If you want to be extra indulgent, melt some chocolate and drizzle it over the top. Let the drizzle set before serving.
Pro Tips for Making No Bake Peanut Butter Granola Bars Recipe
- Use Fresh Ingredients: Always go for fresh oats and good-quality peanut butter for the best texture and flavor.
- Press Firmly: Pressing the mixture tightly into the pan helps the bars hold together without crumbling when cut.
- Gentle Microwave Heating: Heat in short increments to avoid burning the peanut butter or honey.
- Sharp Knife for Slicing: To get clean bars, wipe your knife between cuts and use a gentle sawing motion.
How to Serve No Bake Peanut Butter Granola Bars Recipe

Garnishes
I love adding a quick drizzle of melted dark chocolate on top—it makes these bars look so inviting and adds that extra hit of rich flavor. Sometimes I sprinkle a pinch of flaky sea salt over the drizzle to bring out all the sweetness and deepen the peanut butter notes.
Side Dishes
This recipe pairs beautifully with a glass of cold milk or a warm cup of coffee for breakfast. I also like serving these bars alongside fresh fruit like apple slices or a small bowl of yogurt for a more balanced snack.
Creative Ways to Present
For parties or kids’ lunchboxes, I sometimes wrap individual bars in parchment paper tied with cute twine—it makes them feel a little extra special. You can also line a gift box with wax paper and add colorful sprinkles or mini edible flowers on top if you’re gifting homemade snacks.
Make Ahead and Storage
Storing Leftovers
I keep leftover granola bars in an airtight container in the fridge. They stay chewy and fresh for up to a week, making them a convenient grab-and-go snack during busy mornings.
Freezing
If I’m prepping ahead for the week, I freeze a batch. I slice the bars before freezing, individually wrap them in plastic wrap, and pop them in a freezer bag. They thaw quickly at room temperature and taste just as good as fresh.
Reheating
These bars don’t really need reheating, but if you want that fresh-out-of-the-oven feel, a 10-second zap in the microwave softens the bars without melting the chocolate chips. Just watch closely!
FAQs
-
Can I use natural peanut butter in this No Bake Peanut Butter Granola Bars Recipe?
Yes, you can use natural peanut butter, but keep in mind it tends to be thinner and oilier. You might need to stir it thoroughly before melting, and the bars might be slightly less firm — pressing the mixture firmly and chilling well helps with that.
-
Are these granola bars gluten free?
Absolutely! Just make sure to use certified gluten-free oats if you’re sensitive, as some oats are processed in facilities that handle gluten.
-
How long do these No Bake Peanut Butter Granola Bars last?
Stored in an airtight container in the fridge, they stay fresh for up to a week. If you freeze them, they’ll keep well for up to 3 months.
-
Can I add other ingredients like nuts or dried fruit?
Definitely! This recipe is a great base for customizing. Add chopped nuts, dried fruit, seeds, or even protein powder to make the bars your own.
Final Thoughts
This No Bake Peanut Butter Granola Bars Recipe has become a go-to in my kitchen whenever I need a quick snack that’s both satisfying and wholesome. What I love most is how easy it is to make, how flexible it is for different tastes, and how well these bars keep you fueled throughout the day. I hope you enjoy making and eating these as much as my family and I do—once you try them, I bet they’ll become your new favorite snack, too!
Print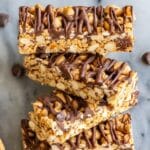
No Bake Peanut Butter Granola Bars Recipe
- Prep Time: 10 min
- Cook Time: 0 min
- Total Time: 2 hr 10 min
- Yield: 10 bars
- Category: Snack
- Method: No-Cook
- Cuisine: American
- Diet: Gluten Free
Description
These Easy Homemade Granola Bars are a delicious, no-bake treat combining creamy peanut butter, honey, oats, shredded coconut, and mini chocolate chips. Perfect for a quick snack or breakfast on the go, these chewy and gluten-free bars require minimal ingredients and effort, making them an ideal healthy snack option.
Ingredients
Base
- 1 cup Peanut butter (creamy preferred, chunky optional)
- 1/2 cup Honey
- 2 1/2 cups Old fashioned rolled oats
- 1/4 cup Shredded coconut
Add-ins
- 1/3 cup Mini chocolate chips (or any preferred add-ins)
Optional
- 1/4 cup Melted chocolate (for drizzling)
Instructions
- Melt Ingredients: In a microwave-safe mixing bowl, combine the peanut butter and honey. Heat in the microwave in 20-second increments until the peanut butter is fully melted. Stir the mixture thoroughly until smooth and well combined.
- Combine Dry Ingredients: Add the old fashioned rolled oats and shredded coconut to the peanut butter and honey mixture. Mix vigorously until all the oats and coconut are evenly coated and incorporated.
- Add Chocolate Chips: Stir in the mini chocolate chips (or alternate add-ins) evenly throughout the mixture to distribute the chocolate flavor in every bite.
- Prepare Pan and Flatten Mixture: Line an 8×8 inch square pan with wax paper. Transfer the granola mixture into the pan and use your hands or the flat base of a measuring cup to press down the mixture firmly and evenly, ensuring it is tightly packed.
- Chill Mixture: Cover the pan with saran wrap or foil paper and refrigerate for several hours or overnight until the granola mixture is firm enough to cut into bars.
- Cut Bars: Remove chilled mixture from the pan using the wax paper and slice into approximately 10 bars with a sharp knife for clean edges.
- Optional Chocolate Drizzle: If desired, drizzle the bars with melted chocolate and allow it to set and harden before serving.
- Serve and Enjoy: Once set, enjoy your homemade granola bars as a nutritious snack or breakfast option.
Notes
- Quick and easy no-bake recipe requiring minimal ingredients and prep time.
- Gluten free when using certified gluten-free oats.
- Customize bars by swapping mini chocolate chips with other nuts, seeds, or dried fruit.
- Store bars in an airtight container in the refrigerator for up to one week.
- Perfect as a portable snack or a grab-and-go breakfast option.
Nutrition
- Serving Size: 1 bar
- Calories: 343 kcal
- Sugar: 23 g
- Sodium: 130 mg
- Fat: 18 g
- Saturated Fat: 5 g
- Unsaturated Fat: 13 g
- Trans Fat: 0 g
- Carbohydrates: 40 g
- Fiber: 4 g
- Protein: 9 g
- Cholesterol: 0 mg


