If you’re a chocolate lover and craving something show-stopping but fuss-free, you’re going to adore this No-Bake KitKat Cheesecake Recipe. I absolutely love how it brings together buttery digestives, creamy cheesecake, and ALL the chocolatey goodness of KitKats — no oven required! Stick with me, and I’ll walk you through every step so you end up with a dessert that feels like a celebration in every bite.
Why You’ll Love This Recipe
- No Oven Needed: Perfect for hot days or when you don’t want to heat up the kitchen.
- Crunchy Meets Creamy: The biscuit base and KitKat shell add delightful texture contrasts to the silky cheesecake layer.
- Chocolate Lover’s Dream: Uses both milk and dark chocolate plus a luscious ganache topping that’s rich but never overwhelming.
- Impress Without Stress: Easy enough for busy days but fancy enough to wow guests and family alike.

Ingredients You’ll Need
Each ingredient here plays a role in creating layers of texture and flavor that will make this cheesecake unforgettable. Plus, I’ll share a few tips to make shopping or substitutions a breeze!
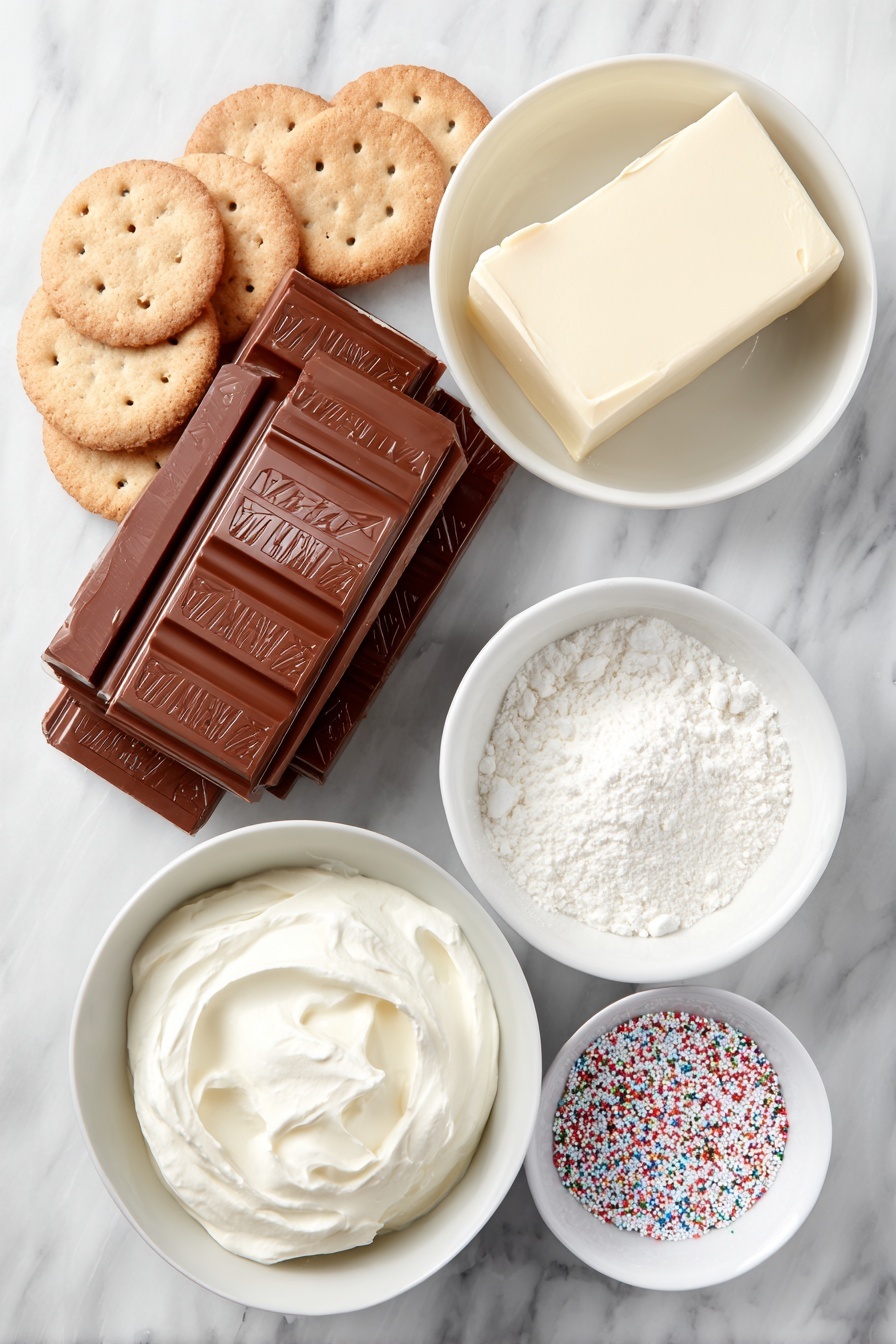
- KitKats: You’ll need 18.5 bars—yes, half a KitKat! Using mostly doubles and one single makes handling easier for that iconic chocolate logo shell.
- Digestives: These biscuits form the perfect crunchy base with just the right amount of bite.
- Unsalted butter: Melting this binds the biscuit base beautifully—unsalted lets you control the saltiness.
- Milk chocolate and dark chocolate: Both add depth to the cheesecake and ganache toppings; don’t skimp on quality for a richer flavor.
- Full-fat cream cheese: Bring to room temp before mixing—this helps avoid lumps and makes blending silky smooth.
- Icing sugar: Sweetens without grainy texture—trust me, it makes all the difference in desserts like this.
- Double cream: Divided into two portions—one for the cheesecake’s fluffiness and the other for that silky ganache topping.
- KitKat Bites and sprinkles: For decorating and that extra fun crunch when serving.
Variations
I love experimenting with this No-Bake KitKat Cheesecake Recipe — sometimes I swap in different chocolate bars or add nuts for crunch. Feel free to make it your own and get creative!
- Peanut Butter Twist: I once added a swirl of peanut butter into the cheesecake filling for my husband’s birthday—it was a total crowd-pleaser.
- Fruit Flair: Swap sprinkles for fresh berries on top to balance the richness with a burst of freshness.
- Vegan Version: Use dairy-free cream cheese and coconut cream, and check KitKat alternatives to keep it plant-based.
- Nutty Crunch: Toss in chopped toasted hazelnuts or almonds for an added texture that pairs beautifully with the KitKat shell.
How to Make No-Bake KitKat Cheesecake Recipe
Step 1: Create the Perfect Biscuit Base
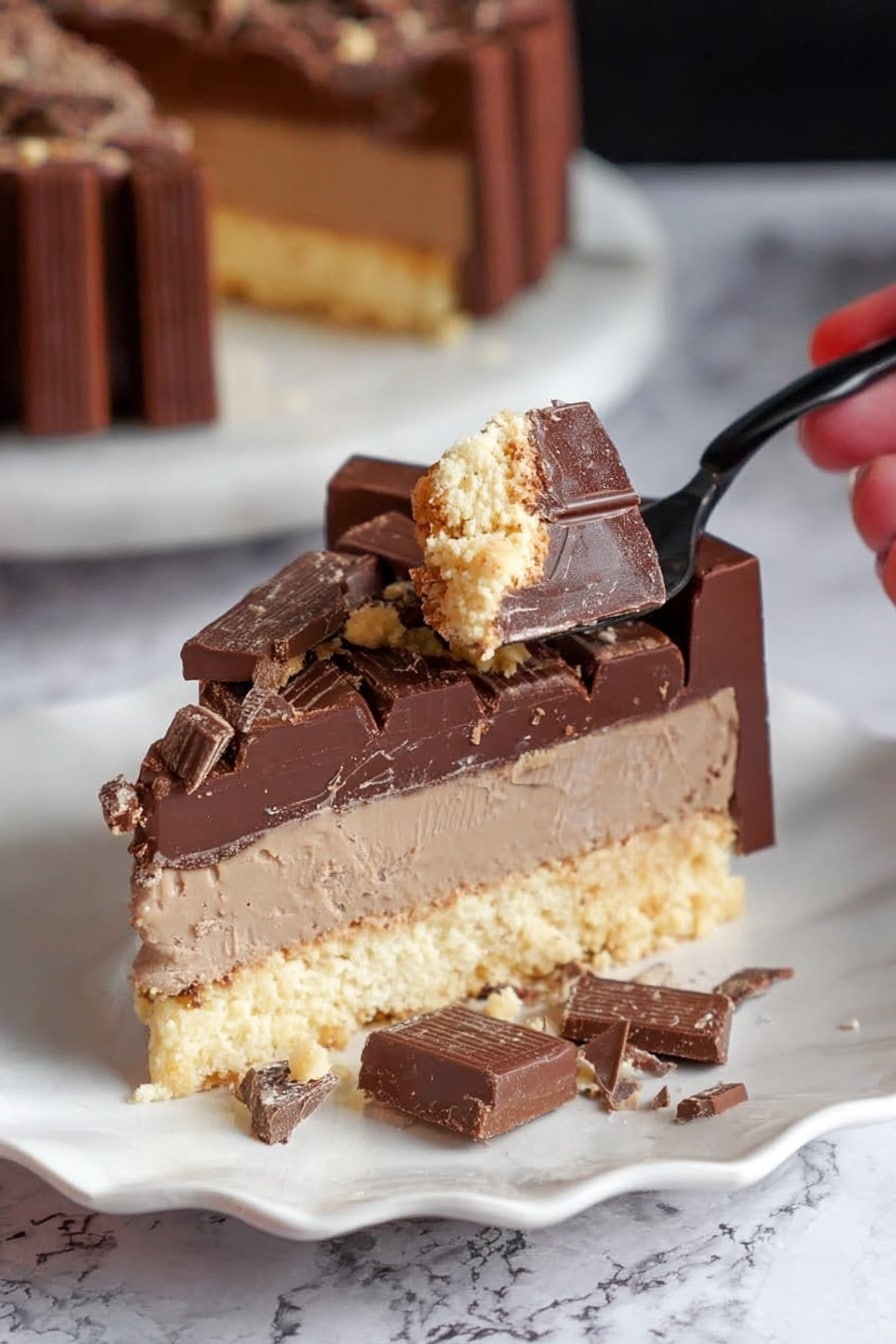
Start by crushing the digestives until they resemble fine crumbs — I use a food processor, but you can also pop them in a sealed bag and crush with a rolling pin. Then, melt your unsalted butter and stir it into the crumbs until everything looks evenly moistened. Press this mixture into the base of a springform tin using a flat-bottomed glass or the back of a spoon. Don’t rush! Firm pressure here ensures a sturdy base that won’t crumble when you slice.
Step 2: Whip Up That Luscious Cheesecake Filling
In a bowl, beat the full-fat cream cheese with icing sugar until smooth and creamy. Separately, whip 300 ml of double cream until it holds soft peaks. Gently fold the whipped cream into the cream cheese mixture—this lightens the batter, making your cheesecake fluffy and dreamy. Next, melt your milk and dark chocolate together over a bain-marie or carefully in the microwave, stirring frequently to avoid burning. Allow the chocolate to cool slightly, then fold it into the cheesecake mix slowly. Patience here pays off with a smooth, luxuriously chocolatey filling.
Step 3: Assemble and Chill
Pour the cheesecake filling over your biscuit base and smooth the top with a spatula. Pop it into the fridge for at least 4 hours, though I prefer overnight. This waiting game is key—it lets everything set beautifully so when you slice in, the cheesecake holds its shape with that satisfying cream-chewy texture we all crave.
Step 4: Prepare the Ganache & KitKat Shell
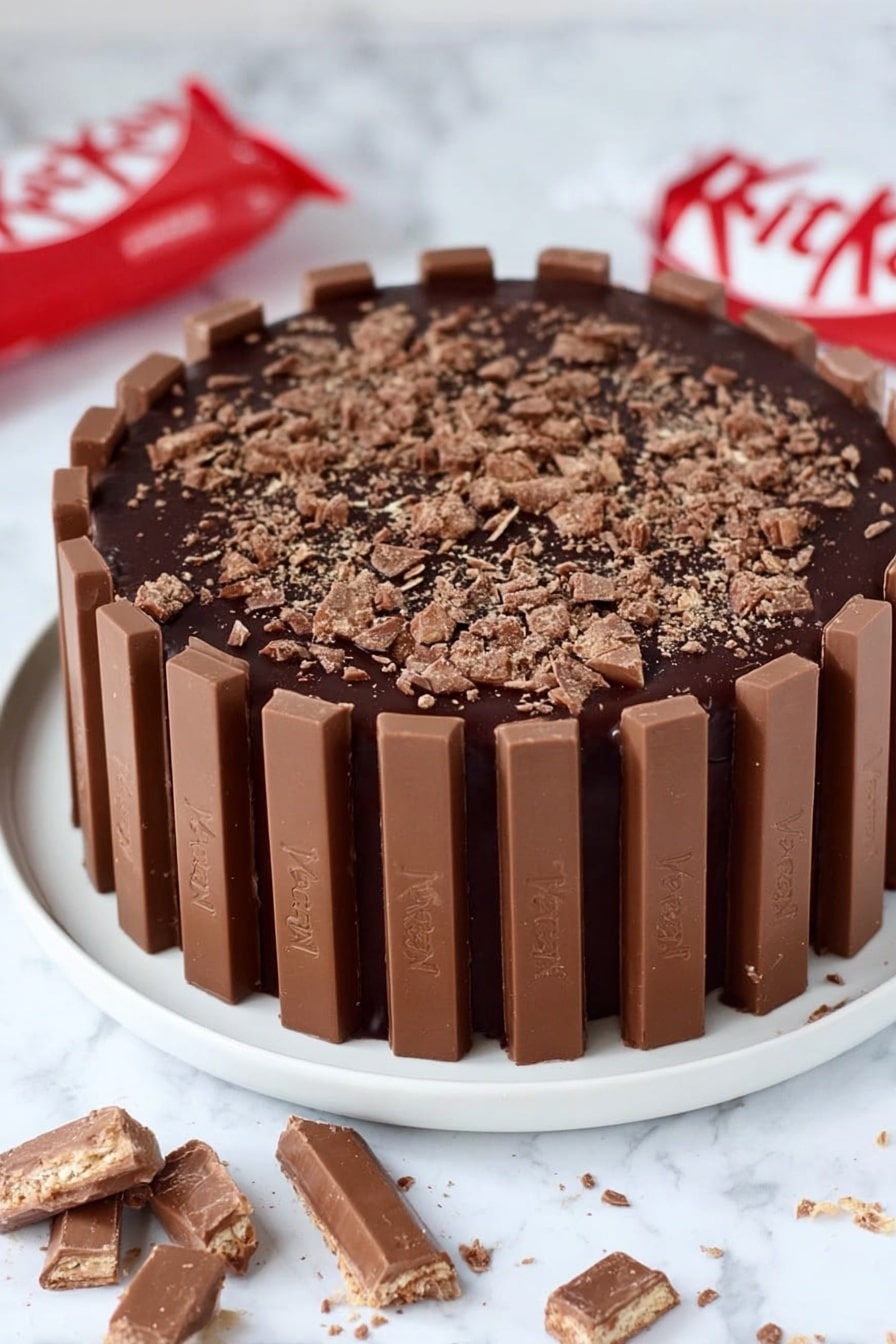
While your cheesecake chills, warm 150 ml double cream in a saucepan just until it simmers. Pour over 150 g chopped dark chocolate and let it sit for a minute before stirring into a glossy ganache. Once your cheesecake is set, pour this ganache over the top and spread evenly. Then, it’s time for the fun part: carefully lining the sides of the springform tin with your KitKats, upright and snug, forming a chocolatey fence. The final touch? Sprinkle the top with KitKat bites and colorful sprinkles for that extra wow factor.
Pro Tips for Making No-Bake KitKat Cheesecake Recipe
- Room Temperature Cream Cheese: Cold cream cheese can cause lumps, so I always leave it out for about 30 minutes before mixing.
- Press Your Base Firmly: Using something flat to press the biscuit base makes slicing easier and helps the cheesecake hold together.
- Don’t Overheat Chocolate: Melt slowly with gentle heat or use the microwave in short bursts, stirring often to prevent seizing.
- Chill Time is Everything: Trust me, skipping or shortening this step means a softer, messier slice—plan ahead for best results!
How to Serve No-Bake KitKat Cheesecake Recipe
Garnishes
I love topping this cheesecake with extra KitKat bites and a sprinkle of rainbow sprinkles to bring a playful, festive vibe. Sometimes I add a few dollops of whipped cream or fresh raspberries to cut through the rich chocolate, which my family always appreciates.
Side Dishes
This cheesecake pairs wonderfully with a fresh fruit salad or a scoop of vanilla bean ice cream if you want to add some cold creaminess contrast. For an afternoon treat, I often serve it with a cup of strong coffee or espresso—the bitterness balances the sweet richness perfectly.
Creative Ways to Present
For birthdays or special occasions, I’ve shaped this cheesecake in smaller silicone molds to create cute individual portions, then decorated each with mini KitKat bars and edible gold dust. It’s always a showstopper at parties and makes everyone feel extra special!
Make Ahead and Storage
Storing Leftovers
I keep leftover cheesecake in an airtight container in the fridge, where it stays fresh for up to 3 days. Make sure to cover it well so the chocolate ganache and biscuits don’t dry out or absorb fridge odors.
Freezing
I’ve frozen this cheesecake successfully by wrapping it tightly in cling film and aluminum foil. When I thaw it overnight in the fridge, the texture holds up surprisingly well, though the biscuit base softens slightly. Great to prep in advance for parties!
Reheating
This cheesecake is best enjoyed cold, so I don’t recommend reheating. If it’s too firm from the fridge, let slices sit at room temperature for about 10 minutes before serving—this softens the ganache and cream cheese filling beautifully.
FAQs
-
Can I use other chocolate bars instead of KitKats?
Absolutely! While KitKats give that iconic crunchy wafer shell, you can experiment with other chocolate bars like Twix, Kinder Bueno, or even simple chocolate fingers. Just keep in mind the texture and thickness so your cheesecake sides hold well.
-
How long should I chill the cheesecake?
The cheesecake sets best after chilling for at least 4 hours, but overnight is ideal. This gives the filling time to firm up and the flavors to meld nicely, making slicing much easier.
-
Can I make this in advance for a party?
Yes! This no-bake cheesecake is perfect for advance prep. Make it up to 2 days ahead, keep it covered in the fridge, and top with fresh KitKat bites or sprinkles right before serving to keep everything looking fresh.
-
Is it okay to substitute full-fat cream cheese with a lighter version?
While you can, I recommend full-fat for creaminess and taste. Lighter versions might affect texture and flavor, making the cheesecake less rich and possibly a bit runnier.
-
What’s the best way to cut the cheesecake into neat slices?
Use a sharp knife warmed in hot water, then wiped dry before each slice. This prevents sticking and helps you get clean, smooth cuts through the ganache and KitKat edges.
Final Thoughts
Honestly, this No-Bake KitKat Cheesecake Recipe brings me so much joy—it’s easy, fun, and impressively delicious every single time. I love making it on weekends when I want a treat without the oven heat, and it’s become a favorite with my family’s sweet tooth. Give it a try—I promise you’ll be smiling ear to ear when you get that first perfect slice loaded with crunchy KitKat goodness and luscious chocolate cheesecake. Can’t wait to hear how yours turns out!
Print
No-Bake KitKat Cheesecake Recipe
- Prep Time: 20 min
- Cook Time: 10 min
- Total Time: 50 min
- Yield: 15 servings (15 slices)
- Category: Dessert
- Method: No-Cook
- Cuisine: British
Description
Delight in this indulgent No-Bake KitKat Cheesecake featuring a crunchy biscuit base, creamy chocolate-infused cheesecake filling, rich ganache topping, and a crunchy KitKat shell. Perfect for chocolate lovers seeking an easy yet impressive dessert without any baking.
Ingredients
Biscuit Base
- 18.5 KitKats (18 doubles, one single)
- 300 g digestives
- 150 g unsalted butter
Cheesecake Filling
- 125 g milk chocolate
- 125 g dark chocolate
- 500 g full-fat cream cheese (room temperature)
- 75 g icing sugar
- 300 ml double cream
Ganache Topping
- 150 ml double cream
- 150 g dark chocolate
Decoration
- KitKat Bites / KitKats
- Sprinkles
Instructions
- Prepare the Biscuit Base: Crush the digestives into fine crumbs and melt the unsalted butter. Mix the crumbs and melted butter thoroughly, then press this mixture evenly into the base of a springform cake tin to form a firm base. Chill in the fridge to set.
- Melt the Chocolates: Gently melt the milk and dark chocolate together, either in a heatproof bowl over simmering water or in short bursts in the microwave, stirring frequently to avoid burning.
- Make the Cheesecake Filling: In a large bowl, beat the full-fat cream cheese until smooth. Gradually add the icing sugar and continue mixing until well combined. Pour in the melted chocolate, stirring until incorporated. Whip the 300 ml double cream until it forms soft peaks, then fold it gently into the cream cheese mixture to maintain airiness.
- Assemble the Cheesecake: Pour the chocolate cheesecake filling over the chilled biscuit base, smoothing the surface with a spatula. Refrigerate the cheesecake to set firmly, ideally for several hours or overnight.
- Prepare the Ganache Topping: Heat the 150 ml double cream until just boiling, then pour it over the 150 g dark chocolate. Let it sit for a minute before stirring until smooth and glossy. Pour the ganache evenly over the set cheesecake layer.
- Decorate: Arrange KitKat Bites or KitKats around the edge of the cheesecake to form a chocolate shell. Finish by sprinkling colorful sprinkles on top for a festive finish. Chill again briefly to allow the ganache to set before serving.
Notes
- This no-bake cheesecake requires chilling time to set properly; plan in advance.
- Use room temperature cream cheese for a smooth filling without lumps.
- Handle chocolates gently while melting to avoid burning or seizing.
- Refrigerate leftovers and consume within 3-4 days for best freshness.
- Customize decoration with your favorite toppings or omit sprinkles for a simpler look.
Nutrition
- Serving Size: 1 serving
- Calories: 552 kcal
- Sugar: 22 g
- Sodium: 220 mg
- Fat: 44 g
- Saturated Fat: 25 g
- Unsaturated Fat: 16 g
- Trans Fat: 0.5 g
- Carbohydrates: 37 g
- Fiber: 3 g
- Protein: 6 g
- Cholesterol: 100 mg


