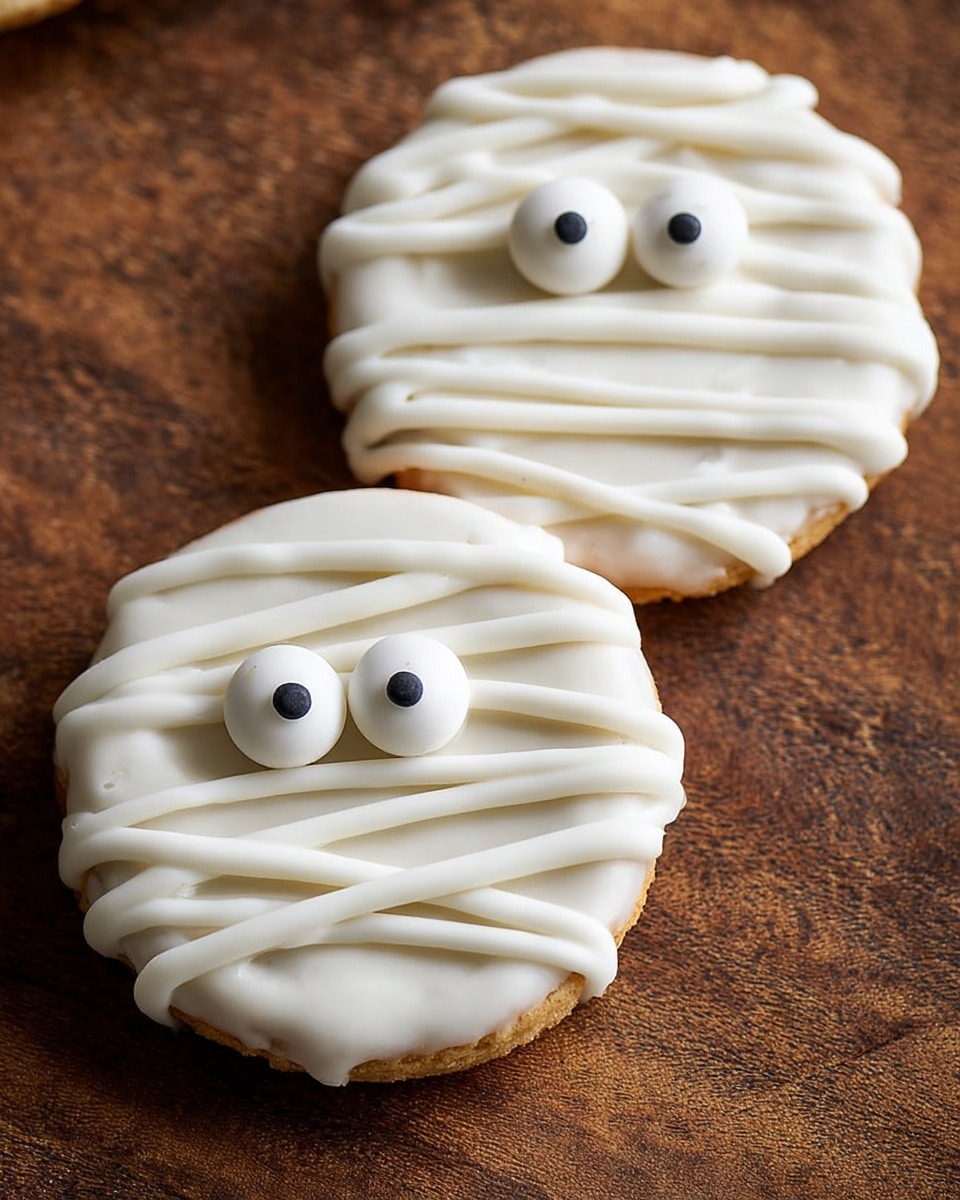
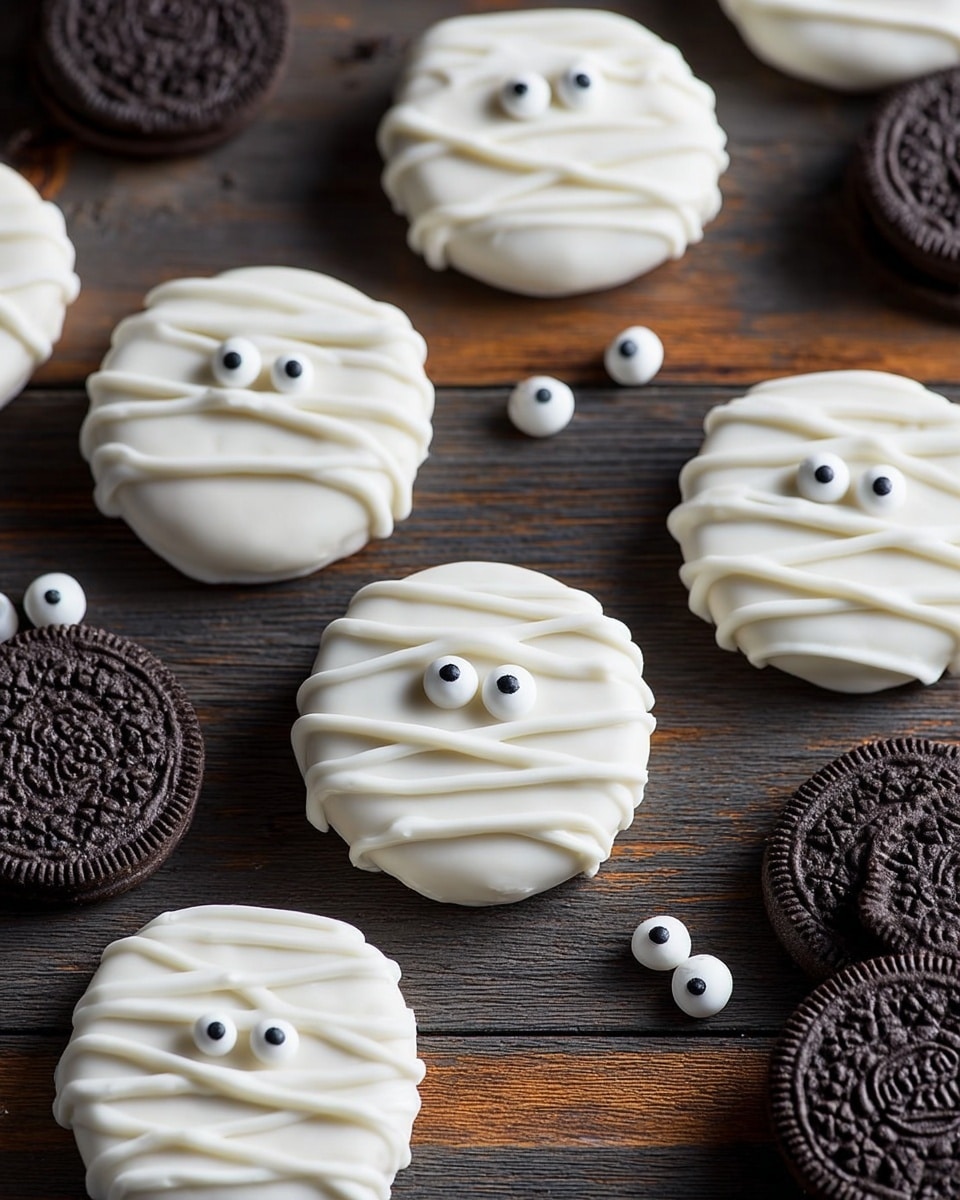
If you’re looking for a super fun, spooky treat that’s as easy as it is adorable, you’re going to fall head over heels for this Mummy Oreos Recipe. I absolutely love how these little mummies turn out — you get that creamy white chocolate coating, the classic Oreo crunch, and those irresistibly cute candy eyes that make snack time delightfully festive. Plus, it’s a recipe you’ll want to pull out every Halloween or anytime you need a quick, kid-friendly project that tastes amazing.
Why You’ll Love This Recipe
- No Baking Required: You’ll whip these up in under half an hour, perfect for last-minute Halloween fun.
- Kid-Friendly & Fun: My kids adore helping place the candy eyes and drizzle the chocolate mummy wrapping.
- Perfect Party Treat: These mummies always disappear quickly at school parties or casual get-togethers.
- Customizable & Simple: You can easily swap out candy eyes or adjust the drizzle to personalize every mummy Oreo.
Ingredients You’ll Need
Before you dive in, I want you to know the ingredients here are simple but magical in how they come together. The white chocolate gives that “bandage” effect perfectly, and the coconut oil helps with a smooth, shiny finish on your mummies.
- White chocolate chips: Choose good quality for a silky melt and the perfect color contrast against the Oreos.
- Coconut oil: This thins out your melted chocolate, making coating the cookies so much easier and less messy.
- Oreo cookies: The classic original works best, but feel free to swap for double stuff if you like extra creme.
- Candy eyes: These bring the mummies to life – grab the size that fits your Oreos best for the cutest look!
Variations
I love playing around with this mummy Oreo idea—it’s so versatile! You can tweak candy eyes or even try different chocolate coatings if white chocolate isn’t your thing. Don’t hesitate to get creative; personalization makes the process more fun and your mummies more memorable.
- Dark chocolate coating: I once swapped white chocolate for dark chocolate and added mini red candy eyes for a vampire mummy twist — spooky and delicious!
- Peanut butter drizzle: If you want an extra layer of flavor, try drizzling melted peanut butter instead of extra white chocolate for a salty-sweet combo.
- Dairy-free option: Use dairy-free white chocolate and coconut oil for an allergy-friendly version that still melts beautifully.
How to Make Mummy Oreos Recipe
Step 1: Melt the White Chocolate to Perfection
Start by putting your white chocolate chips and coconut oil into a microwave-safe bowl. Microwave at half power for one minute and then stir well. You’ll probably still see lumps—that’s totally normal! Keep microwaving at 30-second bursts, stirring each time until your chocolate is silky smooth. I discovered that being patient here really pays off — rushing it can cause the chocolate to seize, and that’s a headache you don’t want!
Step 2: Coat Each Oreo Like a Pro
Drop each Oreo one at a time into the melted white chocolate. Use a fork to flip the cookie over, fully coating it on all sides. After scooping it out, tap the fork on the edge of your bowl a few times to drip the excess chocolate back before placing the Oreo on parchment paper. This little trick keeps your workspace a lot cleaner!
Step 3: Add the Cute Candy Eyes
While the coating is still wet, gently press two candy eyes close together at the top of each cookie. This is where your mummy gets personality, so take your time positioning those eyes just right. If they don’t stick at first, a tiny dab of extra melted chocolate can act like glue.
Step 4: Create Your Mummy Wrapping Drizzle
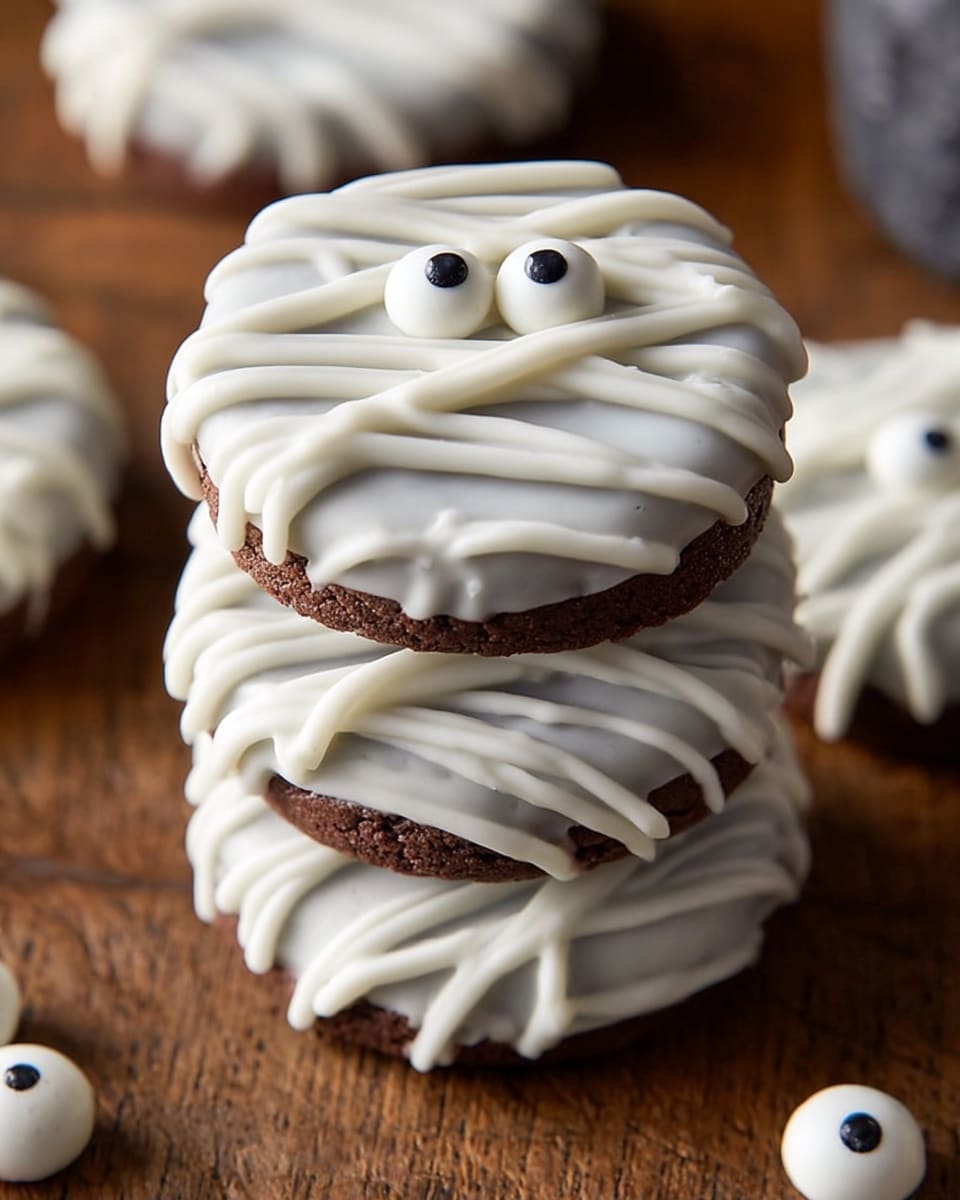
Once your mummies have set for a bit, scoop remaining melted chocolate into a small ziplock bag. Snip off a tiny corner and drizzle over the Oreos in thin lines to mimic mummy bandages. This part is super fun and lets you get creative with the lines—wavy, overlapping, or neat, it all looks great!
Pro Tips for Making Mummy Oreos Recipe
- Perfect Chocolate Melt: Always heat chocolate gently at half power to avoid burning or seizing, stirring often.
- Clean Parchment Paper: Fresh parchment paper beneath your Oreos prevents sticking and keeps your treats pristine.
- Eye Placement Hack: Use tweezers for precise candy eye placement if you’re not confident doing it by hand.
- Drizzle Control: Snip a very small hole in your piping bag to create fine, mummy-like chocolate bands without mess.
How to Serve Mummy Oreos Recipe
Garnishes
I usually keep it simple with these mummies because they’re already pretty eye-catching! Sometimes I sprinkle a tiny bit of edible glitter or Halloween-themed sprinkles around for a bit of extra flair, but those candy eyes are really the showstoppers.
Side Dishes
Pair Mummy Oreos with a tall glass of cold milk or a warm cup of hot cocoa for a comforting snack. They also work great alongside some pumpkin-flavored treats or simple popcorn at parties.
Creative Ways to Present
For Halloween get-togethers, I love arranging these Mummy Oreos on a decorated platter with fake spider webs and mini pumpkins. Once, I even used cupcake liners to separate each mummy and created a mummy “graveyard” display — it got rave reviews and tons of oohs and aahs!
Make Ahead and Storage
Storing Leftovers
Leftover Mummy Oreos keep best stored in an airtight container at room temperature or in a cool spot. I’ve found they stay fresh and tasty for up to a week—if you don’t eat them all in one sitting, that is!
Freezing
If you want to make these ahead of Halloween, you can freeze them on a baking sheet, then transfer to a freezer bag. When you’re ready, just thaw them at room temp. I recommend not freezing too long though, as the candy eyes can sometimes lose their charm.
Reheating
There’s no need to heat these little mummies—serve them straight out or bring to room temperature if frozen. Heating can melt your chocolate and ruin the crisp Oreo texture.
FAQs
-
Can I use other chocolate besides white chocolate for this Mummy Oreos Recipe?
Absolutely! While white chocolate gives the classic mummy bandage look, you can use milk or dark chocolate if you prefer. Just keep in mind it changes the final ‘mummy’ appearance but still tastes delicious.
-
What’s the best way to store Mummy Oreos?
Store them in an airtight container at room temperature, away from heat and humidity. They usually keep well for up to a week, making them perfect for prepping early.
-
Is this recipe kid-friendly?
Definitely! Kids love getting involved, especially with placing the candy eyes and drizzling the chocolate. Just make sure an adult handles the melting chocolate part for safety.
-
Can I prepare these without a microwave?
Yes! You can melt the white chocolate and coconut oil in a heatproof bowl over a pot of simmering water (double boiler method), stirring until smooth.
-
What if my chocolate seizes?
Don’t panic! Try stirring in a little more coconut oil or a few drops of vegetable oil to bring it back to a smooth consistency. Next time, melt more slowly at lower power.
Final Thoughts
This Mummy Oreos Recipe really holds a special place in my heart because it’s not just a treat—it’s a mini celebration wrapped in chocolate and fun. I hope you enjoy making it as much as I do, whether you’re baking with kids, throwing a party, or just craving a spooky snack. Trust me, once you try this, it becomes your go-to Halloween DIY dessert. Go ahead, grab those Oreos and candy eyes, and have some fun turning a classic cookie into a cute little mummy masterpiece!
Print
Mummy Oreos Recipe
- Prep Time: 20 minutes
- Cook Time: 2 minutes
- Total Time: 22 minutes
- Yield: 12 Mummy Oreos
- Category: Dessert
- Method: No-Cook
- Cuisine: American
Description
Mummy Oreos are a fun and spooky treat perfect for Halloween or any festive occasion. These Oreo cookies are dipped in creamy white chocolate and decorated with candy eyes and drizzled chocolate to resemble cute little mummies, making them both delicious and visually appealing for parties and celebrations.
Ingredients
Chocolate Coating
- 2 cups white chocolate chips
- 1 tsp coconut oil
Cookies and Decoration
- 12 Oreo cookies
- 24 candy eyes
Instructions
- Prepare the white chocolate: Place the white chocolate chips and coconut oil in a small microwave-safe bowl. Microwave at half power for 1 minute, then stir thoroughly as much as possible to help the chocolate melt evenly.
- Continue melting: If the chocolate isn’t smooth yet, microwave in additional 30-second increments at half power, stirring after each, until the chocolate is completely melted and smooth.
- Dip the Oreos: Using a fork, drop one Oreo cookie at a time into the melted white chocolate. Flip the cookie to coat all sides evenly with the chocolate.
- Remove excess chocolate: Lift the Oreo out using the fork and gently tap the fork’s edge against the bowl to let excess chocolate drip back into the bowl.
- Place on parchment paper: Set the coated Oreo onto a piece of parchment paper, ensuring it doesn’t stick.
- Add candy eyes: Place two candy eyes close together on the chocolate-covered side of the Oreo to mimic mummy eyes.
- Let chocolate set: Allow the white chocolate coating to harden completely at room temperature or in the refrigerator if preferred.
- Decorate with chocolate drizzles: Transfer any remaining melted chocolate into a ziplock bag. Snip a small corner of the bag and drizzle the white chocolate over each Oreo in a crisscross pattern to resemble mummy wrappings.
- Final setting: Let the drizzle chocolate set fully before serving or storing.
Notes
- Use coconut oil to ensure the white chocolate melts smoothly and is easier to work with.
- Make sure the chocolate is completely set before adding the drizzle to create a defined mummy wrapping effect.
- If the chocolate hardens too quickly, gently re-melt it in the microwave in short intervals.
- For best results, store the finished Mummy Oreos in an airtight container at room temperature or in the fridge for up to one week.
- You can substitute candy eyes with edible googly eyes or white and dark chocolate dots if candy eyes are unavailable.
Nutrition
- Serving Size: 1 Oreo
- Calories: 150
- Sugar: 18g
- Sodium: 90mg
- Fat: 7g
- Saturated Fat: 5g
- Unsaturated Fat: 2g
- Trans Fat: 0g
- Carbohydrates: 22g
- Fiber: 1g
- Protein: 1g
- Cholesterol: 0mg

