
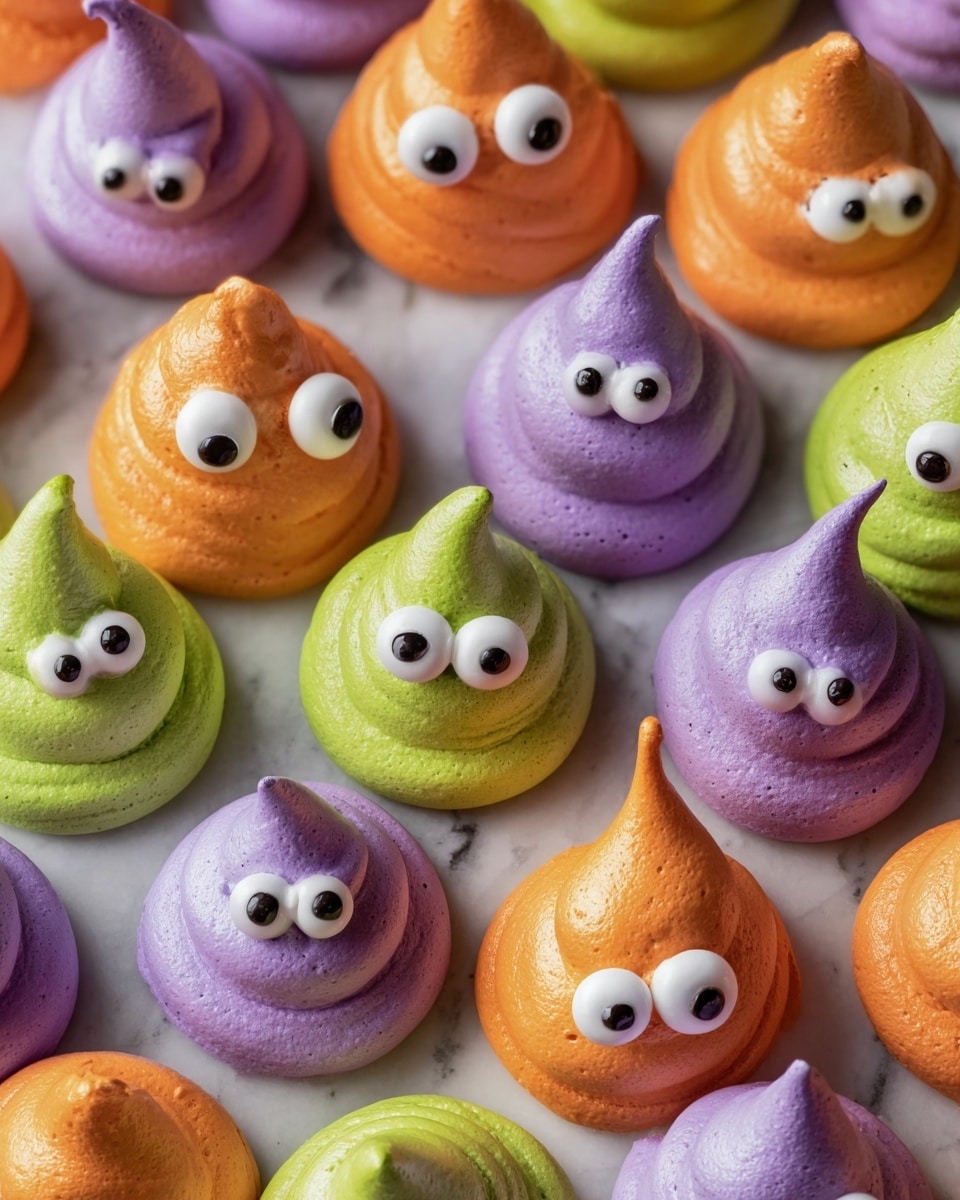
If you’re craving a sweet treat that’s as fun to make as it is to eat, you’ve come to the right place! This Monster Meringues Recipe is my absolute favorite way to impress friends and family with minimal fuss but maximum wow factor. I love these quirky, colorful meringues because they’re crunchy on the outside, chewy inside, and their playful “monster” look always brings a smile. Stick around, and I’ll walk you through everything you need to know to make these little clouds of happiness at home.
Why You’ll Love This Recipe
- Fun and Colorful: This recipe lets you get creative with bright gels and candy eyes to make each meringue one-of-a-kind.
- Simple Ingredients: Mostly egg whites and sugar, plus a few easy add-ins—perfect if your pantry is running low.
- Perfect Texture: Crunchy outside, chewy center—my family goes crazy over this delightful combo every time.
- Great for Gifting: These hold up well at room temp and are easy to package for parties or holiday gifts.

Ingredients You’ll Need
All you really need are quality egg whites and sugar to start, but a few extras make these meringues stand out. I recommend using gel food coloring because, trust me, liquid colors can mess with your meringue’s structure. Also, candy eyes bring these monsters to life—totally optional but highly recommended!
- Egg whites: Use room temperature egg whites for better volume and stability when whipping.
- Cream of tartar: Optional, but it helps stabilize the egg whites and makes whipping easier.
- Superfine caster or granulated sugar: Adding the sugar slowly is key to getting that glossy, stiff peak texture.
- Vanilla or almond extract: Just a little splash adds a subtle flavor boost without overpowering.
- Gel food coloring: Choose neon orange, purple, and green for that spooky monster vibe.
- Candy eyes: For decorating—adds so much personality to each meringue monster.
Variations
I love playing around with this Monster Meringues Recipe to match the season or occasion. Whether it’s a Halloween party or a colorful birthday treat, these meringues are a fun canvas. You can switch up colors, flavors, or even add edible glitter for some extra sparkle!
- Flavored Extracts: I once swapped vanilla for peppermint extract around Christmas, and it took these meringues to a whole new level of festivity.
- Natural Coloring: If you want to avoid artificial colors, beet juice powder or matcha can tint your meringues with a more subtle monster look.
- Chocolate Chip Eyes: Sometimes I use tiny chocolate chips instead of candy eyes for a different texture and flavor.
- Mini Monster Versions: Try piping smaller dollops for bite-sized treats your kids can nibble on at parties.
How to Make Monster Meringues Recipe
Step 1: Prep Your Tools and Oven
First things first, preheat your oven to a low 200°F (93°C) and line your baking sheet with parchment or a silicone mat. You’ll want to ensure your mixing bowl and whisk are completely grease-free—any oily residue will stop your meringue from whipping up properly. I discovered this trick after a few failed batches: a little vinegar on a paper towel cleans off any stubborn grease perfectly!
Step 2: Whip the Egg Whites to Soft Peaks
Pop your room-temp egg whites into the mixer and start whipping on medium speed until you see tiny bubbles forming on the surface. This usually takes a few minutes. Add cream of tartar if you’re using it—it helps stabilize the mixture. Keep whipping until the egg whites hold soft peaks that leave trails when you drag your whisk—this means you’re on the right track.
Step 3: Gradually Add Sugar and Beat to Stiff Peaks
This is the most critical part—adding the sugar slowly, about a tablespoon at a time, and beating well between additions. This slow process takes about 5 minutes but ensures your meringue is glossy, smooth, and stable. Once you’re almost at stiff peaks, add your vanilla or almond extract, then keep whipping until firm peaks form that hold their shape without drooping.
Step 4: Divide and Color Your Meringue
Scoop roughly a third of the meringue into a separate bowl and stir in your neon green gel color—mix gently so you don’t deflate the meringue. Pipe into a bag with a large round tip or cut a wide opening for thick dollops. Repeat with purple and orange colors. I love this part because you’re bringing your monsters to life with bright colors.
Step 5: Pipe and Bake Your Meringue Monsters
Pipe your colorful meringue dollops onto the prepared sheets, layering some for different heights and personalities. The fun part? They don’t spread while baking, so space them about an inch apart. Bake on the middle rack for 2 hours, then turn off the oven and leave the meringues inside to cool slowly for at least an hour—this avoids cracking and keeps them perfect.
Step 6: Cool and Decorate
Once fully cool, your meringues will have that signature crunchy shell with a chewy center. Now, use a dab of melted white chocolate to stick on candy eyes—this is where your monsters get their character! I usually add between one and three eyes per meringue for maximum fun. Store these beauties at room temperature in an airtight container for up to two weeks.
Pro Tips for Making Monster Meringues Recipe
- Egg Temperature Matters: I learned that separating eggs while cold but whipping at room temp makes the fluffiest meringue every time.
- Go Slow with Sugar: Gradual sugar addition is non-negotiable for stable stiff peaks that pipe beautifully.
- Medium-High Speed: Beating at medium-high instead of high helps create smaller air bubbles, making your meringues stronger and easier to shape.
- Cool Gradually: Never rush cooling; letting meringues cool with the oven off helps avoid cracks and keeps the centers perfectly chewy.
How to Serve Monster Meringues Recipe
Garnishes
I usually stick with classic candy eyes because they give such personality, but sometimes I add sprinkles or edible glitter for extra sparkle. A drizzle of melted white or dark chocolate after baking also adds a chic touch and tastes incredible.
Side Dishes
These monster meringues shine as a standalone treat but go great alongside fresh fruit like strawberries or kiwi to balance their sweetness. You might also enjoy them with a cup of rich hot chocolate or coffee for a cozy dessert experience.
Creative Ways to Present
For Halloween or kids’ parties, I love arranging these monsters on a platter with faux spider webs and candy pumpkins for a spooky theme. Another favorite is packaging them in cute cellophane bags tied with colorful ribbons—great for gifts that wow without much effort!
Make Ahead and Storage
Storing Leftovers
Leftover monster meringues store beautifully in an airtight container at room temperature. I always keep them away from humidity or strong odors, which can mess with their crispness. They usually stay perfect for up to two weeks if stored properly.
Freezing
Freezing meringues isn’t something I do often, but if you choose to, wrap them tightly in plastic wrap and place them in an airtight container. When thawed at room temp, they maintain texture fairly well, though the exterior might soften slightly.
Reheating
If your meringues lose some crispness, a quick 5-10 minutes in a 250°F (120°C) oven can help crisp them back up. Just keep an eye on them to prevent burning—this little trick saved a batch after a humid day!
FAQs
-
Can I use regular food coloring instead of gel for the Monster Meringues Recipe?
It’s best to avoid liquid food coloring for meringues because the extra moisture can make your meringue less stable and more prone to collapsing. Gel food coloring is concentrated, so it colors perfectly without affecting texture.
-
How do I know when the meringues are done baking?
After baking and cooling in the oven, the meringues should feel dry to the touch and peel off the parchment cleanly. They’ll have a crunchy exterior and a slightly chewy center. If they still feel sticky or soft, leave them in the oven longer at low heat.
-
Can I make Monster Meringues Recipe without cream of tartar?
Yes! Cream of tartar helps with stability but isn’t absolutely necessary. If you don’t have it, just be sure your bowl and whisk are very clean and grease-free, and whip the egg whites thoroughly for best results.
-
How long do Monster Meringues keep?
Stored in an airtight container at room temperature, these meringues will stay fresh for about two weeks. Make sure to keep them away from humidity to maintain their crisp texture.
Final Thoughts
This Monster Meringues Recipe feels like a tiny party every time I make it. The joy of watching those silly colorful monsters come to life on the baking sheet and then turn into deliciously crunchy-chewy bites never gets old. Whether you’re baking for kids, a festive gathering, or just to treat yourself, these meringues are sure to delight. Give this recipe a try—I promise it’s as fun and tasty as it sounds!
Print
Monster Meringues Recipe
- Prep Time: 10 minutes
- Cook Time: 2 hours
- Total Time: 3 hours 10 minutes
- Yield: 40-50 meringues
- Category: Dessert
- Method: Baking
- Cuisine: Western
- Diet: Vegetarian
Description
These whimsical Monster Meringues are light, airy, and colorful treats made by whipping egg whites with sugar into stiff peaks, then piped into fun monster shapes and baked low and slow to achieve a crunchy exterior with a soft, chewy center. Perfect for parties or a creative dessert, they are decorated with candy eyes for a playful finish.
Ingredients
Monster Meringues
- 4 large egg whites, room temperature (approximately 120g)
- 1/4 tsp cream of tartar (optional)
- 1 cup superfine caster or granulated sugar (200g)
- 1/2 tsp vanilla or almond extract (optional, about 3g)
- Orange gel food coloring
- Neon purple gel food coloring
- Neon green gel food coloring
- Candy eyes for decoration
Instructions
- Prepare the Oven and Baking Sheet: Preheat the oven to 200°F (93°C). Line a large baking sheet with parchment paper or a silicone baking mat and set aside to ensure a non-stick surface for the meringues.
- Ensure Equipment is Grease-Free: Clean the whisk attachment and mixing bowl thoroughly to remove any grease, which can prevent egg whites from whipping properly. Wipe with vinegar-moistened paper towels if necessary.
- Whip Egg Whites: Place the 4 room-temperature egg whites into the bowl of a stand mixer fitted with the whisk attachment. Whip on medium speed until the surface forms small bubbles.
- Add Cream of Tartar and Continue Whipping: Add 1/4 teaspoon cream of tartar and mix until soft peaks form, meaning the meringue holds peaks that gently fold over when the whisk is lifted and visible tracks remain in the mixture.
- Gradually Add Sugar: Slowly incorporate 1 cup of granulated sugar, adding about 1 tablespoon at a time while mixing on medium-low speed. This gradual addition stabilizes the meringue.
- Increase Speed and Add Extract: Once all sugar is incorporated, increase the mixer speed to medium-high (speed 6 on a KitchenAid). As stiff peaks start forming, add 1/2 teaspoon of vanilla or almond extract. Continue whipping until the meringue is glossy and holds firm, stiff peaks.
- Divide and Color Meringue: Scoop roughly one-third of the meringue into a separate bowl and add green gel food coloring, mixing gently until evenly colored. Transfer the colored meringue into a piping bag fitted with a large round tip (e.g., Wilton 1A). Repeat this process with neon purple and orange gel colors in separate bags.
- Pipe Monster Shapes: On the prepared baking sheet, pipe dollops of meringue spaced about 1 inch apart. Layer some dollops to create varying monster heights and unique shapes, as the meringue won’t spread during baking.
- Bake the Meringues: Bake on the middle rack of the preheated oven for 2 hours. Then turn off the oven and let the meringues sit inside for an additional 1 hour to cool gradually, which prevents cracking.
- Check Doneness and Additional Baking: If meringues still feel moist or wet after the hour of resting, continue baking for up to another hour. Properly baked meringues will lift cleanly off the parchment or mat and have dry surfaces.
- Cool and Decorate: Remove meringues from the oven and let cool fully to room temperature. Using melted white chocolate, attach candy eyes (1 to 3 per meringue) to decorate each monster.
- Storage: Store finished meringues at room temperature in an airtight container for up to two weeks.
Notes
- The yield varies depending on the size of the piped monsters and piping tip used; using a Wilton 1A tip and small dollops typically yields about 40-50 meringues.
- Plan for at least 3 hours total (baking plus cooling) or up to overnight in the oven to fully dry the meringues.
- Separate eggs when cold, but whip the egg whites at room temperature for best volume.
- Use gel food coloring to avoid compromising meringue stability; avoid liquid food coloring.
- Beat meringue on medium-high speed instead of maximum to create small, stable air bubbles ideal for piping.
- Test doneness by gently peeling one meringue off the baking surface; it should lift cleanly and be dry to the touch.
- Add candy eyes after baking and cooling to prevent sinking or meringue defects.
Nutrition
- Serving Size: 1 meringue (approx. 10g)
- Calories: 15
- Sugar: 3.5g
- Sodium: 1mg
- Fat: 0g
- Saturated Fat: 0g
- Unsaturated Fat: 0g
- Trans Fat: 0g
- Carbohydrates: 3.6g
- Fiber: 0g
- Protein: 0.3g
- Cholesterol: 0mg


