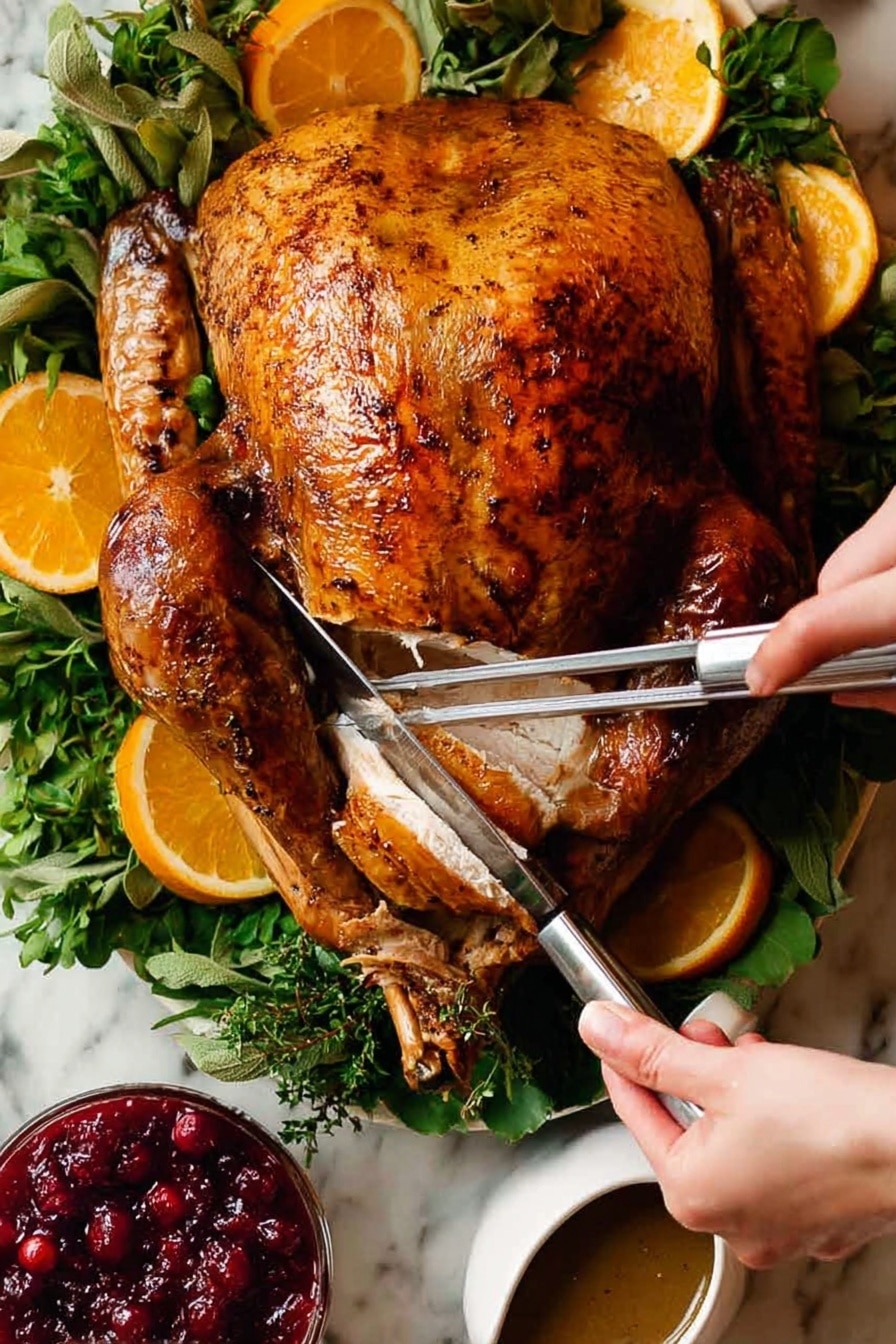
If you’re on the hunt for the ultimate bird that’s both flavorful and foolproof, look no further because this Juicy Roast Turkey with Crispy Skin Recipe is exactly what you need. It’s the one I keep coming back to for holidays, family dinners, and any time I want to impress without stress. The combination of a dry brine, butter basting, and a two-temp roast method guarantees turkey that slices juicy as can be, with skin so crispy and golden it’s practically crackling. Trust me, once you try this, you’ll never go back to generic roasting methods again.
Why You’ll Love This Recipe
- Easy Dry Brine: No buckets of liquid soaking – just a simple seasoned salt rub that works its magic while the bird chills.
- Juicy Flesh Guarantee: The turkey stays moist inside even after roasting, thanks to the smart timing and butter basting.
- Crispy Skin Every Time: Starting the turkey upside down in a hot oven locks in juices and crisps up skin beautifully once flipped.
- Faster Cooking: Because dry-brined meats cook faster, you’ll get dinner on the table quicker—a lifesaver for busy days.

Ingredients You’ll Need
Let’s talk ingredients — each one plays its part to build complex flavors and enhance juiciness without clutter. I always pick fresh herbs when I can, and a good unsalted butter because it lets me control salt levels perfectly.
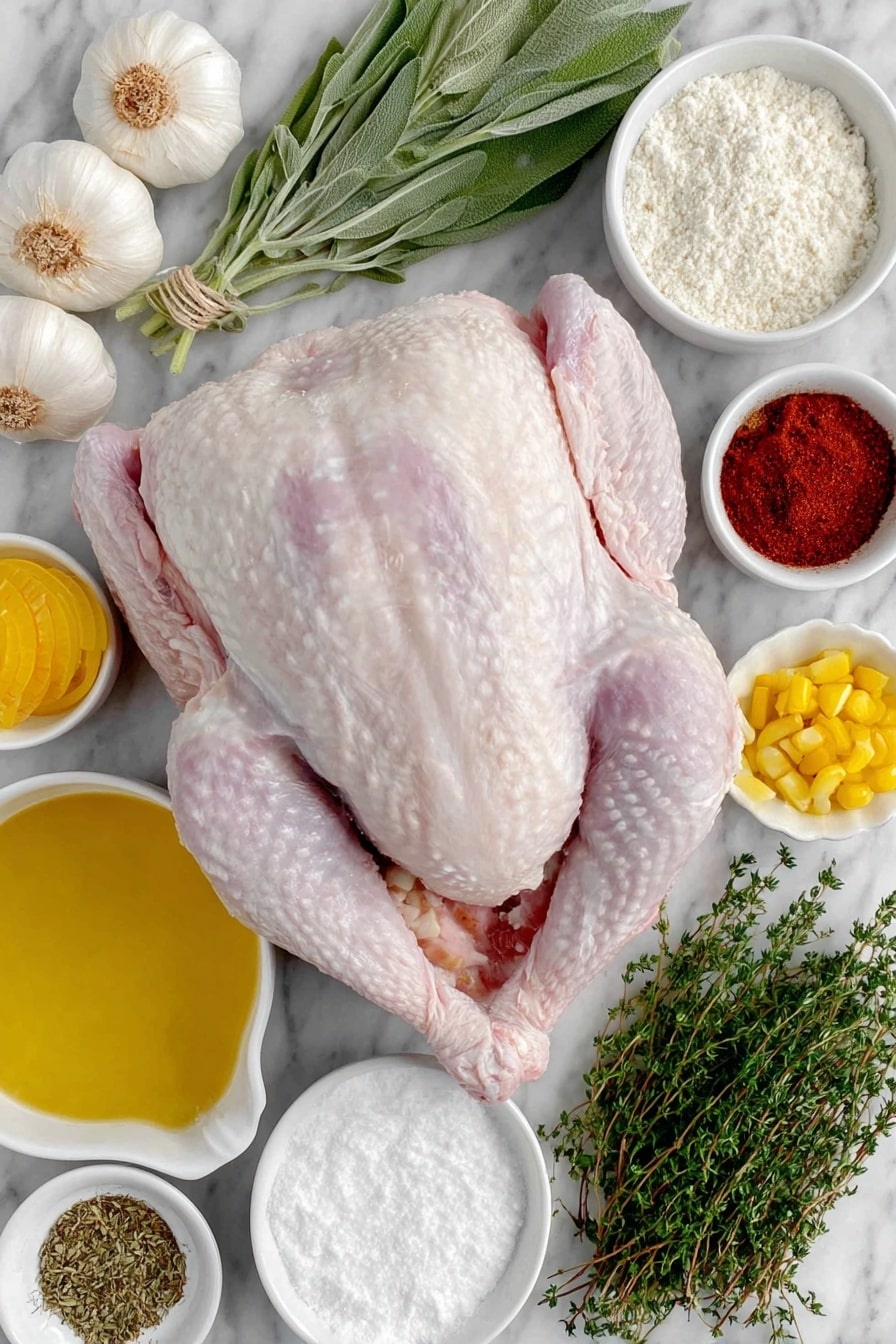
- Whole turkey: Go for a plain, non-pre-brined bird; that’s key for this dry brine to do its job well.
- Kosher salt/cooking salt: Essential for drawing out moisture and seasoning evenly; don’t skip this!
- Dried thyme: Adds a gentle herbal note—you can swap with sage or rosemary depending on your mood.
- Paprika: Gives subtle smoke and lovely color to the skin.
- Garlic powder (optional): For that hint of savory depth if you want.
- Black pepper: Freshly ground is best to wake up the spices.
- Heads of garlic: Halved to roast inside and add cozy flavor.
- Onion (halved): Skin on is fine—it adds sweetness and aroma.
- Mixed fresh herbs: Sage, rosemary, thyme, parsley for stuffing and basting.
- Unsalted butter (melted): This is what keeps the turkey juicy and gives that golden skin.
- Minced sage, rosemary, thyme: Fresh, added late to avoid burning and keep vibrant taste.
- Garlic cloves (minced): Added near the end for fragrant, fresh bites without bitterness.
- Dry white wine or water: The wine adds acidity and depth, but water works fine too.
- Chicken broth/stock: For basting pan juices and making gravy.
- Plain flour: Thickens the gravy.
- Salt and pepper: For final seasoning adjustments.
Variations
I’m all about customizing my roast turkey depending on the occasion or what’s in season. You’ll find this recipe flexible enough to make your own without any drama!
- Herb swaps: I’ve often switched thyme for fresh sage and rosemary for a more piney flavor, which my family adores.
- Garlic variations: Sometimes I add roasted garlic cloves inside the cavity for deeper, mellow garlic aroma.
- Cooking liquids: On days I want a little zest, I swap the white wine with apple cider or a splash of lemon juice diluted in water.
- Butter alternatives: I’ve tried clarified butter for extra crispness and even blended in some olive oil when butter was low—it still turned out great.
How to Make Juicy Roast Turkey with Crispy Skin Recipe
Step 1: Dry Brine Your Turkey Up to 3 Days Ahead
This is where the magic truly starts. Pat your turkey dry (skin dryness is key to crispiness), then rub the kosher salt, thyme, paprika, garlic powder, black pepper all over inside and out. I usually do this the night before or even two days ahead, letting the bird rest uncovered in the fridge so the skin dries out perfectly. The salt draws moisture from the meat, which then reabsorbs, seasoning deeply and helping it stay juicy. This dry brine method changed my turkey game — no soggy skin or dry bites!
Step 2: Prep Aromatics and Oven for Two-Temp Roast
Before roasting, stuff the cavity with halved garlic heads, onion, and fresh herbs. Here’s a trick: Start roasting your turkey upside down (breast side down) in a hot 230°C/450°F oven for 30 minutes. This pushes juices toward the breast meat for extra moisture. After that, flip it breast-side up, reduce the temperature to about 180°C/350°F, and roast until a thermometer reads 70°C/160°F inside the thickest part of the thigh. This two-step roasting ensures juicy meat and skin that crisps beautifully without burning.
Step 3: Butter Baste and Add Fresh Herbs Late
About 20 minutes before the turkey’s done, brush the skin with the melted butter, then sprinkle the minced garlic and finely chopped fresh herbs on top. I learned this saves the herbs and garlic from burning, keeps them fresh and aromatic, while giving your turkey that irresistible golden shine. Keep basting every 10-15 minutes with pan juices mixed with white wine or stock to keep things moist and flavorful.
Step 4: Rest and Make Gravy
Don’t rush this part — tent your turkey with foil and let it rest 20-30 minutes before carving. This locks in the juices and makes slicing neater. Use the pan drippings poured through a sieve with chicken broth and a splash of white wine to make a rich gravy. Simply stir in some flour to thicken—it’s the perfect accompaniment.
Pro Tips for Making Juicy Roast Turkey with Crispy Skin Recipe
- Dry Skin Equals Crispy Skin: Always air-dry your bird uncovered in the fridge for best results.
- Use a Thermometer: I can’t recommend this enough – it stops guesswork and keeps your turkey juicy, not overcooked or dry.
- Butter Basting Timing: Add fresh herbs and garlic only at the end to avoid bitterness and preserve bright aroma.
- Let It Rest: Resisting the urge to carve immediately keeps juices locked in – patience pays off big time.
How to Serve Juicy Roast Turkey with Crispy Skin Recipe
Garnishes
I love finishing the turkey platter with a scattering of fresh chopped parsley or rosemary sprigs for color and earthy aroma. Lemon wedges on the side brighten flavors too — guests always reach for them. Sometimes I’ll roast a few garlic cloves alongside the turkey to pop on the plate for extra flavor bombs when you bite in.
Side Dishes
My go-to sides are classic mashed potatoes whipped with butter and cream, my grandma’s sage and onion stuffing, roasted root vegetables tossed with those same fresh herbs, and a tangy cranberry sauce. It’s the perfect balance of creamy, savory and fresh to complement the rich turkey.
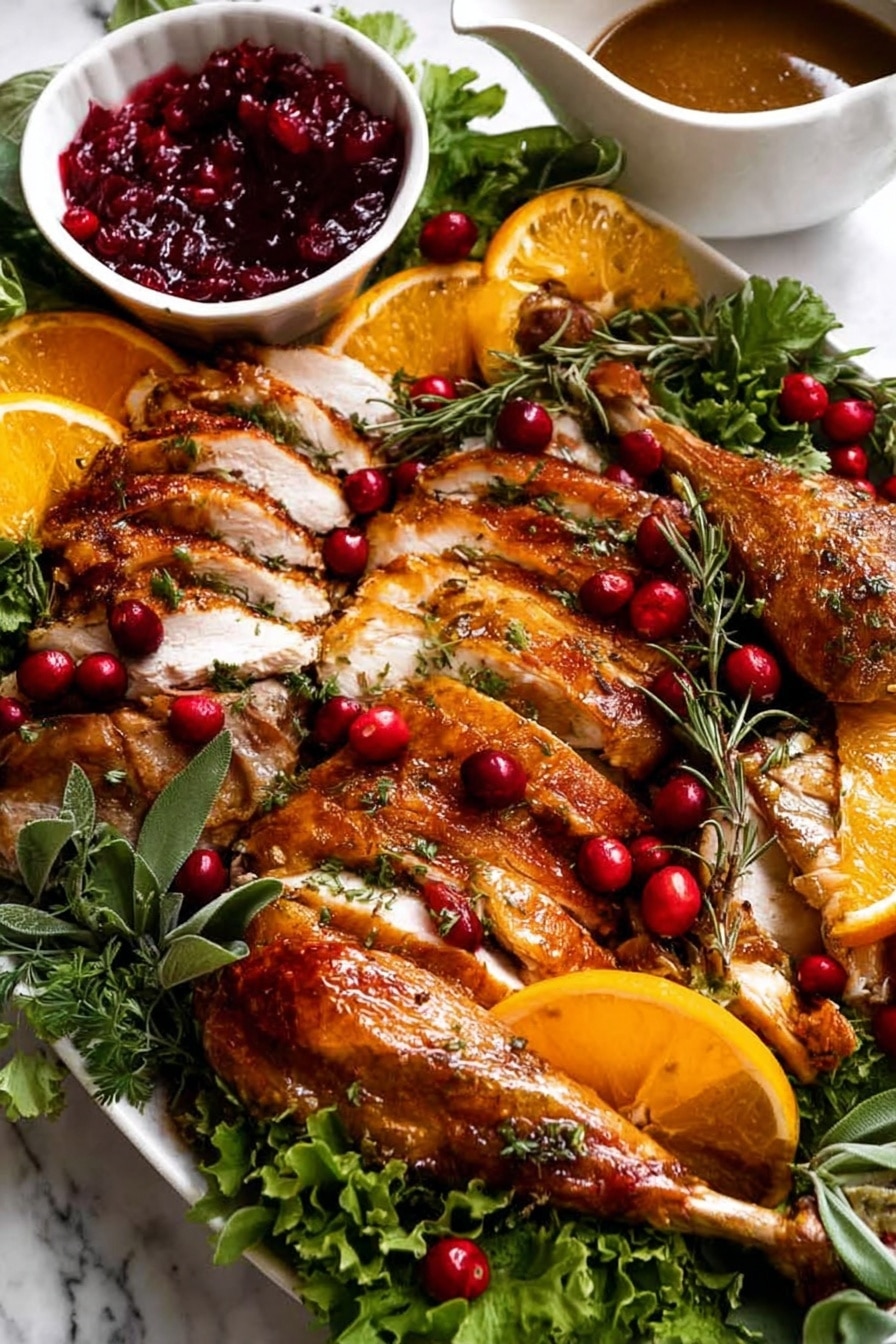
Creative Ways to Present
For big family dinners, I sometimes carve the turkey into thick slices, arrange them on a rustic wooden board layered with herb sprigs, roasted garlic cloves, and small bowls of gravy and cranberry sauce for a shareable platter feel. It looks stunning and invites everyone to dig in casually, which makes the meal all the more enjoyable.
Make Ahead and Storage
Storing Leftovers
I wrap leftover turkey tightly in foil or plastic wrap and place it in an airtight container in the fridge for up to 4 days. Keeping the pieces separated by parchment paper helps prevent sogginess. Leftover meat stays surprisingly moist—especially if you include some skin—and is perfect for sandwiches.
Freezing
For freezing, I portion the leftover turkey into freezer-safe bags or containers, pressing out excess air. It freezes well for 2-3 months, making it a great way to save leftovers from a big roast and enjoy later without losing quality.
Reheating
When reheating, I prefer warming turkey slices gently in the oven wrapped in foil at 160°C/325°F to keep them moist, adding a splash of broth if needed. Microwave works in a pinch but risks drying out the meat if not careful. For gravy, reheat on the stove stirring frequently.
FAQs
-
Can I dry brine the turkey if it’s still partially frozen?
Absolutely! One of the best things I discovered is that starting your dry brine while the turkey is still partially frozen works well—the salt penetrates as it thaws, seasoning the meat evenly without any issues.
-
What’s the advantage of starting the turkey upside down in the oven?
Roasting breast side down initially allows juices to flow into the white meat, which usually dries out first. This trick greatly increases the moisture and juiciness in the breast without sacrificing crispy skin when flipped later.
-
How do I know when the turkey is done?
Using a reliable meat thermometer is your best bet — the thigh should hit about 70°C/160°F. This temperature ensures fully cooked but juicy meat. Avoid relying only on timing or visual cues to prevent dryness.
-
Can I use this recipe for turkeys smaller or larger than 10 pounds?
Yes, you can. I recommend scaling the ingredients proportionally based on your turkey’s weight. The dry brine and timing will still work well, though smaller birds generally take less time to cook.
-
Should I rinse the turkey after dry brining?
No rinse needed here! Rinsing can wash away the seasoning and also risks cross-contamination. Just pat the bird dry before roasting to keep skin crisp.
Final Thoughts
This Juicy Roast Turkey with Crispy Skin Recipe has quickly become my go-to, especially when I want to impress friends and family without getting stressed out in the kitchen. Once I figured out the dry brine and two-step roasting trick, turkey nights suddenly felt a lot more achievable and delicious. I can’t wait for you to try it—it’s like having that restaurant-level juicy meat and crispy skin magic right at home. Give it a go, and trust me, you’ll be getting rave reviews at your next dinner.
Print
Juicy Roast Turkey with Crispy Skin Recipe
- Prep Time: 20 min
- Cook Time: 120 min
- Total Time: 140 min
- Yield: 10-12 servings
- Category: Main Course
- Method: Baking
- Cuisine: American
Description
This Moist Roast Turkey recipe features a whole turkey dry brined with seasoned salt and herbs, roasted upside down initially in a hot oven, then flipped and finished in a lower temperature to ensure juicy, flavorful meat and crisp golden skin. Brushed generously with butter and finished with fresh garlic and herbs, it offers a foolproof, practical approach to roasting a whole turkey without the mess of a liquid brine. Ideal for holiday meals, this method keeps the flesh juicy while speeding up cooking time.
Ingredients
Turkey and Dry Brine
- 10 lb / 5kg whole turkey, thawed (plain, not pre-brined)
- 2 1/2 tbsp kosher salt / cooking salt
- 2 tsp dried thyme (or other herb of choice)
- 1 tsp paprika (sweet or ordinary)
- 1 tsp garlic powder (optional)
- 1/2 tsp black pepper
- 2 heads of garlic, halved horizontally (4 halves)
- 1 onion, halved (skin on is fine; brown, yellow, or white)
- 2 small bunches mixed herbs (sage, rosemary, thyme, parsley – optional)
Butter and Herb Mixture
- 10 tbsp (150g) unsalted butter, melted
- 1 tbsp total sage, rosemary, and thyme, finely chopped (equal amounts each)
- 3 garlic cloves, minced
Liquids and Gravy
- 1 1/2 cups dry white wine (or water)
- 4 cups chicken broth / stock, low sodium
- 5 tbsp plain / all purpose flour
- Salt and pepper, to taste
Instructions
- Prepare Dry Brine: Two days before cooking, combine kosher salt, dried thyme, paprika, garlic powder, and black pepper. Rub this mix all over the turkey inside and out. Place the onion halves, garlic heads, and mixed herbs inside the turkey cavity. Refrigerate uncovered for 2 days to dry brine and let flavors penetrate.
- Start Roasting Upside Down: Preheat the oven to a high temperature (approximately 450°F / 230°C). Place the turkey breast-side down (upside down) on a roasting rack inside a pan. Roast at this high temperature to crisp the breast skin and start the cooking process, which helps to keep the meat juicy.
- Flip and Continue Roasting: After about 45 minutes to 1 hour, carefully flip the turkey breast-side up. Lower the oven temperature to around 325°F / 165°C to finish cooking. This gradual change helps cook the meat evenly while maintaining moisture and developing crisp, golden skin.
- Apply Butter and Fresh Herbs: Brush the turkey with melted unsalted butter. Add the minced garlic and finely chopped fresh herbs mixture only towards the final phase of roasting to avoid burning. Continually baste the turkey with butter for extra moisture and flavor.
- Check for Doneness: Continue roasting until the internal temperature of the thickest part of the turkey breast reaches 165°F (74°C), usually under 2 hours total roasting time for a 10 lb (5kg) bird. Let the turkey rest after removing from the oven to allow juices to redistribute.
- Prepare Gravy: Use the pan drippings. Place the roasting pan over medium heat on the stovetop. Add white wine or water and chicken broth to deglaze the pan. Stir in flour to thicken, whisking continuously. Season with salt and pepper as needed and simmer until smooth and rich in flavor.
- Serve: Carve the rested turkey and serve with the gravy alongside your favorite sides.
Notes
- This recipe requires starting two days in advance to allow proper dry brining.
- Dry brining improves moisture retention and flavor without the mess and dilution of wet brines.
- Starting the roast upside down crisps the breast skin and keeps the meat juicier.
- Add fresh garlic and herbs only at the end to prevent burning.
- Cooking time is reduced due to dry brining; a 5kg (10 lb) turkey cooks under 2 hours.
- You can begin brining while the turkey is still partially frozen.
- Use a thermometer to ensure accuracy and food safety.
- Adjust seasoning of gravy according to taste and dietary needs.
Nutrition
- Serving Size: 1/10th of turkey (approx. 250g meat with skin)
- Calories: 430
- Sugar: 1g
- Sodium: 450mg
- Fat: 30g
- Saturated Fat: 10g
- Unsaturated Fat: 18g
- Trans Fat: 0g
- Carbohydrates: 4g
- Fiber: 0.5g
- Protein: 40g
- Cholesterol: 130mg


