If you’re hunting for a turkey that’s bursting with flavor, perfectly tender, and boasts that irresistible crispy skin, then you’ve got to try this Juicy Dry Brine Turkey Recipe. I absolutely love how this turns out every time — it’s straightforward, yet the secret dry brine creates a juicy bird that’s earned rave reviews from my family and friends. No soggy skin, no bland bites, just pure holiday magic that you’ll want to make your go-to turkey recipe.
Why You’ll Love This Recipe
- Unmatched Juiciness: The dry brine draws in moisture and locks it in, resulting in the juiciest turkey you’ve ever had.
- Crispy, Golden Skin: By letting the skin dry in the fridge, it crisps beautifully in the oven—no tricks required.
- Simple, Yet Flavor-Packed: A handful of herbs and brown sugar elevate your turkey to next-level deliciousness.
- Stress-Free Process: You can prep it ahead, and it just keeps getting better as it rests.

Ingredients You’ll Need
All the ingredients are simple pantry staples, but each plays an important role in that unforgettable taste and texture. From the kosher salt that works its briny magic to the herbs that add cozy warmth, you’ll find these ingredients come together in perfect harmony. Just a tip — I recommend choosing a fresh, un-injected turkey for the best dry brining results.
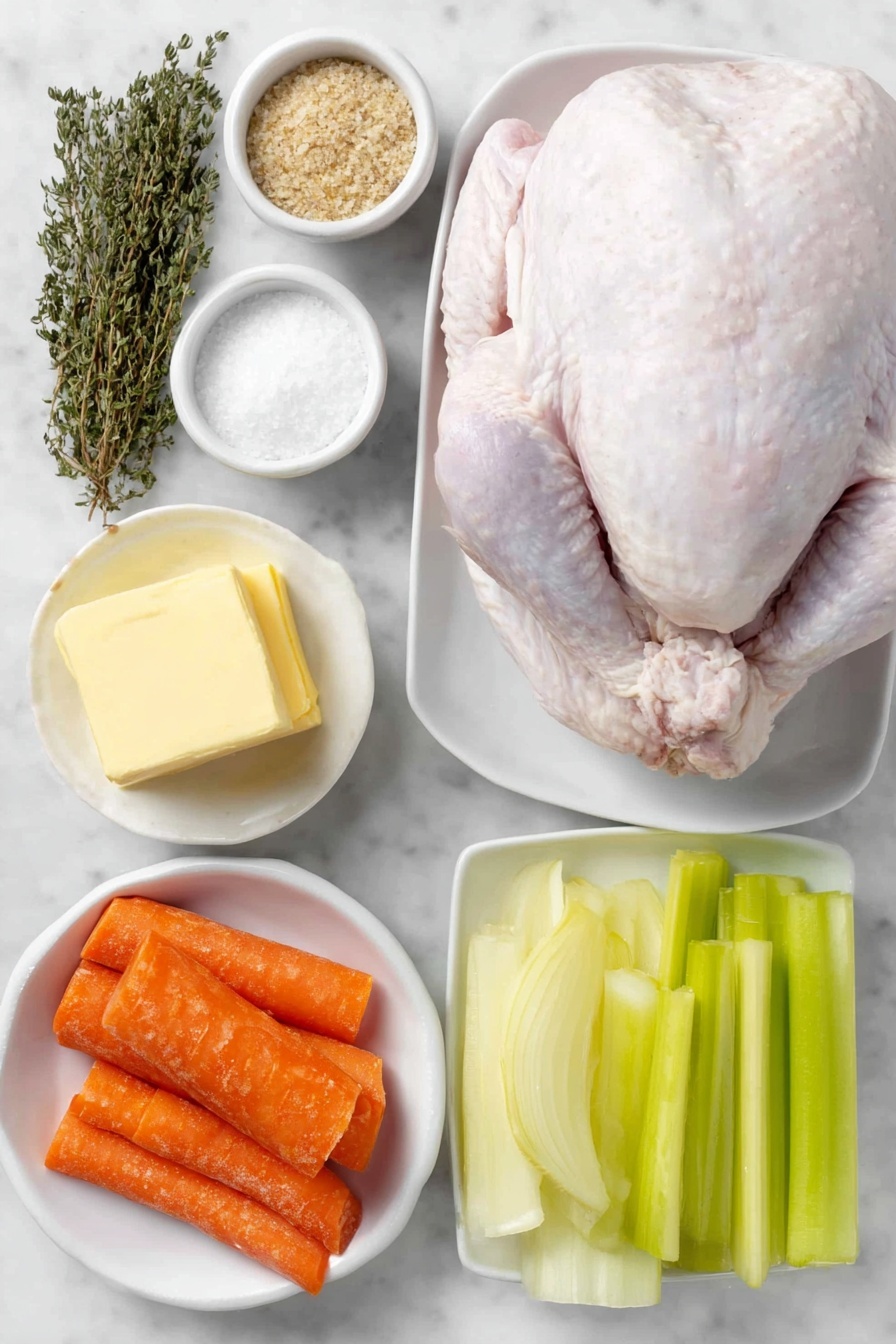
- Turkey: Choose a 12-14 pound fresh or fully thawed bird; avoid self-basting types for best brining.
- Light brown sugar: Adds a touch of sweetness that balances the salt and herbs perfectly.
- Morton kosher salt (or Diamond kosher salt): Essential for dry brining—don’t skimp here but adjust salt if your turkey is already injected.
- Dried thyme: Offers an earthy herbal note that’s classic with poultry.
- Dried sage: Either ground or leaf, sage brings that autumnal aroma we all crave at the holidays.
- Freshly ground black pepper: Adds just enough bite without overpowering.
- Unsalted butter: Room temperature for easy rubbing onto the skin, boosting richness and crispiness.
- Yellow onion: Cut into wedges, roasting alongside the turkey to add sweetness and depth to the drippings.
- Carrots: Adds natural sweetness and flavor to your roasting pan.
- Celery stalks: Provide aromatic backbone for the pan juices and gravy base.
Variations
I love this Juicy Dry Brine Turkey Recipe as is, but I’m all for tweaking recipes to fit your taste or dietary needs. Whether you want to incorporate some fresh herbs from your garden or make it a little more spice-forward, there’s room for personalization here without losing the magic.
- Herb Boost: I sometimes swap in fresh rosemary and thyme, rubbing them gently on the skin with the butter for an aromatic twist.
- Spice It Up: Adding a pinch of smoked paprika or cayenne to the dry brine delivers a subtle smoky warmth that my family goes crazy for.
- Gluten-Free Gravy: For those avoiding gluten, simply thicken your pan juices with cornstarch instead of flour when you make the gravy—it’s foolproof.
- Vegetarian Stock Base: To keep the veggies in the roasting pan but accommodate vegetarian guests’ sides, save the drippings separately.
How to Make Juicy Dry Brine Turkey Recipe
Step 1: Prep and Dry Brine the Turkey
Start by removing the turkey from its packaging, then discard the truss holding the legs together and trim any excess fat or skin that might interfere with even cooking. Pat the turkey completely dry—this is key to getting that skin crispy later on. Mix the brown sugar, kosher salt, thyme, sage, and pepper in a small bowl to create your dry brine. Rub this mixture all over the turkey, inside the cavity as well. Now, here’s a trick I learned: refrigerate the turkey uncovered for at least 24 hours and up to 48 hours—this drying period is what firms up the skin for roasting. If you’re brining longer than a day, you can loosely cover it with plastic wrap initially, then remove it for the last 24 hours. Keep the turkey at 40°F or lower in the fridge the whole time to stay safe!
Step 2: Prepare for Roasting
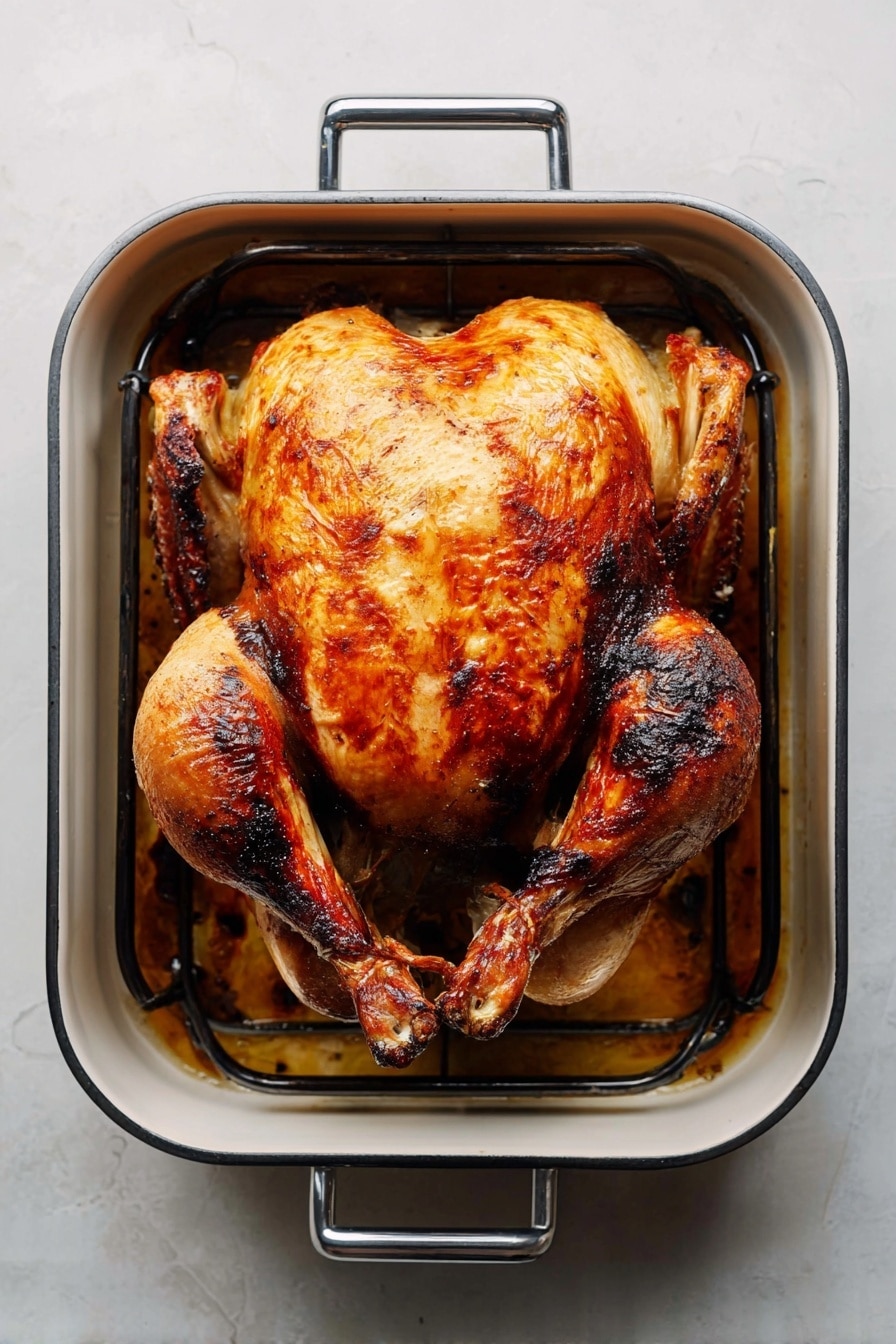
When it’s roasting day, preheat your oven to 375°F and place a rack in the lower third. Before roasting, brush away the dry brine on the turkey’s exterior with a damp paper towel—leave the flavorful seasoning inside the cavity untouched. Scatter the onion wedges, carrots, and celery at the bottom of a large roasting pan, then set a rack inside and place your bird on it. Tuck the wings underneath to prevent burning. This next part is my favorite: smear unsalted butter all over the skin—this adds richness and helps with that golden-brown finish.
Step 3: Roast Until Perfect
Roast the turkey until the skin turns a deep golden brown and the internal temperature hits 165°F in the breast and 175°F in the thigh. For my 12-pound turkey, that’s usually about 1 hour 45 minutes to 2 ½ hours. Around the 90-minute mark, peek and if the skin’s browning too quickly, cover it loosely with foil to avoid burning. Using a leave-in or instant-read thermometer is a total game-changer—it takes the guesswork out and ensures your turkey is perfectly cooked every time without drying out.
Step 4: Rest and Serve
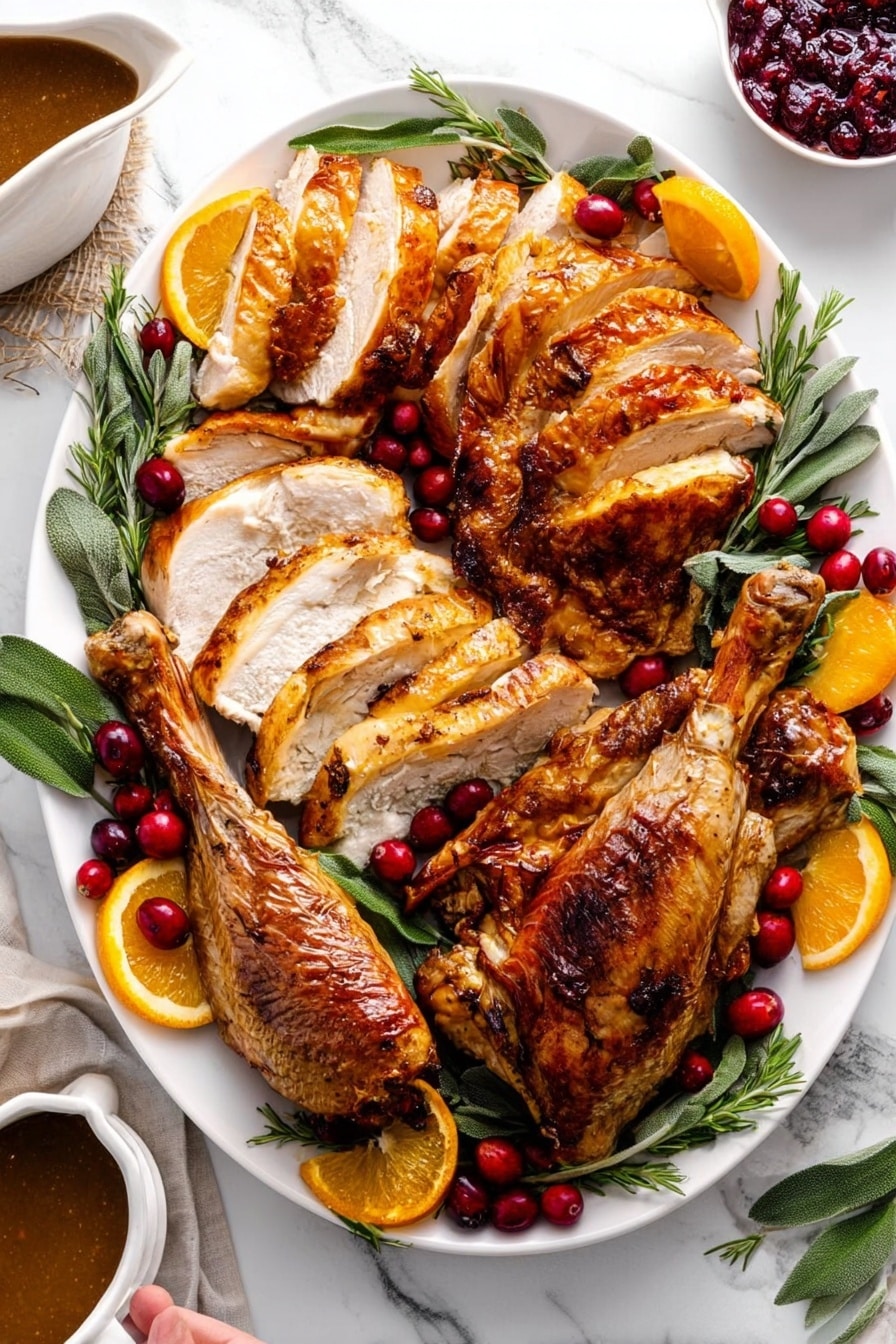
Once out of the oven, carefully tilt the turkey to pour any juices from the cavity into the pan—these are gold for making gravy! Transfer the turkey to a platter, tent it loosely with foil, and let it rest for 20 to 30 minutes. Resting means the juices redistribute, so when you carve, every slice stays juicy. Remove the roasted veggies from the pan—if they look good, place them around your bird on the serving platter for a cozy rustic touch. Save the pan drippings; they’re the cornerstone of a delicious homemade gravy.
Pro Tips for Making Juicy Dry Brine Turkey Recipe
- Patience is Key: I used to rush the drying stage—don’t skip letting the skin air-dry in the fridge; it’s critical for that crisp texture.
- Thermometer Lover: Using a leave-in thermometer changed everything—no more guessing if it’s done or overcooked.
- Butter’s Best Friend: Rubbing butter on the skin after the brine gives that irresistible golden color and adds flavor complexity.
- Don’t Skip the Rest: Resting your turkey before carving ensures the juices stay put and saves you from dry meat.
How to Serve Juicy Dry Brine Turkey Recipe
Garnishes
I like to keep garnishes simple and inviting. Fresh herb sprigs like rosemary and thyme laid around the platter add a pop of green and aroma. A few bright cranberries or slices of roasted citrus can also bring a festive touch and a pleasant tart contrast to the rich turkey flavors.
Side Dishes
This Juicy Dry Brine Turkey Recipe pairs wonderfully with classic sides — I always serve it alongside creamy mashed potatoes, buttery green beans, and a tangy cranberry sauce. For something a little heartier, roasted Brussels sprouts or sweet potato casserole round things out beautifully.
Creative Ways to Present
For special occasions, I love arranging carved turkey slices overlapping on a large wooden cutting board with fresh herbs tucked around the edges. Sometimes, I drizzle a little pan jus over the top right before serving for an elegant, juicy presentation that wows guests without feeling fussy.
Make Ahead and Storage
Storing Leftovers
After everyone’s had their fill, I carve the leftover turkey, then arrange it in a shallow dish with some gravy poured over the top to keep it moist. Cover tightly with plastic wrap and store in the fridge — it stays juicy and delicious for up to two days.
Freezing
You can freeze carved turkey leftovers wrapped well in foil and plastic wrap, or in freezer-safe containers. Thaw in the fridge overnight before reheating. I’ve found the dry brine really helps retain moisture, so your frozen turkey won’t dry out as much as usual.
Reheating
To warm up leftovers, I prefer placing them in a covered baking dish with a splash of gravy and reheating at 325°F for about 20-30 minutes. This method keeps the turkey tender and prevents the meat from drying out like microwave reheating can.
FAQs
-
What is a dry brine and how does it work for turkey?
A dry brine is a mixture of salt, sugar, and seasonings rubbed directly onto the turkey, rather than soaking it in liquid. It works by drawing moisture from the turkey initially and then reabsorbing it, seasoning the meat deeply and helping it retain moisture during cooking for a juicier bird with crispier skin.
-
How long should I dry brine my turkey?
For best results, dry brine your turkey uncovered in the fridge for at least 24 hours and up to 48 hours. This time allows the skin to dry out and the salt and seasonings to penetrate the meat, enhancing flavor and texture.
-
Can I use this dry brine recipe on a frozen turkey?
No, it’s best to fully thaw your turkey before applying the dry brine. The brining process depends on the salt penetrating the meat, which can’t happen effectively if the bird is still frozen.
-
How do I know when my turkey is cooked perfectly?
The most reliable way is using a leave-in or instant-read digital thermometer. The breast should reach 165°F and the thigh 175°F. This ensures your turkey is safe to eat but still juicy and tender.
-
Can I dry brine a pre-brined or self-basting turkey?
You can, but be sure to reduce the amount of salt in the dry brine by half to avoid over-salting, since these turkeys have been injected with a salt solution already.
Final Thoughts
I remember the first time I tried this Juicy Dry Brine Turkey Recipe—it completely changed my turkey game forever. No more dry, disappointing birds for holidays or special dinners. The process is surprisingly simple and the payoff? A moist, flavorful turkey with that perfectly crisp skin everyone notices and loves. I hope you’ll give it a try and make it your new forever recipe too. Trust me, once you taste this turkey, you’ll wonder why you didn’t start dry brining sooner!
Print
Juicy Dry Brine Turkey Recipe
- Prep Time: 30 minutes
- Cook Time: 2 hours 30 minutes
- Total Time: 3 hours
- Yield: 8 servings
- Category: Main Course
- Method: Roasting
- Cuisine: American
Description
This dry brine turkey recipe ensures juicy meat with crisp skin and classic holiday flavors. The turkey is seasoned generously with a blend of brown sugar, kosher salt, and herbs, then refrigerated uncovered for up to 48 hours to allow the flavors to penetrate deeply and the skin to dry out for optimal roasting results. The bird is roasted to golden perfection alongside aromatic vegetables, producing a moist and flavorful centerpiece perfect for Thanksgiving or any festive occasion.
Ingredients
Turkey and Dry Brine
- 1 (12 to 14-pound) turkey, patted dry
- ¼ cup packed light brown sugar
- 3 tablespoons Morton kosher salt (or ¼ cup Diamond kosher salt)
- 2 teaspoons dried thyme
- 2 teaspoons dried sage leaves or ground sage
- 1 teaspoon freshly ground black pepper
- 6 tablespoons unsalted butter, at room temperature
Vegetables for Roasting
- 1 large yellow onion, cut into wedges
- 2 carrots, cut into 2-inch pieces
- 2 stalks celery, cut into 2-inch pieces
Instructions
- Prepare the Turkey: Line a rimmed baking sheet with aluminum foil and place a rack on top. Remove the truss holding the turkey legs together, discard excess fat and giblets, then pat the turkey dry thoroughly with paper towels to ensure proper brining.
- Make and Apply Dry Brine: In a small bowl, combine brown sugar, kosher salt, thyme, sage, and black pepper. Rub and pat this mixture all over the turkey, including inside the cavity, ensuring even coating for optimal seasoning.
- Dry Brine in Refrigerator: Place the turkey on the prepared rack and refrigerate uncovered for at least 24 hours and up to 48 hours. If exceeding 24 hours, loosely cover with plastic wrap for the initial period, then uncover for the last 24 hours to allow the skin to dry.
- Preheat the Oven and Prepare for Roasting: Preheat oven to 375°F and position oven rack in the lower third. Brush off the dry brine from the turkey’s exterior with a damp paper towel while keeping the cavity seasoning intact.
- Arrange Vegetables and Turkey: Scatter onion, carrots, and celery in a large roasting pan. Place a roasting rack inside the pan and situate the turkey on it. Tuck wings underneath the bird and rub the softened butter all over the skin.
- Roast the Turkey: Roast for 1¾ to 2½ hours until the skin is deep golden and an instant-read thermometer reads 165°F in the thickest breast and 175°F in the thigh. Check at around 1½ hours, covering loosely with foil if the skin browns too fast.
- Rest and Drain Juices: Using oven mitts, carefully tilt the turkey to drain juices from the cavity into the roasting pan. Transfer the turkey to a platter or cutting board, tent with foil, and rest for 20 to 30 minutes. Remove vegetables from pan and discard or save for serving. Reserve the pan drippings for gravy.
- Make Gravy and Serve: Prepare gravy using the reserved drippings (reference provided). Carve the turkey and serve warm alongside the gravy.
- Make-Ahead Option: Roast and carve the turkey ahead of time if desired, arranging the slices over a thin layer of gravy in an ovenproof dish. Cover tightly and refrigerate for up to two days. Reheat uncovered in a 325°F oven for 20 to 30 minutes and warm gravy separately before serving.
Notes
- For best results, use a digital leave-in probe thermometer to monitor turkey temperature without opening the oven.
- Select a fresh, un-injected turkey without self-basting to avoid over-salting; if using pre-brined birds, reduce salt in the dry brine by half.
- The dry brine method enhances natural flavors and promotes crisp, golden skin.
- Vegetables under the roasting rack add flavor to drippings but can be discarded or served depending on texture after roasting.
- Resting the turkey allows juices to redistribute for moist meat.
Nutrition
- Serving Size: 1/8 of prepared turkey (approximately 8 oz meat)
- Calories: 1075
- Sugar: 5 g
- Sodium: 1619 mg
- Fat: 47 g
- Saturated Fat: 15 g
- Unsaturated Fat: 32 g
- Trans Fat: 0 g
- Carbohydrates: 6 g
- Fiber: 0 g
- Protein: 147 g
- Cholesterol: 513 mg


