
If you’re looking for a fun, delicious way to serve your favorite soups or stews, this Homemade Bread Bowls Recipe is an absolute game-changer. I absolutely love how crispy on the outside yet soft and tender on the inside these bread bowls turn out, and honestly, once you try making them yourself, you’ll never want store-bought ones again. Trust me, your family and friends will be asking for seconds—and you’ll feel like a kitchen rockstar for pulling these beauties off!
Why You’ll Love This Recipe
- Crispy Yet Soft Texture: The crust gets beautifully golden and crunchy while the inside stays pillowy and perfect for soaking up soups.
- Simple Ingredients: Made from everyday kitchen staples, meaning no fancy or hard-to-find components here.
- Impress Your Guests: These homemade bread bowls make any dinner feel like a special occasion without too much extra effort.
- Flexible and Fun: Great for various fillings, from creamy chowders to chili, and the leftover bread “lid” is a tasty bonus.

Ingredients You’ll Need
The ingredients in this Homemade Bread Bowls Recipe come together in a way that guarantees a sturdy but soft dough. Each one plays a key role in creating bread bowls that can hold all your favorite soups without getting soggy too fast. I recommend using bread flour for that lovely chewy texture and good structure.

- Active Dry Yeast: This is the magic that gets your dough rising—make sure your water is just right (between 110°F and 115°F) so the yeast can bloom perfectly.
- Warm Water: Adds hydration and activates the yeast; lukewarm is key—not too hot or you’ll kill the yeast.
- Granulated Sugar: Just a touch to feed the yeast and help with browning during baking.
- Salt: Enhances flavor and controls yeast growth, so don’t skip it!
- Olive Oil: Adds tenderness to the dough and helps with crust development.
- Bread Flour: Provides the protein needed for a good, chewy texture, holding shape nicely for bread bowls.
- Egg Wash: A beaten egg with water or milk gives the bread bowls their signature glossy, golden finish.
Variations
I like to switch things up depending on what I’m serving or what mood I’m in. This Homemade Bread Bowls Recipe is a great base for all sorts of flavorful tweaks, so feel free to make it your own and get creative.
- Herb-Infused Bowls: Adding dried herbs like rosemary or thyme to the dough gives a fragrant touch — my family goes wild for these with creamy tomato basil soup.
- Gluten-Free Option: I’ve experimented with gluten-free bread flour blends to accommodate dietary needs—just know the texture will be a bit different, but still tasty.
- Mini Bread Bowls: Making smaller rolls to hold individual servings is a cute way to serve parties or kids’ meals.
- Whole Wheat Variation: Swap half the bread flour for whole wheat for a nuttier flavor and extra fiber, just add a little more water since whole wheat absorbs more.
How to Make Homemade Bread Bowls Recipe
Step 1: Bloom Your Yeast Like a Pro
Start by pouring the warm water over the yeast in your mixing bowl—whether it’s a stand mixer bowl or a big mixing bowl. Whisk gently to combine and let it sit covered for about 5 minutes. You want to watch for that lovely foamy, bubbly surface—that’s your yeast waking up and ready to work its magic. No foam? Your yeast might be old or the water too hot or cold, so don’t skip this step.
Step 2: Mixing and Kneading the Dough
Turn on your stand mixer to low speed, and add sugar, salt, olive oil, and 4 cups of bread flour. Mix for a minute, then add the remaining 2 cups of flour. Keep kneading the dough either with your mixer’s dough hook for 5-6 minutes or use your hands on a floured surface if you’re going old school like me. I’ve found the “windowpane test” super helpful here — just stretch a bit of dough thin, and if light passes through without tearing, you’re golden. If your dough feels sticky, add tiny bits of flour at a time. Remember, you want your dough soft and a bit tacky, not dry or stiff.
Step 3: First Rise
Shape your kneaded dough into a ball and place it into a greased bowl, turning once to coat the dough’s surface in oil. Cover it tightly and set in a warm spot for about 90 minutes, or until it doubles in size. I’ve used the trick of placing the covered bowl inside my turned-off, slightly warm oven with the door cracked open—it creates a perfect cozy environment.
Step 4: Shaping Your Bowls
Once doubled, punch down the dough gently to let any air out, then place it on a floured surface and divide it into six even pieces. Roll each piece into a nice, tight ball. Don’t stress too much about perfect shaping — rustic is good too! Place them spaced out on two baking sheets lined with parchment paper and cover to rest for 20 minutes while you preheat the oven.
Step 5: Baking Your Bread Bowls
Preheat the oven to 400°F (204°C). Before baking, brush each dough ball with your egg wash to achieve that gorgeous, shiny crust. Then score the tops with a sharp knife—making an X looks classic and helps the steam escape so your bread rises evenly. Bake for about 30 minutes or until golden brown and the internal temp hits 195°F (90°C). If you don’t have a thermometer, look for a lovely crust color and a hollow sound when tapped.
Step 6: Cooling and Hollowing
Patience is key here — let your bread bowls cool for a good 20-30 minutes before cutting. This helps them firm up so you don’t squash or tear them while hollowing. Cut a round from the top, scoop out the soft center (reserve it for dunking or breadcrumbs!), and fill with your favorite soup or chili. Yum!
Pro Tips for Making Homemade Bread Bowls Recipe
- Perfect Water Temp: I always check water temperature with a kitchen thermometer to keep that yeast happy—too hot or cold can ruin your rise.
- Don’t Overflour: Adding too much flour can lead to dense bread; use just enough to keep dough manageable and soft.
- Use an Instant-Read Thermometer: This little gadget saves me every time by ensuring the bread is fully baked and not doughy inside.
- Let Cooling Finish Before Cutting: Cutting too soon makes the bread collapse — wait until it’s mostly cool for neat bowls.
How to Serve Homemade Bread Bowls Recipe

Garnishes
I love topping my filled bread bowls with fresh herbs like chopped parsley or chives—it adds a pop of color and freshness. Sometimes a sprinkle of shredded cheese melts beautifully on top when served hot, especially with chili or broccoli cheese soup.
Side Dishes
Pair these homemade bread bowls with a crisp green salad or roasted veggies for a complete meal. I’ve found a simple side of pickles or olives can also balance the richness of creamy soups perfectly.
Creative Ways to Present
For special occasions, I’ve filled bread bowls with steaming stews topped with a dollop of sour cream and a sprinkle of paprika—it looks so inviting on the table! Mini bread bowls make delightful individual servings for parties, and placing them on wooden boards alongside rustic butter and salt for dipping always gets compliments.
Make Ahead and Storage
Storing Leftovers
I store leftover bread bowls at room temperature in a paper bag or loosely covered to maintain their crust for a couple of days. If you need to keep them longer, the fridge is fine for up to a week, but wrap them well to prevent drying.
Freezing
Freezing is a lifesaver—after baking, I let bread bowls cool completely, then wrap each tightly in plastic wrap and foil. They freeze beautifully for up to three months. When you want one, just thaw overnight in the fridge.
Reheating
To bring back that fresh-baked vibe, I reheat bread bowls in a 350°F oven for about 10-15 minutes. This crisps the crust back up and warms the inside nicely—way better than microwaving, which makes them chewy or soggy.
FAQs
-
Can I make this Homemade Bread Bowls Recipe without a stand mixer?
Absolutely! While a stand mixer with a dough hook makes kneading easier, you can knead the dough by hand on a lightly floured surface. It might take a little more elbow grease, but just knead for about 5-6 minutes until the dough feels soft and elastic. I actually learned to make bread this way, and it’s very rewarding.
-
How do I know when my bread bowls are fully baked?
The best way is to check with an instant-read thermometer—the internal temperature should reach 195°F (90°C). You can also tap the crust; a hollow sound means they’re done. This ensures your bread bowls are cooked through and won’t be doughy inside.
-
Can I use all-purpose flour instead of bread flour?
While you can substitute all-purpose flour in a pinch, bread flour’s higher protein content helps develop gluten more effectively, giving your bread bowls better structure and chewiness. Using all-purpose may result in a slightly softer and less chewy crust.
-
How long do homemade bread bowls stay fresh?
Fresh homemade bread bowls taste best the day they’re made, but they’ll stay good at room temperature for 2-3 days if kept in a paper bag or wrapped loosely. Refrigerate to extend up to a week or freeze for longer storage, just remember to properly reheat before serving.
Final Thoughts
I have to say, this Homemade Bread Bowls Recipe has earned its spot as one of my favorite kitchen projects. I used to struggle with bread that was too dense or crusts that wouldn’t crisp right, but once I nailed this method, it really boosted my confidence baking at home. There’s something so satisfying about scooping rich soup into your very own handcrafted bread bowl—it’s comfort food at its finest. Give it a try next time you want to wow your people with minimal fuss but maximum flavor and fun!
Print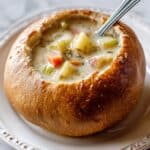
Homemade Bread Bowls Recipe
- Prep Time: 2 hr
- Cook Time: 30 min
- Total Time: 2 hr 30 min
- Yield: 6 large bread bowls
- Category: Bread
- Method: Baking
- Cuisine: American
- Diet: Vegetarian
Description
This Homemade Bread Bowls recipe yields six large, crusty yet soft bread bowls perfect for serving soups, stews, or dips. Made with simple ingredients like bread flour, yeast, olive oil, and an egg wash for a golden finish, these bread bowls are baked to a perfect golden brown with a delectably soft interior that’s easy to scoop out and fill.
Ingredients
Dough Ingredients
- 2 packets Red Star® Active Dry Yeast (4 and 1/2 teaspoons)
- 2 and 1/4 cups (540ml) warm water (110°F – 115°F)
- 2 teaspoons granulated sugar
- 2 teaspoons salt
- 2 Tablespoons (30ml) olive oil
- 6 cups (780g) bread flour (spooned & leveled), plus more for hands and surface
Egg Wash
- 1 large egg beaten with 1 Tablespoon water or milk
Instructions
- Activate Yeast: Pour the warm water over the yeast in the bowl of a stand mixer fitted with a dough hook or a large mixing bowl. Whisk gently and let it sit covered with a towel for 5 minutes until the mixture becomes frothy and foamy.
- Combine Ingredients: With the mixer running on low speed, add in sugar, salt, olive oil, 4 cups of bread flour, and any optional seasonings. Beat for 1 minute, then gradually add the remaining 2 cups of flour.
- Knead the Dough: Knead the dough with the mixer for 5-6 minutes or knead by hand on a floured surface for the same time, adding flour as needed to maintain a slightly tacky but not dry dough. Perform the windowpane test to check readiness.
- First Rise: Shape dough into a ball and place it in a greased bowl, turning once to coat the top. Cover with plastic wrap and place in a warm environment to rise until doubled in size, about 90 minutes. Use a warmed oven if needed to create this environment.
- Punch Down Dough: Once risen, punch down the dough to release air bubbles, then turn it out onto a lightly floured surface and punch down again if necessary.
- Divide and Shape: Cut the dough into 6 equal pieces using a sharp knife or dough scraper, then form each piece into a large ball.
- Second Rest: Place 3 dough balls on each of two parchment-lined baking sheets, cover lightly, and let rest for 20 minutes as the oven preheats.
- Prepare for Baking: Preheat oven to 400°F (204°C). Brush each dough ball with the egg wash and score an X on the top with a sharp knife for controlled expansion.
- Bake: Bake for 30 minutes or until the bread bowls are golden brown and an instant-read thermometer inserted into the center reads 195°F (90°C).
- Cool and Serve: Cool the bread bowls until easy to handle. Cut a large round from the top and scoop out the inside to create the bowl cavity. Fill with soup or your preferred filling.
- Storage: Store leftover bread bowls at room temperature for a few days, refrigerate up to one week, or freeze up to three months. Thaw overnight in the refrigerator and bring to room temperature before serving.
Notes
- For a warm environment to rise dough on cold days, preheat oven to 150°F (66°C), turn off, place dough inside with door slightly ajar, then close after 30 minutes.
- Do not add too much flour during kneading to avoid a dry dough; keep it soft and slightly tacky.
- Use leftover bread centers for dipping in soup or sauces for zero waste and extra flavor enjoyment.
- The egg wash helps create a shiny, golden crust on the bread bowls.
- Cold dough may need a longer rising time; patience results in better texture.
Nutrition
- Serving Size: 1 bread bowl (approximately 130g)
- Calories: 320
- Sugar: 2g
- Sodium: 400mg
- Fat: 4g
- Saturated Fat: 0.5g
- Unsaturated Fat: 3g
- Trans Fat: 0g
- Carbohydrates: 62g
- Fiber: 3g
- Protein: 10g
- Cholesterol: 35mg

