
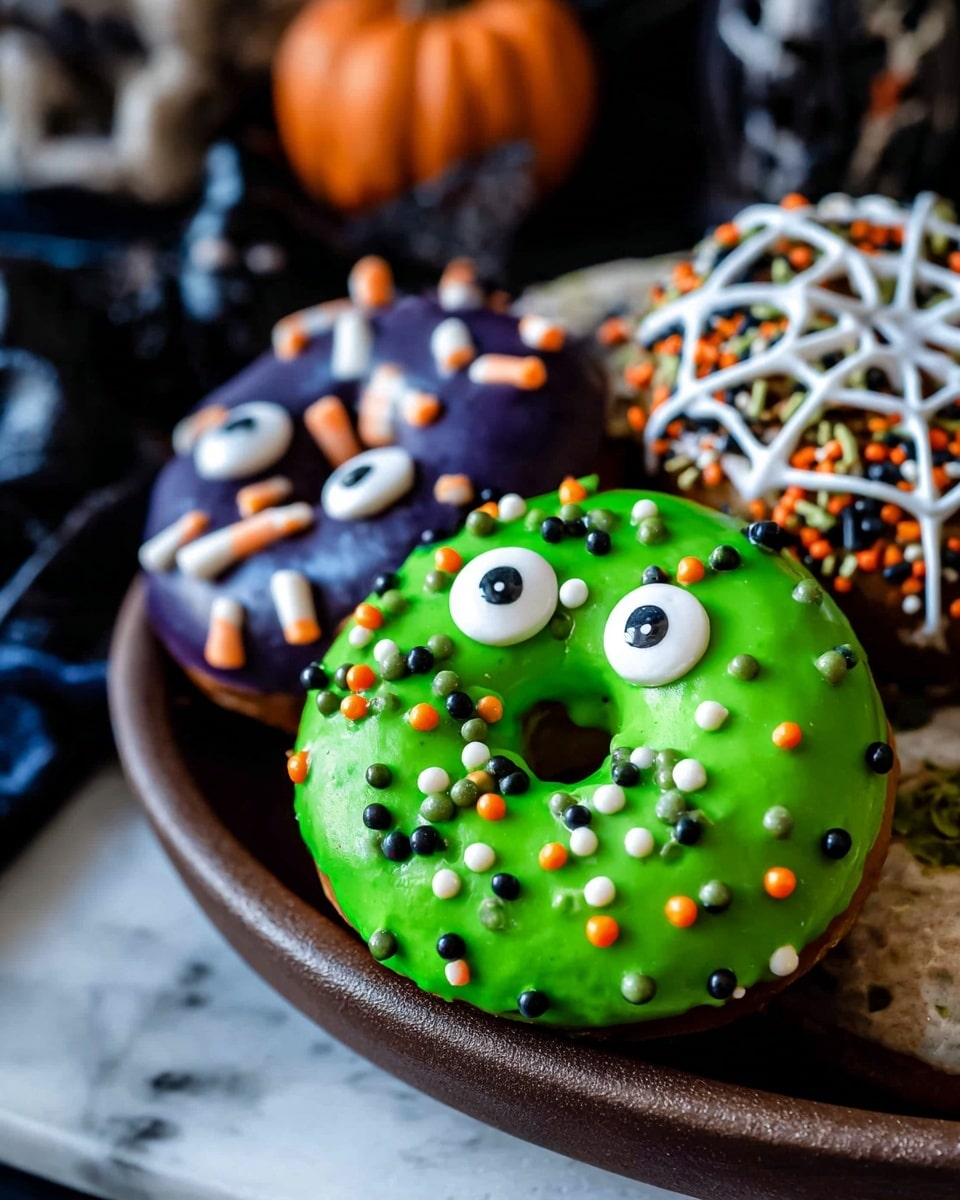
If you’re looking to wow your friends and family this Halloween, you’re going to adore this fun and festive project. Halloween Donuts: Spooky and Festive Decorating Ideas for Monster, Frankenstein, Mummy, Dracula, and Spiderweb Donuts Recipe is my go-to when I want something that’s both playful and downright delicious. These aren’t your average store-bought treats; they’re a creative way to bring some spooky charm right to your kitchen table. Whether you’re making them for a party, classroom treats, or just because, you’ll find that the decorating ideas here make the whole process super fun, and the results are irresistibly cute and tasty.
Why You’ll Love This Recipe
- Fun and Festive: Each donut design brings a unique Halloween character to life with simple decorating tips.
- Easy to Customize: You can tailor each donut to your skill level and ingredient preference, making them perfect for everyone.
- Great for Kids: The step-by-step decorating makes this a hit for family activities and little helpers.
- Delicious Results: Beyond looks, these donuts stay soft and sweet—the perfect treat for any spooky celebration.

Ingredients You’ll Need
These Halloween donuts are all about colorful candy melts, classic glazed and chocolate donuts, and the fun little toppings that bring each character to life. When choosing candy melts, I always go for refined coconut oil or shortening to get that smooth, easy-to-dip consistency without weird flavors interfering.
- Glazed Donuts or Bars: The perfect neutral base to make your spooky designs pop.
- Filled Glazed Donuts: Adds variety in texture and flavor, especially great for Monster and Frankenstein treats.
- Purple Candy Melts: For monster eyes and details, these bring a great pop of color.
- Green Candy Melts: Essential for Frankenstein and monster skin effect, plus easy to melt.
- Bright White Candy Melts: For mummy bandages and spiderwebs, this white is bright and vivid.
- Black Frosting: Perfect for Dracula’s hair and Frankenstein’s stitches; thick and pipeable is best.
- Candy Eyes: Different sizes make it fun to customize your monsters and mummies with expressive faces.
- Plastic Fangs: A must-have for Dracula donuts—adds instant spooky character.
- Red Decorating Food Gel Icing: For Dracula’s signature blood-drop details around the fangs.
- Chocolate Frosted Donuts: The base for spiderweb donuts; the dark surface makes the white web shine.
- Sprinkles of Choice: Add a little extra texture and sparkle where you want.
- Refined Coconut Oil or Shortening: Helps thin out candy melts to the perfect dipping consistency without coconut flavor.
- Piping Bags & Tips (#104, #8, #3): For precise decorating—from broad mummy lines to tiny stitches.
Variations
I love how this recipe lets you get creative. You can mix and match colors or swap out candy melts for chocolate if you want a richer base. Feel free to customize with seasonal sprinkles or try adding edible glitter for an extra creepy-cute effect.
- Use Vegan or Gluten-Free Donuts: I’ve tried these decorating ideas with gluten-free donuts, and they worked wonderfully with zero loss of fun.
- Adjust Candy Melt Colors: Swap in orange for the monster melts for a pumpkin vibe! My family loved the bright twist I did last year.
- Try Different Fillings: Filled donuts with raspberry or chocolate cream add a delicious surprise when biting into your creations.
- Make Mini Versions: Smaller donuts are perfect for party trays or bite-sized spooky fun. Mini donuts take half the time to decorate too!
How to Make Halloween Donuts: Spooky and Festive Decorating Ideas for Monster, Frankenstein, Mummy, Dracula, and Spiderweb Donuts Recipe
Step 1: Prep Your Workspace and Donuts
I always start by lining one or two baking sheets with parchment paper—trust me, it makes cleanup and drying way easier. Place your donuts on these sheets as you decorate. Having everything prepped and ready means you won’t feel rushed while working through the different designs, which helps you get better results.
Step 2: Perfectly Melt Your Candy Melts
Here’s where patience pays off! Heat your candy melts with a tablespoon of refined coconut oil or shortening to get a smooth, scoopable consistency. I like to microwave at 50% power in 30-second bursts, stirring in between. Sometimes the last few lumps melt just by sitting a minute—no overheating necessary. If your melts feel thick still, add more coconut oil by the teaspoon until they’re silky but not runny. This method keeps your candy melts from burning or clumping, which was a game-changer for me.
Step 3: Create Your Monster Donuts
Dip your glazed or filled donuts face down into the green or purple candy melts. Press on various sizes of candy eyes while the coating is still wet, then sprinkle on decorations if you like. Set them on parchment to dry. You’ll love how these monsters come alive just by adding eyes and sprinkles—the kids are always so impressed!
Step 4: Frankenstein Donuts Go Next
Dip your filled donuts in green candy melts first, then add eyes immediately. Let them dry for 3-5 minutes on your parchment. Meanwhile, split your black frosting between two piping bags—one with a larger tip (#8) for hair and one with a smaller tip (#3) for stitching and mouth details. Pipe hair spikes and stitch marks to bring Frankenstein’s monster to life. My trick is to keep extra frosting handy for touch-ups later!
Step 5: Wrap Up with Mummy Donuts
Melt your white candy melts for the mummy look and pour them into a piping bag with a #104 tip (this makes those perfect bandage stripes). First, gently stick candy eyes onto the donuts with a dab of candy melt. Then pipe thick, overlapping strips across the donut surface in layers—start with lines around the eyes and then zigzag more over the whole donut. This layered look took me a couple of tries to perfect, but it’s so worth it.
Step 6: Dracula Donuts for Classic Creepy Vibes
Pop those plastic fangs halfway closed and press them into the center of your glazed donuts. Press candy eyes on with a little black frosting as glue, then pipe on Dracula’s widow’s peak hairline with the #8 tip. Just a drop of red gel icing around the fangs adds that perfect bloody touch. I always find these particularly fun at parties because they’re dramatic yet so simple.
Step 7: Finish Off with Spiderweb Donuts
Use chocolate frosted donuts as your base here. Melt white candy melts and pipe concentric circles over the donut with a #3 piping tip. Then take a toothpick or skewer and drag lines from the center outward, creating a spiderweb effect. To complete the look, place plastic spiders strategically. It’s surprisingly easy but looks super impressive—your guests will think you’re a pro decorator.
Pro Tips for Making Halloween Donuts: Spooky and Festive Decorating Ideas for Monster, Frankenstein, Mummy, Dracula, and Spiderweb Donuts Recipe
- Candy Melts Consistency: I learned that thinning gradually with coconut oil is key—too much and your designs lose shape, too little and it’s hard to dip.
- Let Donuts Dry Thoroughly: I once rushed this step, and my decorations smudged; giving them at least 5 minutes to set saved me headaches.
- Use Parchment Paper: Cleaning up is so much easier, and it prevents the decorated donuts from sticking.
- Avoid Overheating Candy Melts: Overheated melts get clumpy and tough to work with; slow melting ensures smooth, shiny results.
How to Serve Halloween Donuts: Spooky and Festive Decorating Ideas for Monster, Frankenstein, Mummy, Dracula, and Spiderweb Donuts Recipe
Garnishes
Besides the obvious candy eyes and plastic fangs, I like to add edible glitter or tiny Halloween-themed sprinkles around the edges for a little festive sparkle. Sometimes using colored sugar or even crushed cookies can add texture and make each donut feel extra special.
Side Dishes
These donuts pair wonderfully with a simple hot chocolate or a cold glass of milk. At parties, I’ve served them alongside pumpkin-shaped cookies or spiced apple cider to keep the Halloween vibe flowing strong.
Creative Ways to Present
I love arranging these donuts on tiered trays or decorating a cake stand with fake cobwebs and plastic spiders for a full spooky display. Another favorite trick is placing each donut in little cupcake wrappers decorated with Halloween motifs—that way, guests get their own individual treat that’s both festive and mess-free!
Make Ahead and Storage
Storing Leftovers
If you have leftovers (which rarely happens in my house!), store them in an airtight container at room temperature for up to 2 days. I avoid refrigerating because it can dry out the donuts and affect the candy melts’ shine.
Freezing
I’ve frozen these donuts wrapped individually in plastic wrap and then in a sealed bag for up to a month. When you’re ready to enjoy, just thaw at room temperature for about an hour. The candy melts and decorations hold up surprisingly well.
Reheating
Reheating isn’t usually necessary, but if you want fresh warmth, pop a donut in the microwave for 10 seconds max—any more and you risk melting your decorations. I prefer eating these just as they are for the perfect texture and flavor.
FAQs
-
Can I use homemade donuts instead of store-bought?
Absolutely! Homemade donuts work great for this recipe. Just make sure they’re fully cooled before decorating, and consider glazing them lightly if you want a glossy base for your candy melts to stick well.
-
What if I don’t have candy melts? Can I use chocolate instead?
Yes, you can substitute white or colored chocolate melts, but keep in mind they might behave slightly differently in melting and setting times. Adding a bit of coconut oil can help with consistency and ease of dipping.
-
How do I prevent the candy melts from clumping?
The key is gentle heating. Use microwave bursts at half power, stirring frequently, and avoid overheating. Adding a teaspoon of coconut oil when needed keeps the melts smooth and glossy.
-
How long will these decorated donuts stay fresh?
Best eaten within 1-2 days when stored properly at room temperature in an airtight container. After that, the texture and decoration quality may begin to degrade.
Final Thoughts
This Halloween Donuts: Spooky and Festive Decorating Ideas for Monster, Frankenstein, Mummy, Dracula, and Spiderweb Donuts Recipe holds a special place in my heart (and kitchen!). It’s become my go-to treat during the fall because it brings so much joy in the making—and the eating! The best part? You don’t have to be a pro baker to create donuts that look amazing and taste delicious. I hope you have as much fun with these decorations as I do and that they bring plenty of smiles to your Halloween celebrations.
Print
Halloween Donuts: Spooky and Festive Decorating Ideas for Monster, Frankenstein, Mummy, Dracula, and Spiderweb Donuts Recipe
- Prep Time: 10 minutes
- Cook Time: 0 minutes (melting candy melts in microwave)
- Total Time: 30 minutes
- Yield: 36 Donuts
- Category: Dessert
- Method: No-Cook
- Cuisine: American
Description
Celebrate Halloween with these fun and festive Halloween Donuts decorated as Monsters, Frankenstein, Mummies, Dracula, and Spiderwebs. Using colorful candy melts, frosting, candy eyes, and creative piping techniques, these no-bake decorated donuts are perfect for a spooky party or treat!
Ingredients
Monster Donuts
- ½ Dozen Glazed Donuts or Bars
- ½ Dozen Filled Glazed Donuts
- 6 oz Purple Candy Melts
- 6 oz Green Candy Melts
- 2-4 tbsp refined coconut oil or shortening
- Candy Eyes (various sizes)
- Sprinkles of choice
Frankenstein Donuts
- ½ Dozen Filled Donuts or Bars
- 6 oz Green Candy Melts
- 2-4 tbsp refined coconut oil or shortening
- 12 Candy Eyes
- 1-2 cups Black Frosting
Mummy Donuts
- ½ Dozen Glazed Donuts
- 12 oz Bright White Candy Melts
- 2-6 tbsp refined coconut oil or shortening
- 12 Candy Eyes
Dracula Donuts
- ½ Dozen Glazed Donuts
- 1-2 cups Black Frosting
- 12 Candy Eyes
- 6 Plastic Fangs
- Red Decorating Food Gel Icing
Spiderweb Donuts
- ½ Dozen Chocolate Frosted Donuts
- 6 oz Bright White Candy Melts
- 2-4 tbsp refined coconut oil or shortening
- 6 Plastic Spiders
Additional Items
- Piping Bags
- #104 Piping Tip
- #8 Piping Tip or a 7mm Writing Tip
- #3 Piping Tip
Instructions
- Prepare workspace. Line 1 or 2 baking sheets with parchment paper to place decorated donuts on for drying.
- Make Monster Donuts. Melt purple and green candy melts separately with 1 tbsp coconut oil or shortening each. Heat in microwave for 30 seconds at 50% power, stir, repeat until melted. Allow residual heat to melt remaining lumps. Add coconut oil 1 tsp at a time if mixture is too thick to reach desired consistency without overheating. Dip donuts face down into candy melts, press on candy eyes and sprinkles, then set on prepared baking sheets to dry.
- Make Frankenstein Donuts. Melt green candy melts with 1 tbsp coconut oil or shortening using the same method as before. Dip donuts face down, place on lined baking sheet and press on candy eyes. Allow to dry for 3-5 minutes. Divide black frosting between two piping bags: one with #8 writing tip (more frosting) and one with #3 tip. Pipe hair with #8 tip; pipe mouth and stitches with #3 tip for Frankenstein features.
- Make Mummy Donuts. Melt white candy melts with 1 tbsp coconut oil or shortening as before. Pour melted candy melts into a piping bag with #104 tip. Attach candy eyes by placing a little melted candy on back and sticking them on donuts. Pipe white candy melts in strips around donuts to resemble bandages, starting with two lines around eyes and crisscrossing.
- Make Dracula Donuts. Close plastic fangs halfway and press into center of glazed donuts. Place small amount of black frosting behind candy eyes and press onto donuts. Pipe hair using black frosting and #8 piping tip. Pipe red edible gel around teeth to resemble blood.
- Make Spiderweb Donuts. Melt white candy melts with 1 tbsp coconut oil or shortening similarly. Pour into piping bag with #3 tip. Pipe concentric circles on chocolate frosted donuts and drag a toothpick or skewer from center outward to create spiderweb effect. Place plastic spiders on donuts as decoration.
- Dry and serve. Allow all decorated donuts to dry on parchment-lined baking sheets before serving.
Notes
- Candy Melts: Different brands melt differently. Refined coconut oil is preferred to avoid a coconut flavor, but shortening works well too.
- Mummy Donuts: Keep candy melts slightly thick for bandage-like appearance. Thin candy melts cause the bands to blend instead of looking like strips.
- Black Frosting: Make your own chocolate buttercream tinted with black food gel or use pre-made black frosting tubes.
- Be careful not to overheat candy melts to avoid clumping or burning.
- Nutrition estimates vary based on donut type and decoration amounts.
Nutrition
- Serving Size: 1 Donut
- Calories: 220
- Sugar: 18g
- Sodium: 150mg
- Fat: 12g
- Saturated Fat: 5g
- Unsaturated Fat: 6g
- Trans Fat: 0g
- Carbohydrates: 27g
- Fiber: 1g
- Protein: 2g
- Cholesterol: 10mg

