
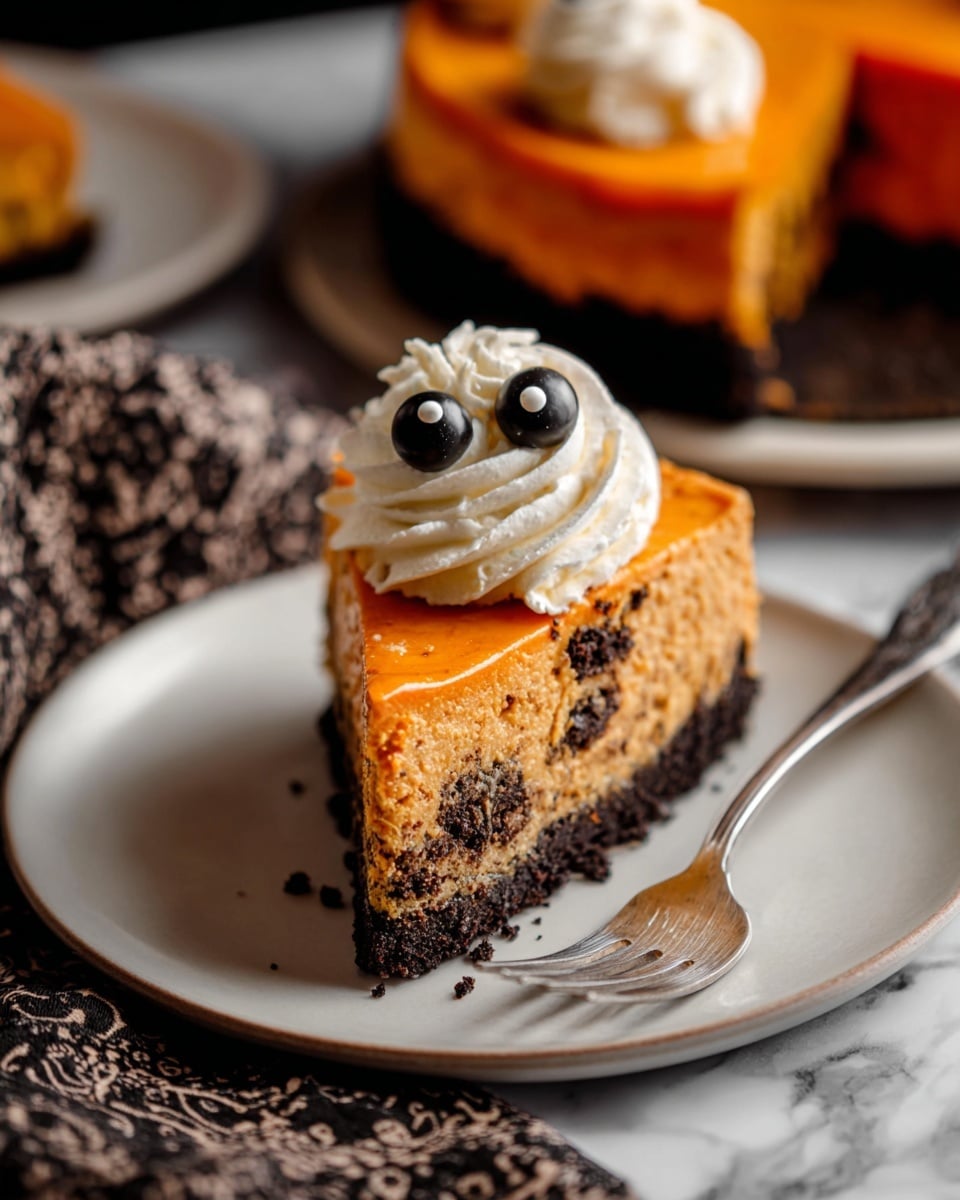
If you’re on the hunt for a dessert that’s both spooky and irresistibly creamy, you’re going to adore this Halloween Cookies & Cream Cheesecake with Whipped Ghosts Recipe. I absolutely love how this cheesecake blends the classic Cookies & Cream flavors with a fun Halloween twist, topped off with the cutest whipped cream ghosts you’ve ever seen. Trust me, whether it’s for a party or just to treat yourself, this dessert steals the show every single time.
Why You’ll Love This Recipe
- Perfect Balance of Flavors: The classic Oreo cookies mixed into the smooth cheesecake batter create a rich Cookies & Cream flavor you just can’t resist.
- Fun Halloween Theme: Those charming whipped cream ghosts with candy eyes make this dessert as cute as it is delicious.
- Moist & Creamy Texture: Thanks to the water bath baking method, you get a perfectly creamy cheesecake without cracks.
- Make-Ahead Friendly: You can prepare this cheesecake a day ahead, which means less stress for your Halloween celebration.

Ingredients You’ll Need
It’s amazing how just a handful of ingredients can come together to make something so delectable. You’ll find that choosing full-fat cream cheese and high-quality Oreos really makes a difference here.
- Oreos: Using Halloween-themed Oreos adds a festive touch, but regular ones work great too—just consider removing fillings for the crust to control butter content.
- Unsalted butter: Melted butter binds the Oreo crust; unsalted lets you manage the salt level perfectly.
- Cream cheese: Full-fat, room temperature cream cheese gives that dreamy creamy texture without lumps.
- Granulated sugar: Sweetens the cheesecake just right without overpowering.
- Heavy whipping cream: Adds richness—make sure it’s at room temperature to blend smoothly.
- Greek yogurt or sour cream: These add tenderness and a slight tang, balancing the sweetness beautifully.
- Vanilla extract: A little vanilla lifts the flavor and enhances the cheesecake’s depth.
- Orange food coloring: Optional but fun for that Halloween vibe—gel food coloring works best for vibrant color without thinning the batter.
- Eggs and egg yolks: They give structure to the cheesecake; room temperature helps them incorporate evenly.
- Candy eyes: For decorating your whipped cream ghosts and adding a whimsical finishing touch.
- Homemade whipped cream: Light and fluffy to create those adorable ghost toppers.
Variations
I love how versatile this Halloween Cookies & Cream Cheesecake with Whipped Ghosts Recipe is. Depending on your mood or dietary needs, you can totally tweak it to fit your style or occasion.
- Gluten-Free Variation: Swap standard Oreos for gluten-free cookies—I’ve done this with great success for friends with gluten restrictions.
- Dairy-Free Option: Use dairy-free cream cheese and coconut whipped cream; my cousin swears by this for her dairy-free Halloween party.
- Chocolate Lover’s Boost: Mix in mini chocolate chips or drizzle melted dark chocolate on top after baking for an extra indulgence.
- Color & Theme: You can skip the orange food coloring or swap it for other gel colors to match your Halloween décor or personal taste.
How to Make Halloween Cookies & Cream Cheesecake with Whipped Ghosts Recipe
Step 1: Make the Oreo Crust
First things first, preheat your oven to 325°F (162°C)—you want to get everything ready! Toss those Oreos into a food processor until they become fine crumbs (this is where I like to pretend I’m a cookie monster). Mix in the melted unsalted butter till the crumbs stick together. Press this mixture firmly into the bottom of a greased 9″ springform pan, then pop it in the oven for about 8-10 minutes. This sets the crust nicely so it holds up under that creamy filling. While it cools, you can prep your filling.
Step 2: Whip Up the Cookies & Cream Cheesecake Filling
In a big bowl, beat the full-fat cream cheese on medium-high until smooth—about 2 minutes. I discovered that letting your cream cheese soften at room temp before mixing really stops lumps from creeping in, saving you from frustration later. Add the sugar and beat again, then slow it down to low speed and slowly mix in the heavy cream, Greek yogurt, vanilla, and orange food coloring (if you’re using it). Now, add eggs and yolks one at a time, mixing on low so you don’t whip in too much air—this helped me avoid cracks in the cheesecake every time! Fold in the chopped Oreos gently; this step is all about being tender with your batter.
Step 3: Bake in a Water Bath
Pour the batter over your cooled crust in the springform pan. Here’s a trick I learned: use a water bath by placing the cheesecake pan inside two larger pans filled with hot water halfway up the sides. This keeps the cheesecake moist and gives you that silky texture without cracking—trust me, it’s worth the extra pans. Bake it for about 1 hour and 35 minutes to 1 hour and 50 minutes. You’ll know it’s ready when there’s just a tiny jiggle in the middle. I always double-check with my instant-read thermometer—145°F (63°C) is the perfect finish line. Then, turn the oven off and leave the cheesecake inside for an hour to cool slowly. This gentle cooling trick stops big cracks from forming.
Step 4: Chill & Decorate with Whipped Cream Ghosts
Once cooled down at room temperature, chill your cheesecake in the fridge for at least 6 hours or ideally overnight to let it set fully. When ready to serve, loosen the crust carefully with a spatula and remove the springform ring. Time for my favorite part—the whipped cream ghosts! I make fresh whipped cream (you can use store-bought too, but homemade is just fluffier and tastes fresher). Pipe ghost shapes all over the top and perch little candy eyes on them. They’re not just adorable, they bring a light creaminess that makes every forkful feel festive and fun.
Pro Tips for Making Halloween Cookies & Cream Cheesecake with Whipped Ghosts Recipe
- Room Temperature Ingredients: Taking your cream cheese, eggs, and heavy cream to room temp helps everything combine smoothly without lumps.
- Low Mixer Speed After Sugar: After beating in the sugar, switch to low speed to avoid too much air and cracking.
- Use a Water Bath: The water bath prevents the cheesecake from drying out or cracking—it’s a game changer.
- Slow Cooling: Let the cheesecake cool in the oven with the door ajar for an hour; this gentle temperature change keeps the texture perfect.
How to Serve Halloween Cookies & Cream Cheesecake with Whipped Ghosts Recipe
Garnishes
I personally love topping my cheesecake with those cute whipped cream ghosts and candy eyes because it adds whimsy and extra creaminess. Sometimes I sprinkle crushed Oreos or a little edible glitter to catch the light for parties. If you want to mix it up, chocolate curls or small candy pumpkins work really well too!
Side Dishes
Pairing this rich cheesecake with something fresh is key—I like serving it with a simple mixed berry salad or a tangy cranberry compote to cut through the richness. Hot apple cider or a spiced coffee complements the Halloween vibe perfectly, too.
Creative Ways to Present
For Halloween parties, I’ve arranged mini cheesecakes in mason jars topped with ghost whipped cream and candy eyes—everyone loved how easy it was to grab and go! Another time, I piped the whipped cream ghosts around the edges to create a spooky border and drizzled orange chocolate ganache for a dramatic effect.
Make Ahead and Storage
Storing Leftovers
Leftovers keep really well in the fridge for up to 5 days if you cover the cheesecake tightly with plastic wrap or store it in an airtight container. I recommend putting it in the coldest part of your fridge to preserve the texture and freshness.
Freezing
I’ve frozen this cheesecake successfully by wrapping it very tightly in plastic and then foil—freezes beautifully for up to 3 months. For best texture, thaw it overnight in the fridge rather than at room temperature. Just be sure to add your whipped cream ghosts fresh after thawing.
Reheating
This cheesecake is best enjoyed cold, so I don’t recommend reheating. However, if you want it a little less chilled, I gently let slices sit out for 10-15 minutes before serving to take the chill off and soften the texture.
FAQs
-
Can I use regular Oreos instead of Halloween Oreos for this cheesecake?
Absolutely! Regular Oreos work just as well. If you want a lighter crust, you can remove the cream filling from some of the Oreos before crushing. Either way, your cheesecake will be just as delicious and festive.
-
Why is the water bath necessary when baking this cheesecake?
The water bath provides gentle, even heat and adds moisture to the oven environment. This helps prevent cracking and creates that smooth, creamy texture that makes cheesecakes so special. Trying it changed the way I bake cheesecakes forever!
-
Can I prepare the whipped cream ghosts ahead of time?
It’s best to prepare the whipped cream ghosts just before serving so they stay light, fluffy, and visually fun. You can make the whipped cream ahead and keep it chilled, but pipe the ghosts and add candy eyes last minute.
-
How do I avoid cracks in my cheesecake?
Use room temperature ingredients, mix at low speed after adding eggs, bake in a water bath, and cool the cheesecake slowly in the oven with the door slightly open. These tricks have always helped me get that flawless top every time.
-
Can I make this recipe dairy-free or vegan?
Yes! Substitute dairy cream cheese with a plant-based alternative, use coconut yogurt, and swap heavy cream for coconut cream. For vegan whipped cream ghosts, use whipped coconut cream. The texture and flavor will differ slightly, but it’s still a fun Halloween treat.
Final Thoughts
This Halloween Cookies & Cream Cheesecake with Whipped Ghosts Recipe has become a total staple in my household every fall. There’s something so satisfying about that creamy, dreamy cheesecake paired with the festive fun of ghostly whipped cream that everyone, from kids to adults, raves about. If you’re looking for a dessert that’s show-stopping but approachable, I genuinely encourage you to give this recipe a try—it’s like a warm hug on a chilly October evening, and I promise your family and friends will be asking for seconds.
Print
Halloween Cookies & Cream Cheesecake with Whipped Ghosts Recipe
- Prep Time: 25 minutes
- Cook Time: 1 hour 50 minutes
- Total Time: 10 hours 15 minutes
- Yield: 10 slices
- Category: Dessert
- Method: Baking
- Cuisine: American
Description
This Halloween Cheesecake features a rich and creamy cookies and cream cheesecake nestled on a crunchy Oreo crust, decorated with whipped cream ghosts and candy eyes for a festive spooky touch. Baked with a water bath to ensure a smooth, crack-free texture, it combines classic flavors with a fun Halloween twist, perfect for holiday celebrations.
Ingredients
Oreo Crust
- 20 Oreos
- ¼ cup (57g) unsalted butter, melted
Cookies & Cream Cheesecake
- 32 ounces (900g) full fat block cream cheese, completely softened to room temperature
- 1 cup (200g) granulated sugar
- ¼ cup (60mL) heavy whipping cream, at room temperature
- 5 ounces (153g) Greek yogurt or sour cream (about ⅔ cup), at room temperature
- 1 Tablespoon vanilla extract
- Orange food coloring (gel preferred), to tint
- 4 large eggs, at room temperature
- 2 large egg yolks, at room temperature
- 14 Oreos, chopped
Whipped Cream Ghosts
- 1 cup homemade whipped cream
- Candy eyes
Instructions
- Prepare Oreo Crust: Preheat the oven to 325ºF (162ºC). Spray a 9″ springform pan with nonstick spray and set aside. Crush 20 Oreos in a food processor until fine crumbs form. Mix with melted butter in a large bowl, then press the mixture into the bottom of the springform pan. Bake for 8-10 minutes until set, then remove and let cool while preparing the filling.
- Make Cheesecake Batter: Using a handheld or stand mixer fitted with a paddle attachment, beat the softened cream cheese on medium-high speed until smooth (about 2 minutes). Add granulated sugar and beat again until combined (another 2 minutes). Reduce mixer speed to low. Add heavy cream, Greek yogurt or sour cream, vanilla extract, and orange food coloring and mix until fully incorporated.
- Add Eggs and Oreos: Add eggs one at a time, mixing on low speed just until combined, ensuring the batter is smooth without lumps. Gently fold in the chopped 14 Oreos, being careful not to overmix.
- Assemble for Baking: Pour the batter over the cooled crust in the springform pan. Create a water bath by placing the springform pan inside a slightly larger round pan (10″ cake pan), which is then placed into an even larger pan (12″ cake pan or roasting pan). Fill the outer pan with hot water halfway up the sides of the middle pan.
- Bake the Cheesecake: Carefully transfer the entire setup to the oven. Bake for 1 hour 35 minutes to 1 hour 50 minutes. The center (about 2″ wide) should jiggle slightly and have an internal temperature of 145ºF (63ºC) when checked with a thermometer. Turn off the oven and let the cheesecake cool inside for 1 hour with the door slightly ajar.
- Cool Completely: Remove the springform pan from the water bath pans and place it on a cooling rack for 2 hours until cooled to room temperature. Then, cover or wrap tightly and chill in the refrigerator for at least 6 hours, preferably overnight.
- Decorate with Whipped Cream Ghosts: Once chilled, loosen the crust edges with a spatula or butter knife, release the springform pan ring, and top the cheesecake with homemade whipped cream ghosts. Add candy eyes for a festive Halloween decoration.
- Storage: Store leftovers in the refrigerator for up to 5 days. The cheesecake freezes well for up to 3 months; thaw overnight in the refrigerator before serving.
Notes
- Oreos: For Halloween Oreos (Double Stuf), remove the filling from about half to avoid excess butter in the crust. Regular Oreos can be used whole.
- Orange Food Coloring: Use gel food coloring (e.g., AmeriColor) to tint the cheesecake batter to your preferred shade or omit if desired.
- Mixer Speed: Keep mixer speed low after adding wet ingredients to prevent incorporating too much air, which can cause cracks in the cheesecake.
- Water Bath: Using nested pans for the water bath eliminates the need to wrap the pan in foil and ensures even baking.
- Cooling: Prop the oven door open with a wooden spoon or spatula during the cooldown period to prevent cracking.
Nutrition
- Serving Size: 1 slice (1/10th of cheesecake)
- Calories: 560
- Sugar: 32g
- Sodium: 350mg
- Fat: 42g
- Saturated Fat: 25g
- Unsaturated Fat: 13g
- Trans Fat: 0g
- Carbohydrates: 40g
- Fiber: 1g
- Protein: 8g
- Cholesterol: 160mg


