
If you’re dreaming of a fun, festive treat that screams holiday cheer and packs a punch of peppermint goodness, you have to try my Grinch Cookies with Peppermint and Green Food Coloring Recipe. These little green delights are soft, fluffy, and bursting with that wintry mint flavor that just makes you want to cozy up with a cup of cocoa. Trust me, once you make these, they’ll be the star of your cookie platter and impossible to resist!
Why You’ll Love This Recipe
- Super simple and quick: Mixing cake mix with just a few ingredients means you get festive cookies on your table fast.
- Perfect peppermint flavor: The peppermint extract gives these cookies an irresistible minty twist that’s just right, not overpowering.
- Eye-catching green color: Thanks to gel food coloring, these cookies get that iconic Grinch green that’s vibrant and fun for holiday parties.
- Great texture every time: They bake soft with slightly crisp edges — a texture I’ve found everyone loves, especially kids.

Ingredients You’ll Need
I love how these ingredients come together to make cheerful and minty cookies that are light but flavorful. When shopping, look for a good quality white cake mix and gel food coloring to get that rich green color without watering down your dough.
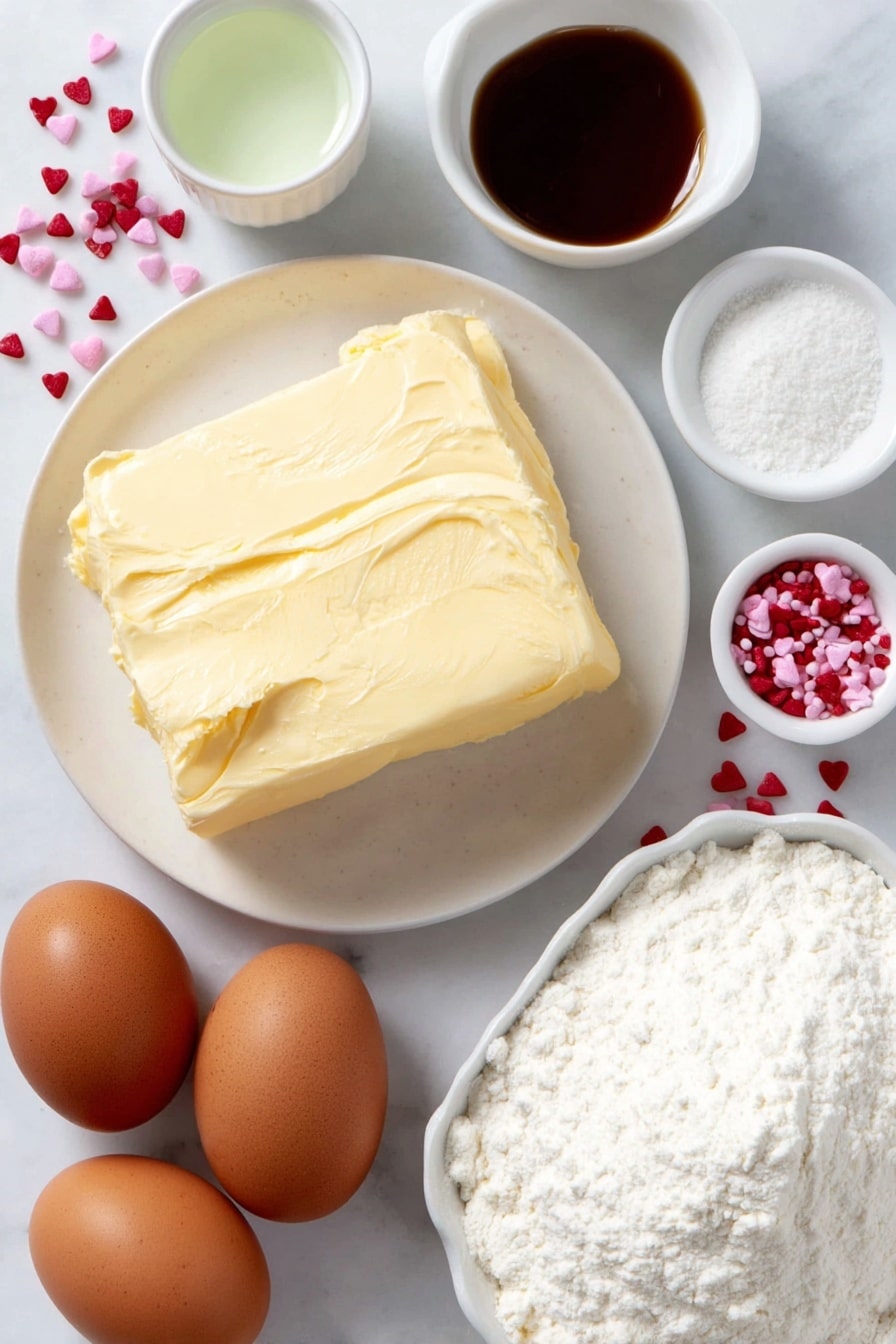
- White cake mix: Your cookie base that guarantees softness without fussing over flour and leavening agents.
- Unsalted butter: Softened for easy mixing and rich flavor control.
- Large eggs: At room temperature for better incorporation and soft crumb.
- Peppermint extract: This brings the festive minty zing; you can swap with mint extract for a slightly different twist.
- Vanilla extract: Adds warmth and rounds out the flavor opposite the peppermint.
- Green gel food coloring: For that perfect Grinch green without watering down the dough.
- Powdered sugar: Used to coat the dough balls, keeping them from sticking and giving a delicate bite.
- Cornstarch: Mixed with powdered sugar to add a light barrier that helps the dough roll easier.
- Red heart-shaped sprinkles or cinnamon hearts: The finishing touch that’s adorable and adds a festive pop of color.
Variations
I’ve played around with a few ideas to make this Grinch Cookies with Peppermint and Green Food Coloring Recipe really my own, and it’s fun to personalize it for your own holiday style. Whether you want to dial up the chocolate or keep it allergy-friendly, there’s something here for you to try.
- Chocolate Peppermint Grinch Cookies: I once stirred in mini chocolate chips, which gave a sweet, melty surprise in every bite—big hit at my family gathering!
- Vegan variation: Swap the butter for vegan margarine and eggs for flax eggs; the texture changes a bit, but you still get great flavor and that festive color.
- Less sweet version: I sometimes use half the powdered sugar coating if you prefer something not too sugary—and it still looks fabulous.
- Festive shapes: Instead of scooping dough balls, roll out the dough slightly and cut into Grinch-themed shapes with cookie cutters before baking.
How to Make Grinch Cookies with Peppermint and Green Food Coloring Recipe
Step 1: Mix Together the Basics
First, preheat your oven to 375°F and line a baking sheet with parchment paper so nothing sticks—this step made my life so much easier! Next, grab your hand mixer or stand mixer and combine the white cake mix, softened butter, and eggs until you get a nice uniform dough. You’ll notice it’s thick and a bit sticky—that’s perfect!
Step 2: Add Peppermint and Color
Now comes the fun part—add the peppermint and vanilla extracts, then mix in your green gel food coloring until you hit that festive shade of green you love. I like to start with a little coloring and build it up; it’s easier to add more than fix if it’s too bright. Mix on low just until everything is combined so you keep that lovely dough texture intact.
Step 3: Prepare Your Coating
In a small bowl, whisk together the powdered sugar with the cornstarch. This combo is a game-changer—I discovered that this keeps the cookie dough from sticking to your hands or scoop and adds a delicate sweetness and texture.
Step 4: Scoop, Roll, and Bake
Using a 1½ tablespoon cookie scoop (or a spoon if you don’t have one), scoop dough balls and roll them in the powdered sugar mixture to coat completely. The dough is sticky, so this step is essential to keep things tidy. Arrange the dough balls about one inch apart on your prepared baking sheet. Bake for 10-12 minutes—when the edges set and the tops appear dry, they’re ready!
Step 5: Add Your Festive Touch and Cool
Right when the cookies come out of the oven, gently press a red heart-shaped sprinkle or cinnamon heart in the center of each to give them that adorable Grinch-y pop. Let the cookies cool on the baking sheet for about 5 minutes before transferring to a wire rack to cool completely. This cooling time helps them set up perfectly.
Pro Tips for Making Grinch Cookies with Peppermint and Green Food Coloring Recipe
- Use gel food coloring: Gel colors give you that vivid green without thinning your dough, unlike liquid colorings which can alter texture.
- Don’t skip chilling (optional): While not in the original recipe, if you have time, chilling the dough for 30 minutes helps with rolling and shape retention.
- Perfect your scoop size: Using the same sized scoop ensures even baking and consistent cookie sizes, which is especially helpful when baking multiple batches.
- Press sprinkles while warm: Adding the decorative hearts right out of the oven helps them stick perfectly without breaking the cookies.
How to Serve Grinch Cookies with Peppermint and Green Food Coloring Recipe

Garnishes
I honestly keep it simple with the red heart-shaped sprinkles because they contrast so beautifully with the green, but I’ve also tried crushed candy canes sprinkled on top just before baking for a crunchy surprise. Both options add that extra festive touch I love.
Side Dishes
These cookies pair wonderfully with a warm mug of hot chocolate (extra marshmallows, please!) or peppermint latte. If you’re doing a holiday party, I like to serve them alongside sugar cookies and gingerbread for a themed treat table.
Creative Ways to Present
Try stacking these Grinch Cookies tied up with a red ribbon as party favors, or arrange them around a platter with Holly and pine sprigs for a photo-worthy centerpiece. For kids, I’ve turned them into a “Grinch Snack Plate” with a small bowl of milk and green-themed candies — it’s always a fun hit.
Make Ahead and Storage
Storing Leftovers
I keep leftover Grinch Cookies in an airtight container at room temperature, and they stay fresh and soft for about 4 days. If you want to keep that just-baked texture, add a slice of bread in the container—it helps keep the cookies moist.
Freezing
Once the cookies are completely cool, I freeze them flat in a single layer on a baking sheet, then transfer to a freezer-safe bag or container. They hold up great for up to 3 months and thaw quickly when you’re ready to enjoy them again.
Reheating
To reheat, I pop a couple of cookies in the microwave for about 10-15 seconds, which revives their softness beautifully. You could also do a quick warm-up in a low oven for around 5 minutes if you prefer a slight crisp edge.
FAQs
-
Can I use regular liquid food coloring instead of gel?
While you can use liquid food coloring, gel food coloring is recommended because it doesn’t thin out the cookie dough. Liquid colors may change the texture, making your dough more sticky and impacting baking results.
-
Can I substitute peppermint extract with another flavor?
Yes! Mint extract works well as a substitute and gives a slightly different but still refreshing flavor. You could even experiment with almond or vanilla extract, though that will alter the cookie’s signature taste.
-
How do I prevent Grinch Cookies from spreading too much?
Make sure your butter is softened but not melted, and avoid adding extra liquid colors. Chilling the dough before baking also helps the cookies keep their shape and prevents excessive spreading.
-
Can I make these cookies ahead of time?
Absolutely! You can prepare the dough and chill it for up to 24 hours before baking. Baked cookies store well for several days or freeze nicely for longer-term storage.
Final Thoughts
I absolutely love how this Grinch Cookies with Peppermint and Green Food Coloring Recipe turns out every time — the color, the flavor, the texture… it all just feels perfect for the holidays. When I first made these, I had no idea they’d become a staple in my Christmas baking rotation, but now my whole family goes crazy for them. If you want a guaranteed crowd-pleaser that’s easy, fun, and festive, grab your mixing bowl and give these a try this season. I promise you’ll be smiling as much as the Grinch does — maybe even more!
Print
Grinch Cookies with Peppermint and Green Food Coloring Recipe
- Prep Time: 15 minutes
- Cook Time: 10 minutes
- Total Time: 25 minutes
- Yield: 30 cookies
- Category: Dessert
- Method: Baking
- Cuisine: American
Description
These festive Grinch Cookies are a fun and easy Christmas treat featuring soft, minty green cookies coated in powdered sugar and topped with a cute red heart sprinkle. With a white cake mix base infused with peppermint and vanilla extracts and vibrant green food coloring, these cookies are perfect for holiday cookie plates and dessert tables. Quick to prepare and bake, they’re sure to steal the hearts of friends and family this season!
Ingredients
Dry Ingredients
- 15.25 ounces white cake mix (432 g box)
- ¼ cup powdered sugar (32 g)
- 3 tablespoons cornstarch
Wet Ingredients
- 8 tablespoons unsalted butter (softened)
- 2 large eggs (room temperature)
- 2 teaspoons peppermint extract (or mint extract)
- ½ teaspoon vanilla extract
Other
- Green gel food coloring
- Red heart-shaped sprinkle or cinnamon
Instructions
- Preheat the oven: Preheat your oven to 375°F (190°C). Line a large baking sheet with parchment paper and set aside for easy cleanup.
- Mix wet and dry ingredients: Using a hand-held mixer or stand mixer, combine the white cake mix, softened butter, and eggs until the mixture is well blended and smooth.
- Add flavorings and color: Stir in the peppermint (or mint) extract and vanilla extract. Add enough green gel food coloring to reach your desired festive shade. Mix on low speed just until everything is combined; the batter will be thick and sticky.
- Prepare powdered sugar coating: In a small bowl, whisk together the powdered sugar and cornstarch. This will be used to coat the cookie dough balls to reduce stickiness and create a nice outer texture.
- Scoop and coat dough balls: Using a 1½ tablespoon cookie scoop, portion out balls of dough. Roll each ball in the powdered sugar and cornstarch mixture to fully coat them. Place the coated balls about 1 inch apart on the prepared baking sheet.
- Bake the cookies: Bake in the preheated oven for 10 to 12 minutes, or until the cookie edges are set and the tops look dry but not browned.
- Add the topping: Immediately after removing the cookies from the oven, press a red heart-shaped sprinkle gently onto the center of each cookie so it adheres while still warm.
- Cool: Allow the cookies to cool on the baking sheet for 5 minutes, then transfer them to a wire rack to cool completely before serving.
Notes
- These cookies are perfect for holiday parties and make a festive addition to any cookie platter.
- The batter will be quite sticky, so coating the dough balls with powdered sugar and cornstarch helps make handling easier.
- If you can’t find red heart-shaped sprinkles, cinnamon hearts or red colored sugar sprinkles make a great substitute.
- Store cookies in an airtight container at room temperature for up to 5 days to maintain freshness.
- For a stronger mint flavor, adjust the peppermint extract to taste, but be careful not to overpower the cookie.
Nutrition
- Serving Size: 1 cookie
- Calories: 93 kcal
- Sugar: 7 g
- Sodium: 105 mg
- Fat: 4 g
- Saturated Fat: 2 g
- Unsaturated Fat: 2 g
- Trans Fat: 1 g
- Carbohydrates: 14 g
- Fiber: 1 g
- Protein: 1 g
- Cholesterol: 20 mg

