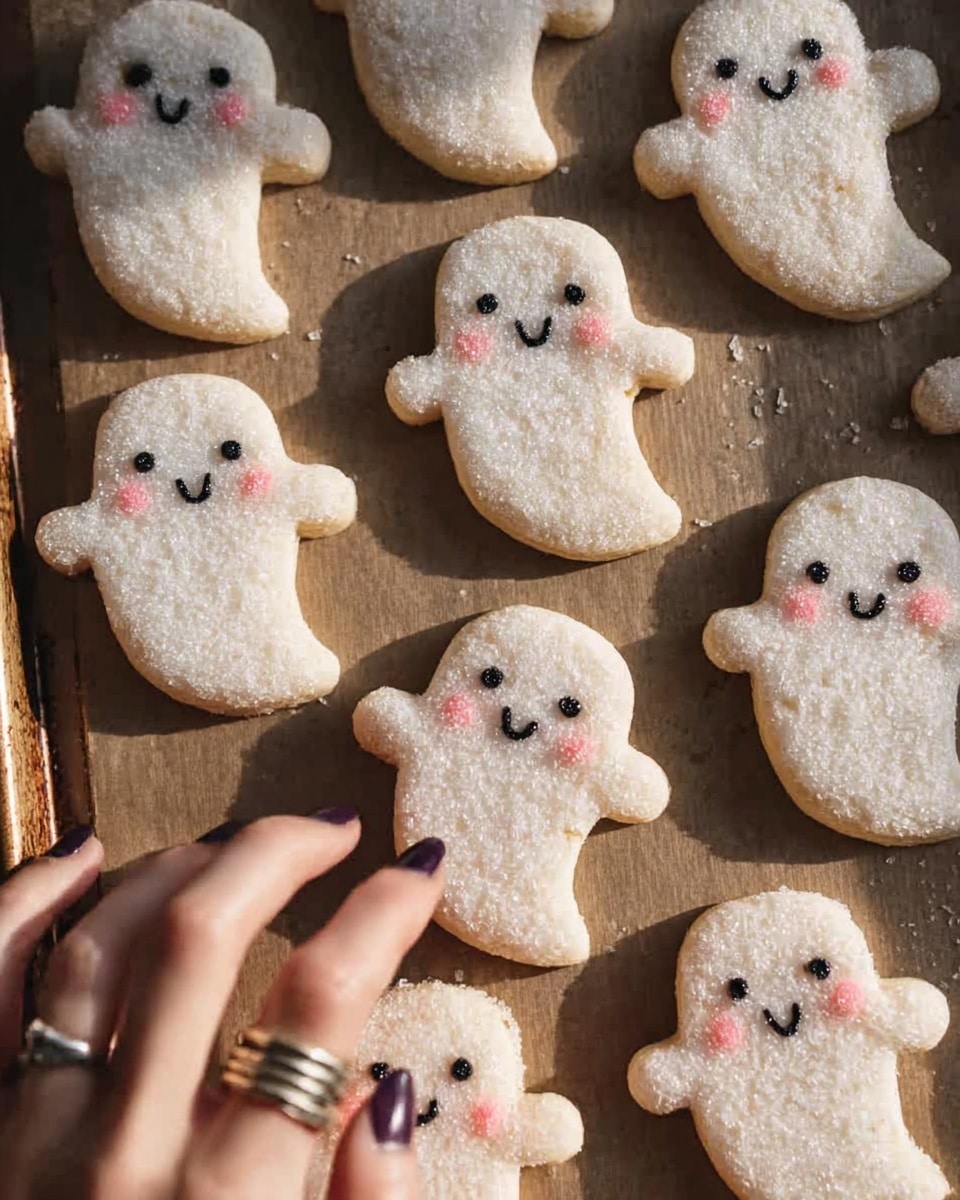
If you’re looking for a fun, spooky treat that’s also irresistibly soft and buttery, you’re in for a treat with this Ghost Cookies Recipe. These ghost-shaped cookies bring a whimsical charm to your cookie jar and a melt-in-your-mouth texture that will have everyone coming back for more. I absolutely love how they balance creamy, rich cream cheese in the dough with a luscious buttercream frosting that’s perfect for decorating. Plus, these cookies are easier to make than you might expect – I’m excited to share all my tips with you!
Why You’ll Love This Recipe
- Soft, Tender Texture: Thanks to cream cheese and butter, these cookies stay soft and chewy without being cakey or greasy.
- Fun and Festive: The ghost shapes and cute frosting faces make these perfect for Halloween or any spooky-themed party.
- No Spreading Cookies: Chilling the dough and the extra cornstarch help these maintain their shape beautifully as they bake.
- Frosting Flexibility: Creamy buttercream that you can color and style however you want – let your creativity shine!
Ingredients You’ll Need
The magic behind this Ghost Cookies Recipe lies in using a mix of classic cookie ingredients plus cream cheese, which gives these cookies that soft, rich crumb. I like to invest in good-quality vanilla extract or vanilla bean paste here because it really lifts the flavor.
- Unsalted Butter: Room temperature is key so it creams perfectly with the cream cheese.
- Cream Cheese: Full fat, room temp, it adds moisture and tenderness.
- Granulated Sugar: Use regular sugar to keep the texture right – no substitutes here.
- Large Egg: Room temperature ensures it mixes smoothly without shocking the butter.
- Vanilla Extract or Vanilla Bean Paste: I prefer vanilla bean paste for those pretty specks and intense flavor.
- All-Purpose Flour: Sifted or whisked to prevent lumps and designed for structure.
- Cornstarch: This little addition keeps cookies soft and delicate rather than tough.
- Baking Powder: To give just a bit of lift without puffing the cookies too much.
- Fine Salt: Enhances all the flavors and balances sweetness.
- Powdered Sugar: For the silky buttercream frosting.
- Heavy Whipping Cream: Added to frosting for the perfect spreadable consistency.
- Decorations (Sanding Sugar, Black Sprinkles, Pink Gel Food Coloring): To bring these adorable ghosts to life.
Variations
One of the best things about this Ghost Cookies Recipe is how easy it is to customize. Whether you want a less sweet frosting or a dairy-free version, there’s room to play around and make this your own.
- Gluten-Free Variation: I’ve tweaked this with a gluten-free all-purpose blend – just ensure it contains xanthan gum or add it yourself to help hold the shape.
- Flavor Twists: Add a pinch of cinnamon or pumpkin spice to the dough for a cozy fall version – my family goes crazy for that spin!
- Dairy-Free Version: Swap cream cheese and butter with coconut-based alternatives and a bit more cornstarch, though the texture will be slightly different.
- Frosting Flavors: Mix in a bit of lemon zest or peppermint extract to the buttercream for festive flavor twists.
How to Make Ghost Cookies Recipe
Step 1: Cream the Butter and Cream Cheese
Start by beating your softened butter and cream cheese until the mixture is smooth and light. I use my stand mixer with the paddle attachment set at medium speed, but a hand mixer works just as well. This step is so important because it sets the base for those soft, melt-in-your-mouth cookies. Don’t rush it — beat for about 1-2 minutes until you see there are no lumps and the texture is creamy.
Step 2: Mix in Sugar, Egg, and Vanilla
Next, add your granulated sugar and mix on medium-high to lighten the mixture; you’ll notice the dough takes on an almost fluffy look. Then, mix in the egg and vanilla extract on medium speed until everything’s combined. I make sure my egg is room temperature, so it blends in without breaking the buttercream.
Step 3: Combine Dry Ingredients and Incorporate
Whisk together flour, cornstarch, baking powder, and salt in a separate bowl. Adding cornstarch is a small trick I learned that really helps keep the cookies tender. Gently add the dry ingredients to your wet mixture in two parts, mixing on low speed just until combined. Overmixing here can make your cookies tough – I usually scrape the sides of the bowl between additions with a spatula to make sure everything blends evenly.
Step 4: Chill the Dough
The dough will be sticky, which is totally normal. Divide it in half, flatten into rectangles about half an inch thick, wrap tightly in plastic wrap, and refrigerate for at least 2 hours or overnight. If I’m short on time, I pop it in the freezer for about 30 minutes. This chilling step is a game-changer because it stops spreading and helps the cookies keep their lovely ghost shape when baked.
Step 5: Roll, Cut, and Chill Again
Once chilled, remove one dough portion from the fridge and keep the other cold. Roll out the dough between sheets of plastic wrap dusted with flour to about ⅓-inch thickness. I’ve found this method cuts down on mess and makes rolling easier. Cut out ghost shapes with a 2 ½-inch cookie cutter, or if you don’t have one, a small sharp knife works just fine! Brush off excess flour gently with a kitchen brush. Place these cut cookies 1 inch apart on lined baking sheets. Then chill the cut-out cookies again for 15 minutes in the fridge or 5 minutes in the freezer to help them hold their shape.
Step 6: Bake the Cookies
Preheat your oven to 350°F (175°C) for at least 30 minutes before baking. Bake one tray at a time on the top rack for 12-14 minutes, checking closely so edges don’t brown. I always pull mine just as the edges set and before they get any color—you want soft, pale ghosts here. Let the cookies cool on the pan for 15 minutes before transferring them to a wire rack to cool completely. While the first batch cools, combine the dough scraps, rewrap, and chill to roll out again.
Step 7: Make the Buttercream Frosting
Beat your softened butter for 30 seconds until smooth. Add vanilla and salt, then gradually blend in powdered sugar and heavy cream. Don’t forget to scrape the bowl often to keep everything mixed evenly. Beat until you get a creamy consistency perfect for spreading or piping. If it feels too thick, add cream tablespoon by tablespoon; too thin, add more powdered sugar. Scoop out about a quarter cup to a small bowl and add pink gel food coloring to create rosy cheeks. Put this in a small piping bag fitted with a small round tip or simply a small cut at the bag’s end. Fill a larger piping bag with the white frosting for the main decoration.
Step 8: Decorate Your Ghost Cookies
Once the cookies are fully cooled, pipe a layer of white frosting on each, then press them into a bowl of coarse sanding sugar until well coated. This gives a frosted, slightly sparkly look that’s just dreamy. Next, add two small black round sprinkles or mini chocolate chips for eyes, and a long black sprinkle for the mouth. For that extra charm, pipe small pink cheeks with your tinted frosting. If you don’t have these exact decorations, improvise! I once used edible markers and loved the results.
Pro Tips for Making Ghost Cookies Recipe
- Don’t Skip Chilling: Chilling both the dough and cut-out cookies prevents spreading and keeps your ghosts looking crisp and defined.
- Watch the Bake Time: I learned the hard way that underbaking by a minute or two means softer cookies that continue to cook as they cool.
- Use Plastic Wrap Rolling: Rolling dough between plastic wrap makes cleanup way easier and prevents sticking, a trick I swear by.
- Get Creative with Faces: No sprinkles? No problem! Use small piping tips with black frosting or even edible markers to customize your ghosts.
How to Serve Ghost Cookies Recipe

Garnishes
I love keeping it simple with the frosting and sanding sugar for that frosted look, but adding edible glitter or a light dusting of powdered sugar before serving gives an extra spooky shimmer. Sometimes I pipe little cobwebs using black buttercream for a festive touch that fascinates the kids every time.
Side Dishes
These cookies are a sweet star on their own, but pairing them with a creamy hot chocolate or a cold glass of milk is heavenly. For a party spread, I like to serve them alongside pumpkin spice muffins or even some roasted pumpkin seeds to balance the sweetness.
Creative Ways to Present
For Halloween get-togethers, I arrange these ghost cookies on a black platter with fake spiderwebs underneath for a dramatic effect. You can also stack them with parchment paper in between and tie them with orange and black twine for adorable gift bags. I even made a ghost cookie wreath once by arranging frosted cookies on a foam base — everyone loved it!
Make Ahead and Storage
Storing Leftovers
I store frosted Ghost Cookies in an airtight container at room temperature for up to 2 days, or pop them in the fridge for up to 5 days if I want to keep them fresh longer. To prevent smudging, I chill the cookies well before stacking and add parchment paper layers. This way, they stay beautiful and delicious without the frosting getting messy.
Freezing
Freezing is a lifesaver! I like to freeze cookie dough wrapped tightly in plastic wrap and stored in a container for up to a month. When I’m ready, I thaw it overnight in the fridge, then roll and bake fresh. You can also freeze baked but unfrosted cookies for up to a month—just thaw them gently before decorating.
Reheating
If you want to warm the cookies slightly, I recommend a few seconds in the microwave (about 10-15 seconds) or a quick 3-minute stint in a preheated 300°F oven. This refreshes the soft texture without melting the frosting. Just keep an eye on them so they don’t get too warm or the frosting will soften too much.
FAQs
-
Can I make the cookie dough ahead of time for this Ghost Cookies Recipe?
Absolutely! In fact, chilling the dough overnight enhances the flavor and makes rolling it out much easier. Just be sure to wrap it tightly in plastic wrap and store it in the fridge. When you’re ready, let it sit out for about 10 minutes before rolling to soften slightly.
-
What can I use if I don’t have a ghost-shaped cookie cutter?
No worries if you don’t have a ghost cutter! A small sharp knife is your friend—you can freehand the shape on rolled dough. Or, try cutting a simple rounded triangle with two small “arms” at the sides. The charm is in the decoration anyway.
-
How do I keep my Ghost Cookies soft and not crunchy?
The secret is in not overbaking and using cream cheese in the dough. Follow the bake time closely and pull the cookies before the edges brown. Also, chilling the dough helps maintain a tender bite.
-
Can I decorate these cookies with royal icing instead of buttercream?
Yes! Royal icing is a great alternative for a harder finish that’s less creamy. Buttercream makes it soft and luscious, but royal icing lets you do detailed designs that hold well at room temperature.
-
How many cookies does this recipe make?
This recipe yields about 36 cookies if you use a 2 ½-inch cookie cutter. You can halve the recipe for fewer cookies, but I don’t recommend doubling it unless you have a large stand mixer.
Final Thoughts
Making these Ghost Cookies is one of those fun kitchen adventures that always brings smiles, whether it’s for a Halloween bash or just a sweet treat to brighten your day. I love how approachable this recipe is — soft, flavorful cookies with that adorable frosted ghost look, all manageable even if you’re not a seasoned baker. Give it a try, and I promise you’ll enjoy the process and the delicious results as much as I do. Plus, once you master these, you’ll be the star of any spooky gathering!
Print
Ghost Cookies Recipe
- Prep Time: 20 minutes
- Cook Time: 14 minutes
- Total Time: 2 hours 4 minutes
- Yield: 36 cookies
- Category: Cookies
- Method: Baking
- Cuisine: American
Description
Ghost Cookies are soft-batch cream cheese cookies shaped like cute ghosts, decorated with smooth buttercream frosting and sanding sugar for a festive Halloween treat. These American-style cookies have a tender texture achieved by chilling the dough, and detailed decorating with piped frosting eyes, mouth, and cheeks make them adorable and delicious for celebrations or parties.
Ingredients
Soft-Batch Cream Cheese Cookies
- 3/4 cup (1 1/2 sticks) unsalted butter, room temperature (170g)
- 1/2 cup or 4 oz. full fat cream cheese, room temperature (113g)
- 1 1/2 cups granulated sugar (300g)
- 1 large egg, room temperature (56g)
- 2 tsp vanilla extract or vanilla bean paste (8g)
- 3 cups all-purpose flour (375g)
- 1 Tbsp cornstarch (8g)
- 1/2 tsp baking powder (2g)
- 1/2 tsp fine salt (3g)
Buttercream Frosting for Cookies
- 1 cup unsalted butter, room temperature (226g)
- 1 Tbsp vanilla extract or vanilla bean paste (12g)
- 1/4 tsp fine salt (2g)
- 3 1/2 cups powdered sugar (454g or 1 lb. box)
- 1/4 cup heavy whipping cream, room temperature (60g)
Decorations
- 1 cup coarse sanding sugar
- Black, 4mm round sprinkles (optional)
- Black strand sprinkles
- Pink gel food coloring
Instructions
- Prepare the Cookie Dough: In a large bowl or stand mixer, beat the butter and cream cheese on medium speed until smooth. Add granulated sugar and mix on medium-high for a few minutes until lighter in color. Incorporate the egg and vanilla extract on medium speed until combined.
- Mix Dry Ingredients: In a separate bowl, whisk together flour, cornstarch, baking powder, and salt. Gradually add this flour mixture to the butter mixture in two additions, mixing on low speed just until combined. Scrape the bowl as needed. The dough will be sticky.
- Chill the Dough: Divide dough in half, flatten into rectangles about 1/2 inch thick, wrap in plastic wrap, and chill in the refrigerator for 2 hours, freezer for 30 minutes, or overnight. If overnight, let rest 10 minutes at room temperature before rolling.
- Preheat Oven and Prepare Sheets: Preheat oven to 350°F (175°C) about 30 minutes before baking. Line two large baking sheets with silicone mats or parchment paper.
- Roll and Cut Cookies: Remove one dough portion from fridge/freezer; place plastic wrap on counter and unwrap dough on top. Dust dough and rolling pin with flour. Roll dough to 1/3 inch thickness. Cut ghost shapes using a 2 1/2 inch cookie cutter or a sharp knife. Brush excess flour off cookies and place them about 1 inch apart on baking sheets.
- Chill Cut Cookies: Chill cut cookies in fridge for 15 minutes or freezer for 5 minutes to help maintain shape during baking.
- Bake the Cookies: Bake one sheet at a time on the top oven rack for 12-14 minutes, watching closely to prevent browning edges. Remove when edges are just set. Let cookies cool on baking sheet 15 minutes, then transfer to wire racks to cool completely.
- Reuse Scraps: Knead scraps together, wrap in plastic, and chill to roll out again. Repeat rolling, cutting, chilling, and baking with remaining dough and scraps.
- Make Buttercream Frosting: Beat butter on medium speed with paddle till smooth (about 30 seconds). Add vanilla and salt, mixing on low. Gradually add powdered sugar and heavy cream while mixing on low speed. Scrape bowl as needed. Adjust consistency by adding cream or powdered sugar gradually.
- Color Frosting: Scoop 1/4 cup frosting into small bowl, tint with pink gel coloring, and fill small piping bag fitted with small round tip or cut 1/2 cm opening. Place remaining frosting into larger piping bag fitted with medium round tip or cut 1 cm opening.
- Decorate Cookies: Pour white sanding sugar into bowl. Pipe layer of frosting onto one cookie, then press cookie into sanding sugar to coat frosting evenly. Use black round sprinkles or mini chocolate chips for eyes, black strand sprinkles for mouth, and pipe pink cheeks with pink frosting. Repeat for all cookies.
Notes
- This recipe yields about 36 cookies sized 2 1/2 inches each; yield and bake times vary with cookie cutter size.
- You can halve the recipe for fewer cookies; doubling is not recommended except with commercial 8 qt. mixer.
- Store frosted cookies in airtight container up to 2 days at room temperature, 5 days refrigerated, or 1 month frozen.
- Stack chilled cookies with parchment paper layers to prevent sticking, as buttercream firms but does not harden like royal icing.
- Cookie dough freezes well up to 1 month; thaw in fridge overnight before rolling.
- Baked, unfrosted cookies also freeze well; frost after fully thawed at room temperature.
- Roll dough to consistent thickness (1/3 inch) to ensure even baking; avoid overworking dough to keep cookies tender.
- Do not overbake; cookies continue baking slightly after removal from oven.
- Decorating options for ghost faces can be adapted using fondant or black buttercream if sprinkles are unavailable.
Nutrition
- Serving Size: 1 cookie
- Calories: 190
- Sugar: 19g
- Sodium: 70mg
- Fat: 10g
- Saturated Fat: 6g
- Unsaturated Fat: 3g
- Trans Fat: 0g
- Carbohydrates: 24g
- Fiber: 0.5g
- Protein: 2g
- Cholesterol: 25mg

