
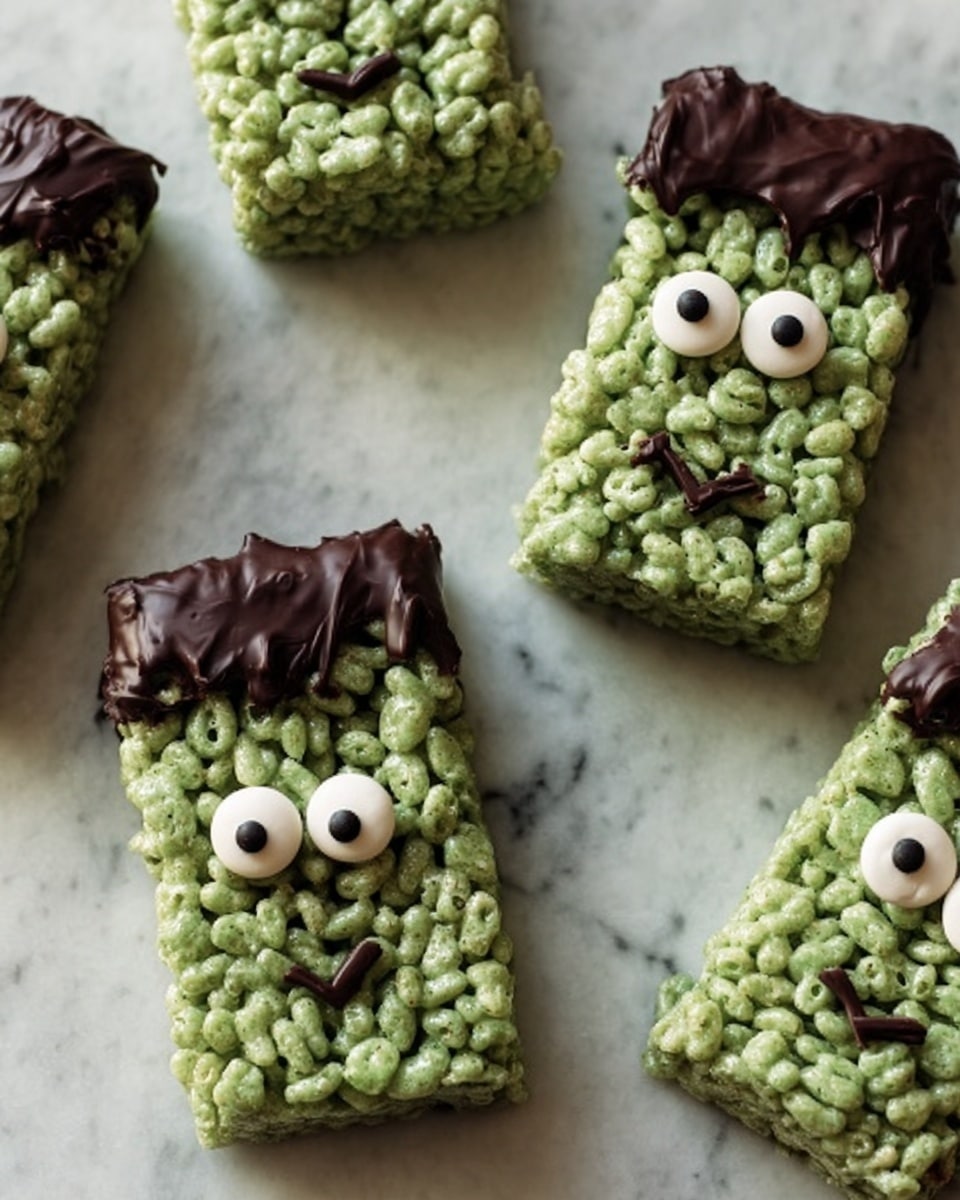
If you’re looking for a fun, spooky twist on a timeless childhood favorite, you have to try this Frankenstein Rice Krispie Treats Recipe. It’s the perfect way to get everyone excited in the kitchen – and trust me, these treats vanish almost as fast as I make them! I absolutely love how these come together: soft, chewy, and bursting with gooey marshmallow goodness, with just enough chocolatey charm to bring Frankenstein’s face to life. Stick around and I’ll walk you through every step so you nail it just like I do.
Why You’ll Love This Recipe
- Easy & Kid-Friendly: This recipe is simple enough to make with the kids, and they love helping decorate Frankenstein’s face!
- Visual Impact: The green marshmallow base with chocolate-dipped edges really makes these treats pop at any party or Halloween gathering.
- Quick to Whip Up: From melting marshmallows to decorated treats, you can pull these together in under 10 minutes total.
- Fun & Customizable: Once you master the basics, it’s a blast to personalize each Frankenstein face with candy eyes and chocolate details.

Ingredients You’ll Need
The magic of this Frankenstein Rice Krispie Treats Recipe really comes down to using classic ingredients that play well together. Marshmallows and butter create the perfect sticky binder while the crispy cereal delivers that beloved crunch. Green food coloring is essential for the monster’s signature look, and the melted chocolate brings in rich flavor and lets you decorate easily.
- Krispie cereal: Use classic Rice Krispies for that light, airy texture.
- Butter: Adds richness and helps melt the marshmallows smoothly.
- Marshmallows: The key to gooey binding and chewy deliciousness; fresh marshmallows melt better.
- Vanilla extract: Adds a subtle sweetness and depth of flavor.
- Green food coloring: A few drops bring Frankenstein’s face to life – gel food coloring works best to avoid thinning the mixture.
- Milk chocolate chips: These melt nicely and are perfect for dipping and drawing features.
- Candy eyes: These add whimsical character – find them at most baking or craft stores.
Variations
I love playing around with this Frankenstein Rice Krispie Treats Recipe, especially when I want to suit different tastes or occasions. Don’t be shy to tweak the colors or swap out certain add-ins. You can easily make it your own while keeping all that charm.
- Use white chocolate instead of milk chocolate: For a different flavor, I tried this once and loved how it made the green pop even more.
- Add peppermint extract: Around the holidays, a touch of peppermint makes these treats extra festive.
- Gluten-free cereal option: Perfect for friends with allergies, just swap the Rice Krispies for a gluten-free crispy cereal.
- Alternate food coloring: Experiment with purple or orange marshmallow mix for fun seasonal twists like witches or pumpkins.
How to Make Frankenstein Rice Krispie Treats Recipe
Step 1: Prep Your Workspace and Pan
Start by spraying your 13 x 9 x 2-inch baking dish with cooking spray. This little step makes it so much easier to remove the treats later without sticking or crumbling apart. I like to line my pan with parchment paper for extra insurance, especially when I’m making this for a party.
Step 2: Melt Butter and Marshmallows
In a large microwave-safe bowl, combine the butter and marshmallows. Microwave on high for 2 to 3 minutes, stopping to stir every 30 seconds if you can. You’re aiming for a smooth, bubbly marshmallow sauce – no clumps! Be careful not to overheat, or marshmallows can get tough. When I first tried this recipe, I learned that stirring often makes a big difference.
Step 3: Add Vanilla and Green Food Coloring
Once melted and smooth, add the vanilla extract and green food coloring. Stir until you reach your desired shade of Frankenstein green. I usually go for a vibrant but not too neon green because it looks more natural and festive. This step is where you get to play artist – don’t be shy with the color!
Step 4: Mix in the Rice Krispies
Pour in the Krispie cereal and gently fold it into the green marshmallow mixture. Use a spatula or wooden spoon to coat the cereal evenly without squashing the crispy texture. This step is key because you want the treats to stay light and crunchy, not smooshed. From experience, folding gently is my go-to method.
Step 5: Press the Mixture into the Pan
Using greased hands or a buttered spoon, press the mixture firmly and evenly into your prepared pan. Don’t press too hard, or you risk crushing the treats. I learned this the fun way when my first batch was dense instead of fluffy! Smooth the top so it’s even, then let it cool slightly before slicing.
Step 6: Slice Into Rectangles
Cut the slab into 12 equal rectangles. Sharp knives work best here — I even dip mine in hot water and wipe it dry to get neat cuts without dragging marshmallow strings everywhere.
Step 7: Melt Chocolate and Decorate
Place the chocolate chips in a microwave-safe bowl and microwave for 1 minute. Stir well until smooth and completely melted. Dip each Rice Krispie rectangle about an inch into the chocolate, then place it on parchment paper to set. Use a toothpick dipped in chocolate to draw Frankenstein’s features—his scars, mouth, and neck bolts. Don’t forget to add candy eyes before the chocolate hardens! This step is my favorite – it’s like bringing your monster to life.
Step 8: Let Chocolate Harden Before Serving
Allow the treats to cool and the chocolate to harden completely before digging in. You can speed this up by placing them briefly in the fridge. I usually make these a day ahead to let the flavors set and decorations firm up perfectly.
Pro Tips for Making Frankenstein Rice Krispie Treats Recipe
- Use Gel Food Coloring: The gel packs more color without watering down your marshmallow mix, giving a richer green.
- Grease Your Hands: Always grease your hands or the spoon before pressing the mixture down to prevent stickiness and messy fingers.
- Even Chocolate Coat: When dipping the treats, angle them to get a smooth chocolate edge – it makes decorating easier and looks polished.
- Quick Chocolate Fixes: Keep some extra melted chocolate handy for fixing any designs that don’t turn out perfect the first time.
How to Serve Frankenstein Rice Krispie Treats Recipe
Garnishes
I love topping these treats with candy eyes naturally, but you can also sprinkle green sanding sugar for a little extra sparkle. Sometimes I add edible markers to draw scars or stitches for more detail — it’s a fun afternoon project, especially with kids.
Side Dishes
For parties, these treats go great with simple vanilla or chocolate milk. If you want a more grown-up twist, serve alongside green-hued drinks like matcha lattes or pistachio milkshakes. My family likes pairing them with a handful of fresh fruit to balance the sweetness.
Creative Ways to Present
I’ve tried stacking Frankenstein treats into a “monster tower” centerpiece on a skull-themed platter for Halloween parties — it was a hit! You can also wrap each treat in clear cellophane and tie with a black ribbon for cute party favors. It’s all about making them look as fun as they taste.
Make Ahead and Storage
Storing Leftovers
I store leftover Frankenstein Rice Krispie Treats in an airtight container at room temperature. I’ve found that they stay perfectly chewy for up to 3 days. Just make sure they’re completely cooled before sealing to prevent sogginess.
Freezing
Freezing is totally doable! Wrap each treat individually in plastic wrap and pop into a freezer bag. When I tried this, they kept well for up to a month. Thaw at room temperature before serving to get back that classic chewy texture.
Reheating
If you want to freshen up leftover treats, a quick 10-second zap in the microwave softens them right up. Just be careful not to melt the chocolate decorations. I recommend reheating uncovered and watching carefully.
FAQs
-
Can I use regular marshmallows instead of mini ones in this Frankenstein Rice Krispie Treats Recipe?
Absolutely! Regular-sized marshmallows work perfectly here — they just melt down a bit slower than mini ones. Since the recipe calls for melting everything together first, either size will give you the gooey, sticky base you need.
-
What if I don’t have green food coloring for the Frankenstein Rice Krispie Treats Recipe?
If you’re out of green food coloring, you can mix blue and yellow gel colors to create green, or simply skip it and make classic Rice Krispie treats — they’re still delicious! This recipe really shines with the green color, but it’s optional.
-
Can I make this recipe vegan or dairy-free?
It’s a bit tricky since marshmallows usually contain gelatin and butter is dairy, but you can try vegan marshmallows and dairy-free margarine or coconut oil as substitutes. Just be sure to check their melting properties so your treats hold together nicely.
-
How long do Frankenstein Rice Krispie Treats last?
Stored in an airtight container at room temperature, you can expect them to stay fresh and chewy for about 3 to 4 days. Keep them away from heat and humidity for best results.
Final Thoughts
This Frankenstein Rice Krispie Treats Recipe has become one of my absolute favorites to whip up for any occasion where a little spooky fun is welcome. It’s quick, easy, and brings smiles every time I serve it. I hope you’ll give it a try soon — it’s the kind of recipe where the memories you make decorating and sharing are just as sweet as the treats themselves. Trust me, once you see those green, chocolatey monsters come to life, you’ll be hooked!
Print
Frankenstein Rice Krispie Treats Recipe
- Prep Time: 2 minutes
- Cook Time: 5 minutes
- Total Time: 7 minutes
- Yield: 12 servings
- Category: Dessert
- Method: No-Cook
- Cuisine: American
Description
These Frankenstein Rice Krispie Treats are a fun, festive twist on the classic marshmallow cereal snack. Perfect for Halloween or any spooky celebration, they feature green-tinted marshmallow cereal bars dipped in melted chocolate and decorated with candy eyes and chocolate details to resemble Frankenstein’s monster. Quick and easy to make, they combine the crispiness of Rice Krispies with gooey marshmallow sweetness and a rich chocolate coating.
Ingredients
Main Ingredients
- 8 cups Rice Krispie cereal
- 5 tbsp butter
- 12 oz marshmallows
- 1 tsp vanilla extract
- green food coloring, as needed
Decoration Ingredients
- 1 1/2 cups milk chocolate chips
- Candy eyes, quantity as desired
Instructions
- Prepare the baking dish: Spray a 13 x 9 x 2 inch baking dish with cooking spray to prevent sticking and set aside.
- Melt butter and marshmallows: In a large microwave-safe bowl, combine butter and marshmallows. Microwave on high for 2-3 minutes, stopping to stir until the mixture is smooth and fully melted.
- Add vanilla and color: Stir in the vanilla extract and add green food coloring gradually until the marshmallow mixture reaches the desired green shade.
- Combine with cereal: Fold in the Rice Krispie cereal carefully until all pieces are evenly coated with the green marshmallow mixture.
- Shape the treats: Pour the coated cereal mixture into the prepared pan. Using greased hands or a spoon, press it firmly and evenly into the pan.
- Cut into rectangles: Slice the mixture into 12 equal rectangular pieces while still warm.
- Melt chocolate: Place milk chocolate chips in a microwave-safe bowl. Microwave for 1 minute, stirring until the chocolate is melted and smooth.
- Dip and decorate: Dip each Rice Krispie rectangle about 1 inch into the melted chocolate, then place on a parchment-lined baking sheet. Using a toothpick dipped in melted chocolate, draw Frankenstein’s facial features, and attach candy eyes to complete the look.
- Cool and set: Allow the decorated treats to cool at room temperature until the chocolate hardens completely before serving.
Notes
- Use greased hands or a buttered spatula to press the cereal mixture into the pan to prevent sticking.
- You can adjust the amount of green food coloring to make the color more or less vibrant.
- For a firmer set, refrigerate the treats after decorating until the chocolate hardens.
- Substitute dark or white chocolate chips if preferred for different flavor variations.
- Store the treats in an airtight container at room temperature for up to 3 days.
Nutrition
- Serving Size: 1 rectangular treat (approx. 1/12 of recipe)
- Calories: 210
- Sugar: 18g
- Sodium: 110mg
- Fat: 8g
- Saturated Fat: 5g
- Unsaturated Fat: 2g
- Trans Fat: 0g
- Carbohydrates: 31g
- Fiber: 1g
- Protein: 2g
- Cholesterol: 15mg


