
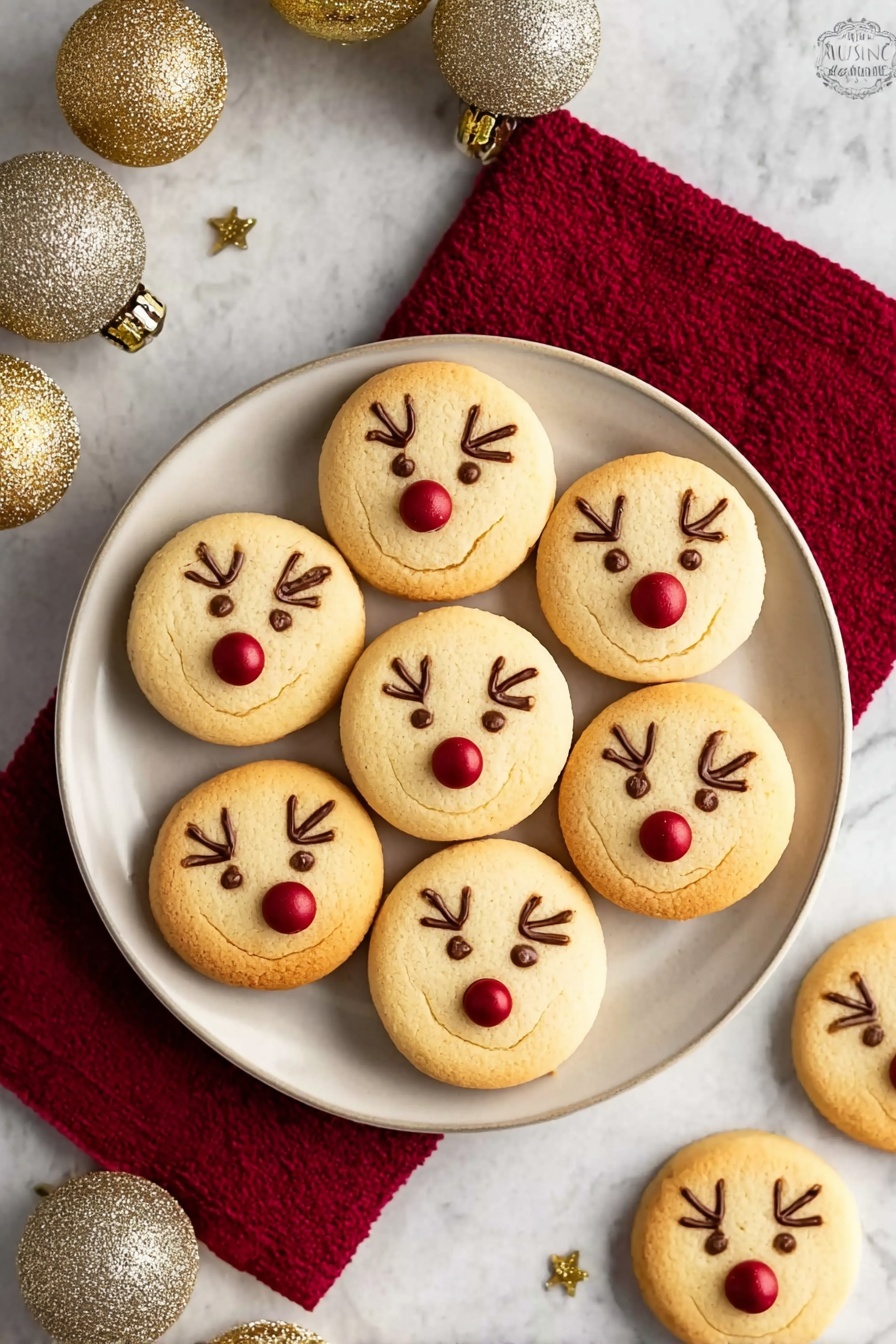
If you’re looking for a festive treat that’s as adorable as it is delicious, you’re in the right place! I absolutely love this Easy Reindeer Cookies Recipe because it’s approachable for all baking levels but still delivers a show-stopping holiday cookie. You won’t believe how fun it is to make these reindeer faces come alive with just a few simple ingredients and a little creativity. Stick around, and I’ll walk you through every step so your cookies turn out perfectly cute and scrumptious every time.
Why You’ll Love This Recipe
- Super Simple Ingredients: You’ll find everything you need is probably already in your pantry, making this a breeze to start.
- Adorable Presentation: These cookies are seriously cute – perfect for gifting or holiday parties.
- Fun and Interactive Baking: Kids and adults alike will have a blast decorating the reindeer faces together.
- Reliable Results: After a few tries, you’ll nail the perfect dough consistency and cookie shapes every time.

Ingredients You’ll Need
The beauty of this Easy Reindeer Cookies Recipe is in how straightforward the ingredients are—and how well they work together to create a tender, buttery cookie with a sweet pop of jam and rich chocolate details.
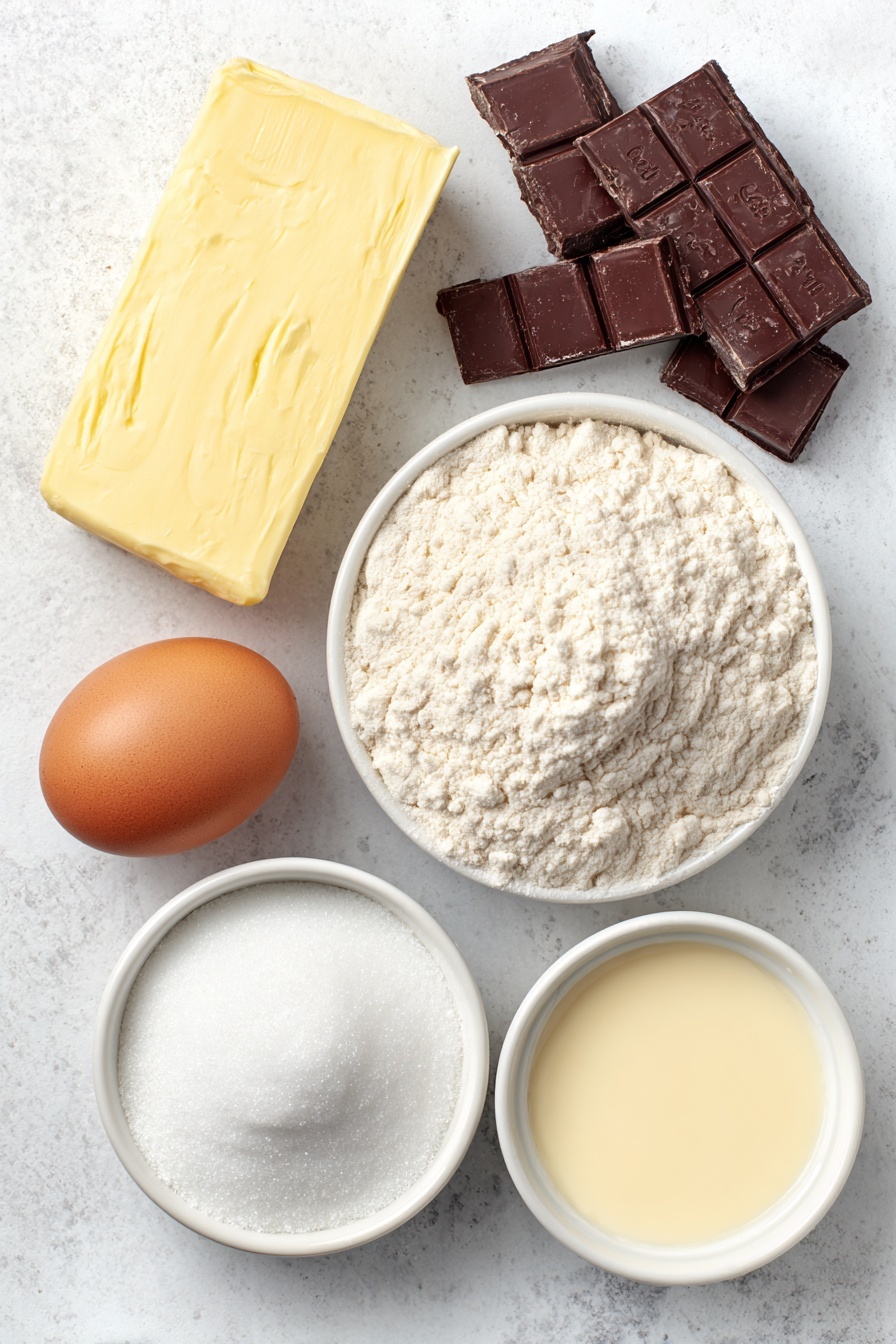
- Unsalted Butter: Using room temperature butter is key here; it helps the dough come together smoothly and keeps your cookies tender.
- Icing/Confectioners Sugar: This adds just the right amount of sweetness and helps with that melt-in-your-mouth texture.
- Egg Yolk: This binds everything nicely while keeping the dough rich.
- Vanilla Extract: A splash of vanilla amplifies the flavor and makes the cookies smell heavenly.
- Pinch of Salt: Salt balances out the sweetness and enhances the buttery notes.
- Plain/All Purpose Flour: This forms the base of your dough, so sift it for lightness if you can.
- Strawberry Jam: Softened jam peeking through the smaller cut-outs gives the “red nose” effect – absolutely essential for that classic Rudolph look.
- Milk Chocolate: Melted and piped on for the eyes and antlers, it adds a rich finish and makes the design pop.
Variations
One thing I love about this Easy Reindeer Cookies Recipe is how easy it is to make it your own. Whether you want to swap ingredients to suit dietary needs or add a personal twist for the holidays, there’s room to get creative.
- Gluten-Free Option: I’ve tried swapping plain flour for a gluten-free blend, and it works beautifully—just watch the dough consistency, which might be a bit more delicate.
- Jam Flavors: While strawberry is classic, raspberry or cherry jam also make fantastic nose colors and add a lovely tartness.
- Chocolate Choices: Dark chocolate brings a richer flavor contrast, and white chocolate can make your antlers really stand out visually.
- Holiday Spice: Add a teaspoon of cinnamon or mixed spice to the dough for a warm, festive twist that’ll have your kitchen smelling amazing.
How to Make Easy Reindeer Cookies Recipe
Step 1: Creaming Butter and Sugar Till Fluffy
Start by placing your softened unsalted butter, icing sugar, egg yolk, vanilla extract, and a pinch of salt into either a stand mixer or a large bowl with an electric hand whisk. Beat these together until the mixture looks light and fluffy—this usually takes about 3-5 minutes. This step is crucial because it incorporates air, which helps make your cookies tender and soft. I discovered this trick early on; rushing this step results in flat, hard cookies that just don’t have the same magic.
Step 2: Adding Flour and Forming the Dough
Next, gradually fold in the plain flour until a soft dough forms. Resist the temptation to over-mix here; just combine until no flour patches remain. Once your dough looks tidy but still pliable, take it out and knead gently with your hands—that little extra helps bind everything perfectly without making it tough.
Step 3: Rolling and Cutting Out Your Cookies
Roll your dough between two sheets of baking paper until it’s about 6mm thick. This thickness keeps the cookies delicate but sturdy enough to hold their shape. Use your 6cm round cookie cutter to punch out circles. For half of these circles, use the smaller 1cm circle cutter to cut out a nose hole just off-center—this is where the strawberry jam will peek through later and give your cookie its signature reindeer red nose. Don’t throw away your scraps; just gently re-roll and keep cutting until all the dough is used.
Step 4: Chilling and Baking
Place your cookies on a lined baking tray and pop them into the fridge for 30 minutes. This chill time is key to preventing the cookies from spreading too much in the oven. Meanwhile, preheat your oven to 180ºC (fan 170ºC). When ready, bake the cookies for 11-13 minutes until the edges show a lovely golden hue. Let them sit for a couple of minutes on the tray before transferring to a cooling rack so they firm up properly and don’t break. I learned this the hard way—moving hot cookies too soon makes them fragile!
Step 5: Decorating with Jam and Chocolate
While your cookies cool, soften the strawberry jam in a small bowl so it’s easy to pipe. Spoon the jam into a disposable piping bag and carefully pipe small circles onto the cookies without nose holes—be gentle and avoid the edges. Now gently press the cookies with the nose holes on top; the jam “nose” will shine through perfectly. Next, melt your milk chocolate in short bursts in the microwave, stirring as you go for a smooth finish. Pour melted chocolate into another piping bag for decorating. Pipe two little eyes right above the red nose, then draw the antlers with neat lines and cute downward-pointing arrows for the details. Trust me, the piping step is way easier when you don’t rush. Let them set before storing.
Pro Tips for Making Easy Reindeer Cookies Recipe
- Butter Softness Matters: Make sure your butter isn’t melted—softened just enough to leave an indentation when pressed.
- Don’t Skip Chilling: Chilling the dough before baking is what keeps your cookies from flattening out too much in the oven.
- Piping Practice: Before jumping into piping the antlers, practice on parchment paper to get comfortable with your strokes.
- Jam Control: Pipe just enough jam so it’s visible but won’t ooze out during assembly—less is more here.
How to Serve Easy Reindeer Cookies Recipe
Garnishes
I like to keep the garnishes simple—fresh rosemary sprigs nearby add a lovely pine scent and green contrast. A light dusting of edible glitter on the chocolate antlers gives that extra festive sparkle without overpowering the chocolate flavor.
Side Dishes
Pair these cute reindeer cookies with warm mugs of spiced hot chocolate or vanilla chai tea for an indulgent holiday moment. They also go great with a platter of mixed nuts and dried fruit to balance the sweetness.
Creative Ways to Present
I’ve wrapped them individually in clear cellophane bags tied with red and green ribbons for gifting—instant crowd-pleasers! For parties, arrange them standing up against a backdrop of pinecones and twinkling fairy lights for a whimsical display. Another fun idea is placing them on mini cookie stands shaped like sleighs or reindeer, making your dessert table extra merry.
Make Ahead and Storage
Storing Leftovers
I store leftover cookies in a tin at room temperature, separated by parchment paper layers to keep them from sticking. This way they stay fresh and tasty for about 4-5 days—just long enough to savor every crumb!
Freezing
Freezing works well if you want to prep ahead: just freeze unbaked dough discs wrapped in plastic wrap. When you’re ready, thaw in the fridge and bake as usual. I don’t recommend freezing decorated cookies though, as the chocolate details can get a little fragile when thawed.
Reheating
If you want to warm these up, I pop them in a 150ºC oven for 3-4 minutes to bring back that freshly baked soft texture without melting the chocolate decorations. Just watch them closely so they don’t overbake.
FAQs
-
Can I use a hand mixer instead of a stand mixer for this recipe?
Absolutely! I actually whip these up with my hand mixer all the time. Just make sure to beat the butter and sugar until you reach that fluffy texture, which might take a bit longer than with a stand mixer.
-
What if I don’t have the exact cookie cutters? Can I still make these?
No worries! You can use any round cookie cutter for the main circles and a straw or small drinking glass to make the nose holes. The key is just to have a smaller circle inset off-center to create the reindeer noses.
-
How do I prevent the jam from leaking out when assembling the cookies?
Make sure to soften your jam well and pipe just a thin layer onto the cookie base. Also, gently sandwich the top cookie to avoid squeezing jam out the sides—taking your time here makes all the difference.
-
Can I make these cookies ahead for a party?
Definitely! Bake and cool your cookies, then decorate a day or two before your event to keep chocolate details crisp. Store them in an airtight tin in between decorating sessions to preserve freshness.
-
What if my dough feels too sticky?
If your dough is stickier than expected, pop it in the fridge for 10-15 minutes. This firms it up, making it much easier to roll and cut without losing shape.
Final Thoughts
Honestly, this Easy Reindeer Cookies Recipe has quickly become one of my holiday staples—not just because they look absolutely adorable, but because they’re genuinely fun to make and taste fantastic. Every holiday season when I bake them, friends and family go crazy, asking for seconds (and thirds). I hope you enjoy making this recipe as much as I do, and that these charming little cookies bring a little extra joy and warmth to your celebrations. Don’t hesitate to get creative and make them your own – after all, holiday baking is all about spreading love and delicious cheer!
Print
Easy Reindeer Cookies Recipe
- Prep Time: 20 min
- Cook Time: 12 min
- Total Time: 1 hr 2 min
- Yield: 11 cookies
- Category: Dessert
- Method: Baking
- Cuisine: Western
Description
Delightfully festive and easy to make, these Reindeer Cookies combine buttery shortbread dough with a sweet strawberry jam center and detailed chocolate decorations to bring cheerful holiday spirit to your kitchen. Perfect for Christmas gatherings, these adorable cookies are sure to charm both kids and adults alike.
Ingredients
Cookie Dough
- 140g (1/2 Cup + 1/8 Cup) Unsalted Butter, room temperature
- 60g (1/2 Cup) Icing/Confectioners Sugar
- 1 Egg Yolk
- 1 tsp Vanilla Extract
- Pinch of Salt
- 210g (1 + 2/3 Cup) Plain/All Purpose Flour
Filling and Decoration
- 200g (1/2 Cup + 2 tbsp) Strawberry Jam
- 75g (2.6 oz) Milk Chocolate
Instructions
- Prepare the dough: Place the butter, sugar, egg yolk, vanilla extract, and a pinch of salt into a stand mixer bowl and beat on medium speed until the mixture is light and fluffy, creating a smooth base for your cookie dough.
- Add flour and knead: Gradually add the plain/all-purpose flour and fold it through the mixture until a soft dough forms. Remove the dough from the bowl and knead briefly on a clean surface to combine everything evenly.
- Roll out and cut shapes: Roll the dough between two sheets of baking paper to an even thickness of 6mm. Using a 6cm round cookie cutter, cut out circles. On half of these circles, use a smaller 1cm circle cutter off-center to cut out the ‘nose’ holes for the reindeer cookies.
- Chill the cookies: Place the dough cookies on a lined baking tray and chill in the refrigerator for 30 minutes to firm up. Meanwhile, preheat your oven to 180ºC (Fan 170ºC / 356ºF).
- Bake the cookies: Arrange the cookies spaced out on a lined baking tray. Bake for 11-13 minutes or until the edges turn golden brown. Bake in batches if your tray cannot hold all at once. After baking, allow cookies to firm on the tray for a couple of minutes before transferring them to a cooling rack to cool completely.
- Prepare jam filling: Soften the strawberry jam by mixing it gently in a small bowl. Transfer the jam to a disposable piping bag and cut a small tip for controlled piping.
- Assemble cookies: Pipe small circles of jam onto each cookie without nose holes, being careful not to overfill or pipe too close to the edges. Gently place the cookies with nose holes on top, aligning the holes to reveal the jam ‘nose’ beneath without squeezing jam out of the sides.
- Melt chocolate: In a microwave-safe bowl, melt the milk chocolate in short 10-second bursts, stirring between each until two-thirds melted. Remove from the microwave and stir until entirely smooth. Pour the chocolate into another piping bag and cut a small tip.
- Decorate reindeer faces: Pipe small chocolate eyes just above each red jam nose. Then carefully pipe the main outlines of each antler, followed by detailed lines to create realistic antler shapes. Use downward-pointing arrow strokes for easy detailing.
- Set and store: Allow the chocolate decorations to fully set on a rack at room temperature. Once set, store the cookies in an airtight metal tin at room temperature. Consume within 4-5 days for best freshness.
Notes
- These reindeer cookies are perfect for festive gift-giving or holiday parties, guaranteed to bring joy to loved ones.
- Ensure the dough is well chilled before baking to maintain cookie shape and crisp edges.
- You can substitute strawberry jam with raspberry jam or another red-colored jam for a similar visual effect.
- When melting chocolate, avoid overheating to prevent burning; stir well after removing from microwave for smooth texture.
- Store in an airtight container to keep cookies fresh and preserve the chocolate decoration.
Nutrition
- Serving Size: 1 cookie
- Calories: 275
- Sugar: 18g
- Sodium: 26mg
- Fat: 13g
- Saturated Fat: 8g
- Unsaturated Fat: 4g
- Trans Fat: 0g
- Carbohydrates: 37g
- Fiber: 1g
- Protein: 3g
- Cholesterol: 46mg


