
If you’re on the hunt for a melt-in-your-mouth, super simple treat that screams indulgence, you absolutely have to try this Easy Oreo Truffles Recipe. I’ve made these countless times for parties, last-minute guests, you name it—everyone goes crazy for them! The best part? They’re insanely easy to whip up, and you only need a handful of ingredients to get these beauties on your table. Trust me, once you try these, they’ll become your go-to dessert for any occasion.
Why You’ll Love This Recipe
- Incredibly Easy: You only need three main ingredients plus a few extras for fun toppings.
- No-Bake Magic: No oven required—perfect for hot days or when you want quick results.
- Customizable: Whether you love white chocolate, semi-sweet, or extra crunch, it’s adaptable.
- Fan Favorite: Everyone I’ve shared these with asks me for the recipe—they’re just that good!

Ingredients You’ll Need
One of the reasons this Easy Oreo Truffles Recipe is so foolproof is because it uses simple, familiar ingredients that combine perfectly. Plus, they’re easy to find in any grocery store and don’t require fancy prep.
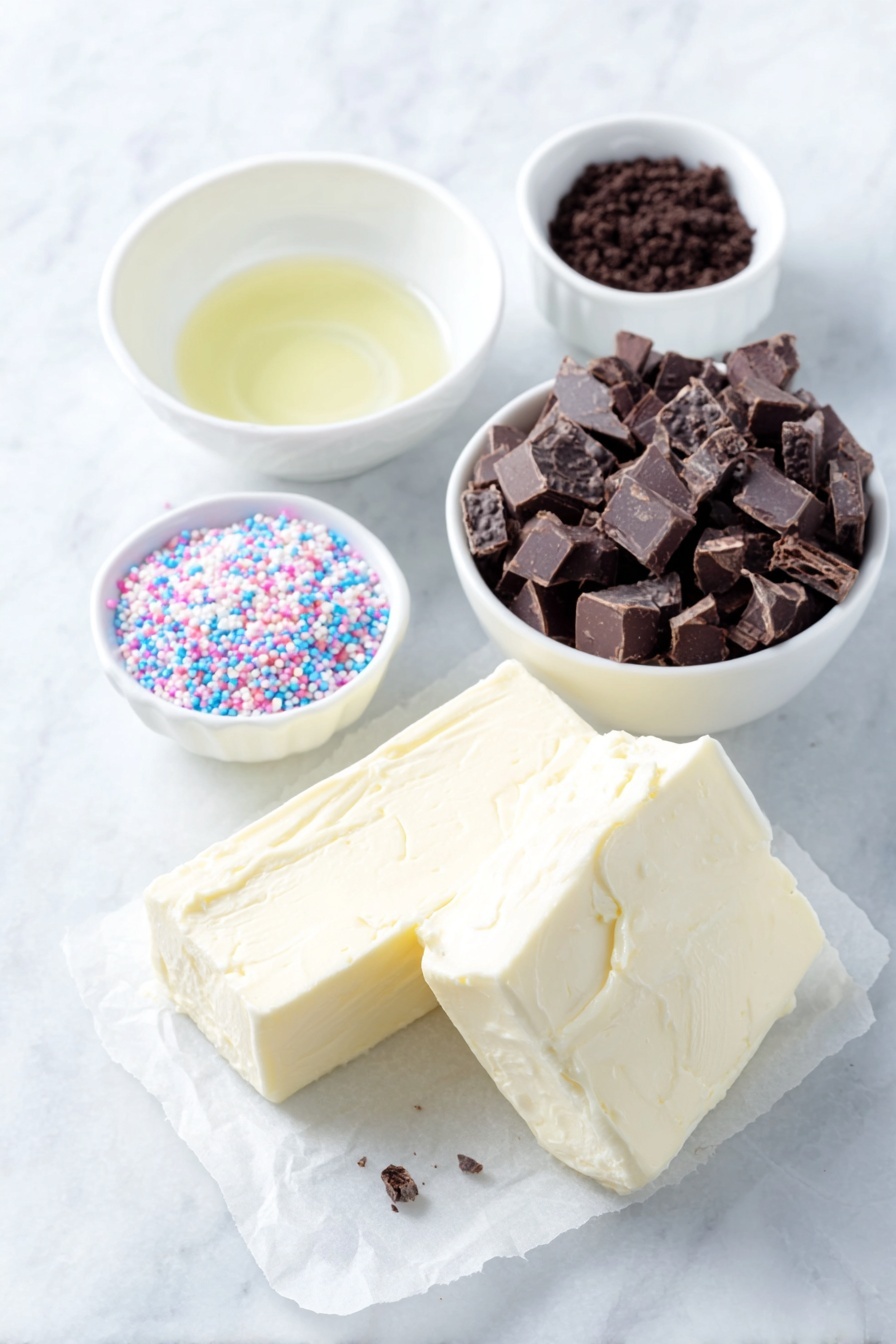
- Oreos: Classic regular Oreos work best—not Double-Stuf—to get the right crumb texture.
- Cream Cheese: Full-fat and softened to room temperature for smooth mixing and rich flavor.
- Chocolate: Semi-sweet or white chocolate, chopped roughly to melt evenly; your choice depending on your sweetness level.
- Vegetable or Coconut Oil: Just a touch to smooth out the melted chocolate for dipping.
- Optional Garnishes: Sprinkles, Oreo crumbs, or extra melted chocolate for drizzle add flair and texture.
Variations
I love tweaking this Easy Oreo Truffles Recipe depending on my mood or what I have on hand. It’s so easy to customize that you might find a new favorite every time you make it.
- White Chocolate Coating: When I swapped semi-sweet for white chocolate, my truffles instantly felt more decadent and festive, especially with colorful sprinkles on top.
- Vegan Version: I’ve used vegan cream cheese and dairy-free chocolate with great results—perfect for plant-based friends.
- Peanut Butter Twist: Mixing in a tablespoon of peanut butter with the cream cheese creates this amazing nutty surprise inside the truffles.
- Crunch Factor: Add crushed nuts or mini chocolate chips to the mixture before forming balls for a fun texture.
How to Make Easy Oreo Truffles Recipe
Step 1: Crush the Oreos to Perfect Crumbs
This part is so satisfying—you want to blitz the Oreos in your food processor or blender until they’re fine crumbs. I learned not to overdo it; if you pulverize them too much, the mixture gets gummy later. Just pulsing a few times until no big chunks remain works best. Don’t worry about the cream filling—leave it in; it helps bind everything.
Step 2: Mix Oreo Crumbs and Cream Cheese
Next, toss the Oreo crumbs and that perfectly softened cream cheese into a mixing bowl and combine until smooth—no giant lumps! I usually use my stand mixer with the paddle attachment, but a food processor can still do the trick if it’s roomy enough. This is where you’ll hear me say: make sure the cream cheese is *really* soft. It makes all the difference in getting easy-to-roll balls.
Step 3: Shape and Chill Your Truffles
Using a tablespoon or a small cookie scoop, portion out the mixture into even bits (about 18 to 22 grams each) and roll them gently between your palms. If the mixture feels sticky or hard to handle, pop it in the fridge for 15 minutes—that trick saved me during my first batch! Place the balls on a parchment-lined tray, then cover and chill at least one hour, or up to three days, before dipping. If you’re short on time, freeze them for 30 minutes—the quick chill firms them up perfectly.
Step 4: Melt and Prepare Your Chocolate
To achieve a smooth, glossy chocolate coating, melt your chopped chocolate with a splash of vegetable or coconut oil in short bursts—20 seconds in the microwave is my go-to—and stir well until silky. Be patient here; letting the chocolate sit for about 5 minutes after melting cools it just enough so it won’t melt your truffles when dipping.
Step 5: Dip and Decorate
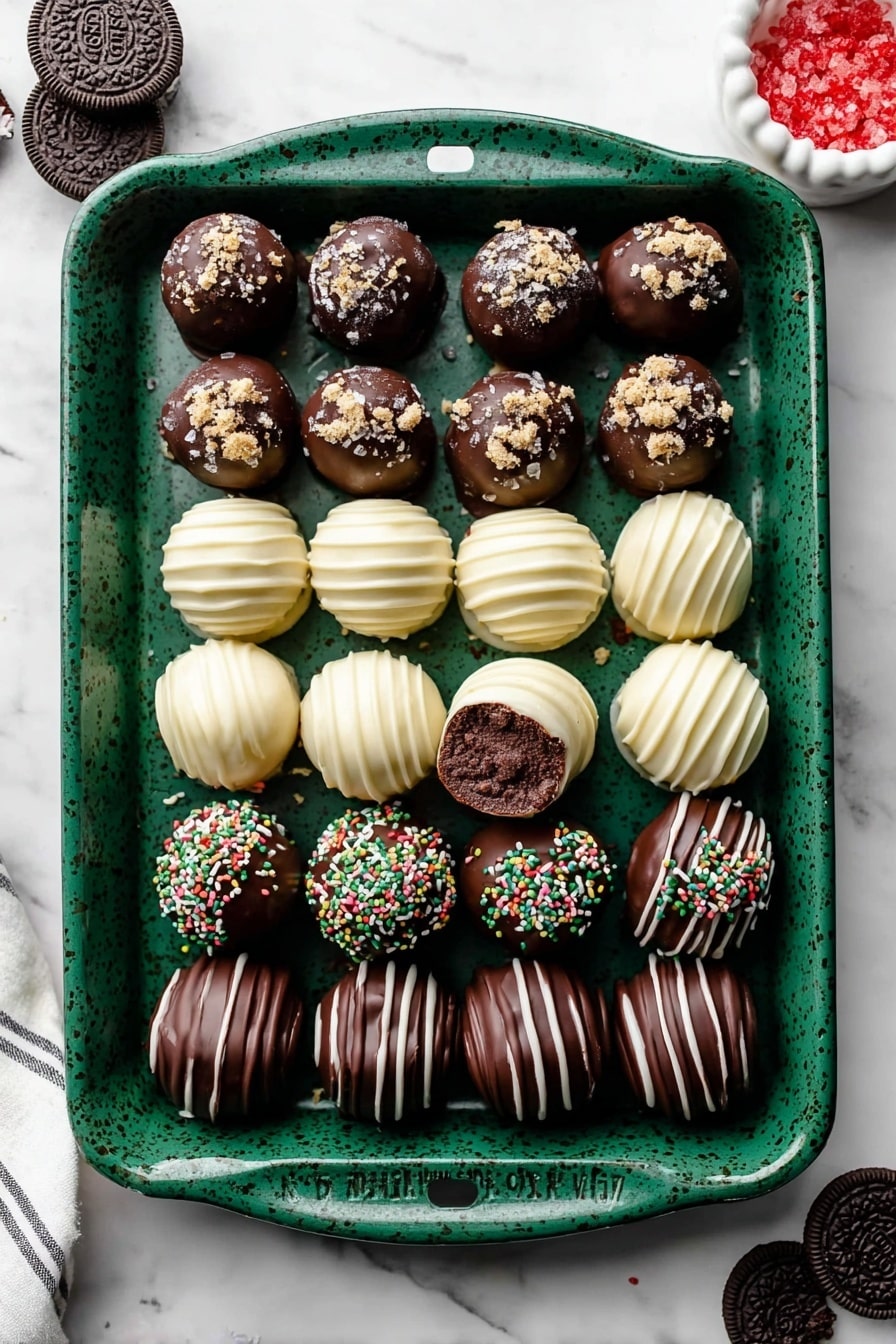
This is the fun part! Using a fork or a candy dipping tool, dip each Oreo ball into the melted chocolate, swirl to coat evenly, then gently tap off excess chocolate. I use a toothpick to slide the truffle off the fork onto the parchment. If you want an extra festive touch, sprinkle toppings or drizzle contrasting chocolate on your still-wet coating. This little extra always makes my treats look special!
Step 6: Chill Until Set
Once dipped, refrigerate your truffles for at least an hour so the chocolate hardens up nicely. Afterwards, you can store them in an airtight container layered with parchment paper—that keeps them fresh and pretty for up to two weeks.
Pro Tips for Making Easy Oreo Truffles Recipe
- Room Temperature Cream Cheese: I can’t stress enough how much smoother and easier to mix these truffles are when your cream cheese isn’t cold.
- Don’t Skimp on Chilling: Letting the Oreo balls firm up before dipping prevents a messy meltdown during chocolate coating.
- Oil in Chocolate is Key: Adding a bit of oil thins the chocolate just enough for a silky, professional finish.
- Use Parchment Paper: Always place dipped truffles on parchment to avoid sticky, frustrating cleanups.
How to Serve Easy Oreo Truffles Recipe
Garnishes
I usually keep it simple with crushed Oreo crumbs or rainbow sprinkles on top—both add a nice pop of texture and color. Sometimes, I drizzle a contrasting chocolate (white over dark or vice versa) for a little artistic flair. It makes the truffles look like they’re straight from a bakery.
Side Dishes
Because these truffles are so rich, I like pairing them with fresh fruit like berries or a light, crisp salad if serving to guests. They also go beautifully alongside a cup of coffee or a glass of cold milk for that cozy feel.
Creative Ways to Present
For parties, I arrange these truffles in mini cupcake liners or pretty candy cups. Another trick I love is stacking them in a clear jar or a tiered dessert tray—it makes for a stunning centerpiece and guests can help themselves easily.
Make Ahead and Storage
Storing Leftovers
Leftover truffles keep so well in the refrigerator—simply layer them in an airtight container with parchment or wax paper between layers to avoid sticking. They stay fresh and moist for up to two weeks, which is great if you want to prep ahead for gatherings.
Freezing
I’ve frozen these truffles multiple times with excellent results. Just place them in a freezer-safe container separated by parchment, freeze for up to three months, then thaw in the fridge overnight before serving. They keep their texture and flavor remarkably well.
Reheating
While these truffles are best enjoyed cold, if you prefer them slightly softer, I pop them out of the fridge 10 minutes before serving. Warm up chocolate coatings gently in case of any melting. Avoid microwaving the whole truffle—it’ll ruin the texture.
FAQs
-
Can I use Double-Stuf Oreos for this recipe?
While you can, I recommend using regular Oreos because the extra filling in Double-Stuf makes the mixture too soft and sticky, which can make rolling the truffles tricky. Regular Oreos give you the ideal balance of cookie to filling for perfect texture.
-
What if I don’t have a food processor?
No worries! You can place the Oreos in a sealed plastic bag and crush them with a rolling pin until finely ground—it takes a bit more effort but works just fine. Just be sure to get them finely crushed for the best results.
-
How do I prevent chocolate from cracking after dipping?
Adding a teaspoon of vegetable or coconut oil to your melted chocolate helps keep it smooth and flexible, reducing cracking. Also, avoid very thick coatings by tapping off excess chocolate gently before the chocolate sets.
-
Can I make these truffles ahead of time for a party?
Absolutely! These are perfect make-ahead treats. Keep them refrigerated in an airtight container until you’re ready to serve, and they’ll taste fresh and delicious. Just add fresh garnishes like sprinkles right before serving.
Final Thoughts
Honestly, this Easy Oreo Truffles Recipe is one of those treasures I’m so glad I discovered. It’s quick, requires minimal effort, and always impresses whoever’s lucky enough to try them. Whether you’re making a sweet gift or need a crowd-pleaser dessert, these truffles have your back. So go ahead—grab those Oreos and cream cheese, and get ready for some serious deliciousness. I can’t wait to hear how they turn out in your kitchen!
Print
Easy Oreo Truffles Recipe
- Prep Time: 45 minutes
- Cook Time: 1 hour
- Total Time: 1 hour 45 minutes
- Yield: 28 (28–32 truffles)
- Category: Dessert
- Method: No-Cook
- Cuisine: American
Description
Delicious no-bake Oreo balls made by combining finely crushed Oreos with smooth cream cheese, shaped into bite-sized truffles, then dipped in melted chocolate for a decadent treat. Perfectly creamy, rich, and easy to customize with sprinkles or drizzled chocolate.
Ingredients
Main Ingredients
- 36 (14.3oz / 405g) regular Oreo cookies (not Double-Stuf)
- 8 ounces (226g) full-fat brick cream cheese, softened to room temperature
- 12 ounces (339g) semi-sweet or white chocolate, coarsely chopped
- 1/2 teaspoon vegetable oil or coconut oil
Optional Garnish
- Sprinkles
- Oreo crumbs
- Additional melted chocolate
Instructions
- Crush Oreos: Place the entire Oreos, including the cream filling and cookies, into a food processor or blender. Pulse until they become fine crumbs.
- Mix with Cream Cheese: Using a hand-held or stand mixer fitted with a paddle attachment, or continuing with the food processor if large enough, blend the Oreo crumbs together with softened cream cheese until fully combined into a uniform mixture.
- Form Balls: Scoop out about 18–22 grams (one tablespoon) of the mixture and roll it between your palms to form a smooth ball. Place the balls on a baking sheet or plate lined with parchment paper. If the mixture is too sticky to handle, refrigerate for 15 minutes before rolling. Cover and refrigerate the formed balls for at least one hour or up to three days. For faster set, freeze for 30 minutes but do not freeze longer unless storing in refrigerator afterward.
- Melt Chocolate: In a glass bowl or 2-cup liquid measuring cup, combine chopped chocolate and vegetable or coconut oil. Melt in the microwave in 20-second increments, stirring between each, until smooth and fully melted. Alternatively, use a double boiler method, stirring constantly until melted. Let the chocolate cool for 5 minutes before dipping to avoid melting the Oreo balls.
- Dip Truffles in Chocolate: Working with one ball at a time, submerge it into the melted chocolate, swirl to coat fully, then lift out carefully using a fork or dipping tool. Gently tap off excess chocolate on the side of the bowl. Use a toothpick to slide the truffle off the fork onto parchment-lined surface.
- Garnish: While the chocolate is still wet, add sprinkles or sift Oreo crumbs on top if desired. Drizzle additional melted chocolate over the truffles for decoration if you like.
- Set Chocolate: Refrigerate the dipped truffles for at least one hour to let the chocolate harden completely before serving.
- Storage: Store the Oreo balls in an airtight container layered with parchment paper in the refrigerator for up to two weeks.
Notes
- This is an easy no-bake dessert combining crushed Oreos and cream cheese into creamy truffles.
- Rolling the mixture while cold helps handle sticky dough more easily.
- Use good quality chocolate for smooth coating and best flavor.
- Optional garnishes add visual appeal and extra texture.
- Perfect for parties, gifts, or simple indulgent treats.
- Can be stored refrigerated for up to two weeks without losing freshness.
Nutrition
- Serving Size: 1 truffle (approx. 22g)
- Calories: 120
- Sugar: 12g
- Sodium: 80mg
- Fat: 7g
- Saturated Fat: 4g
- Unsaturated Fat: 2.5g
- Trans Fat: 0g
- Carbohydrates: 14g
- Fiber: 1g
- Protein: 1g
- Cholesterol: 15mg


