
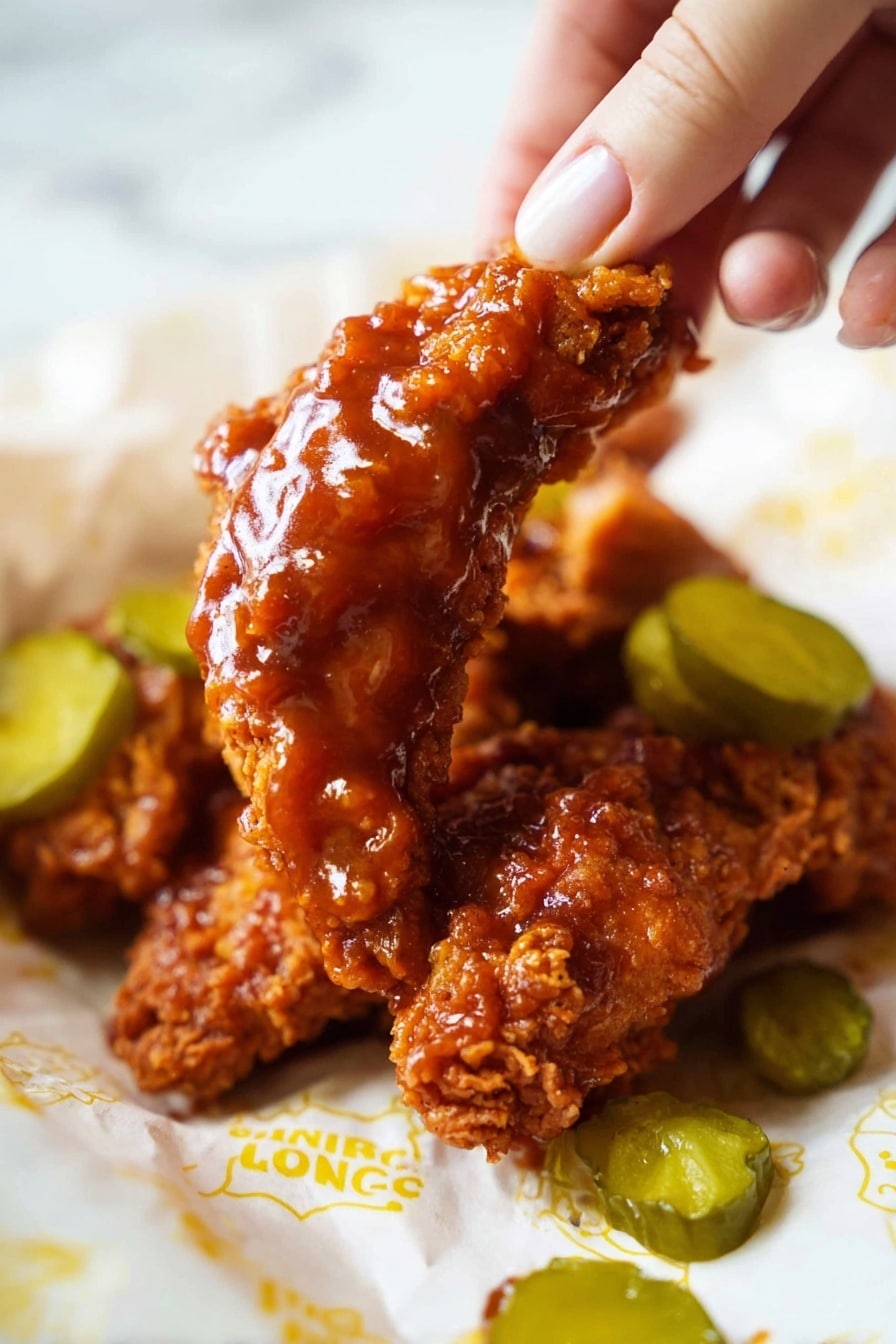
If you’re craving that perfect crunch combined with a fiery kick, then you’re going to love this Crispy Nashville Chicken Tenders Recipe. I absolutely love how these tenders come out—super crispy on the outside, tender and juicy on the inside, and drenched in that signature Nashville spicy glaze that keeps your taste buds dancing. Whether you’re hosting friends or just want a special treat for dinner, this recipe will quickly become your go-to for a finger-licking good meal. Stick around, I’ll walk you through every step, and share some insider tips so you nail it every time!
Why You’ll Love This Recipe
- Perfect Crispy Crunch: The flour coating with double seasoning creates those flaky, crunchy bits you dream of when biting into Nashville tenders.
- Flavor-Packed Marinate: The combo of buttermilk, pickle juice, and hot sauce infuses the chicken with tender juiciness and that tangy heat.
- Customizable Heat Level: You can easily adjust the spice in the glaze to suit your family’s tolerance or spice cravings.
- Simple Technique: Even if you’re new to frying, these steps make it easy to get restaurant-quality tenders at home.

Ingredients You’ll Need
These ingredients work together to build the perfect Nashville Chicken Tenders flavor and texture. When shopping, definitely look for good-quality chicken tenders and fresh spices to keep the taste vibrant. Also, if you can’t find pickle juice, gherkin juice works great as a substitute.

- Chicken Tenders: Fresh, good-quality chicken tenders ensure juicy meat; avoid frozen if possible.
- Vegetable, Peanut, or Sunflower Oil: Pick a neutral oil with a high smoke point perfect for deep frying.
- Buttermilk: Adds tang and tenderizes the chicken wonderfully during marinading.
- Pickle Juice (Gherkin juice if UK): The secret tangy kick that elevates Nashville heat.
- Hot Sauce: Choose your favorite for marinade and glaze, it packs the heat and depth.
- Egg: Helps the coating adhere beautifully to the chicken.
- Plain/All-Purpose Flour: The base for the crispy, crunchy crust.
- Spices (Paprika, Cayenne Pepper, Garlic Powder, Onion Powder, Smoked Paprika): Layer the flavor with these aromatic spices for authentic Nashville taste.
- Baking Powder: Creates that light, flaky texture in the crust.
- Salt and Black Pepper: Essential for bringing out all the flavors perfectly.
- Honey: Balances the heat with a touch of sweetness in the glaze.
Variations
One of the best things about this Crispy Nashville Chicken Tenders Recipe is how easy it is to customize. I like to tweak the heat level and sometimes swap ingredients to match dietary needs or mixer sauces for a twist. Don’t be afraid to make it your own!
- Mild Version: When serving kids, I reduce the cayenne pepper and hot sauce for a gentler spice that still has great flavor.
- Gluten-Free: I’ve tried replacing flour with a gluten-free mix, and it works well if you double-check it contains baking powder for crispiness.
- Spicy Honey Glaze: I sometimes add more honey or even a splash of maple syrup for a sweeter glaze that balances the heat beautifully.
- Baked Option: For a lighter meal, you can bake instead of deep-frying, but the crisp factor won’t be quite the same.
How to Make Crispy Nashville Chicken Tenders Recipe
Step 1: Marinate for Maximum Flavor and Tenderness
Start by whisking together buttermilk, pickle juice, hot sauce, egg, and salt in a medium bowl—this simple marinade makes all the difference. Submerge your chicken tenders fully, cover tightly, and pop them in the fridge for at least 2 hours, but 4+ hours is even better. I discovered this trick early on: the longer you marinade, the juicier and more flavorful the chicken becomes. Take them out 30 minutes before frying so they come to room temperature; this helps them cook evenly.
Step 2: Create the Crispy Coating
While the chicken marinates, mix your dry ingredients—flour, paprika, cayenne, garlic powder, onion powder, baking powder, salt, and black pepper—in a large shallow dish. When you’re coating the tenders, take them straight from the marinade and press the flour mixture into every nook and cranny with your hands. I always make sure to give a good shake to remove excess, then set aside. This pressing step is where that irresistible flaky crunch really forms.
Step 3: Fry the Tenders to Golden Perfection
Heat your oil in a pot or cast iron skillet to about 350°F (175°C). I recommend working in small batches—3 to 4 tenders at a time—to keep the oil from cooling too much. Once you add the chicken, the temp might dip to around 320°F (160°C). Try to maintain that range as you fry. Flip the tenders after a few minutes and fry until they’re deep golden and super crispy, watching carefully—the chicken should be cooked through and white inside. I like to place them on a wire rack over a tray to drain the excess oil; paper towels tend to get soggy too fast.
Step 4: Whip Up the Signature Nashville Glaze
Once all the tenders are fried, let the oil cool a bit—then scoop about half a cup into a bowl. Stir in hot sauce, honey, smoked paprika, garlic powder, and salt to make that luscious, sticky glaze. Brush the tenders generously with this glaze to lock in heat and sweetness. The glaze is what really sets this Crispy Nashville Chicken Tenders Recipe apart, so don’t skimp on it!
Pro Tips for Making Crispy Nashville Chicken Tenders Recipe
- Room Temp Chicken: Bringing the chicken to room temperature before frying helps it cook evenly without drying out.
- Press the Flour: I learned that really pressing the flour mix into every crevice is the secret to that extra flaky crunch.
- Manage Your Oil Temperature: Using a thermometer to maintain oil between 320°F-350°F keeps the tenders crisp and golden without burning.
- Don’t Crowd the Pan: Frying in batches avoids oil temperature drops that make the coating soggy.
How to Serve Crispy Nashville Chicken Tenders Recipe
Garnishes
I usually top these tenders with a sprinkle of fresh chopped parsley or thinly sliced green onions for a pop of color and freshness—plus, a few dill pickle slices on the side are always a crowd-pleaser. They add a cool crunch that balances the heat perfectly.
Side Dishes
My go-to sides are classic Southern staples: creamy coleslaw, buttery cornbread, or crunchy pickles. I’ve also served these with crisp French fries or sweet potato fries, which soak up the glaze beautifully and keep the meal fun and casual.
Creative Ways to Present
For special occasions, I like to present the tenders stacked in a rustic wooden board lined with parchment and add small bowls of extra glaze and ranch or blue cheese dips. It turns the meal into a finger-food feast that’s perfect for game day or casual dinner parties.
Make Ahead and Storage
Storing Leftovers
After they cool, I store leftover tenders in an airtight container lined with paper towels to keep them from getting soggy. They’ll stay fresh in the fridge for up to 3 days, though the crunch diminishes a bit over time.
Freezing
I’ve had good luck freezing these tenders individually on a tray before transferring to a freezer bag—this keeps them from sticking together. When ready, I thaw overnight in the fridge and re-crisp in the oven for best results.
Reheating
To retain that crispy texture, reheating in the oven or air fryer at 375°F for 8–10 minutes works wonders. Avoid the microwave because it tends to make the coating soggy, and nobody wants that.
FAQs
-
Can I use chicken breasts instead of tenders for this recipe?
Absolutely! If using chicken breasts, slice them into tender-sized strips so they cook evenly and absorb the marinade well. Just keep an eye on the cooking time, as thicker pieces may need a little longer.
-
What’s the purpose of pickle juice in this recipe?
Pickle juice adds a subtle tangy brightness and tenderizes the chicken during marination. It’s a key ingredient that gives Nashville-style tenders their unique punch—don’t skip it!
-
How do I adjust the spice level if I’m sensitive to heat?
You can reduce or omit the cayenne pepper and use a mild hot sauce or less of it in both the marinade and glaze. Also, adding a bit more honey to the glaze helps balance out the heat nicely.
-
Can I bake the tenders instead of frying?
Yes, baking is an option for a healthier version, but you won’t get quite the same crunch. Bake at 425°F for about 20–25 minutes, flipping halfway, and consider spraying the tenders with oil to help crisp them up.
-
What oil is best for frying Nashville Chicken Tenders?
Choose oils with high smoke points like vegetable, peanut, or sunflower oil. They keep the oil stable and flavors neutral, allowing the seasonings and chicken shine through.
Final Thoughts
This Crispy Nashville Chicken Tenders Recipe has been my secret weapon for bringing great flavor and crunch to the table every time. I remember the first time I made it, my whole family went crazy over the spicy glaze and perfectly crispy coating. It’s easy enough to whip up during the week but impressive enough for weekend gatherings. Give it a try—you’ll find yourself making these tenders on repeat, just like I do!
Print
Crispy Nashville Chicken Tenders Recipe
- Prep Time: 20 minutes
- Cook Time: 15 minutes
- Total Time: 155 minutes
- Yield: 4 servings
- Category: Main Dish
- Method: Frying
- Cuisine: American (Southern)
Description
Nashville Chicken Tenders offer a spicy, crispy, and flavorful twist on classic fried chicken. Marinated in a tangy blend of buttermilk, pickle juice, and hot sauce, then coated with a well-seasoned flour mixture, these tenders are deep-fried to golden perfection and finished with a smoky, sweet-hot glaze. Perfect for a snack or a meal, they deliver authentic Nashville heat and crunch.
Ingredients
Chicken and Marinade
- 1.3 lb / 600 g Chicken Tenders
- 1 cup / 240 ml Buttermilk
- 1/4 cup / 60 ml Pickle Juice (Gherkin juice in UK)
- 1/4 cup / 60 ml Hot Sauce
- 1 Egg
- 1 tsp Salt
Dredging Mixture
- 1 3/4 cups / 250 g Plain/All Purpose Flour
- 2 tsp Paprika
- 2 tsp Cayenne Pepper
- 1 tsp Garlic Powder
- 1 tsp Onion Powder
- 1 tsp Baking Powder
- 1 tsp Salt
- 1/2 tsp Black Pepper
Cooking Oil
- 3-4 cups / 750 ml – 1 litre Vegetable, Peanut or Sunflower Oil (for frying)
Glaze
- 1/2 cup / 120 ml Leftover Oil (from deep frying)
- 1/2 cup / 120 ml Hot Sauce
- 2 tbsp Honey (or to sweetness preference)
- 1.5 tsp Smoked Paprika
- 1/2 tsp Garlic Powder
- Salt (to taste)
Instructions
- Marinate the Chicken: In a medium-sized mixing bowl, whisk together buttermilk, pickle juice, hot sauce, egg, and salt until fully combined. Add the chicken tenders into the marinade, making sure they are fully submerged. Cover tightly and refrigerate for at least 2 hours, preferably 4 hours, to allow the flavors to infuse. Take the tenders out 30 minutes before cooking to bring them to room temperature.
- Prepare the Dredging Mixture: In a large shallow dish or curved baking tray, combine the flour, paprika, cayenne pepper, garlic powder, onion powder, baking powder, salt, and black pepper. Mix well to evenly distribute the spices.
- Coat the Chicken: Remove one chicken tender from the marinade and immediately place it into the dry flour mixture. Using your hands, thoroughly press the flour into all surfaces and crevices to create a thick, even coating. Shake off excess flour and set aside. Repeat with all tenders.
- Heat the Oil: In a suitably sized pot or cast iron skillet, heat the oil to 350°F (175°C). Use a thermometer to monitor the temperature closely, as it will slightly drop once tenders are added.
- Deep Fry the Tenders: Working in batches of 3-4, carefully add the coated tenders to the hot oil. The temperature might drop to about 320°F (160°C), so try to maintain the heat. Fry for several minutes on one side until golden and crispy, then flip and fry the other side until fully cooked, white inside, and piping hot. Remove and drain on a wire rack placed over a tray to catch excess oil.
- Prepare the Glaze: After frying all tenders, allow the oil to cool slightly. Scoop out 1/2 cup of the used frying oil into a small bowl. Add hot sauce, honey, smoked paprika, garlic powder, and salt to taste. Whisk vigorously to create a smooth, flavorful glaze.
- Glaze and Serve: Using a brush, coat all fried chicken tenders evenly with the glaze. Serve immediately and enjoy the combination of spicy, sweet, and smoky flavors with a perfect crunch.
Notes
- These Nashville Chicken Tenders are spicy and crispy with a bold flavor profile characteristic of Nashville hot chicken.
- Use fresh chicken tenders for best texture and consistency.
- The marinating time can be a minimum of 2 hours but allowing 4 hours or overnight enhances flavor and tenderness.
- Pressing the flour coating firmly onto the chicken helps develop the classic flaky, crispy crust.
- Maintain proper oil temperature to ensure the chicken cooks evenly without becoming greasy.
- The glaze ingredients can be adjusted to taste, especially sweetness from honey and heat from hot sauce.
Nutrition
- Serving Size: 1 serving
- Calories: 186 kcal
- Sugar: 2.57 g
- Sodium: 322 mg
- Fat: 14.23 g
- Saturated Fat: 6.438 g
- Unsaturated Fat: 6.986 g
- Trans Fat: 1.841 g
- Carbohydrates: 13.58 g
- Fiber: 0.7 g
- Protein: 2.02 g
- Cholesterol: 6 mg
