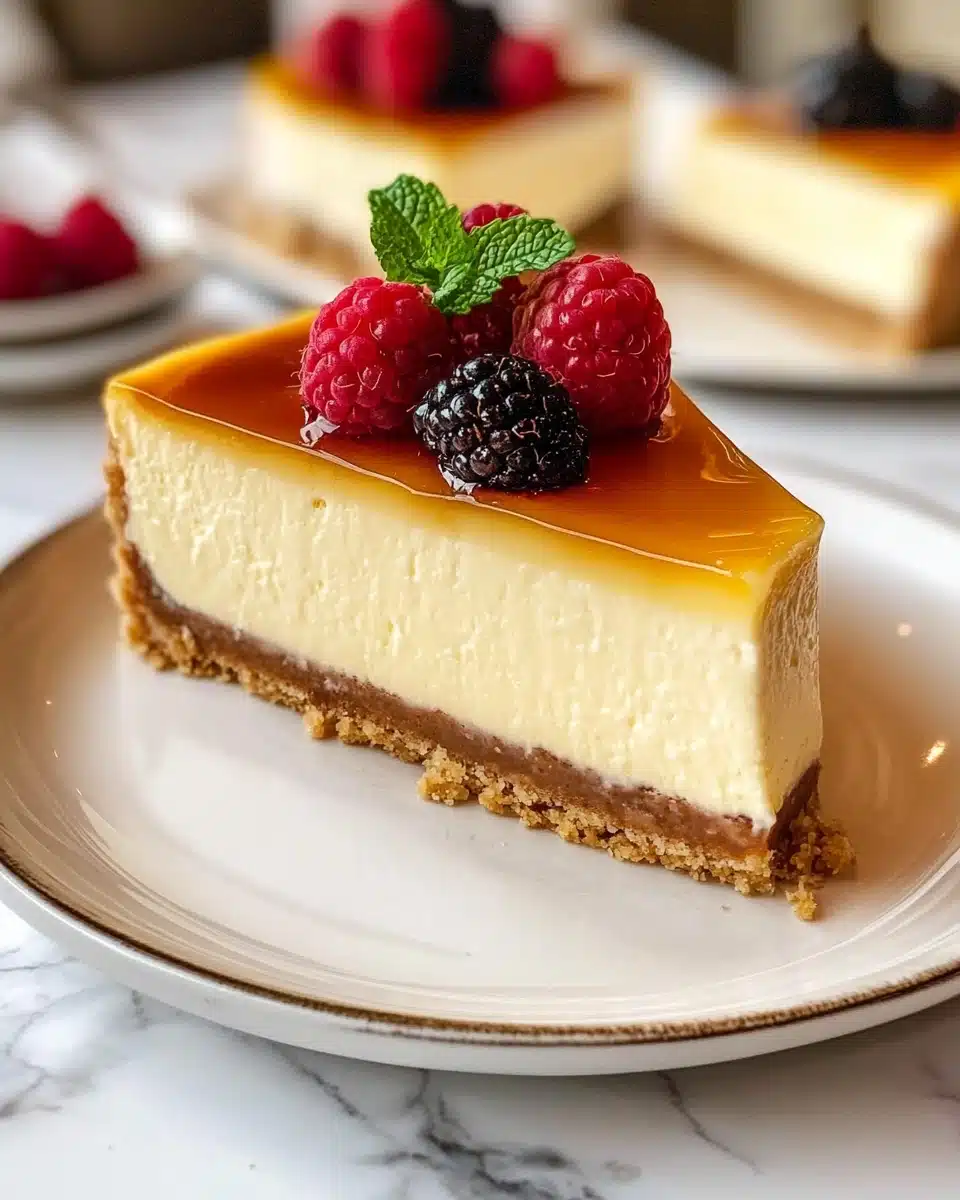
If you’ve ever dreamed of combining the silky decadence of classic crème brûlée with the creamy tang of cheesecake, you are in for the ultimate treat! This Crème Brûlée Cheesecake boasts a dreamy, custardy filling flecked with fragrant vanilla beans, nestled on a buttery graham cracker crust, all crowned with a glassy caramelized sugar topping that crackles at first bite. Let’s make dessert magic!
Why You’ll Love This Recipe
- Showstopping Dessert: This Crème Brûlée Cheesecake instantly steals the spotlight at any gathering with its golden caramelized top and elegant vanilla-speckled interior.
- Dreamy Texture Fusion: Experience the luscious creaminess of cheesecake paired with the signature crisp sugar shell of classic crème brûlée in every forkful.
- Simple, Stunning Flavors: Straightforward ingredients create layers of dynamic flavor—rich cream cheese, aromatic vanilla, and that irresistible caramel crunch.
- Make-Ahead Friendly: Plan stress-free celebrations—this dessert tastes even better after a chill overnight and holds beautifully for days.
Ingredients You’ll Need
Each element in this Crème Brûlée Cheesecake is chosen for both simplicity and impact—nothing fussy, just big flavor and that signature crackle. Here’s a rundown on the key ingredients and why they matter.
- Graham cracker crumbs: The foundation! These crumbs or digestive biscuits bring a subtle sweetness and satisfying crunch to the base.
- Brown sugar: Adds a warm, caramel-like flavor that elevates the crust and balances the tang of the filling.
- Unsalted butter: Melted butter acts as the glue, giving your crust its rich flavor and golden hue.
- Cream cheese: Use full-fat, room temperature cream cheese for an ultra-smooth, creamy, and tangy cheesecake layer.
- Granulated sugar: Sweetens both the cheesecake and the caramelized brûlée topping—don’t skimp!
- Vanilla bean pods: The star ingredient for that deep, aromatic vanilla flavor; scrape out every precious seed for gorgeous speckles.
- Sour cream: Adds brightness and silkiness to the batter, making your cheesecake extra luscious.
- Large eggs: These bind the batter and add richness—be sure they’re at room temperature for a smooth blend and even bake.
- Vanilla extract: A splash at the end boosts the vanilla depth, especially if you aren’t using vanilla bean paste.
- Salt: Just a hint enhances and balances every sweet, creamy note.
- Extra granulated sugar (for topping): This is what transforms into that iconic glassy brûlée shell on top!
Variations
Don’t be afraid to make this Crème Brûlée Cheesecake your own! It’s incredibly flexible—play with flavors, swap out the crust, or tweak it for special dietary needs. Here are some tasty ideas to get you started.
- Lemon Zest Twist: Add a teaspoon of finely grated lemon zest to the batter for a pop of citrus that brightens the whole dessert.
- Chocolate Cookie Crust: Swap the graham crackers for chocolate wafer cookies to infuse a subtle cocoa kick beneath the rich filling.
- Gluten-Free Adaptation: Use gluten-free graham-style crackers or almond flour to create a crust suitable for guests with dietary restrictions.
- Espresso Brûlée Cheesecake: Add 1 tablespoon of instant espresso powder to the batter for a sophisticated coffeehouse twist!
How to Make Crème Brûlée Cheesecake
Step 1: Prepare and Bake the Crust
Start by preheating your oven to 325ºF. Pulse graham crackers into fine crumbs in a food processor, blend with brown sugar, and stir in melted butter until every crumb is glossy and golden. Press the mixture evenly into your cheesecake pan—a springform with tall sides works best—making sure to pack the base tightly. Bake it for 10 minutes so the crust sets, then let it cool while you turn to the filling.
Step 2: Mix Up the Dreamiest Cheesecake Batter
With the crust cooling, grease the sides of your pan (this helps the cheesecake release perfectly later). Beat the softened cream cheese until it’s ultra-creamy, then add granulated sugar and scrape in all those beautiful vanilla bean seeds for true crème brûlée flavor. Cream together until perfectly smooth. Next, blend in sour cream for silkiness. Now, add eggs—one at a time!—mixing gently after each so the batter stays smooth and you don’t over-whip (which could cause cracks). Finish with vanilla extract and salt, mixing briefly until just combined.
Step 3: Bake in a Water Bath
Pour your luscious batter over the baked and cooled crust. Carefully wrap the pan’s bottom with several layers of foil to keep water out, then place it in a larger roasting pan. Pour in hot water until it reaches halfway up the sides—this makes a gentle water bath, ensuring your Crème Brûlée Cheesecake bakes up irresistibly creamy, never dry or cracked. Bake for 60–75 minutes, until the edges are set but the center is just a tiny bit wobbly when shaken.
Step 4: Cooling and Chilling
Once baked, turn off the oven and leave the cheesecake inside for an hour—this gentle finish ensures no sudden temperature shifts that could lead to cracking. Let it cool to room temperature, then chill in the fridge for at least 6 hours (overnight is even better!). Resist the urge to unmold until it’s fully cold for those perfect, clean sides.
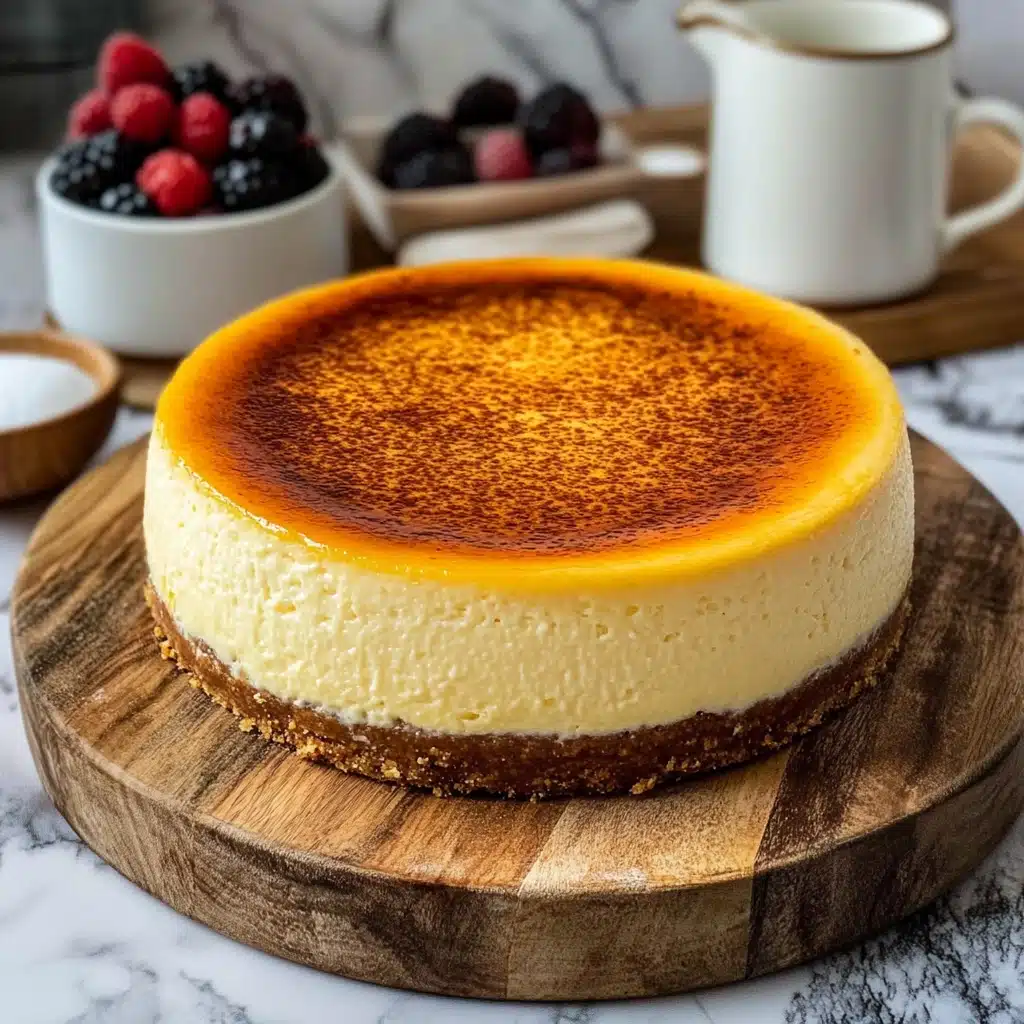
Step 5: Caramelize the Brûlée Topping
Time for the grand finale! After unmolding the chilled cheesecake, sprinkle a generous, even layer of granulated sugar over the top. Take a kitchen torch and gently caramelize the sugar, keeping the flame moving in circles to avoid burning. Wait a minute for the golden shell to harden, then slice… and listen for that signature crackle as you pop the first forkful!
Pro Tips for Making Crème Brûlée Cheesecake
- Room Temperature Ingredients: Always let your cream cheese, eggs, and sour cream come fully to room temp before mixing—this ensures a lump-free, ultra-smooth batter.
- How to Avoid Cracking: The water bath and gradual cooling in the oven are non-negotiable for a perfectly creamy, uncracked cheesecake.
- Torch Technique: Use a low flame and steady, circular motion when brûléeing—take your time to avoid burnt sugar patches and aim for a shell that glistens all over.
- Unmolding Like a Pro: Refrigerate fully before unmolding and run a thin, warm knife around the sides for picture-perfect slices every time.
How to Serve Crème Brûlée Cheesecake
Garnishes
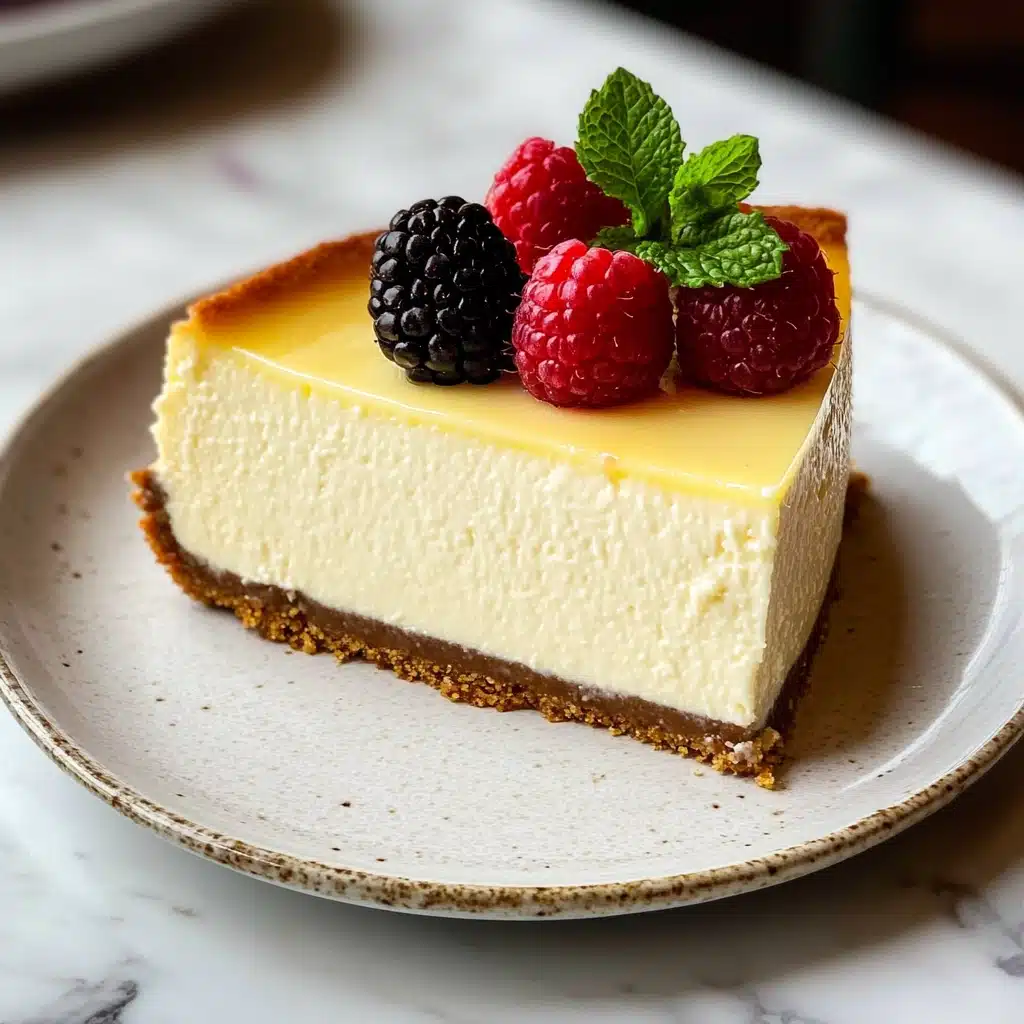
Let that glassy caramel top shine front and center, but if you want a little extra flourish, try adding a few fresh berries—think raspberries or sliced strawberries—for juicy color. A whisper of whipped cream or a scattering of edible flowers will make your Crème Brûlée Cheesecake party-ready in seconds.
Side Dishes
Because the cheesecake is so luxurious, I love to balance it with something light and bright—maybe a simple fruit salad on the side, or some crisp lemon shortbread cookies to nibble alongside your slice. For special occasions, a flute of sparkling wine pairs gorgeously with that creamy filling and crunchy top.
Creative Ways to Present
For a fun twist, try making individual mini Crème Brûlée Cheesecakes in small jars or ramekins—perfect for picnics or gifting! Serve cut wedges on a black slate platter for dramatic contrast, or use festive plates and a scoop of vanilla bean ice cream to play up that crème brûlée magic.
Make Ahead and Storage
Storing Leftovers
Wrap leftover Crème Brûlée Cheesecake tightly in plastic or store in an airtight container in the fridge, where it will keep beautifully for up to 4 or 5 days. The sugar shell softens a bit with time, but you can crisp it back up with a quick torch!
Freezing
This cheesecake freezes exceptionally well. Once completely chilled, wrap it snugly in several layers of plastic then foil, and freeze for up to 2 months. For best results, brûlée the sugar topping fresh just before serving.
Reheating
No oven required—simply let frozen slices thaw overnight in the fridge. If the sugar top needs its signature snap, give it a light touch with the torch to revive that golden crackle before serving individual pieces.
FAQs
-
Can I make Crème Brûlée Cheesecake in advance?
Absolutely! In fact, this dessert is perfect for making ahead. Chill it overnight (or even 2 days in advance), then add the brûlée sugar and torch just before serving for that spectacular glassy finish.
-
What if I don’t have a kitchen torch?
The torch delivers the classic brûlée crunch, but if you don’t have one, you can briefly broil the sugared top in your oven. Watch closely—caramelization happens fast!
-
Why use a water bath for Crème Brûlée Cheesecake?
The water bath helps the cheesecake bake slowly and evenly, preventing tough edges or unsightly cracks. It’s the secret to that irresistibly creamy, custard-like texture.
-
Can I substitute vanilla bean paste for the pods?
Yes! Simply use 1 tablespoon of high-quality vanilla bean paste in place of the seeds from two vanilla pods. Add it when you mix in the vanilla extract for fabulous flavor and those signature vanilla flecks.
Final Thoughts
There’s nothing quite like the moment a fork cracks through the caramel shell of this Crème Brûlée Cheesecake—pure dessert bliss with every bite! I hope you give this showstopper a try and enjoy its irresistible balance of creamy, crunchy, and utterly decadent flavors. Treat yourself and your loved ones—you deserve it!
Print
Crème Brûlée Cheesecake Recipe
- Prep Time: 40 minutes
- Cook Time: 1 hour 20 minutes
- Total Time: 2 hours
- Yield: 12 servings
- Category: Dessert
- Method: Baking
- Cuisine: French
- Diet: Vegetarian
Description
Indulge in the decadent fusion of two classic desserts with this Crème Brûlée Cheesecake recipe. Creamy cheesecake sits atop a buttery graham cracker crust, topped with a caramelized sugar layer for the perfect finish.
Ingredients
Graham Cracker Crust
- 1 1/2 cups graham cracker crumbs (180 grams, or digestive biscuits)
- 1/4 cup brown sugar (55 grams)
- 6 tbsp unsalted butter, melted (85 grams)
Cheesecake Batter
- 907 grams cream cheese, softened (4 packages of 8 oz.)
- 1 1/3 cup granulated sugar (266 grams)
- 2 vanilla bean pods (see notes)
- 1/2 cup sour cream (120 grams)
- 4 large eggs, room temp
- 1/2 tbsp vanilla extract
- 1/2 tsp salt
For the topping
- 1/4 cup granulated sugar (50 grams)
Instructions
- Graham Cracker Crust – Pre-heat the oven to 325ºF. Place the graham cracker in a food processor and process to obtain fine crumbs. Add the brown sugar and mix to combine. Melt the butter and mix with the crumbs and sugar. Press the mixture on the bottom of an 8” or 9” cheesecake pan. Bake the crust in the oven for 10 minutes. Remove it from the oven and let it cool down.
- Cheesecake Batter – Grease the sides of the cheesecake pan. Beat the cream cheese for 3 minutes with a mixer at medium speed, until creamy. Add the granulated sugar, vanilla bean seeds, and sugar, then mix. Scrape the bowl and beat for another 30 seconds. Add the sour cream, then mix. Add the eggs one at a time, mixing until incorporated. Add vanilla extract, salt, and mix briefly. Pour the batter in the pan, wrap in foil, place in a water bath, and bake for 60-75 minutes. Let cool before chilling.
- To decorate – After chilling, remove the ring, sprinkle sugar on top, and caramelize with a torch. Allow to harden, slice, and serve.
Notes
- Storage: Store in the fridge for up to 4-5 days or freeze for up to 2 months.
- Crust: Digestive biscuits can be used instead of graham crackers.
- Vanilla Bean Pod: Substitute with 1 tbsp of vanilla bean paste.
- Greasing the pan: Grease after baking the crust to prevent sogginess.
- Electric mixer: Hand mixer recommended for smoother batter.
- Oven temperature: Adjust for convection ovens, ensuring doneness.
- Oven thermometer: Use to verify accurate oven temperature.
Nutrition
- Serving Size: 1 slice
- Calories: 450 kcal
- Sugar: 24g
- Sodium: 380mg
- Fat: 32g
- Saturated Fat: 18g
- Unsaturated Fat: 10g
- Trans Fat: 0g
- Carbohydrates: 35g
- Fiber: 1g
- Protein: 8g
- Cholesterol: 150mg


