
If you grew up savoring Dairy Queen Crunch Cones, then you know just how magical that sweet, nutty, candy-coated topping tastes—it’s a blend of nostalgia and pure joy in each bite! With this Copycat Dairy Queen Crunch Cone Recipe, you can now easily recreate those blissful summer moments right in your own kitchen. The beauty of this recipe? It’s outrageously quick to whip up, requires only a handful of basic pantry staples, and the results are nothing short of delightful. That signature crunch with a hint of rainbow fun makes any ordinary scoop of vanilla ice cream feel like a true celebration, perfect for capping off a busy weeknight or brightening a weekend get-together.
Why You’ll Love This Recipe
- Ridiculously Easy: Anyone can make this—no fancy candy thermometer required and no tricky steps to worry about.
- Lightning Fast: The whole process, from dissolving the sugar to smashing the brittle, takes less than half an hour (not counting cooling time).
- Irresistibly Delicious: Between the caramelized sugar, roasted peanuts, and festive sprinkles, every spoonful is a mix of crunchy, nutty, and sweet.
- Perfect for Parties or Weeknight Treats: Make a big batch and store in the pantry for instant ice cream upgrades whenever the craving strikes.

Ingredients You’ll Need
- Granulated Sugar: The essential building block for a golden, sweet, candy coating.
- Water: Helps dissolve the sugar and kickstarts the caramelization process.
- Unsalted Roasted Peanuts, Crushed: Bring that deep, nutty crunch—roasted peanuts are key for maximum flavor (and no extra salt).
- Rainbow Sprinkles: For that unmistakable Dairy Queen look and a pop of color—Betty Crocker is a classic, but use what you love.
- Vanilla Ice Cream in Cake Cones: The classic serving choice (but any scoop will do, if cones aren’t available).
Tip: For a nut-free version, see variations below!
Note: You’ll find the complete list of ingredients, along with their exact measurements, in the printable recipe card at the bottom of this post.
Variations
- Nut-Free Crunch: Swap peanuts for toasted sunflower or pumpkin seeds for an allergy-friendly option.
- Chocolate Twist: Stir in mini chocolate chips or crushed chocolate wafer cookies along with the sprinkles.
- Go Fruity: Dried fruits (like chopped candied pineapple or cherries) add a chewy, sweet surprise.
- Festive Sprinkles: Change up the sprinkle colors to match holidays or parties—red and green for Christmas, pastel for spring, or orange and black for Halloween.
How to Make Copycat Dairy Queen Crunch Cone
Step 1: Make the Syrup
Begin by adding water and granulated sugar to a sauté pan over medium heat. Stir patiently with a wooden spoon until the sugar dissolves completely, and you’re left with a clear syrup.
Step 2: Caramelize the Sugar
Let the syrup cook untouched. Watch for the edges to start taking on a golden hue and the bubbles to slow. Gently swirl the pan—no vigorous stirring needed—to make sure the sugar colors evenly. As soon as it reaches a light yellow shade, you’re ready for the next step.
Step 3: Add the Nuts
Add your crushed roasted peanuts to the pan, and quickly fold them into the caramel until everything is evenly coated.
Step 4: Cool and Smash
Spread the hot peanut brittle mixture onto a silpat- or parchment-lined baking sheet, and let it cool completely. Once set, transfer the brittle to a zip-top bag and gently crush it with a mallet or rolling pin until you get fine, sprinkle-sized pieces.
Step 5: Mix with Sprinkles
Toss the crunch pieces with rainbow sprinkles right in the bag, or in a bowl. Once combined, seal it up in an airtight container.
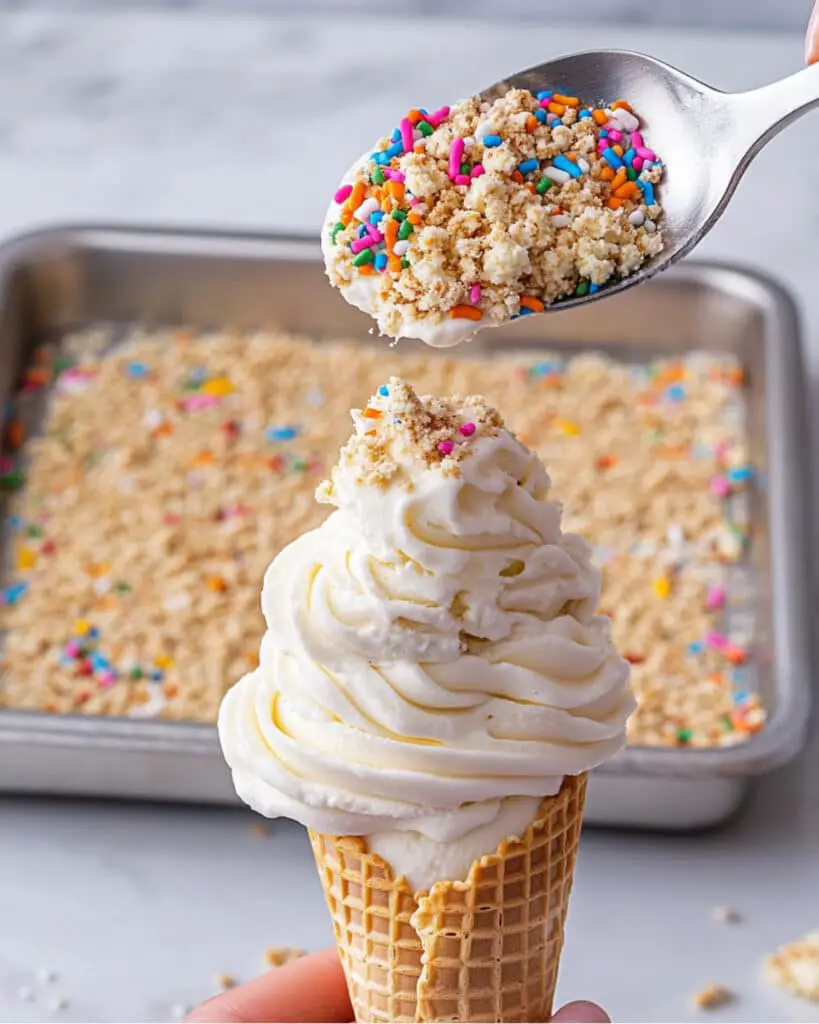
Step 6: Serve!
Spoon the colorful crunch generously over vanilla ice cream in cake cones, and enjoy every nostalgic, crispy bite.
Pro Tips for Making the Recipe
- Go Slow with the Sugar: Rushing the caramelization can result in a bitter, burnt flavor. Wait for that gentle gold color—patience pays off!
- Use a Wooden Spoon: Wood doesn’t get hot and is gentle on your caramel; metal can make the sugar seize.
- Line Your Tray: A silpat mat works wonders, but parchment paper will also prevent sticky cleanup headaches.
- Get Creative with Crushing: For bigger chunks, smash lightly. For a true Dairy Queen-inspired topping, crush until the pieces are small, like classic ice cream sprinkles.
How to Serve
This crunchy topping is made for classic vanilla ice cream cones but don’t stop there!
- Sundaes Galore: Sprinkle over hot fudge or caramel sundaes for a delightful texture contrast.
- Ice Cream Sandwiches: Roll the sides of homemade ice cream sandwiches in the crunch for an added layer of fun.
- Cupcakes or Cakes: Sprinkle over frosted cupcakes for a colorful surprise.
- Yogurt Parfaits: Layer with fruit and yogurt for a crunchy breakfast treat.
Serving Tip: Invite kids to dip their own cones for a fun dessert bar!
Make Ahead and Storage
Storing Leftovers
Store the finished crunch topping in an airtight container at room temperature. It keeps its crispness for up to two weeks—perfect for quick desserts.
Freezing
Freezing isn’t recommended, as moisture from the freezer can make the crunch lose its signature texture.
Reheating
If your crunch ever gets a little sticky, spread it on a lined baking sheet and pop it in a low oven (about 250°F) for 5 minutes, then cool completely.
FAQs
-
Can I use different nuts instead of peanuts?
Absolutely. Cashews, almonds, or even pecans work beautifully. Just be sure they’re roasted and unsalted—otherwise, you may need to adjust the sweetness or salt level.
-
Is a candy thermometer needed for the caramel?
No thermometer needed! You’re watching for visual cues: bubbles slow, and the caramel turns a pale golden color. Trust your eyes and nose—if it starts to brown quickly or smell burnt, remove from heat.
-
Can I make the crunch in advance?
Definitely. Make a big batch and store in an airtight jar; it will stay crisp for a couple of weeks—perfect for spontaneous sundae nights.
-
Can I skip the sprinkles?
Of course. The sprinkles add classic color and a touch of sweetness, but if you prefer a natural look or different flavor, feel free to omit or substitute (mini chocolate chips or more nuts are great alternatives).
Final Thoughts
This Copycat Dairy Queen Crunch Cone recipe brings a beloved ice cream shop treat into your own kitchen, with just a handful of everyday ingredients and less than half an hour of active prep. The best part? It’s nearly impossible to mess up, and every bite is a trip down memory lane. So grab those cones, scoop some vanilla, and elevate your next dessert with pure, playful crunch. Give it a try—and don’t be surprised if this becomes a new family favorite!
Print
Copycat Dairy Queen Crunch Cone Recipe
- Prep Time: 10 minutes
- Cook Time: 15 minutes
- Total Time: 25 minutes
- Yield: 5 cups
- Category: Desserts
- Method: Stovetop
- Cuisine: American
- Diet: Vegetarian
Description
Enjoy the nostalgic taste of Dairy Queen’s famous Crunch Cone with this easy copycat recipe. This homemade topping combines crunchy peanut brittle and colorful rainbow sprinkles for a sweet, delightful addition to vanilla ice cream in a cake cone. Perfect for summer treats or party desserts, this recipe creates a generous batch of flavorful crunch to enjoy at home.
Ingredients
For the Peanut Brittle Crunch
- 2 cups granulated sugar
- 1 cup water
- 2 cups unsalted roasted peanuts, crushed
For the Crunch Coating
- 1 1/4 cup Betty Crocker rainbow sprinkles
For Serving
- Vanilla ice cream
- Cake cones
Instructions
- Prepare the Sugar Syrup: In a sauté pan over medium heat, add the water and granulated sugar. Stir with a wooden spoon until the sugar is fully dissolved, ensuring a smooth mixture to avoid any graininess.
- Caramelize the Sugar: Allow the sugar mixture to cook undisturbed until the sides begin to brown and the bubbles become slow. Gently swirl the pan (do not stir) until the syrup turns a light yellow color, indicating the start of caramelization.
- Add Peanuts: Carefully add the crushed peanuts to the hot caramelized sugar. Gently stir the mixture, making sure all the peanuts are evenly coated in the caramel.
- Cool the Mixture: Pour the peanut mixture onto a silpat-lined sheet tray and spread it out evenly. Allow it to cool completely until it hardens into brittle.
- Crush the Brittle: Break the cooled peanut brittle into large pieces and place them in a Ziploc bag. Use a mallet to smash the brittle into finely sprinkle-sized pieces.
- Add Sprinkles: Transfer the crushed brittle into a bowl and toss with the rainbow sprinkles until fully combined. Store the crunch coating in an airtight container until ready to use.
- Serve: Scoop vanilla ice cream into cake cones, generously coat with the homemade crunch topping, and enjoy immediately for maximum crispness and flavor.
Notes
- Be cautious when working with hot caramel as it can cause burns; handle with care.
- Allow the peanut brittle to cool completely before smashing to achieve the perfect texture.
- Store the finished crunch coating in an airtight container at room temperature to maintain freshness.
- This recipe makes about 5 cups of crunch topping, great for parties or storing for later use.
- Works well with other ice cream flavors or as a topping for yogurt and desserts.
Nutrition
- Serving Size: 1/4 cup topping (approximate)
- Calories: 190
- Sugar: 19g
- Sodium: 10mg
- Fat: 8g
- Saturated Fat: 1g
- Unsaturated Fat: 6g
- Trans Fat: 0g
- Carbohydrates: 27g
- Fiber: 1g
- Protein: 3g
- Cholesterol: 0mg


