
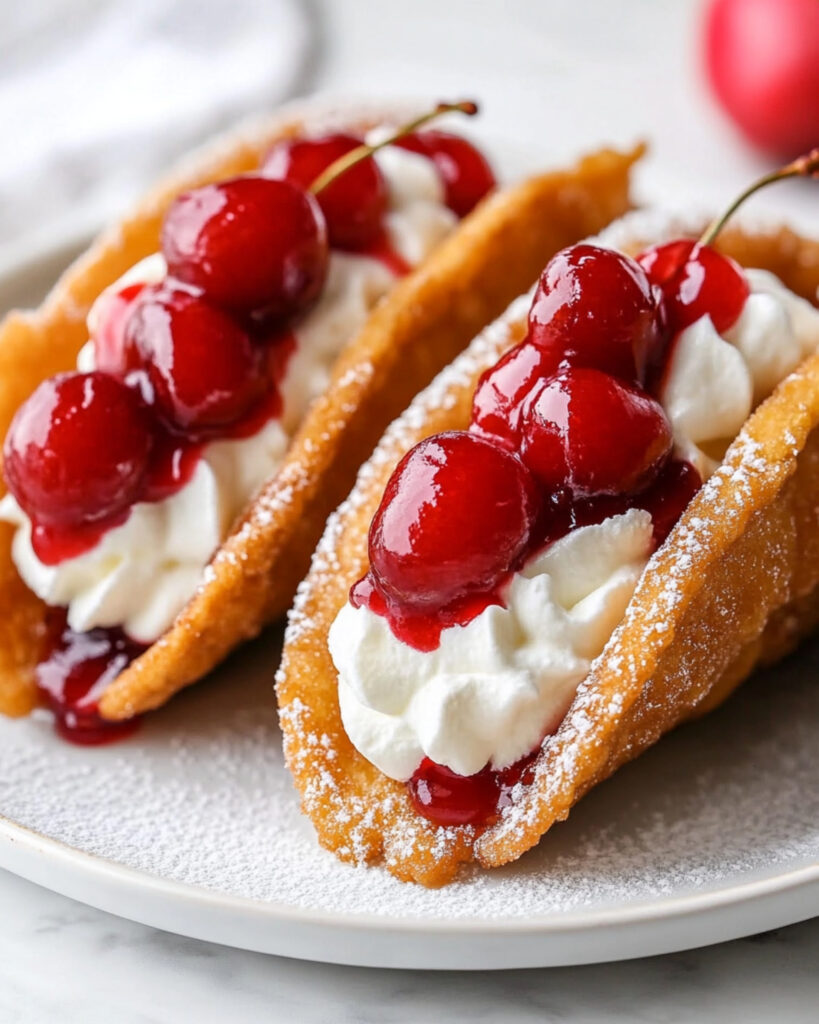
This Cherry Cheesecake Tacos recipe transforms regular flour tortillas into crispy, cinnamon-sugar coated shells filled with a luscious cream cheese mixture and topped with sweet cherry pie filling. It’s the perfect blend of creamy, fruity, and crispy textures that will impress everyone at your table – and it only takes 25 minutes to make! These delightful dessert tacos bring all the flavor of a classic cheesecake but in a fun, handheld format that’s perfect for parties, family gatherings, or whenever you’re craving something special.
Why You’ll Love This Recipe
- Quick and Simple: These dessert tacos come together in just 25 minutes, making them perfect for last-minute entertaining or satisfying sudden sweet cravings.
- Crowd-Pleaser: The combination of crispy cinnamon-sugar shells with creamy cheesecake filling and cherry topping is absolutely irresistible – adults and kids alike will be reaching for seconds!
- Fun Presentation: These dessert tacos are not just delicious, they’re conversation starters! The unique presentation makes them perfect for parties and gatherings.
- Versatile: You can easily swap out the cherry topping for your favorite fruit filling, allowing you to customize these treats for any occasion or preference.

Ingredients You’ll Need
For the Filling:
- Cream cheese: The foundation of our cheesecake filling, providing that rich, tangy flavor we all love.
- Granulated sugar: Sweetens the cream cheese filling to perfection without making it too sweet.
- Vanilla extract: Adds depth and warmth to the filling – always use pure vanilla if you can.
- Lemon juice: Just a touch brightens the whole filling and balances the sweetness.
- Cool Whip: Makes the filling light and fluffy – make sure it’s completely thawed for the best texture.
- Cherry pie filling: The crowning glory that adds a sweet-tart fruity element and beautiful color.
For the Taco Shells:
- Oil: Choose a neutral oil with a high smoke point like vegetable or canola for frying.
- Flour tortillas: Street taco size (about 4-5 inches) works perfectly for these handheld treats.
- Granulated sugar: Creates that wonderful sweet crust when mixed with cinnamon.
- Ground cinnamon: Adds warmth and spice to complement the sweet filling.
Note: You’ll find the complete list of ingredients, along with their exact measurements, in the printable recipe card at the bottom of this post.
Variations
Different Fruit Toppings
Swap the cherry pie filling for strawberry, blueberry, or peach pie filling for a delicious twist. Fresh berries tossed with a bit of sugar would also work beautifully.
Chocolate Lover’s Version
Add mini chocolate chips to the cheesecake filling and drizzle with chocolate sauce instead of using fruit topping.
Caramel Apple
Use apple pie filling instead of cherry and drizzle with caramel sauce for a caramel apple cheesecake taco.
Healthier Option
Make a lighter version using Neufchâtel cheese, light Cool Whip, and fresh fruit instead of pie filling. You could also bake the tortillas instead of frying them.
How to Make Cherry Cheesecake Tacos
Step 1: Prepare the Cheesecake Filling
In a mixing bowl, beat the softened cream cheese, sugar, vanilla extract, and lemon juice until smooth and creamy. Gently fold in the thawed Cool Whip until completely incorporated. Transfer this mixture into a piping bag or ziplock bag and refrigerate until you’re ready to assemble.
Step 2: Prepare for Frying
Heat oil in a deep pan to 350°F. While the oil is heating, combine the granulated sugar and cinnamon in a shallow bowl and set aside.
Step 3: Fry the Tortilla Shells
Using long metal tongs, hold a tortilla folded in half and submerge it in the hot oil. Fry until lightly golden brown, about 1 minute, maintaining the folded taco shape with your tongs. The tortilla will begin to hold its shape as it fries.
Step 4: Coat with Cinnamon Sugar
Remove the fried tortilla from the oil and place it on paper towels to drain for about 30 seconds. While still warm, coat both the inside and outside of the shell with the cinnamon-sugar mixture, using a spoon to ensure even coverage.
Step 5: Repeat and Cool
Continue frying and coating the remaining tortillas. Allow them to cool completely before filling – this ensures the cheesecake filling won’t melt when added.
Step 6: Assemble the Tacos
When ready to serve, pipe the cheesecake filling into each taco shell, filling them about two-thirds full. Top each with a generous spoonful of cherry pie filling.
Pro Tips for Making the Recipe
- Oil Temperature: Keep your oil at a consistent 350°F for perfect shells. Too hot and they’ll burn, too cool and they’ll be greasy.
- Shell Shaping: If you find it difficult to hold the tortillas with tongs, try using a metal ladle to create a well in the oil, then lay the tortilla over it to create the taco shape.
- Timing is Everything: Fill the shells just before serving to keep them crispy. The moisture from the filling will eventually soften the shells.
- Room Temperature Cream Cheese: Make sure your cream cheese is properly softened to avoid lumps in your filling.
- Stable Filling: If making these for an event, add a tablespoon of unflavored gelatin (bloomed and cooled) to the filling to help it maintain its shape longer.
How to Serve
Perfect Pairings
These cherry cheesecake tacos are delightful on their own, but they’re also wonderful paired with a scoop of vanilla ice cream or a dollop of whipped cream.
Special Occasions
Arrange these tacos on a decorative platter for birthdays, holiday gatherings, or dinner parties. They make an impressive dessert station item where guests can add their own toppings.
Dessert Bar
Set up a taco bar with the shells, filling in a piping bag, and various toppings so everyone can customize their own dessert taco.
Make Ahead and Storage
Storing Components Separately
For the best results, store the components separately. Keep the fried shells in an airtight container at room temperature for 1-2 days. Store the cheesecake filling in the refrigerator for up to 3 days. Assemble just before serving.
Freezing
The unfilled taco shells can be frozen for up to 3 months in a freezer-safe container. Thaw at room temperature and warm briefly in a 300°F oven to crisp them up again before filling.
Reheating
To restore crispness to shells that have been stored, place them in a 300°F oven for 3-5 minutes before filling.
FAQs
-
Can I make these ahead of time for a party?
You can prepare all components ahead of time, but I recommend assembling them no more than 30 minutes before serving. The filled tacos will gradually soften as they sit. For the best experience, fry and coat the shells up to a day ahead, store in an airtight container, and fill just before your event.
-
Can I bake the tortillas instead of frying them?
Absolutely! Brush both sides of the tortillas with melted butter, hang them over the bars of your oven rack (with a baking sheet underneath to catch drips), and bake at 375°F for 7-10 minutes until crisp. While still warm, coat them in the cinnamon-sugar mixture.
-
What can I use instead of Cool Whip?
You can substitute homemade whipped cream – beat 1 cup heavy cream with 2 tablespoons powdered sugar and 1/2 teaspoon vanilla until stiff peaks form. For stability, add 1/2 teaspoon of unflavored gelatin (bloomed in 1 tablespoon cold water, then heated until dissolved) to the whipped cream.
-
My tortilla shells aren’t holding their shape. What am I doing wrong?
The oil might not be hot enough. Make sure it’s at 350°F before frying. Also, hold the tortilla firmly in the taco shape with tongs for the entire frying time until it becomes rigid enough to hold its shape.
Final Thoughts
These Cherry Cheesecake Tacos are truly a game-changer when it comes to creative desserts! They combine the beloved flavors of cheesecake with a fun, handheld presentation that’s sure to delight everyone who tries them. The contrast between the crispy, cinnamon-sugar shell and the creamy, fruity filling creates a dessert experience that’s both familiar and exciting. Whether you’re hosting a dinner party, looking for a special family treat, or just want to try something new, these dessert tacos deliver major flavor with minimal effort. Give them a try – I promise they’ll become a requested favorite!
Print
Cherry Cheesecake Tacos Recipe
- Prep Time: 10 minutes
- Cook Time: 15 minutes
- Total Time: 25 minutes
- Yield: 12 tacos
- Category: Desserts
- Method: Frying
- Cuisine: American
- Diet: Vegetarian
Description
Cherry Cheesecake Tacos are a delightful dessert that combines crispy cinnamon-sugar-coated taco shells with a creamy cheesecake filling, topped with a sweet cherry pie filling. Perfect for parties or as a fun treat any time!
Ingredients
For the Filling
-
- 1 (8 oz) package cream cheese, softened
- 1/4 cup granulated sugar
- 1 teaspoon vanilla extract
- 1 teaspoon lemon juice
- 1 (8 oz) container Cool Whip, thawed
- 1 (21 oz) can cherry pie filling
For the Taco Shells
- 2 cups oil, for frying
- 12 small street taco sized flour tortillas
- 1 cup granulated sugar
- 1 tablespoon ground cinnamon
Instructions
- Prepare the Filling: Beat the cream cheese, granulated sugar, vanilla extract, and lemon juice together in a bowl until creamy and fully combined. Gently fold in the thawed Cool Whip to create a smooth, fluffy mixture. Transfer the cream cheese mixture into a piping bag (or a ziplock bag) and refrigerate until ready to use.
- Heat the Oil: In a deep pan, heat the 2 cups of oil to 350°F for frying.
- Make the Cinnamon Sugar Mixture: Combine the granulated sugar and ground cinnamon together in a small bowl and set aside.
- Fry the Tortilla Shells: Using long metal tongs, fold a small street taco flour tortilla in half and submerge it into the hot oil. Hold the tortilla in its folded shape while frying until lightly browned, about 1 minute. (Refer to relevant tips for shaping the tortillas if needed.)
- Coat the Shells: Remove the fried tortilla from the oil and place it on a paper towel-lined plate for about 30 seconds to drain excess oil. Quickly coat it in the prepared cinnamon sugar mixture, both inside and outside, using a spoon to ensure even coating.
- Repeat the Frying Process: Continue frying the remaining tortilla shells and coat each one in the cinnamon sugar mixture until you have all the taco shells ready.
- Assemble the Tacos: When ready to serve, pipe the chilled cheesecake filling into the prepared taco shells using a piping bag or a ziplock bag with the corner cut off. Top each one with a spoonful of cherry pie filling for a finishing touch.
Notes
- For easier shaping, you can use a taco holder or oven molds to prebake and shape the tortillas before frying.
- Ensure the oil reaches 350°F for optimal frying results and to avoid sogginess.
- Feel free to experiment with different pie fillings as toppings, like blueberry or strawberry.
- These tacos are best served fresh for maximum crispiness.
Nutrition
- Serving Size: 1 taco
- Calories: 280
- Sugar: 20g
- Sodium: 150mg
- Fat: 16g
- Saturated Fat: 7g
- Unsaturated Fat: 8g
- Trans Fat: 0g
- Carbohydrates: 30g
- Fiber: 1g
- Protein: 3g
- Cholesterol: 25mg


