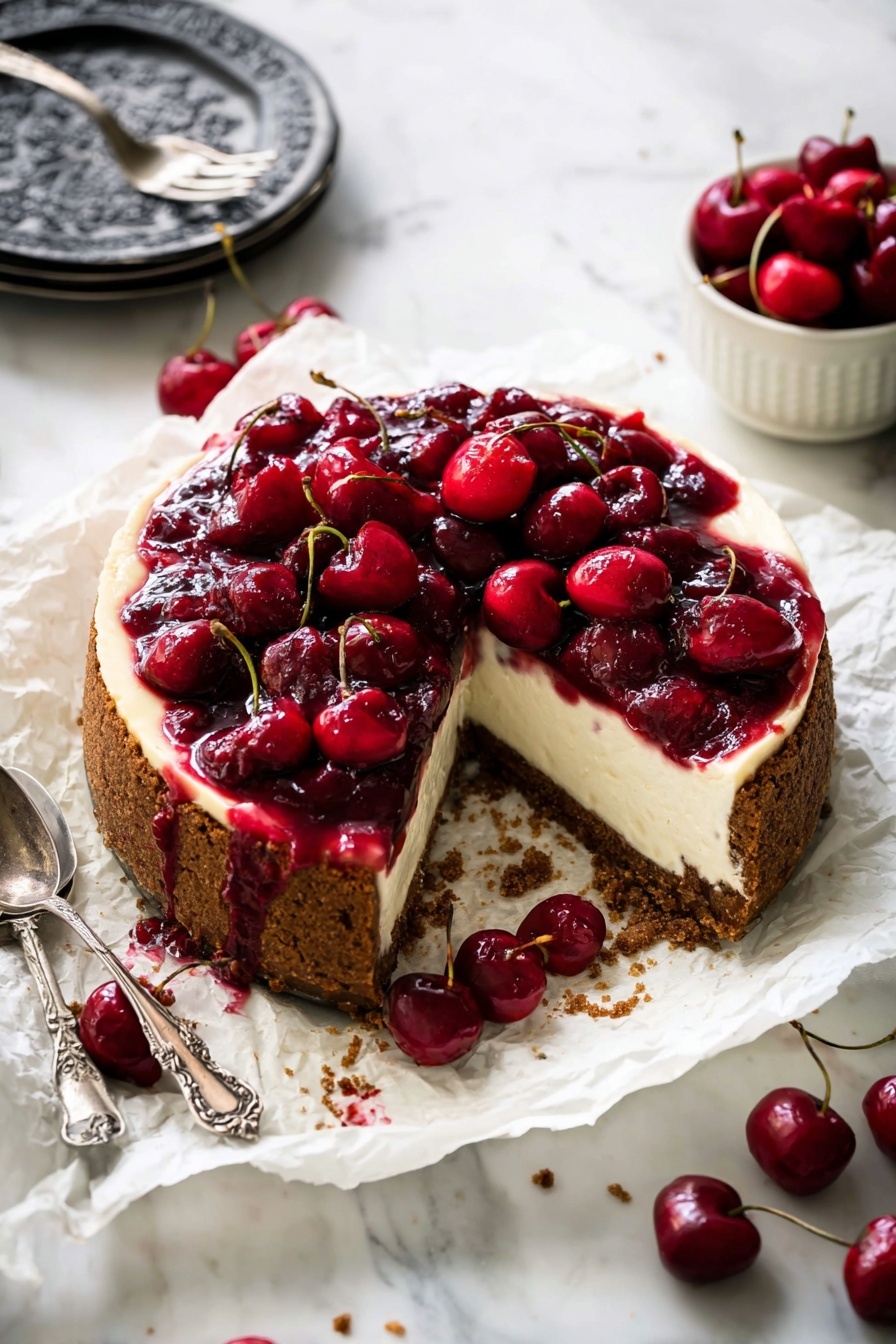
If you’re looking for a dessert that’s both comforting and a little bit unexpected, you’re going to adore this Cherry Biscoff Cheesecake Recipe. I absolutely love how the spiced biscoff cookie crust meets the creamy vanilla cheesecake, topped with a luscious homemade cherry topping. When I first tried this combo, it quickly became a family favorite—perfect for special occasions or anytime you want to wow your guests with minimal fuss. Stick with me and I’ll walk you through everything you need to nail this fan-freaking-tastic treat!
Why You’ll Love This Recipe
- Unique Flavor Combo: The biscoff crust brings a warm, caramelized spice that complements the creamy cheesecake perfectly.
- Homemade Cherry Topping: Fresh black cherries cooked down with lemon and cornstarch add a bright, natural sweetness without any preservatives.
- Fail-Proof Method: I’ve refined this recipe over time, so I’ll share tips that help avoid common cheesecake slip-ups.
- Versatile and Impressive: Whether it’s a casual weekend treat or a fancy dessert, this cheesecake fits the bill!

Ingredients You’ll Need
The magic here comes from combining some pantry staples with standout ingredients that build layers of flavor — from the buttery biscoff crust to the tangy yet smooth cheesecake filling and the fresh cherry topping. I always recommend picking ripe, juicy cherries when you can; it makes a noticeable difference.
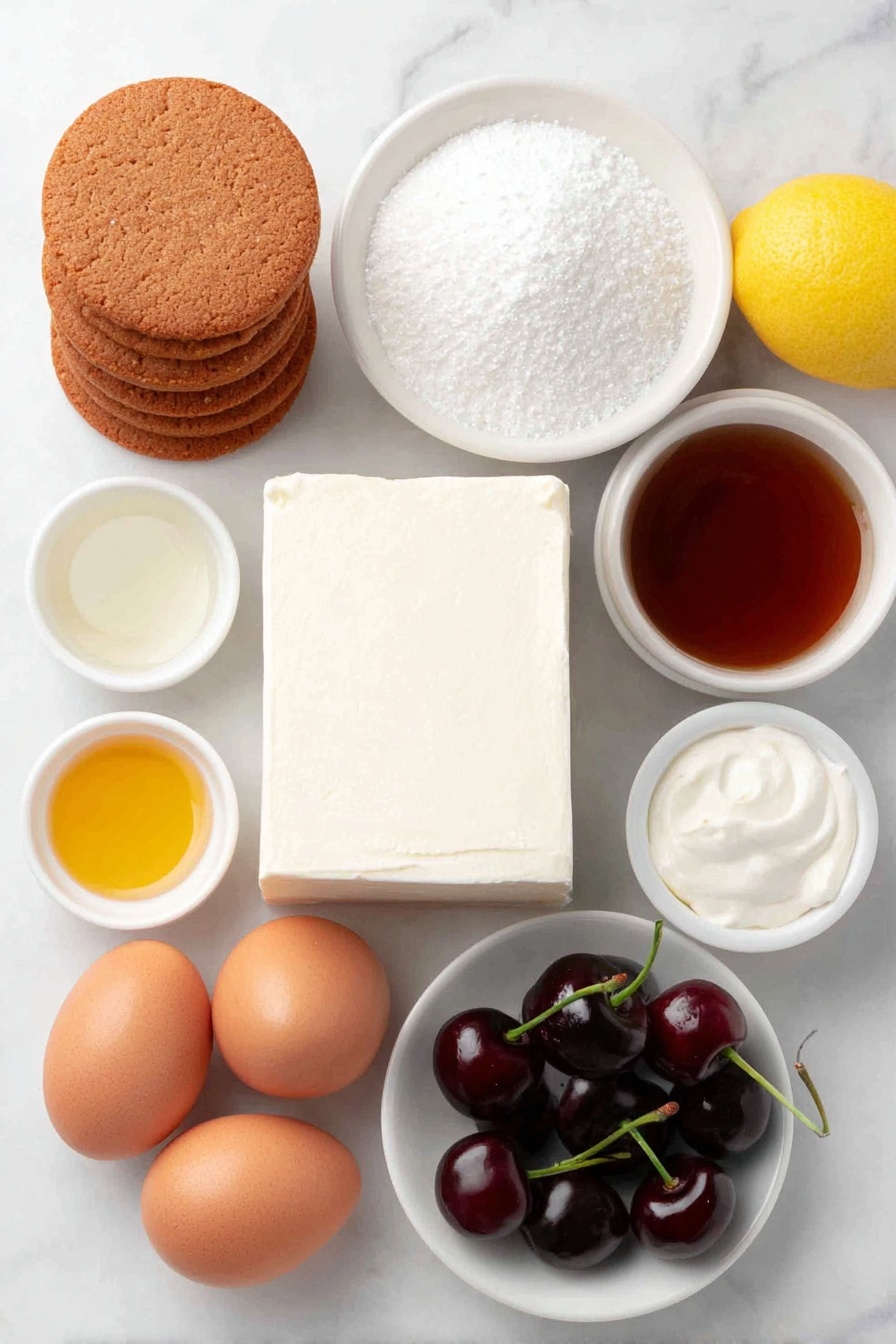
- Biscoff Cookies: Using the whole pack adds that distinctive spiced caramel crunch for the crust.
- Granulated Sugar: Sweetens both the crust and the cheesecake filling evenly.
- Salted Butter: Melted and mixed with the cookie crumbs, it binds the crust and adds richness.
- Cream Cheese: Softened for easy mixing — this is the creamy canvas for your cheesecake masterpiece.
- Sour Cream: Adds moisture and a slight tang that balances the richness of the cheesecake.
- Pure Vanilla Extract: A splash is all you need to enhance the flavor depth.
- Fine Sea Salt: Just a pinch helps lift all the flavors beautifully.
- Eggs: Bring structure to the cheesecake without making it dry – make sure they’re at room temperature!
- Fresh Black Cherries: The star for the topping; fresh cherries bring vibrant color and natural sweetness.
- Lemon: Zest and juice brighten the cherry topping and add freshness.
- Cornstarch: Thickens the cherry topping so it’s perfect for spooning over the cheesecake.
Variations
I like to keep this cherry biscoff cheesecake classic, but I’ve also had fun tweaking it depending on what’s in season or dietary needs. Don’t be afraid to make it your own — that’s part of the joy of baking!
- Berry Swap: I swapped cherries for fresh blueberries once, and it was a lovely seasonal twist that my friends loved.
- Nut-Free Crust: For those with allergies, you can substitute the biscoff crust with a simple graham cracker crust—still delicious!
- Lower Sugar: I’ve reduced sugar by a bit and found the natural sweetness of the cherries balanced it nicely without losing flavor.
- Vegan Version: While I haven’t perfected a vegan version myself, using vegan cream cheese and a coconut-oil-based crust could work well with this flavor profile.
How to Make Cherry Biscoff Cheesecake Recipe
Step 1: Prep Your Crust Like a Pro
Start by crushing those biscoff cookies until they’re fine crumbs—my favorite is to use a food processor, but a rolling pin and zip-top bag works in a pinch. Mix the crumbs with melted salted butter and a touch of sugar, then press firmly into the bottom of a springform pan. I always use the bottom of a glass to get it nice and even. Pop it in the fridge while you prep the filling—this helps it set up and gives you a solid base to work with.
Step 2: Whip Up the Silkiest Cheesecake Filling
Be sure your cream cheese is soft to the touch; this makes all the difference for a smooth batter. Beat it with sugar until fluffy, then mix in sour cream, vanilla, and sea salt. One trick I’ve learned: add the eggs one at a time, mixing gently after each to avoid incorporating too much air. Overbeating can cause cracks during baking, and I’m here to help you avoid that. Once everything’s combined, pour it over your chilled biscoff crust.
Step 3: Bake With Care for That Perfect Texture
Bake your cheesecake at a moderate temperature to avoid browning the edges too much. I set my oven at 325°F (about 160°C) and bake for roughly 60 minutes, but it’s ready when the edges are set and the center still jiggles slightly. Resist the urge to open the oven door too often—temperature changes can cause cracking! After baking, let it cool gradually to room temperature, then refrigerate for at least 4 hours, or overnight for the best texture.
Step 4: Make the Cherry Topping That Tops It All Off
While the cheesecake firms up, toss fresh black cherries with sugar, lemon zest, juice, and cornstarch in a saucepan. Cook over medium heat until the cherries release their juices and the mixture thickens — about 5 to 8 minutes. I like to let it cool completely before spooning it onto the cheesecake to keep the topping thick and glossy rather than runny.
Step 5: Assemble and Serve Your Masterpiece
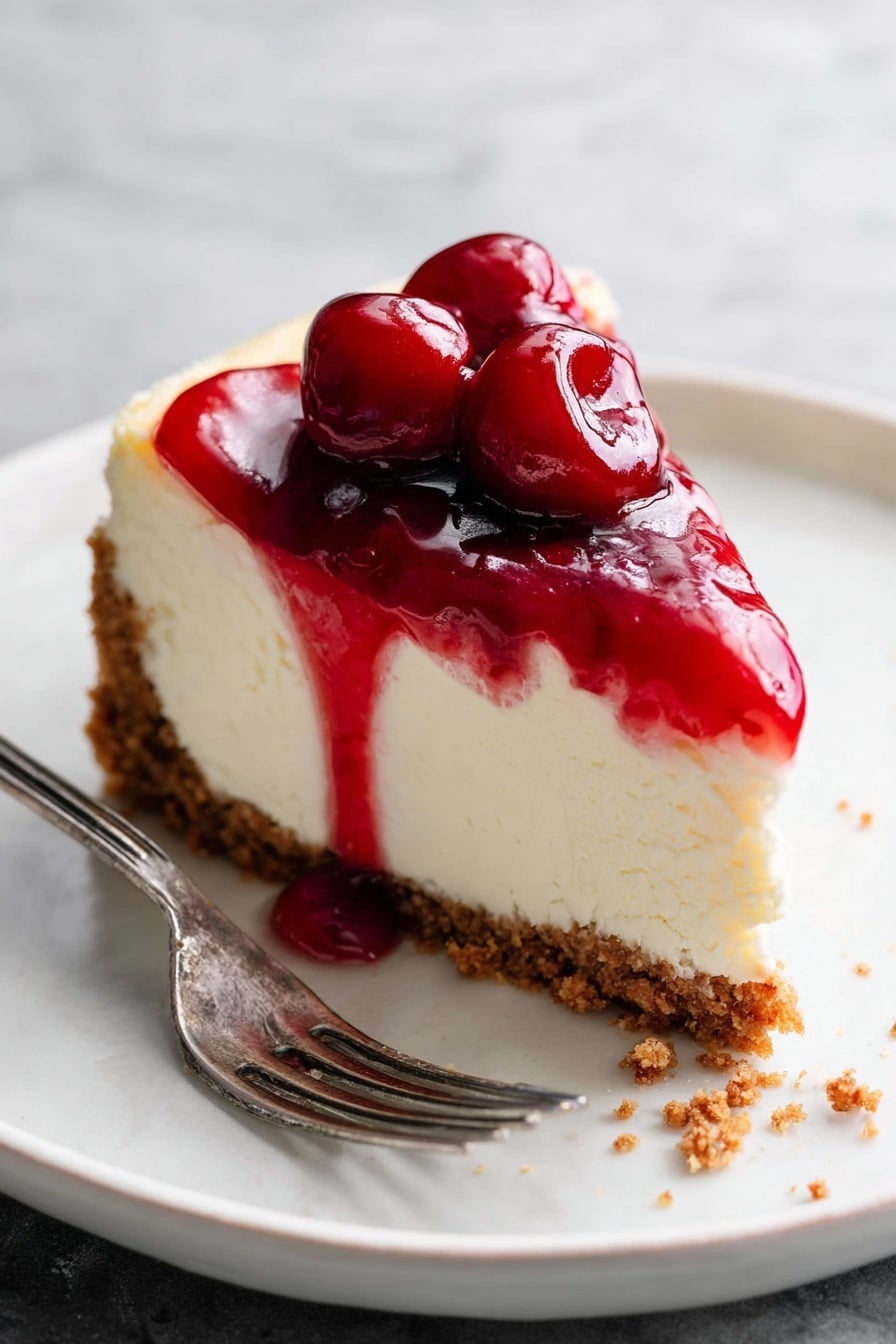
Once the cheesecake is chilled and firm, spread your cool cherry topping evenly over the surface. Your Cherry Biscoff Cheesecake Recipe is ready to dazzle family and friends. I like to slice it with a hot, clean knife for perfect, smooth cuts.
Pro Tips for Making Cherry Biscoff Cheesecake Recipe
- Room Temperature Ingredients: Bringing eggs and cream cheese to room temp helps everything mix smoothly, avoiding lumps.
- Warm Knife for Neat Slices: Wipe your knife clean with warm water between cuts to keep slices pretty and polished.
- Resting Time: Don’t rush the chill—overnight refrigeration perfects texture and makes cutting easier.
- Avoid Overmixing: Fold eggs in gently to prevent cracks and dense texture in your cheesecake.
How to Serve Cherry Biscoff Cheesecake Recipe
Garnishes
I love topping this cheesecake with a few whole fresh cherries or a light dusting of powdered sugar for an elegant finish. If you’re feeling fancy, a dollop of whipped cream or a sprinkle of crushed biscoff cookies adds texture and extra flavor — my guests always ask for seconds!
Side Dishes
This cheesecake pairs wonderfully with a cup of robust coffee or a chilled glass of dessert wine. For brunch or a midday treat, I like serving it alongside fresh fruit salad to balance the richness.
Creative Ways to Present
For celebrations, I’ve presented this cheesecake in individual jars with cherry topping layered inside and a mini biscoff cookie on top — it’s charming and saves cutting hassle. Another time, I swirled some biscoff spread into the cherry topping for a marbled effect that literally stole the show.
Make Ahead and Storage
Storing Leftovers
I store leftover cheesecake tightly covered with plastic wrap or in an airtight container in the fridge, and it keeps beautifully for up to 4 days. The flavors actually meld even better after a day or two.
Freezing
Freezing cheesecake works well if you wrap slices individually in parchment and foil. When I do this, I thaw overnight in the fridge before serving, and the texture comes back almost like fresh!
Reheating
This cheesecake is best served cold, but if you want to soften it a bit, let it sit at room temperature for 15 to 20 minutes before slicing. I avoid microwaving because it can turn the texture grainy.
FAQs
-
Can I use frozen cherries for the cherry topping?
Absolutely! Frozen cherries work well if you don’t have fresh ones. Just thaw and drain them before cooking to avoid extra water diluting your topping.
-
How do I prevent cracks on my cheesecake?
The key is gentle mixing, room temperature ingredients, and baking at a moderate temperature. Avoid overbeating your batter and cool the cheesecake slowly after baking.
-
Can I make this cheesecake in another pan size?
Definitely! Just adjust the crust and filling quantities accordingly. This recipe works well in 8 or 9-inch springform pans. Keep an eye on baking time as it may vary slightly.
-
Is biscoff cookie crust gluten-free?
Traditional biscoff cookies contain wheat flour, so this crust is not gluten-free. For a gluten-free option, try using gluten-free cookie crumbs or nut-based crusts.
-
Can I prepare the cherry topping in advance?
Yes! You can make the cherry topping a day ahead and keep it refrigerated. Bring it to room temperature or warm slightly before spooning over the cheesecake.
Final Thoughts
This Cherry Biscoff Cheesecake Recipe has become one of those desserts I reach for when I want to impress without stress. I love how the layers — from the crunchy-spiced crust to the silky cream cheese filling and the vibrant cherry topping — come together for an unforgettable bite every time. Give it a try, and I promise you’ll have people asking how you made that incredible cheesecake with so little effort!
Print
Cherry Biscoff Cheesecake Recipe
- Prep Time: 25 min
- Cook Time: 60 min
- Total Time: 445 min
- Yield: 16 servings
- Category: Dessert
- Method: Baking
- Cuisine: American
Description
This Cherry Cheesecake recipe features a rich and creamy vanilla cheesecake baked on a buttery biscoff cookie crust and topped with a homemade, sweet cherry pie topping. Perfect for dessert lovers, this cheesecake combines the crunchy spiced cookie base with the smooth texture of cream cheese and the fresh burst of cherries for an indulgent yet balanced treat.
Ingredients
Crust
- 248 grams biscoff cookies (1 pack)
- 25 grams granulated sugar
- 113 grams salted butter (melted)
Cheesecake Filling
- 681 grams cream cheese (softened)
- 200 grams granulated sugar
- 170 grams sour cream (room temperature)
- 1 tablespoon pure vanilla extract
- 1/4 teaspoon fine sea salt
- 3 large eggs (room temperature)
Cherry Topping
- 1/2 lb fresh black cherries
- 25 grams granulated sugar
- 1 large lemon (juice and zest)
- 5 grams cornstarch
Instructions
- Prepare the crust: Preheat the oven to 325°F (163°C). Crush the biscoff cookies until fine crumbs form. In a bowl, combine cookie crumbs with 25 grams of granulated sugar and melted salted butter. Mix thoroughly until the crumbs are evenly coated. Press this mixture firmly into the bottom of a springform pan to form an even crust. Bake the crust for 10 minutes and then remove from the oven to cool.
- Make the cheesecake filling: In a large mixing bowl, beat softened cream cheese with 200 grams of granulated sugar until smooth and creamy. Add sour cream, pure vanilla extract, and fine sea salt, mixing well to combine. Add eggs one at a time, mixing on low speed to incorporate without overwhipping.
- Bake the cheesecake: Pour the cheesecake filling over the cooled biscoff crust in the springform pan. Place the pan on the middle rack of the preheated oven. Bake for approximately 55-60 minutes or until the edges are set and the center slightly jiggles when shaken. Turn off the oven, leave the door slightly ajar, and let the cheesecake sit for 1 hour to cool slowly.
- Prepare the cherry topping: While the cheesecake cools, pit and halve the fresh black cherries. In a saucepan over medium heat, combine cherries, 25 grams of granulated sugar, lemon juice and zest, and cornstarch. Stir constantly until the mixture thickens and the cherries release their juices, about 5-7 minutes. Remove from heat and let the topping cool to room temperature.
- Chill and assemble: Once the cheesecake is fully cooled, refrigerate it for at least 4 hours or overnight to set completely. Before serving, spoon the homemade cherry topping evenly over the cheesecake. Slice and serve chilled.
Notes
- This recipe uses a biscoff cookie crust that adds a unique spiced flavor to the cheesecake base.
- The cherry topping is homemade and can be adjusted with more or less sugar depending on the sweetness of your cherries.
- Make sure all dairy ingredients are at room temperature for the smoothest, creamiest batter.
- This cheesecake works well in a 9-inch springform pan but can be adapted to other sizes with adjusted baking time.
- Allowing the cheesecake to cool slowly in the oven helps prevent cracking on the surface.
Nutrition
- Serving Size: 1 slice (approx. 115g)
- Calories: 234 kcal
- Sugar: 16 g
- Sodium: 475 mg
- Fat: 11 g
- Saturated Fat: 6 g
- Unsaturated Fat: 4 g
- Trans Fat: 0.2 g
- Carbohydrates: 26 g
- Fiber: 1 g
- Protein: 9 g
- Cholesterol: 57 mg


