
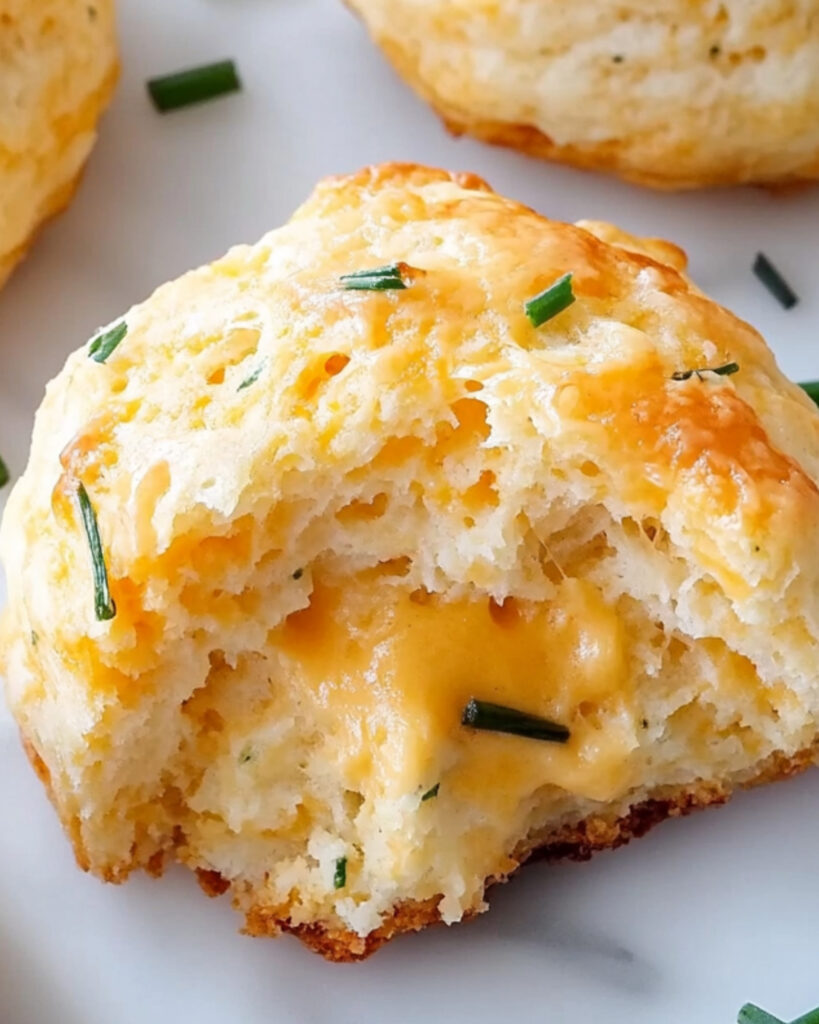
Get ready to fall in love with a biscuit that’s outrageously fluffy, wonderfully cheesy, and sprinkled with the magic of fresh chives. These Cheddar Chive Biscuits are a game-changer for busy weeknights—and honestly, for any occasion that calls for a little extra comfort. They come together in just 30 minutes, meaning hot, golden-brown biscuits can be gracing your table before you even finish setting it! With their lusciously tender center, crisp buttery edges, and savory bursts of cheddar and chive in every bite, you’ll be making these on repeat.
Why You’ll Love This Recipe
- Effortlessly Quick: This is the kind of recipe that rewards you instantly. Mix, cut, bake, and, before you know it, you’re enjoying bakery-quality biscuits at home.
- Irresistibly Flavorful: Cheddar adds a tangy richness, while chives bring a fresh, almost oniony brightness that makes each bite pop.
- Wonderfully Versatile: These biscuits work at breakfast, as a side for dinner, or even as a base for mini sandwiches. Trust me, they’ll disappear fast.
- Beginner Friendly: No special skills or fancy gadgets needed. If you can stir, fold, and cut, you can make these biscuits.

Ingredients You’ll Need
- All-Purpose Flour: The trusty base that gives the biscuits structure and that classic crumb.
- Baking Powder: The rising star—literally!—for gorgeously tall, fluffy biscuits.
- Kosher Salt: Essential for balancing all the flavors. Don’t skip or skimp.
- Cold Unsalted Butter: The secret to tender, flaky layers. Keep it cold for ultimate fluffiness.
- Sharp Cheddar Cheese: Bold, melty cheese pockets that boost flavor with every bite. Freshly shredded is best for meltiness.
- Chives: Fresh chives offer the best color and vibrancy, but dried work in a pinch—just use a bit less.
- Buttermilk: This magic ingredient guarantees a tangy flavor and tender crumb. If you’re out, milk with a splash of lemon juice works.
- Melted Butter (for brushing): Brushing biscuits after baking creates an irresistible golden, glossy finish.
Note: Real butter is non-negotiable! It’s what gives these biscuits their antique flavor and postcard-worthy look.
Note: You’ll find the complete list of ingredients, along with their exact measurements, in the printable recipe card at the bottom of this post.
Variations
Craving a twist? Try these easy ideas:
- Herb Your Enthusiasm: Swap chives for dill, parsley, or a blend of your favorite herbs.
- Spicy Kick: Fold in chopped jalapeños or a pinch of cayenne with the cheese.
- Mix Up the Cheeses: Smoked gouda or pepper jack would be fantastic guest stars next to cheddar.
- Bacon Biscuits: Add crisped, crumbled bacon to the dough for the ultimate savory treat.
- Gluten-Free Option: Use a 1:1 gluten-free flour blend if needed—consistency may vary, but it’s worth a shot if gluten is off the table.
How to Make Cheddar Chive Biscuits
Step 1: Prep Oven and Dry Mix
Start by preheating your oven to 425°F. Whisk together your flour, baking powder, and salt in a roomy bowl. You want them evenly combined so every biscuit puffs up like a dream.
Step 2: Cut in Butter
Drop your cold butter cubes into the flour mix. Use a pastry cutter (or two knives) to work the butter into pea-sized bits. This step is relaxing and crucial—those cold butter pockets melt as they bake, giving you layers.
Step 3: Add Cheese and Chives
Toss cheddar and chives right into the mix. Coat them well in flour so everything’s distributed. You want little bites of cheese and herby chive popping up throughout.
Step 4: Add Buttermilk
Drizzle buttermilk over the dry ingredients. Stir with a fork just until combined, then bring the dough together gently with your hands. Don’t overwork—just enough to get things sticking together.
Step 5: Fold for Flakiness
Turn dough onto a lightly floured surface. Pat into a rectangle, fold in half, then into quarters. Repeat that process one more time. These folds are your shortcut to those mouthwatering layers.
Step 6: Shape and Cut
Pat dough into a 1-inch thick rectangle. Cut rounds using a biscuit cutter; press straight down (don’t twist!) to preserve those flaky sides. Gather scraps once for extra rounds—expect the first batch to be the tallest.
Step 7: Bake
Arrange biscuits on a parchment-lined baking sheet with a bit of breathing room between each. Bake for about 15 minutes or until deliciously golden brown on top.
Step 8: Finish with Butter
Once they’re out, brush the tops generously with melted butter for shine and extra flavor. Serve warm and watch the smiles spread!
Pro Tips for Making the Recipe
- Keep Everything Cold: Cold butter and chilled buttermilk mean flakier, taller biscuits—so don’t dawdle during assembly.
- Don’t Overmix: Mix until just combined. It’s fine if a few dry streaks remain; overmixing leads to tough biscuits.
- Use Fresh Cheese: Pre-shredded cheese contains anti-caking agents that can mess with biscuit texture. Shred your own for best results!
- Gentle Folding is Key: Those folds? They create irresistible, bakery-worthy layers. Don’t skip or rush them.
- Sharp Cutter, Straight Down: When cutting, go straight down—no twisting—to keep those layers lofty.
How to Serve
These biscuits shine warm from the oven, but they play well with all sorts of dishes. Try them:
- With a pat of salted butter for a simple snack.
- Smothered in gravy alongside scrambled eggs for breakfast.
- As the perfect companion to a bowl of soup or chili.
- Split and filled with ham for crowd-pleasing sliders.
- On a holiday table beside roast chicken or turkey.
Tip: For a joyous brunch board, serve them with whipped honey butter and fruit preserves—trust me, they’ll be the first to go.
Make Ahead and Storage
Storing Leftovers
Once completely cool, store your biscuits in an airtight container at room temperature for up to 2 days, or refrigerate for up to 4 days.
Freezing
These biscuits freeze beautifully! Just let them cool completely, pop them in a zip-top bag, and freeze for up to 2 months. Reheat straight from the freezer or after thawing overnight in the fridge.
Reheating
To restore that fresh-baked magic, warm biscuits in a 350°F oven for 5-7 minutes, or microwave individually for about 15-20 seconds.
FAQs
-
Can I use milk instead of buttermilk?
Absolutely. While buttermilk gives the biscuits an amazing tang and tenderness, regular milk works in a pinch. For a quick buttermilk substitute, add a splash of lemon juice or vinegar to your milk and let it sit for a few minutes before using.
-
What if I don’t have fresh chives?
No problem—dried chives work well, just use a little less (their flavor is more concentrated). You could also use finely chopped green onion or even parsley for a fresh, green bite.
-
My biscuits came out flat. What happened?
Usually, this is because the butter or buttermilk wasn’t cold enough, or the dough was overworked. Be sure to handle the dough with a light touch and keep those ingredients cold until the very last minute for the tallest, flakiest biscuits.
-
Can I make the dough ahead of time?
Yes! You can prepare the dough and cut the biscuits, then refrigerate them (covered) for several hours or overnight before baking. Bake straight from the fridge—they may need an extra minute or two in the oven.
Final Thoughts
There’s something truly special about homemade biscuits—especially when they deliver big flavor with so little effort. These Cheddar Chive Biscuits are destined to become your weeknight secret weapon: simple, crowd-pleasing, and endlessly adaptable. Give them a try. Enjoy the process, savor the cheesy aroma, and delight in every warm, tender bite. Weeknight comfort never tasted so good!
Print
Cheddar Chive Biscuits Recipe
- Prep Time: 15 minutes
- Cook Time: 15 minutes
- Total Time: 30 minutes
- Yield: 12 biscuits
- Category: Bread
- Method: Baking
- Cuisine: American
- Diet: Vegetarian
Description
These Cheddar Chive Biscuits are savory, flaky, and tender, studded with sharp cheddar cheese and fresh chives. Perfect as a side for soups, breakfasts, or simply enjoyed warm with butter, these biscuits are quick and easy to prepare with a rich buttery flavor and delicate layers from careful folding of the dough. Each biscuit is enhanced with a brush of melted butter making them irresistibly golden and flavorful.
Ingredients
Dry Ingredients
- 2 cups (240 g) all-purpose flour
- 4 1/2 teaspoons (18 g) baking powder
- 1 teaspoon kosher salt
Fats & Dairy
- 6 tablespoons (84 g) cold unsalted butter, cut into cubes
- 3 ounces (85 g) sharp cheddar cheese, shredded (about 1 cup)
- 3/4 cup (180 g) buttermilk
- 2 tablespoons (28 g) melted butter, for brushing
Herbs
- 1 tablespoon chopped fresh chives (or 2 teaspoons dried chives)
Instructions
- Preheat Oven – Preheat your oven to 425°F (218°C) and line a baking sheet with parchment paper to ensure biscuits do not stick.
- Mix Dry Ingredients – In a large bowl, thoroughly whisk together the flour, baking powder, and salt until fully integrated and aerated.
- Cut in Butter – Add the cold cubed butter to the bowl and use a pastry cutter or two knives to cut the butter into the flour mixture until the mixture resembles coarse crumbs with pea-sized pieces of butter evenly distributed.
- Add Cheese & Chives – Toss in the shredded cheddar cheese and chopped chives, stirring until they are evenly incorporated throughout the flour/butter mixture.
- Add Buttermilk & Form Dough – Drizzle buttermilk evenly over the mixture and stir gently with a fork until the dough just comes together. Use your hands to press the mixture into a loose ball, but do not overwork it.
- Laminate Dough – Transfer the dough onto a lightly floured surface. Gently press it into a rectangle, fold in half lengthwise, then fold again into quarters. Repeat this process (pat into a rectangle, fold in half, then quarters) once more to create flaky layers.
- Shape & Cut Biscuits – Pat the dough into a 1-inch thick rectangle. Use a round biscuit cutter to cut out biscuits, pressing the cutter straight down and pulling up without twisting for the best layers. Arrange biscuits on prepared baking sheet with some space between them. Gather dough scraps, reshape, and cut additional biscuits as needed.
- Bake – Place the baking sheet in the preheated oven and bake for about 15 minutes, or until the biscuit tops are golden brown and cooked through.
- Brush & Serve – Remove biscuits from the oven and immediately brush generously with melted butter. Serve the biscuits warm for the best texture and flavor.
Notes
- Ensure butter is very cold for maximally flaky layers.
- Use fresh chives for optimal flavor, though dried chives can be substituted in a pinch.
- Avoid overworking the dough to prevent tough biscuits.
- Do not twist the biscuit cutter as you cut, to preserve flaky layers.
- Biscuits are best eaten the day they are baked, but leftovers can be stored in an airtight container and briefly reheated.
Nutrition
- Serving Size: 1 biscuit
- Calories: 165
- Sugar: 1g
- Sodium: 350mg
- Fat: 9g
- Saturated Fat: 5g
- Unsaturated Fat: 3g
- Trans Fat: 0g
- Carbohydrates: 17g
- Fiber: 0.5g
- Protein: 4g
- Cholesterol: 23mg


