
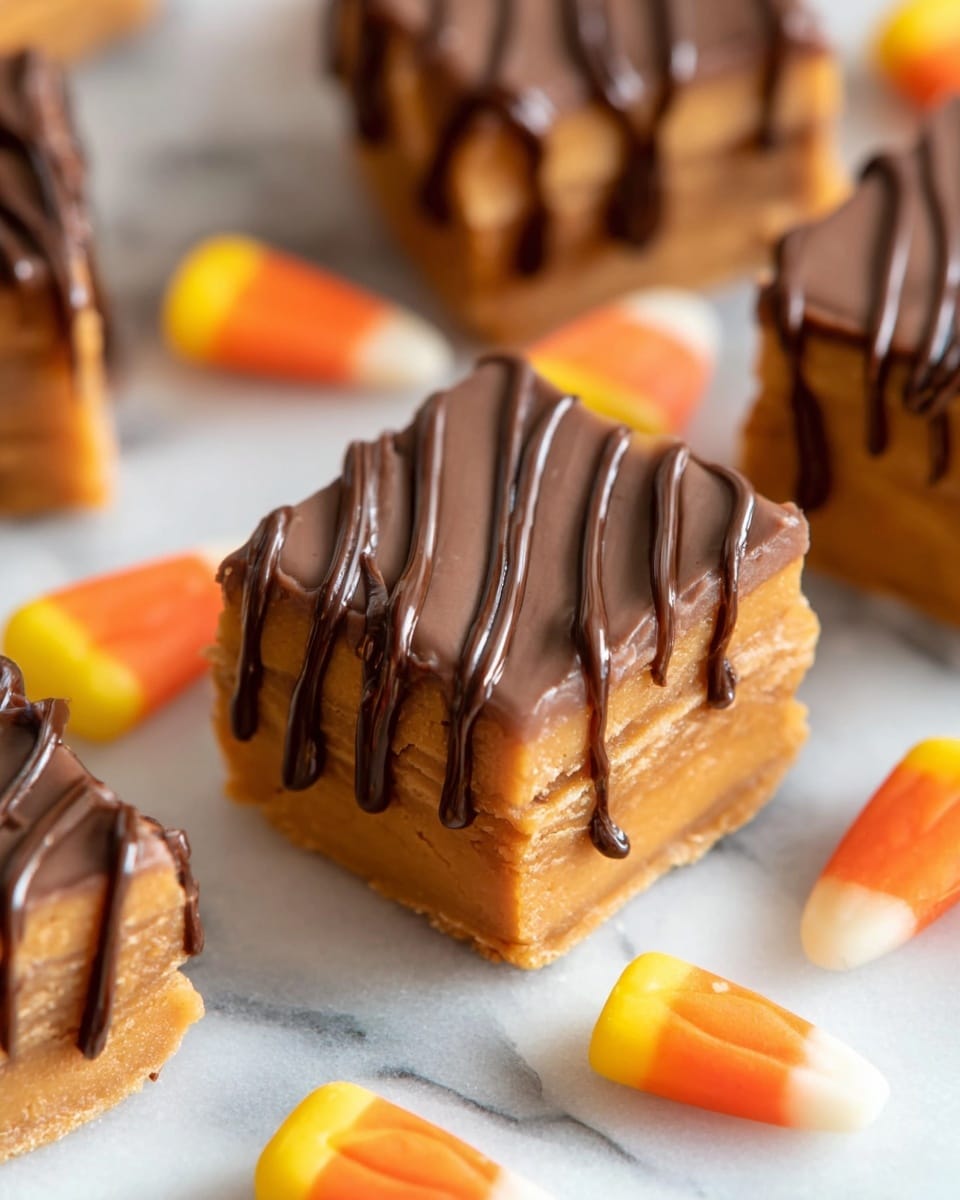
If you’ve ever craved that perfectly crunchy, peanut buttery candy bar in fudge form, you’re going to adore this Butterfinger Fudge Recipe. Trust me, it’s fan-freaking-tastic and a real crowd-pleaser, especially when you want something super sweet but also delightfully chewy with a hint of that classic Butterfinger crunch. I love how easy it comes together and how it makes a nostalgic treat that everyone will rave about at your next gathering.
Why You’ll Love This Recipe
- Easy and Quick: It comes together in about 30 minutes with simple steps that anyone can follow.
- Unique Flavor Combo: Candy corn and peanut butter create that unmistakable Butterfinger taste in a fudge.
- Perfect Texture: Chewy yet slightly soft fudge that melts in your mouth without being grainy.
- Great for Sharing: Makes around 36 pieces, so it’s perfect for parties, gifts, or just keeping your sweet tooth happy for days.

Ingredients You’ll Need
This Butterfinger Fudge Recipe is built on a handful of easy-to-find ingredients that work beautifully together. Each one contributes to the texture and taste that reminds me of the candy bar — with candy corn adding sweetness and crunch while peanut butter brings that creamy, nutty depth.
- Candy Corn: Choose classic candy corn for that crunchy, sweet base. I find chopping them a bit helps them melt better.
- Peanut Butter: Creamy peanut butter works best here, giving moisture and flavor without being gritty.
- Sweetened Condensed Milk: This adds richness and the perfect fudge-like gooey texture.
- White Chocolate Chips: These melt into the fudge for smooth sweetness and a silky finish.
- Milk Chocolate Chips (optional): Use these if you want to dip the fudge squares for an extra chocolaty layer that’s just heavenly.
Variations
I love playing around with this Butterfinger Fudge Recipe to suit different tastes or occasions. You can easily tweak it depending on what you have on hand or if you want to make it a bit healthier or more decadent.
- Peanut Butter Substitutes: For a twist, I’ve swapped in almond butter for a nuttier, slightly less sweet fudge that my family also loves.
- No Candy Corn Option: If candy corn isn’t your thing, chopped Butterfinger bars work well to keep the flavor if you want a chunkier texture.
- Chocolate Dipped Only: Sometimes I skip mixing in milk chocolate chips and just dip the fudge squares afterward for cleaner chocolate pockets.
- Spiced Fudge: Adding a pinch of cinnamon or chili powder gave it an unexpected depth for holiday parties—that’s one for the bold!
How to Make Butterfinger Fudge Recipe
Step 1: Prep Your Pan and Ingredients
Start by lining an 8×8-inch pan with foil (I usually use non-stick foil) and give it a good spray of cooking oil. This step saved me from the stress of sticky fudge later, and trust me, when I first tried skipping it, cutting out fudge chunks was a nightmare. If you like your fudge a bit thinner and easier to slice, consider a 9×9 pan instead.
Step 2: Melt Candy Corn and Peanut Butter
Place your candy corn and peanut butter in a medium saucepan over low heat. Stir every 30 seconds or so — patience is key here. You don’t want to rush because candy corn can stubbornly resist melting at first. It takes about 3 minutes until they’re soft and melded nicely. Chopping the candy corn beforehand really speeds this up and makes melting more even.
Step 3: Stir in Sweetened Condensed Milk
Add the sweetened condensed milk and continue stirring and cooking for around 3 more minutes. Keep the heat low so it just simmers slightly — no boiling! You want a smooth, creamy mixture that’s warm enough for the next step but not scorched.
Step 4: Melt in the White Chocolate Chips
Turn off the heat and add the white chocolate chips. This part feels a little magical — the chips might seem like they’ll never melt, but with steady stirring, they’ll slowly melt into the mixture, making everything silky and luscious. This is when the fudge truly comes together to get that almost buttery smooth texture perfect for Butterfinger fans.
Step 5: Spread, Chill, and Optional Chocolate Dip
Pour the fudge mixture into your prepared pan and smooth it out evenly with a spatula. Let it cool on your kitchen counter for about 15 minutes — this helps set the edges without rushing. Then, transfer it to the fridge to chill completely until firm, typically a couple of hours.
If you want to take it up a notch, melt some milk chocolate chips with a splash of vegetable oil and dip the bottoms of your fudge squares into it. Set them on wax paper to harden, and you’ll have that rich chocolate shell touch that’s irresistible. My family goes crazy for these chocolate-dipped versions!
Pro Tips for Making Butterfinger Fudge Recipe
- Chop Candy Corn First: I discovered this trick when the candy corn was melting unevenly—pre-chopping made the process way smoother.
- Low and Slow Heat: Keep your stove setting low to avoid burning or boiling the mixture, which can ruin the texture.
- Use a Silicone Spatula: It helps scrape every bit of fudge from the pan for less waste and easy mixing.
- Patience When Melting: Don’t rush the white chocolate melting step; constant stirring pays off with smooth fudge every time.
How to Serve Butterfinger Fudge Recipe
Garnishes
I usually keep it simple and let the fudge shine, but sometimes I sprinkle a few sea salt flakes or crushed Butterfinger chunks on top before it sets. It adds a fun salty-sweet contrast and makes it look extra special.
Side Dishes
This fudge pairs wonderfully with a cup of hot coffee or milk to balance the sweetness, or alongside fresh fruit for a refreshing touch after a rich dessert session. It’s my go-to sweet bite after dinner when we want to share something fun without too much fuss.
Creative Ways to Present
For parties, I arrange the fudge squares on a pretty platter with small paper liners, then add colorful Halloween or holiday-themed sprinkles around. Another trick I learned was stacking mini fudge squares like little towers tied with twine as adorable edible gifts that everyone appreciates!
Make Ahead and Storage
Storing Leftovers
I store leftover fudge in an airtight container in the fridge to keep it fresh and chewy. Because it’s softer than traditional fudge, refrigeration helps maintain the perfect texture without getting too sticky or melty.
Freezing
If I want to save fudge for later, I freeze it in layers separated by parchment paper inside a freezer-safe container. It thaws great overnight in the fridge and stays just as delicious without losing any of its buttery chewiness.
Reheating
This fudge really shines cold, so reheating isn’t usually necessary. But if you want a softer bite, I pop a piece into the microwave for about 5-7 seconds—just until it softens slightly—then enjoy immediately.
FAQs
-
Can I use crunchy peanut butter instead of creamy in this Butterfinger Fudge Recipe?
Absolutely! Using crunchy peanut butter will give your fudge an extra nutty texture, which some people love. Just be sure to stir well to distribute the peanut chunks evenly through the fudge.
-
Is it necessary to dip the fudge in milk chocolate?
Nope, dipping in milk chocolate is totally optional. The fudge tastes wonderful on its own, but the chocolate coating adds a nice finishing touch and a bit more richness if you want a decadent treat.
-
Can I make this Butterfinger Fudge Recipe vegan or dairy-free?
With some substitutions, yes. Swap the sweetened condensed milk for a coconut condensed milk alternative and use dairy-free peanut butter and chocolate chips. Keep in mind texture and flavor may shift slightly.
-
How do I prevent the fudge from being grainy?
To avoid graininess, melt your ingredients slowly on low heat and stir continuously. Also, don’t let the mixture boil hard. These extra steps ensure smooth, creamy fudge.
-
What’s the best way to cut the fudge without it sticking?
Use a sharp knife and warm it under hot water, then wipe dry before slicing. This helps make clean cuts without pulling or sticking.
Final Thoughts
This Butterfinger Fudge Recipe holds a special place in my heart because it combines the nostalgic flavors we all love with the welcoming texture of homemade fudge. It’s one of those simple yet impressive desserts you’ll want to make over and over. I genuinely recommend giving it a try—you’ll be surprised how easy it is to nail that Butterfinger flavor at home, and your friends and family will be begging for the recipe!
Print
Butterfinger Fudge Recipe
- Prep Time: 10 minutes
- Cook Time: 20 minutes
- Total Time: 30 minutes
- Yield: 36 pieces
- Category: Dessert
- Method: Stovetop
- Cuisine: American
Description
This Butterfinger Fudge recipe combines the sweetness of candy corn with creamy peanut butter and white chocolate to create a rich, chewy treat reminiscent of the classic Butterfinger candy bar. Easy to prepare on the stovetop and perfect for dessert or holiday gifting, this fudge offers a luscious, buttery flavor that is sure to satisfy your sweet tooth.
Ingredients
Fudge Base
- 3 cups Candy Corn
- 1 cup (268g) peanut butter
- 1 (14 ounce) can sweetened condensed milk
- 2 cups (340g) white chocolate chips
Optional Topping
- 1 cup (170g) milk chocolate chips
- vegetable oil (for thinning chocolate)
Instructions
- Prepare the Pan: Line an 8×8 or 9×9 inch pan with foil and spray lightly with cooking spray to ensure easy removal of the fudge once set.
- Melt Candy Corn and Peanut Butter: In a medium saucepan, combine candy corn and peanut butter. Heat over low heat, stirring every 30 seconds for about 3 minutes until the candy corn begins to melt and mixture starts to combine.
- Add Sweetened Condensed Milk: Stir in the sweetened condensed milk and continue cooking the mixture over low heat for an additional 3 minutes, stirring every 30 seconds. Maintain a very gentle simmer without boiling to avoid curdling.
- Incorporate White Chocolate Chips: Add the white chocolate chips to the saucepan and stir constantly as they melt into the mixture. This may take several minutes; be patient for a smooth, uniform consistency.
- Spread the Fudge: Pour and spread the hot fudge evenly into the prepared pan. Let it cool on the counter for about 15 minutes before transferring to the refrigerator to chill and harden completely.
- Optional Milk Chocolate Dip: Melt the milk chocolate chips in a microwave or double boiler, adding a small amount of vegetable oil to thin the chocolate. Dip the bottoms of the fudge squares into the melted milk chocolate and place on a wax paper-lined baking sheet to set.
- Slice and Serve: Once the fudge is completely hardened, remove from pan using foil edges, cut into 36 squares, and serve or store in an airtight container.
Notes
- This fudge is softer and chewier than traditional fudge but has an authentic Butterfinger flavor.
- Chopping candy corn finely or using a food processor before melting helps it melt more evenly and quickly.
- Using a 9×9 pan will produce a thinner fudge layer if you prefer less thickness.
- The milk chocolate dip is optional but adds a delicious finishing touch.
Nutrition
- Serving Size: 1 piece (approx. 28g)
- Calories: 150
- Sugar: 18g
- Sodium: 55mg
- Fat: 8g
- Saturated Fat: 4.5g
- Unsaturated Fat: 3g
- Trans Fat: 0g
- Carbohydrates: 20g
- Fiber: 0.5g
- Protein: 2g
- Cholesterol: 5mg

