
These Butterfinger Balls are a dream come true for peanut butter and chocolate lovers! Imagine a velvety smooth peanut butter center studded with crunchy Butterfinger bits, all enrobed in rich chocolate. They’re incredibly simple to make with no baking required, making them perfect for busy weeknights when you need a sweet treat or for holiday gift-giving. The contrasting textures and flavors create an irresistible candy that disappears fast from any dessert table!
Why You’ll Love This Recipe
- No Baking Required: These are completely no-bake treats that come together with minimal effort and basic mixing techniques.
- Make-Ahead Friendly: You can prepare these balls days in advance for parties or keep them in the freezer for up to 3 months for whenever a craving strikes.
- Crowd-Pleaser: The combination of peanut butter and chocolate with that signature Butterfinger crunch is universally loved and will win over guests at any gathering.
- Customizable: You can easily adjust the level of sweetness or add your own twist to make these balls uniquely yours.

Ingredients You’ll Need
- Creamy Peanut Butter: Forms the creamy base of our centers. It binds everything together while providing that classic peanut flavor we all love. Jif works perfectly here.
- Salted Butter: Adds richness and helps create that smooth, melt-in-your-mouth texture while enhancing the peanut butter flavor.
- Vanilla Extract: Just a touch elevates all the other flavors and adds depth to the candy centers.
- Powdered Sugar: Sweetens the mixture while helping to create the perfect consistency for rolling into balls.
- Butterfinger Bits: The star ingredient that gives these treats their distinctive crunch and iconic Butterfinger flavor throughout.
- Chocolate Melting Wafers: Creates a perfect chocolate shell that snaps when you bite into it. They melt smoothly without requiring tempering.
Note: You’ll find the complete list of ingredients, along with their exact measurements, in the printable recipe card at the bottom of this post.
Variations
Want to customize your Butterfinger Balls? Here are some delicious ways to make them your own:
- White Chocolate Coating: Swap the milk or dark chocolate for white chocolate for a different look and flavor profile.
- Extra Crunch: Mix in some rice krispies with the Butterfinger bits for additional texture.
- Peanut Butter Swirl: Drizzle melted peanut butter over the chocolate coating for decoration and extra peanut butter flavor.
- Mini Version: Make bite-sized balls for a perfect two-bite treat that’s great for parties.
How to Make Butterfinger Balls
Step 1: Make the Filling
Beat together the peanut butter, softened butter, and vanilla until smoothly combined. Sift in the powdered sugar and beat until the mixture is completely smooth and well incorporated.
Step 2: Add the Butterfinger Bits
Mix the Butterfinger bits into your peanut butter mixture until they’re evenly distributed throughout. This is what gives your balls that signature crunch.
Step 3: Chill the Mixture
Refrigerate the mixture for 30 minutes. This firms it up just enough to roll into balls without being too sticky or soft.
Step 4: Form the Balls
Line a cookie sheet with parchment paper. Using a medium cookie scoop, portion out the mixture and roll between your palms to form smooth balls. Place them on the prepared sheet.
Step 5: Freeze Briefly
Place the balls in the freezer for 20-30 minutes. This crucial step ensures they’ll hold their shape during dipping and helps the chocolate set faster.
Step 6: Melt the Chocolate
Just before removing the balls from the freezer, melt your chocolate wafers in a wide glass or bowl, heating in 30-second microwave intervals and stirring between each until completely smooth.
Step 7: Dip in Chocolate
Using a fork or dipping tool, submerge each ball in the melted chocolate, letting excess drip off before placing back on the parchment paper.
Step 8: Add Finishing Touches
While the chocolate is still wet, sprinkle additional Butterfinger bits on top for decoration and that immediate visual cue of what’s inside.
Pro Tips for Making the Recipe
- Cold Hands Make Better Balls: If your hands warm up and the mixture starts sticking, run them under cold water, dry thoroughly, and continue rolling.
- Double-Dip for Perfection: For an extra-thick chocolate coating, let the first layer set, then dip again.
- Consistency is Key: Use a cookie scoop to ensure all your balls are the same size for uniform cooking and a professional look.
- Work in Batches: Keep most of the balls in the refrigerator while you’re dipping a few at a time. This prevents them from warming up too much.
How to Serve

Butterfinger Balls are incredibly versatile when it comes to serving:
Special Occasions
Present these on a beautiful platter for holiday gatherings, baby showers, or birthday parties. Their elegant appearance and delicious taste make them perfect for celebrations.
Gift-Giving
Place them in small decorative boxes or cellophane bags tied with ribbon for homemade holiday gifts or thank-you presents.
Dessert Table
Add them to a dessert charcuterie board alongside fruits, cookies, and other small sweets for an impressive spread.
Make Ahead and Storage
Storing Leftovers
Keep your Butterfinger Balls in an airtight container in the refrigerator for up to 7 days. The cool temperature maintains their texture and prevents the chocolate from getting too soft.
Freezing
These freeze beautifully! Place them in a single layer in a freezer-safe container or bag, separating layers with parchment paper to prevent sticking. They’ll keep for up to 3 months.
Serving from Frozen
You can enjoy these straight from the freezer for a firm, fudge-like texture, or let them thaw in the refrigerator for about 30 minutes before serving for a softer bite.
FAQs
-
Can I use natural peanut butter for this recipe?
The recipe was developed using Jif creamy peanut butter, which has a consistent texture and sweetness. Natural peanut butter tends to separate and may result in a different consistency that could make the balls too oily or difficult to form. If you want to try natural peanut butter, make sure it’s well-stirred and you might need to adjust the powdered sugar amount
-
Why did my chocolate seize or get lumpy when melting?
Chocolate is sensitive to moisture and overheating. Make sure your bowl and utensils are completely dry, and always melt chocolate slowly at low heat. If using a microwave, use 30-second intervals and stir well between each heating. Adding a bit of coconut oil can help achieve smoother melted chocolate.
-
Can I make these without Butterfinger bits?
Absolutely! While the Butterfinger bits give these their signature flavor, you could substitute crushed graham crackers, crispy rice cereal, or another candy bar of your choice. The texture will be different but still delicious.
-
My peanut butter balls are sweating when I take them out to dip. What’s happening?
This occurs when cold balls meet warm room temperature, creating condensation. Work quickly and in small batches, keeping the rest chilled until ready to dip. If they start sweating, return them to the freezer for 5-10 minutes before attempting to dip them again.
Final Thoughts
These Butterfinger Balls are more than just a treat—they’re little bites of joy that combine the best of creamy, crunchy, sweet, and satisfying all in one perfect package. Whether you’re making them for yourself, your family, or special guests, they’re sure to bring smiles all around. The beauty of this recipe is in its simplicity and flexibility, so don’t hesitate to make it your own. Go ahead and give these a try—I’m confident they’ll become a regular in your dessert rotation!
Print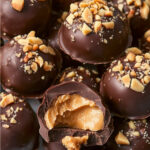
Butterfinger Balls Recipe
- Prep Time: 30 minutes
- Cook Time: 1 hour
- Total Time: 1 hour 30 minutes
- Yield: 34 balls
- Category: Desserts
- Method: No-cook
- Cuisine: American
- Diet: Vegetarian
Description
Butterfinger Balls are a delightful no-bake treat combining creamy peanut butter, sweet Butterfinger Bits, and rich melted chocolate. Perfect for festive gatherings or as a quick snack, these bite-sized delights are easy to make and full of flavor. With a smooth peanut butter filling and a satisfying chocolate coating, these treats are a surefire hit for kids and adults alike.
Ingredients
For the Filling:
- 1 1/3 cup creamy peanut butter
- 1/2 cup salted butter, softened
- 1 teaspoon vanilla extract
- 2 cups powdered sugar
- 1 1/2 cups Butterfinger Bits
For the Coating:
- 3 cups chocolate melting wafers
- Additional Butterfinger Bits, for topping (optional)
Instructions
- Prepare the Peanut Butter Mixture:
In a large mixing bowl or stand mixer, combine the peanut butter, softened butter, and vanilla extract. Cream together for about 30 seconds until fully combined. - Incorporate the Sugar:
Sift the powdered sugar into the bowl and beat again until smooth and the mixture is well incorporated. - Mix in the Butterfinger Bits:
Gently fold in the Butterfinger Bits until they are evenly distributed throughout the mixture. - Chill the Mixture:
Cover the mixture and chill it in the refrigerator for 30 minutes to firm up. - Form the Balls:
Line a baking sheet with parchment paper. Using a medium cookie scoop or your hands, portion out the peanut butter mixture and roll into balls. Place each ball on the parchment-lined sheet. Chill in the freezer for 20 to 30 minutes to set. - Melt the Chocolate:
In a microwave-safe bowl or glass, melt the chocolate melting wafers in 30-second intervals, stirring between each heating, until fully melted and smooth. - Dip the Balls:
Using a dipping tool or a fork, dip each peanut butter ball into the melted chocolate, ensuring an even coating. Place the coated balls back onto the parchment-lined sheet. - Garnish and Set:
Sprinkle additional Butterfinger Bits on top of each ball for garnish (optional). Allow the chocolate to set and harden completely before serving or storing.
Notes
- Jif creamy peanut butter was used in this recipe. Avoid using all-natural peanut butter, as it may alter the texture.
- Substitute chocolate chips for the melting wafers if preferred, but add ½ teaspoon of coconut oil per cup of chips for easy dipping.
- Don’t allow the balls to sit at room temperature too long before dipping, as this will make it harder for the chocolate to stick.
- Avoid freezing the balls for more than 30 minutes prior to dipping. Store them in the refrigerator if you aren’t ready to dip immediately.
- Excess melted chocolate is normal and necessary to ensure the balls are fully coated.
Nutrition
- Serving Size: 1 ball
- Calories: 175
- Sugar: 11g
- Sodium: 85mg
- Fat: 11g
- Saturated Fat: 6g
- Unsaturated Fat: 5g
- Trans Fat: 0g
- Carbohydrates: 16
- Fiber: 1g
- Protein: 2g
- Cholesterol: 10mg

