
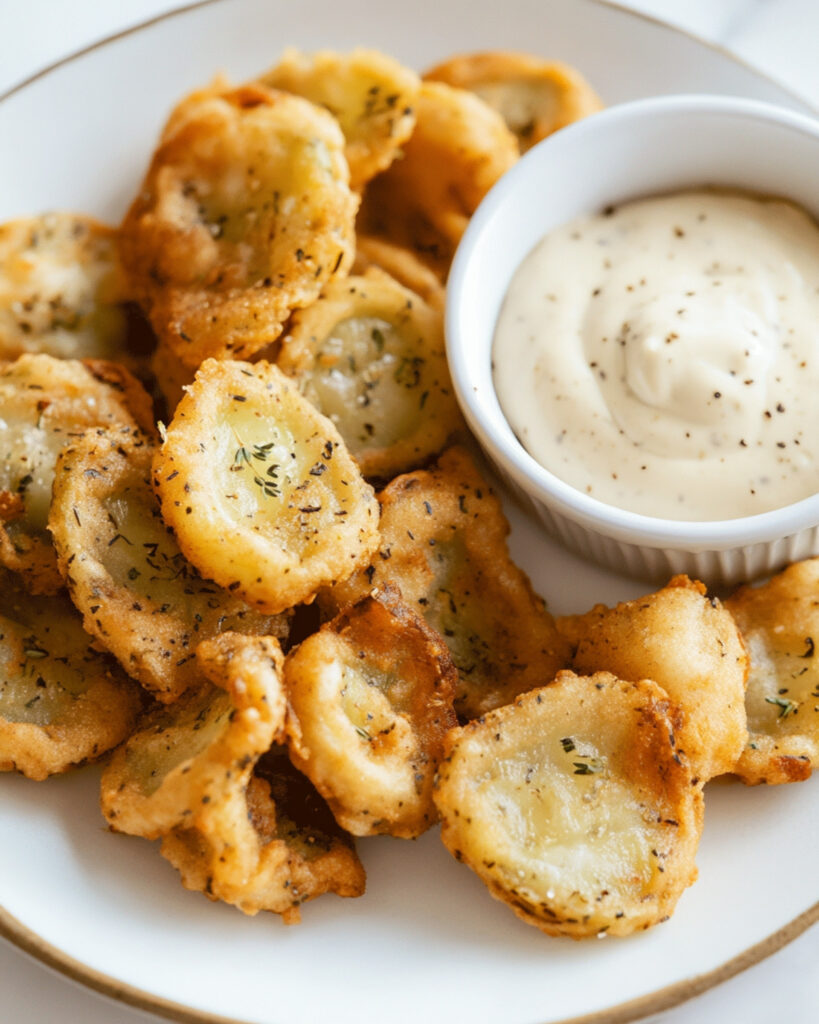
This ridiculously delicious Fried Pickles recipe transforms ordinary dill pickle slices into a crunchy, savory treat that’s impossible to resist. With a perfectly seasoned batter that crisps up beautifully, these fried pickles deliver that ideal contrast between the tangy pickle and the golden crust. Ready in just 30 minutes, they’re perfect for game day snacking, appetizers, or anytime you’re craving something deliciously different!
Why You’ll Love This Recipe
- Restaurant-Quality at Home: Achieve that perfect crunch and flavor you usually only get at restaurants or county fairs.
- Quick Prep: Takes just 10 minutes to prepare and 20 minutes to cook – perfect for last-minute entertaining.
- Crowd-Pleaser: Everyone loves these! They disappear almost as fast as you can make them.
- Customizable: The seasoning blend can be adjusted to match your heat preference, from mild to spicy.

Ingredients You’ll Need
- Dill pickle slices: The star of the show – choose good quality, thick-cut dill pickle chips for the best texture. Make sure to drain and dry them thoroughly.
- Flour: Creates the base for your batter, giving it structure and helping it adhere to the pickles.
- Dried herbs (basil and parsley): Adds wonderful aromatic flavors that complement the tanginess of the pickles.
- Garlic powder: Brings a savory depth that makes these pickles absolutely irresistible.
- Salt and black pepper: Essential seasoning elements that enhance all the other flavors.
- Cayenne pepper: Provides just the right amount of heat without overwhelming the other flavors.
- Milk: Creates the perfect batter consistency when mixed with the dry ingredients.
- Vegetable oil: For frying – choose an oil with a high smoke point to get that perfect golden crust.
Note: You’ll find the complete list of ingredients, along with their exact measurements, in the printable recipe card at the bottom of this post.
Variations
Spice Level Adjustments
Dial up the heat by adding more cayenne or a dash of hot sauce to the batter. For milder pickles, reduce or omit the cayenne entirely.
Batter Variations
Try adding a tablespoon of ranch seasoning mix to the batter for ranch-flavored fried pickles. Alternatively, use buttermilk instead of regular milk for a tangier flavor.
Pickle Options
While dill pickle chips are traditional, this recipe works beautifully with pickle spears, sweet pickles, or even pickled jalapeños for a spicy twist.
Coating Alternatives
For extra crunch, try dipping the battered pickles in panko breadcrumbs before frying.
How to Make Fried Pickles
Step 1: Prepare the Oil
Heat about 1 quart of vegetable oil in a large pot over medium heat until it reaches 375°F. Using an oil thermometer is crucial for maintaining the correct temperature throughout frying.
Step 2: Prepare the Pickles
Drain pickle slices in a colander, then spread them on paper towel-lined plates. Pat thoroughly with additional paper towels to remove as much moisture as possible – this ensures the batter adheres properly.
Step 3: Make the Batter
In a shallow bowl, whisk together flour, dried basil, dried parsley, garlic powder, salt, black pepper, and cayenne pepper. Add milk and whisk until you have a smooth, thick batter.
Step 4: Batter the Pickles
Work in small batches (about a quarter of the pickles at a time) to ensure even coating. Add dry pickles to the batter and toss gently until each slice is fully coated.
Step 5: Fry to Perfection
Carefully place battered pickles one by one into the hot oil. Fry for approximately 1½ minutes or until they achieve a beautiful golden-brown color.
Step 6: Drain and Repeat
Remove fried pickles using a slotted spoon and place them on clean paper towel-lined plates to drain excess oil. Continue the process with remaining pickles, maintaining oil temperature between batches.
Step 7: Serve
Serve immediately while hot and crispy, with ranch dressing or your favorite dipping sauce.
Pro Tips for Making the Recipe
- Temperature Control: Keep your oil between 365-385°F. Too cool and the pickles absorb oil and become soggy; too hot and they burn before cooking through.
- Batch Size Matters: Don’t overcrowd the pot when frying. Too many pickles at once will drop the oil temperature and result in soggy pickles.
- Double-Drying Method: For extra-crispy pickles, dry them once, let them sit for 5 minutes, then pat them dry again before battering.
- Test Batch: Fry a single pickle first to make sure your batter consistency and oil temperature are perfect before committing to a full batch.
- Maintain Batter Consistency: If your batter thickens too much during the process, add a splash more milk to keep it at the ideal coating consistency.
How to Serve
Perfect Dipping Sauces
While ranch dressing is the classic pairing, these fried pickles also shine with:
- Spicy remoulade sauce
- Homemade aioli
- Honey mustard
- Sriracha mayo
- Tangy BBQ sauce
Meal Pairings
Serve alongside:
- Juicy burgers or sandwiches
- Fried chicken
- Grilled hot dogs
- As part of a game day appetizer spread
Presentation
For an eye-catching presentation, serve on a platter with small ramekins of different dipping sauces. Garnish with fresh chopped parsley or dill for a pop of color.
Make Ahead and Storage
Storing Leftovers
Store cooled fried pickles in an airtight container lined with paper towels in the refrigerator for up to 2 days. However, they’re definitely best enjoyed fresh from the fryer.
Freezing
For make-ahead convenience, freeze the pickles after frying. Let them cool completely, then freeze in a single layer on a baking sheet before transferring to a freezer bag. They’ll keep for up to 3 months.
Reheating
For the crispiest results, reheat frozen or refrigerated fried pickles in an air fryer at 375°F for 2-3 minutes, or in a 425°F oven for 5-7 minutes. Avoid microwaving, as this will make them soggy.
FAQs
-
Why are my fried pickles soggy?
Soggy fried pickles usually come from either not drying the pickles thoroughly before battering, or frying at too low a temperature. Make sure to pat the pickles completely dry and maintain oil temperature at 375°F throughout the frying process.
-
Can I use an air fryer instead of deep frying?
Yes! Spray the battered pickles with cooking spray and cook at 400°F for about 8-10 minutes, flipping halfway through. The texture will be slightly different but still delicious and much lower in oil.
-
What’s the best type of pickle to use for this recipe?
Dill pickle chips (slices) work best because they have the perfect thickness and tanginess. Look for thicker-cut pickles rather than thin sandwich slices for the best texture contrast.
-
Can I make the batter ahead of time?
It’s best to make the batter just before using it. If the batter sits too long, it can become too thick and won’t adhere properly to the pickles. If you must make it slightly ahead, you may need to thin it with a little more milk before using.
Final Thoughts
These Crispy Fried Pickles deliver that perfect combination of tangy pickle and savory, crispy coating that’s absolutely addictive. They’re simple enough for beginners but delicious enough to impress even the pickiest eaters. Whether you’re serving them at your next gathering or just treating yourself to a special snack, these homemade fried pickles will quickly become a favorite recipe in your collection. Give them a try – you’ll never want to order them at a restaurant again!
Print
Crispy Fried Pickles Recipe
- Prep Time: 10 minutes
- Cook Time: 20 minutes
- Total Time: 30 minutes
- Yield: 6 servings
- Category: Appetizers
- Method: Frying
- Cuisine: American
- Diet: Vegetarian
Description
Crispy and flavorful fried pickles are an irresistible snack or appetizer, perfect with a side of ranch for dipping. This easy recipe ensures a golden-brown crunch with a hint of spice in every bite.
Ingredients
For Frying
- About 1 quart of vegetable oil for frying
Pickle Slices
- 16 ounces dill pickle slices, drained
Breading Mixture
- 1/2 cup flour
- 1/2 teaspoon dried basil
- 1/2 teaspoon dried parsley
- 2 teaspoons garlic powder
- 1/2 teaspoon salt
- 1/4 teaspoon ground black pepper
- 1/4 teaspoon cayenne pepper
Batter
- 1/2 cup milk
Instructions
- Heat the Oil: Add the vegetable oil to a large pot and heat it over medium heat until it reaches 375º F. Use an oil thermometer to monitor the temperature, ensuring it remains consistent at 375º F throughout the cooking process.
- Prepare the Pickles: Drain the pickle slices through a colander, then spread them on a paper towel-lined plate. Pat them dry with another paper towel to ensure the batter adheres well.
- Make the Breading Mixture: While the oil heats, combine the flour, basil, parsley, garlic powder, salt, black pepper, and cayenne pepper in a shallow bowl. Whisk until evenly mixed.
- Prepare the Batter: Add the milk to the bowl with the breading mixture. Whisk everything together to create a smooth, thick batter.
- Coat the Pickles: Work in batches, adding about ¼ of the dried pickle slices into the batter. Toss them to coat evenly.
- Fry the Pickles: Remove the battered pickles one by one and carefully place them into the hot oil. Fry for about 1 ½ minutes or until they turn golden brown.
- Drain and Repeat: Remove the fried pickles from the oil and place them on a clean paper towel-lined plate to drain. Repeat the battering and frying process with the remaining pickles.
- Serve: Serve the hot fried pickles with ranch dressing on the side for dipping.
Notes
- Make sure you dry the pickle slices well. The drier the pickles, the better the batter will stick.
- Try this recipe with pickle spears instead of slices, following the same steps. Spears will take approximately 2 minutes to fry.
Nutrition
- Serving Size: 1 serving


