
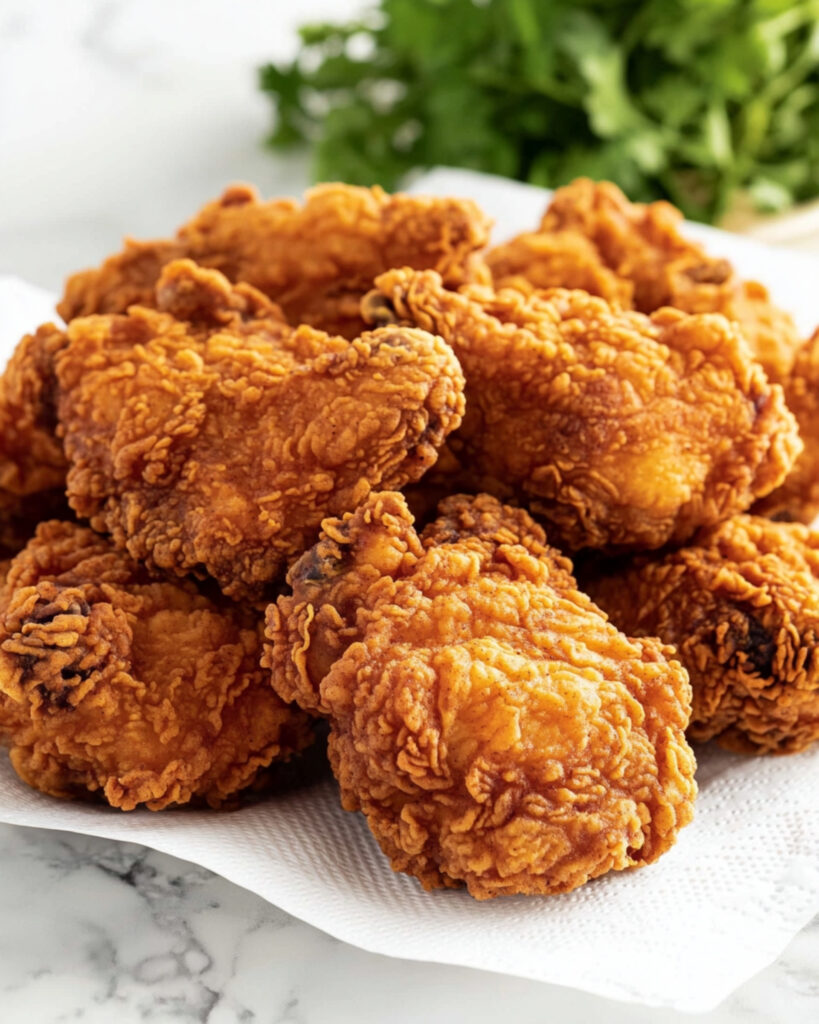
This irresistibly Crispy Fried Chicken is the ultimate comfort food that delivers that perfect crunch on the outside while keeping the meat tender and juicy on the inside. With a flavorful buttermilk brine and a perfectly seasoned coating, this recipe creates restaurant-quality fried chicken right in your own kitchen. While it does require some patience for the brining process, the actual cooking comes together quickly, making the end result absolutely worth the wait!
Why You’ll Love This Recipe
- Perfect Texture: The combination of buttermilk brine and the flour-cornstarch coating creates that magical contrast between crispy exterior and juicy interior that defines great fried chicken.
- Depth of Flavor: From the tangy buttermilk to the carefully balanced spice blend, every bite is packed with flavor that goes way beyond basic fried chicken.
- Foolproof Method: This recipe breaks down the fried chicken process into easy-to-follow steps that guarantee success, even if it’s your first time making it from scratch.
- Crowd Pleaser: Whether for a family dinner, picnic, or special occasion, this chicken will have everyone reaching for seconds (and fighting over the last piece)!

Ingredients You’ll Need
- Chicken thighs and drumsticks: Dark meat stays juicier and more flavorful when fried. The skin-on, bone-in pieces give you that classic fried chicken experience with built-in flavor enhancers.
- Buttermilk: The secret to tender chicken! Its acidity tenderizes the meat while adding tanginess. If you don’t have buttermilk, make your own by adding a tablespoon of vinegar or lemon juice to regular milk.
- Buffalo hot sauce: Adds a wonderful depth of flavor and subtle heat without making the chicken actually spicy. Don’t worry – this isn’t “hot” chicken unless you want it to be!
- Flour: The foundation of our crispy coating. All-purpose flour works perfectly for creating that golden-brown exterior we all crave.
- Cornstarch: The magic ingredient! Adding cornstarch to the flour mixture makes the coating extra crispy and helps it stay that way longer.
- Paprika: Provides beautiful color and a subtle smoky flavor to your coating.
- Herbs and spices: The combination of onion powder, garlic powder, oregano, basil, white pepper, and cayenne creates the perfect seasoning blend that makes this fried chicken irresistible.
- Vegetable oil: Use a neutral oil with a high smoke point for frying. Vegetable, canola, or peanut oil all work well.
Note: You’ll find the complete list of ingredients, along with their exact measurements, in the printable recipe card at the bottom of this post.
Variations
Southern-Style Buttermilk Fried Chicken
Skip the hot sauce in the brine and double up on the black pepper in the flour mixture. Add a teaspoon of poultry seasoning to the dredge for that classic southern flavor profile.
Extra Spicy Version
Double the cayenne pepper and add a tablespoon of your favorite hot sauce to the flour mixture. For serious heat lovers, add some ground habanero or ghost pepper powder.
Herbed Fried Chicken
Add 2 tablespoons of fresh chopped herbs like thyme, rosemary, and sage to the flour mixture for an aromatic twist.
Honey Drizzle Finish
After frying, drizzle the hot chicken with honey mixed with a touch of hot sauce for a sweet-heat finish that’s absolutely addictive.
How to Make Crispy Fried Chicken
Step 1: Prepare the Chicken
Pat the chicken thighs and drumsticks dry with paper towels. This helps the brine adhere better and results in better browning. Trim any excess loose skin if needed, but keep most of the skin intact since it crisps up beautifully.
Step 2: Create the Buttermilk Brine
In a large bowl, combine buttermilk, buffalo hot sauce, salt, and black pepper. This tangy mixture will both flavor and tenderize the chicken. Use tongs to place each piece of chicken in the brine, making sure they’re fully submerged. Cover the bowl and refrigerate for at least 4 hours, though overnight brining (up to 24 hours) will give you even more flavor and tenderness.
Step 3: Prepare for Frying
When you’re ready to cook, pour vegetable oil into a large, heavy skillet to a depth of about 3/4 to 1 inch. Heat the oil to 350°F (175°C). A candy or deep-fry thermometer is really helpful here for monitoring the temperature.
Step 4: Create the Dredging Mixture
While the oil heats, combine flour, cornstarch, salt, paprika, onion powder, garlic powder, dried oregano, dried basil, white pepper, and cayenne pepper in a shallow dish or large bag. Mix everything thoroughly to ensure the spices are evenly distributed.
Step 5: Dredge the Chicken
Set up your breading station. Take one piece of chicken at a time from the buttermilk mixture, letting excess drip off, then place it in the flour mixture. Press the coating onto the chicken to create a good layer, then shake off any excess. Place the breaded chicken on a plate or wire rack while you finish coating the remaining pieces.
Step 6: Fry the Chicken
Carefully lower 3-4 pieces of chicken into the hot oil, being careful not to overcrowd the pan. Fry for about 14 minutes, gently turning the pieces halfway through cooking. The chicken is done when it’s golden brown and reaches an internal temperature of 165°F (or 172-175°F for dark meat, which I personally recommend for the best texture).
Step 7: Drain and Rest
Transfer the fried chicken to a wire rack set over a baking sheet. This setup allows excess oil to drip away while keeping the chicken crispy. Let the chicken rest for at least 10 minutes before serving – this important step allows the juices to redistribute throughout the meat.
Pro Tips for Making the Recipe
- Temperature matters: Keep your oil between 300-350°F. Too hot, and the outside burns before the inside cooks; too cool, and the chicken absorbs too much oil and becomes greasy.
- Double dredge for extra crunch: For an even crispier coating, dip the chicken in buttermilk, then flour, then quickly back in buttermilk, and finally in flour again before frying.
- Don’t crowd the pan: Frying too many pieces at once drops the oil temperature dramatically and prevents proper crisping. Be patient and fry in batches.
- Season immediately after frying: A light sprinkle of flaky salt right after the chicken comes out of the oil adds the perfect finishing touch.
- Monitor with a thermometer: Both for oil temperature and chicken doneness, thermometers take the guesswork out and ensure perfect results.
How to Serve
Classic Pairings
Serve this crispy fried chicken with traditional Southern sides like creamy mashed potatoes, buttery corn on the cob, tangy coleslaw, or flaky buttermilk biscuits.
Dipping Sauces
Take your fried chicken to the next level with dipping sauces like honey mustard, ranch dressing, buffalo sauce, or a spicy mayo for those who want an extra kick.
Family-Style Presentation
Arrange the chicken on a large platter lined with paper towels or butcher paper, garnished with fresh herbs and lemon wedges for a rustic, inviting presentation that encourages everyone to dig in.
Make Ahead and Storage
Storing Leftovers
Let any leftover chicken cool completely, then store in an airtight container in the refrigerator for up to 3 days. The skin won’t stay quite as crispy, but the flavor will still be delicious.
Freezing
Fried chicken freezes surprisingly well! Place cooled pieces in a single layer on a baking sheet and freeze until solid. Then transfer to freezer bags and store for up to 3 months.
Reheating
For the crispiest results, reheat thawed fried chicken in a 375°F oven on a wire rack for about 15-20 minutes. Avoid the microwave, which will make the coating soggy. If you’re in a hurry, an air fryer works wonderfully for reheating – just 3-4 minutes at 375°F.
FAQs
-
Why didn’t my chicken get crispy enough?
The oil was likely not hot enough. Make sure to maintain a temperature between 300-350°F throughout cooking. Also, make sure your chicken pieces are dry before dredging, and don’t overcrowd the pan, which can drop the temperature too much.
-
Can I use skinless chicken for this recipe?
While you can use skinless pieces, the skin helps create that amazing crispy exterior and keeps the meat more juicy. If using skinless, reduce the cooking time slightly and watch carefully to prevent drying out.
-
Is there a way to make this recipe less spicy for kids?
Absolutely! Simply reduce or omit the cayenne pepper and hot sauce in the brine. You can also set aside a portion of the dredging mixture before adding the cayenne for a kid-friendly version.
-
Can I use this recipe for chicken breasts instead of dark meat?
Yes, though white meat tends to dry out more easily. If using breasts, I recommend cutting them into smaller, even-sized pieces and reducing the cooking time to about 10-12 minutes. For the juiciest result, brine chicken breasts for the full 24 hours.
Final Thoughts
There’s something truly magical about homemade fried chicken that connects us to comfort, tradition, and pure culinary pleasure. This Crispy Fried Chicken recipe might take a little time and patience, but the results are absolutely worth it – crispy, juicy, flavorful chicken that will have everyone at your table smiling. Don’t be intimidated by frying – with these straightforward steps and tips, you’ll be making restaurant-quality fried chicken right at home. Give it a try this weekend, and prepare for it to become your new signature dish!
Print
Crispy Fried Chicken Recipe
- Prep Time: 20 minutes
- Cook Time: 30 minutes
- Total Time: 4 hours 50 minutes
- Yield: 6 servings
- Category: Main-course
- Method: Frying
- Cuisine: American
Description
Dive into the ultimate comfort food with this crispy fried chicken recipe! Brined in a flavorful buttermilk mixture infused with buffalo hot sauce and seasoned with a perfectly spiced dredge, this chicken is juicy on the inside and irresistibly crispy on the outside. Perfect for dinners, gatherings, or satisfying your fried chicken cravings at home.
Ingredients
Buttermilk Brine
- 6 chicken thighs, skin-on, bone-in
- 6 chicken drumsticks, skin-on, bone-in
- 3 cups buttermilk
- 1/2 cup buffalo hot sauce
- 2 teaspoons salt
- 1 teaspoon black pepper
Dredging Mixture
- 3 cups all-purpose flour
- 1/2 cup cornstarch
- 1 tablespoon salt
- 1 tablespoon paprika
- 2 teaspoons onion powder
- 2 teaspoons garlic powder
- 1 teaspoon dried oregano
- 1 teaspoon dried basil
- 1 teaspoon white pepper
- 1 teaspoon cayenne pepper
- 1 quart vegetable oil (for frying)
Instructions
- Prepare the Chicken
Pat the chicken thighs and drumsticks dry with paper towels to remove any excess moisture. Trim off loose skin if needed. - Make the Buttermilk Brine
In a large mixing bowl, combine buttermilk, buffalo hot sauce, salt, and black pepper. Submerge the chicken pieces fully into the brine. Cover the bowl with plastic wrap and refrigerate for at least 4 hours, or up to 24 hours for extra tenderness and flavor. - Heat the Oil
Pour vegetable oil into a large heavy skillet, filling it to about 3/4 to 1 inch deep. Heat the oil to 350°F (175°C). - Prepare the Dredging Mixture
In a shallow dish or resealable plastic bag, mix the flour, cornstarch, salt, paprika, onion powder, garlic powder, dried oregano, dried basil, white pepper, and cayenne pepper. Ensure the spices are evenly distributed. - Bread the Chicken
Remove one piece of chicken at a time from the brine, letting excess liquid drip off. Coat the chicken thoroughly in the dredging mixture, pressing the seasoning onto the chicken lightly. Shake off any excess coating. - Fry the Chicken
Carefully place 3–4 chicken pieces into the hot oil at a time without overcrowding the skillet. Fry for about 14 minutes, turning halfway through, until golden brown and the internal temperature of the chicken reaches 165°F (74°C). For dark meat, aim for 172–175°F for the best texture and flavor. Monitor the oil temperature and keep it between 300–350°F for optimal cooking. - Rest the Chicken
Transfer the fried chicken to a wire rack set over a baking sheet to drain excess oil. For larger batches, keep the chicken warm in a 200°F (93°C) oven while frying the remaining pieces. Let the cooked chicken rest for at least 10 minutes before serving.
Notes
- Adjust the amount of hot sauce in the buttermilk brine based on your spice preference. For a milder dish, use less or omit the hot sauce.
- Test the oil before frying by dropping a small pinch of the flour mixture into it. If it sizzles immediately, the oil is ready.
- Do not overcrowd the skillet, as this lowers the oil temperature and affects the crispness of the chicken. Fry in batches for best results.
- Use a meat thermometer to guarantee perfectly cooked chicken every time.
Nutrition
- Serving Size: 2 pieces
- Calories: 620
- Sugar: 3g
- Sodium: 790mg
- Fat: 38g
- Saturated Fat: 7g
- Unsaturated Fat: 30g
- Trans Fat: 0g
- Carbohydrates: 32g
- Fiber: 2g
- Protein: 41g
- Cholesterol: 155mg

