
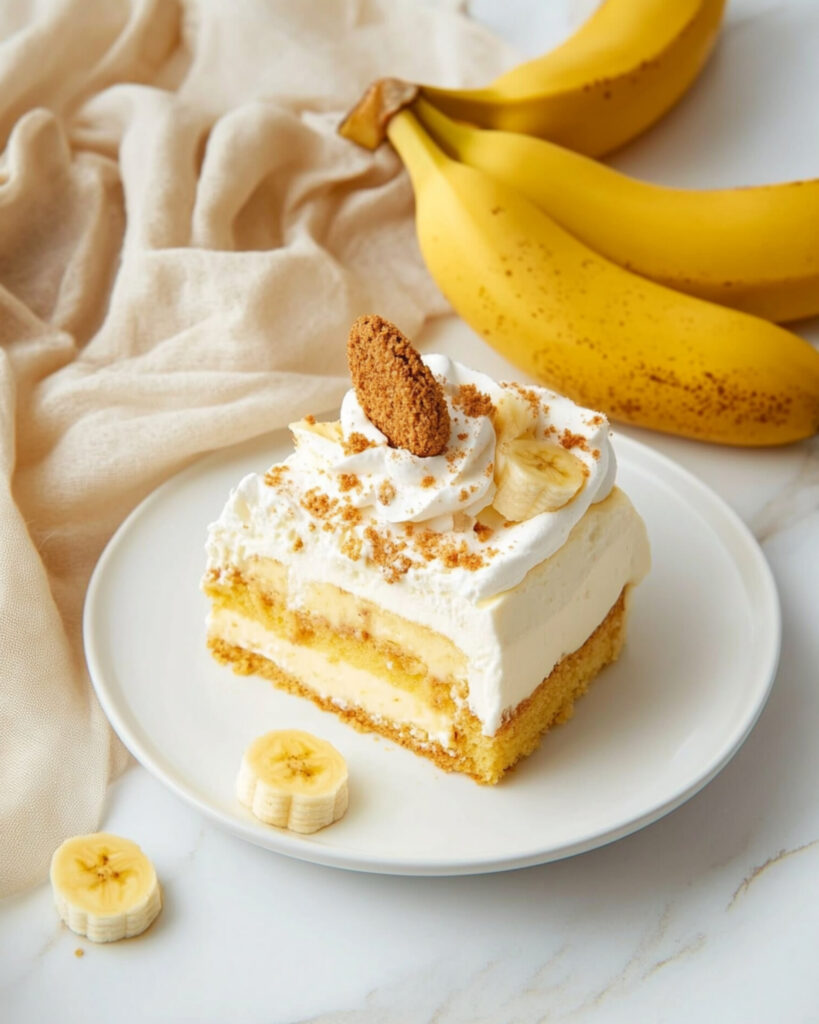
This heavenly Banana Poke Cake is a dream dessert that combines the light fluffiness of yellow cake with creamy banana pudding, all topped with clouds of whipped topping and crunchy vanilla wafer crumbles. It’s remarkably simple to make but delivers spectacular flavor that will have everyone asking for seconds. Perfect for potlucks, family gatherings, or whenever you need a no-fuss dessert that tastes like you spent hours in the kitchen!
Why You’ll Love This Recipe
- Incredibly Easy: With just a handful of ingredients and minimal effort, you’ll have an impressive dessert that looks and tastes like it came from a bakery.
- Make-Ahead Friendly: This cake actually gets better as it sits in the refrigerator, making it perfect for busy schedules when you need to prepare something in advance.
- Crowd-Pleasing Flavor: The combination of banana pudding, moist cake, and vanilla wafers creates a nostalgic flavor profile that appeals to both kids and adults alike.
- No Special Skills Required: Even if you’re not an experienced baker, you can nail this recipe on your first try!

Ingredients You’ll Need
- Yellow Cake Mix: The foundation of our poke cake—provides a perfect neutral canvas that lets the banana flavor shine through.
- Water, Vegetable Oil, and Eggs: These basics transform the cake mix into a moist, tender cake. Don’t substitute the oil with butter as it might change the texture.
- Instant Banana Pudding: The star of the show! This infuses the cake with rich banana flavor and creates that magical moistness that makes poke cakes so irresistible.
- Cold Whole Milk: Using whole milk makes the pudding extra creamy—2% works in a pinch, but avoid skim milk if possible.
- Whipped Topping: Creates a light, fluffy layer that balances the dense pudding-soaked cake. Make sure it’s fully thawed for easy spreading.
- Vanilla Wafer Cookies: These add a wonderful textural contrast and complement the banana flavor perfectly. Crush them just before using for maximum crispness.
- Fresh Bananas: Optional but highly recommended for serving—they add fresh flavor and make the presentation extra special.
Note: You’ll find the complete list of ingredients, along with their exact measurements, in the printable recipe card at the bottom of this post.
Variations
Different Pudding Flavors
Try chocolate pudding instead of banana for a banana-chocolate combination that’s absolutely divine.
Cookie Swaps
Graham crackers or crushed Oreos make excellent alternatives to vanilla wafers if you’re looking to switch things up.
Fancy It Up
Add a drizzle of caramel sauce or chocolate sauce before serving for an extra touch of decadence.
Tropical Twist
Mix in some shredded coconut with the vanilla wafer topping for a tropical flavor profile that’s perfect for summer gatherings.
How to Make Banana Poke Cake
Step 1: Prepare and Bake the Cake
Preheat your oven to 350°F and lightly coat a 9×13-inch baking pan with cooking spray. In a large bowl, combine the cake mix, water, vegetable oil, and eggs. Mix until the batter is smooth and well-combined. Pour the batter into your prepared pan and bake for approximately 25 minutes, or until a toothpick inserted in the center comes out clean.
Step 2: Create the Pokes
Once the cake has cooled slightly (about 15-20 minutes), take the handle of a wooden spoon and poke holes all over the cake, spacing them about an inch apart. Make sure to poke all the way to the bottom of the cake without disturbing the bottom crust.
Step 3: Add the Pudding Layer
In a medium bowl, whisk together the banana pudding mix and cold milk until smooth and slightly thickened (about 2 minutes). While the pudding is still pourable, spread it evenly over the cake, making sure it fills all those wonderful holes you created. Use the back of a spoon to gently press the pudding into the holes if needed.
Step 4: Chill and Top
Refrigerate the cake for at least one hour to allow the pudding to set and infuse the cake with flavor. After chilling, spread the thawed whipped topping evenly over the pudding layer, creating a smooth, fluffy blanket over the entire cake.
Step 5: Add the Finishing Touches
Just before serving, sprinkle the crushed vanilla wafer cookies over the whipped topping. If desired, add sliced fresh bananas on top for extra flavor and a beautiful presentation.
Pro Tips for Making the Recipe
- Don’t Rush the Cooling: Let the cake cool for about 15-20 minutes before poking holes—if it’s too hot, it might fall apart; too cool, and the pudding won’t soak in properly.
- Hole Size Matters: The handle of a wooden spoon creates the perfect-sized holes, not too big or too small. If you make the holes too small, the pudding won’t seep in properly.
- Pudding Timing: Add the pudding while it’s still in its liquid state before it sets. This ensures it will flow into the holes and create that moist, flavorful interior.
- Even Distribution: Be methodical when poking holes and pouring pudding to ensure every slice gets an equal amount of that delicious banana flavor.
- Wafer Wisdom: Add the crushed vanilla wafers just before serving or they’ll soften and lose their crunch. If preparing in advance, store the crushed cookies separately and sprinkle them on right before serving.
How to Serve
This Banana Poke Cake is versatile enough to fit any occasion, from casual family dinners to special celebrations.
For Everyday Dessert
Serve a generous square with a cold glass of milk for the perfect after-dinner treat.
For Special Occasions
Dress it up by adding fresh banana slices, a sprinkle of cinnamon, or a light dusting of powdered sugar just before serving.
Perfect Pairings
This cake is wonderful with a scoop of vanilla ice cream or a drizzle of warm caramel sauce for an extra special touch.
Make Ahead and Storage
Storing Leftovers
Keep your Banana Poke Cake covered in the refrigerator for up to 3 days. The cake continues to absorb flavors over time, so some even prefer it on the second day!
Freezing
While you can freeze portions of the cake without the whipped topping and wafer crumbles for up to 2 months, I recommend enjoying it fresh for the best texture and flavor.
Make Ahead Tips
You can prepare this cake up to 24 hours in advance, but wait to add the crushed vanilla wafers until right before serving to maintain their crunch. If you want to include fresh banana slices, add those just before serving as well to prevent browning.
FAQs
-
Can I use a white cake mix instead of yellow?
Absolutely! White cake mix works beautifully in this recipe and will give you a slightly lighter color but equally delicious results. Some bakers even prefer it for its more neutral flavor that lets the banana pudding shine.
-
Why did my pudding layer disappear into the cake?
If your pudding seemed to vanish, you likely poked too many holes or made them too large. The pudding needs some cake structure to hold it in place. Next time, space the holes about an inch apart and use a standard wooden spoon handle for the perfect size.
-
Can I make this recipe with homemade cake instead of a box mix?
Yes! If you have a favorite yellow cake recipe, feel free to use it instead of the box mix. Just make sure it’s baked in a 9×13-inch pan and cooled slightly before poking the holes.
-
Is it necessary to refrigerate this cake?
Definitely! Since this cake contains dairy products (milk and whipped topping), it must be refrigerated for food safety. Plus, the cool temperature enhances the flavor and creates that perfect pudding-infused texture we’re looking for.
Final Thoughts
This Banana Poke Cake is one of those magical recipes that delivers maximum wow-factor with minimal effort. There’s something truly special about the way the banana pudding infuses into the cake, creating a dessert that’s incredibly moist and bursting with flavor. Whether you’re a seasoned baker or just starting out, this foolproof recipe will earn you rave reviews. Give it a try the next time you need a dessert that’s sure to impress—I promise you’ll find yourself making it again and again!
Print
Banana Poke Cake Recipe
- Prep Time: 15 minutes
- Cook Time: 25 minutes
- Total Time: 1 hour 40 minutes
- Yield: 24 servings
- Category: Desserts
- Method: Baking
- Cuisine: American
- Diet: Vegetarian
Description
This Banana Poke Cake is a rich and indulgent dessert loaded with layers of banana flavor, fluffy whipped topping, and a delightful vanilla cookie crunch. Easy to make and perfect for gatherings, this moist cake will quickly become your go-to treat for any occasion.
Ingredients
For the Cake
- 1 (15oz.) box yellow cake mix
- 1 cup water
- 1/2 cup vegetable oil
- 3 large eggs
For the Banana Pudding Layer
- 2 (3.4oz.) boxes instant banana pudding
- 2 cups cold whole milk
For the Topping
- 8 ounces whipped topping, thawed
- 2 cups crushed vanilla wafer cookies
- Sliced bananas, for serving
Instructions
- Preheat & Prepare
Preheat your oven to 350°F (175°C). Lightly grease a 9×13-inch baking pan with cooking spray and set it aside. - Make the Cake Batter
In a large mixing bowl, combine the yellow cake mix, water, vegetable oil, and eggs. Stir until the batter is smooth and thoroughly combined. Pour the mixture into the prepared baking pan. - Bake the Cake
Bake the cake in the preheated oven for about 25 minutes, or until a toothpick inserted into the center comes out clean. Once done, remove it from the oven and allow it to cool completely. - Poke the Cake
Once cooled, use the handle of a wooden spoon to poke holes evenly across the entire surface of the cake, leaving about 1 inch between each hole. Set the cake aside. - Prepare the Pudding
In a medium bowl, whisk together the banana pudding mix and cold whole milk until smooth and thickened. - Spread the Pudding
Spread the prepared pudding over the cake, making sure to push it into the holes you created. This will allow the pudding to seep through and add extra moisture and flavor. Place the cake in the refrigerator to chill for at least one hour. - Add the Whipped Topping
Once chilled, evenly spread the thawed whipped topping over the pudding layer. - Garnish & Serve
Finish by sprinkling crushed vanilla wafer cookies over the topping. If desired, add some freshly sliced bananas as an additional garnish before serving.
Notes
- Ensure the cake is completely cool before applying the pudding layer to avoid melting it.
- The pudding should be set before spreading the whipped topping to maintain defined layers.
- Add sliced bananas just before serving to prevent browning.
- Store leftovers in an airtight container in the refrigerator for up to 3 days.
Nutrition
- Serving Size: 1 piece
- Calories: 215
- Sugar: 21g
- Sodium: 260mg
- Fat: 9g
- Saturated Fat: 2g
- Unsaturated Fat: 7g
- Trans Fat: 0g
- Carbohydrates: 29g
- Fiber: 1g
- Protein: 3g
- Cholesterol: 25mg

