I absolutely love sharing this Peanut Butter Chocolate Lava Cakes Recipe with friends because it’s seriously the easiest way to impress anyone with a decadent dessert that feels gourmet but takes less than 40 minutes total. When I first tried this recipe, I was blown away by the molten peanut butter center that oozes out alongside rich chocolate – it’s like your favorite candy bar came to life in cake form. Stick with me here, and I’ll walk you through every step to nail these gorgeous, gooey treats that always get raves at dinner parties or simply as a cozy night-in indulgence.
Why You’ll Love This Recipe
- Effortlessly Impressive: Even if you’re not a seasoned baker, these cakes come together quickly and look bakery-level stunning.
- Irresistibly Gooey Center: The peanut butter melts into a luscious core that pairs perfectly with the rich chocolate exterior.
- Minimal Ingredients: You likely have most of these pantry staples on hand, and no fancy gadgets required.
- Customizable Indulgence: Wanna add ice cream or drizzle extra chocolate? You’ve got options to make it your own.

Ingredients You’ll Need
For peanut butter chocolate lava cakes, quality matters – especially when it comes to the chocolate. These ingredients come together beautifully to create that perfect balance of fudgy cake with a molten peanut butter center. Here’s a quick peek at what you’ll want on your counter before starting.
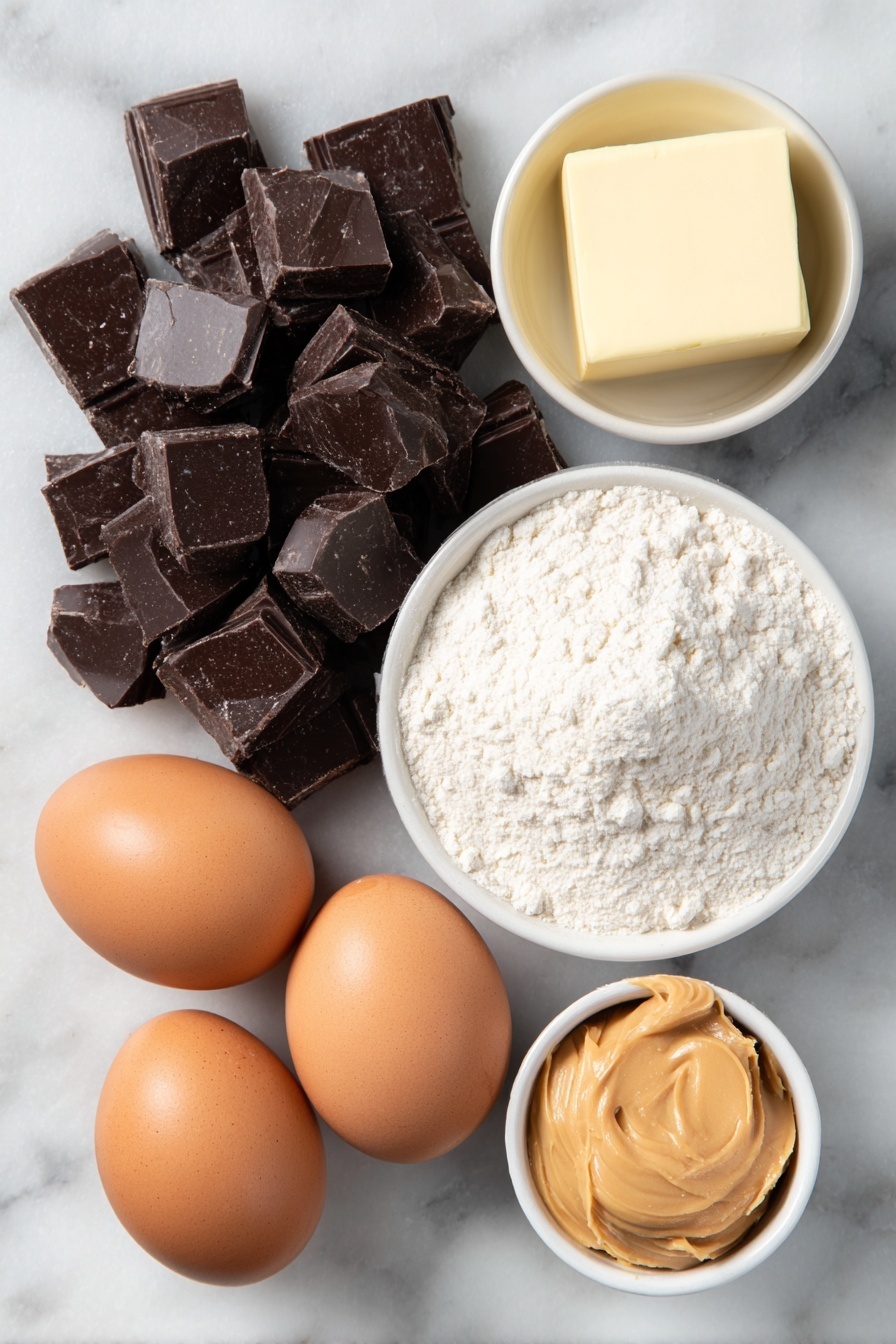
- Semi-sweet chocolate: I prefer high-quality bars like Ghirardelli or Lindt because they melt smoothly and give a rich, deep chocolate flavor.
- Unsalted butter: Using unsalted gives you full control over the salt level, which balances the sweetness and peanut butter.
- All-purpose flour: Make sure to spoon and level it to avoid dense cakes—this little trick helps your cakes rise nicely.
- Confectioners’ sugar: This dissolves better than granulated sugar, keeping your lava cakes silky rather than gritty.
- Salt: Just a pinch to contrast and enhance the chocolate and peanut butter flavors.
- Eggs and egg yolks: These add richness and structure; the extra yolks make the cakes beautifully tender.
- Creamy peanut butter: I recommend creamy (not chunky) for that dreamy molten middle that spreads effortlessly when bitten into.
- Optional toppings: Ice cream, melted peanut butter, or chocolate syrup all bring the decadence level way up.
Variations
I like to switch things up with this Peanut Butter Chocolate Lava Cakes Recipe depending on the mood or occasion. It’s so versatile, you can make it work whether you want to keep it classic or experiment with bold flavors.
- Peanut Butter Swap: Occasionally, I replace peanut butter with almond or hazelnut butter – it’s a personal fave twist that changes the flavor profile but keeps things just as gooey.
- Vegan version: I’ve tried substituting eggs with flax eggs and dairy butter with coconut oil; while the texture shifts a bit, it’s a decent alternative to please vegan friends.
- Extra Crunch: Adding crushed peanuts on top before baking gives a pleasant contrast in texture, and my family goes crazy for that nutty crunch.
- Chocolate variations: Mix semi-sweet with bittersweet chocolate for richer depth or use milk chocolate for a sweeter, softer finish.
How to Make Peanut Butter Chocolate Lava Cakes Recipe
Step 1: Prepare Your Ramekins and Oven
First things first: give your 6-ounce ramekins a good spray with nonstick cooking spray, then dust them with cocoa powder. This double step is a lifesaver—I discovered this trick after struggling with cakes sticking and breaking apart when I was starting out. Preheat your oven to 425°F (218°C) so it’s hot and ready when your batter is set.
Step 2: Melt Chocolate and Butter
Coarsely chop your semi-sweet chocolate and toss it in a heatproof bowl with your butter. Microwave in short 10-second bursts, stirring each time, until everything is smooth and glossy. This method keeps you in control so the chocolate doesn’t seize or burn—a mistake I’ve made more than once! Set this luscious base aside for a moment.
Step 3: Mix Dry and Wet Ingredients Separately
Whisk together your all-purpose flour, confectioners’ sugar, and salt in a small bowl. In a separate bowl, beat your eggs and egg yolks until combined but not frothy—just make sure they’re evenly mixed. This separation helps the batter blend easily without overmixing later, which is key for tender cakes.
Step 4: Combine Everything Gently
Pour the flour mixture and eggs into your melted chocolate mixture. Use a silicone spatula or wooden spoon to slowly fold it all together. If you spot any stubborn lumps, a gentle whisk can help smooth them out without overworking the batter. It should feel thick but silky.
Step 5: Fill Ramekins and Add Peanut Butter
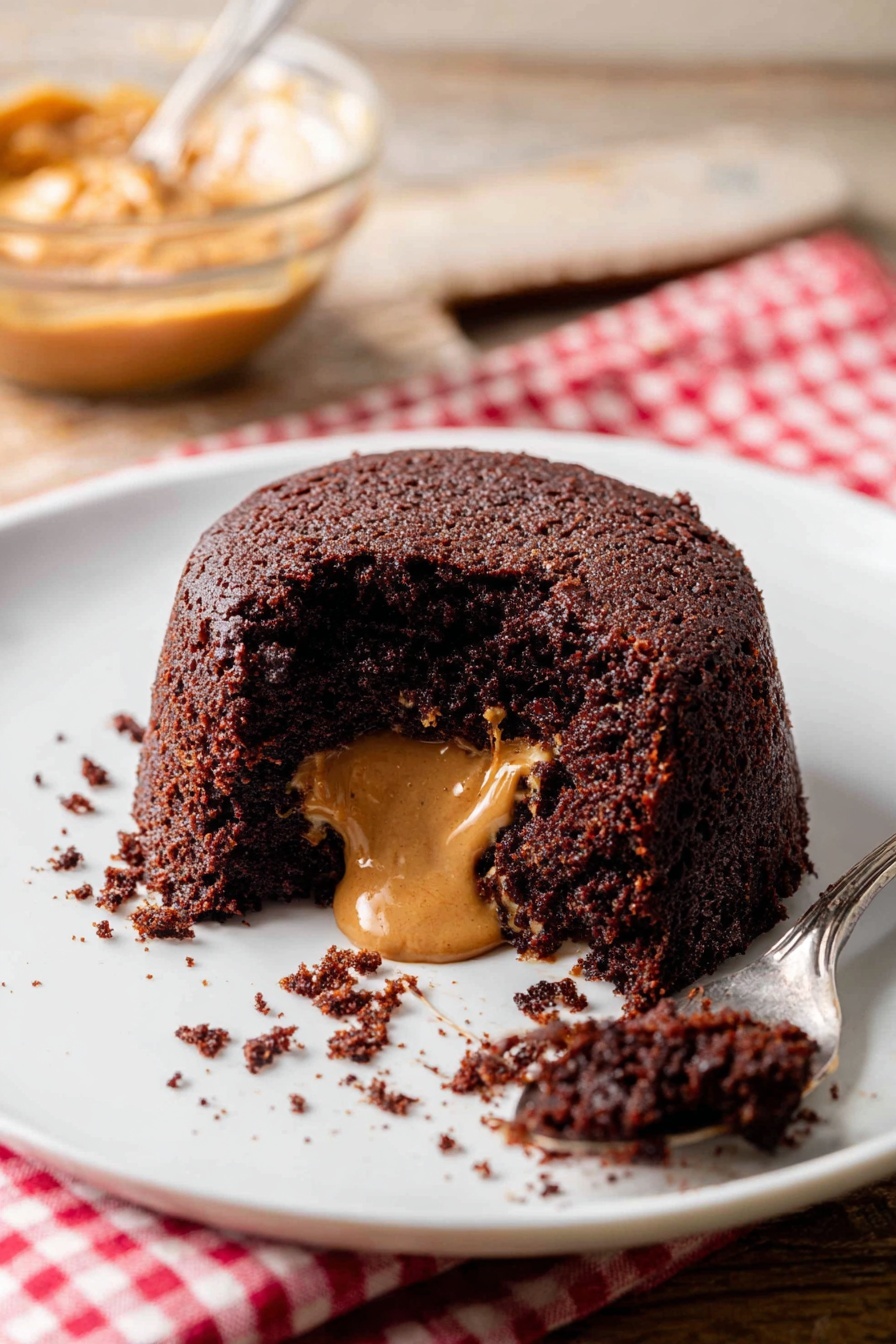
Spoon your chocolate batter evenly into the prepared ramekins. Now here comes the magic—add about 2 teaspoons of creamy peanut butter on top of each and lightly press it down slightly into the batter with a spoon. Don’t worry if some peanut butter sticks out; it’ll swirl in as it bakes and create those lava pockets that make this recipe unforgettable.
Step 6: Bake and Flip
Place your ramekins on a baking sheet and pop them into the oven for 12-13 minutes. You’ll know they’re done when the edges look set and firm but the top still has a bit of softness—that’s exactly what you want for the molten center. Let them cool for just a minute, then carefully cover each ramekin with a small plate and invert them. Trust me, using an oven mitt when flipping will keep you from a mini disaster. The cakes should slide right out, unveiling that sexy lava core.
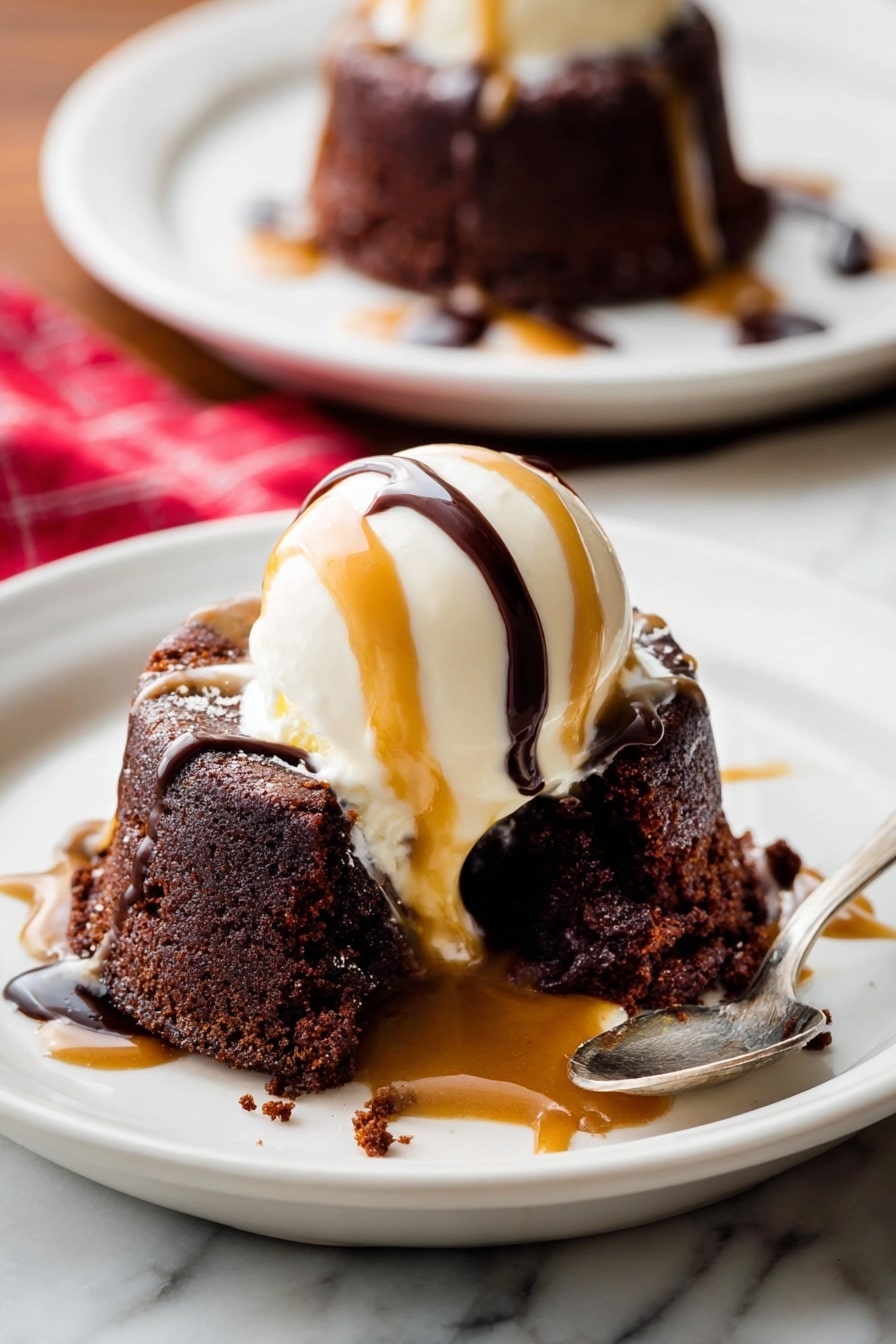
Finish with a scoop of ice cream or drizzle with melted peanut butter and chocolate syrup if you’re feeling fancy—and serve immediately!
Pro Tips for Making Peanut Butter Chocolate Lava Cakes Recipe
- Perfect Ramekin Prep: Cocoa dusting plus nonstick spray makes flipping stress-free—this one trick saved me from countless cake breakups.
- Watch Your Bake Time: Overbaking kills the lava effect; set a timer and start checking at 12 minutes for that soft top.
- Chill Peanut Butter: If your peanut butter is runny, pop it in the fridge briefly before scooping so it holds shape better inside the cakes.
- Gentle Mixing: Avoid vigorous stirring to keep the batter light and airy, which helps make a tender cake shell around that gooey center.
How to Serve Peanut Butter Chocolate Lava Cakes Recipe
Garnishes
I’m a sucker for classic vanilla bean ice cream on top; the cool creaminess complements that hot, molten peanut butter chocolate beautifully. Sometimes I drizzle a little extra melted peanut butter or rich chocolate syrup for that wow factor. A sprinkle of flaky sea salt or chopped peanuts can elevate the flavor and texture too.
Side Dishes
Since this dessert is rich, I like to keep sides light. Fresh berries or a simple mint leaf garnish add a pop of color and brightness. If it’s a celebration, a crisp glass of cold milk or lightly sweetened coffee works beautifully alongside these lava cakes.
Creative Ways to Present
For birthdays or special dinners, I’ve served these lava cakes in elegant ramekins topped with edible gold dust and a mint sprig. Layering them on a slate board with assorted nuts and berry coulis also makes a memorable presentation that guests rave about. The molten center makes every plate feel like a surprise reveal.
Make Ahead and Storage
Storing Leftovers
While these cakes are best fresh, I’ve kept leftovers covered tightly in the fridge for up to 2 days. The texture changes a bit — the lava isn’t quite as molten — but reheating gently can bring back some gooey magic.
Freezing
I like to freeze the cakes before baking sometimes. Just prepare the batter in ramekins, add the peanut butter, then cover tightly and freeze. When ready, bake them directly from frozen, adding a couple extra minutes to the baking time. It’s a total lifesaver for last-minute dessert emergencies.
Reheating
To reheat, I pop a cake in the microwave for about 20-30 seconds until warm but not overcooked, which helps revive that molten center texture. Alternatively, a short stint in a 350°F oven for 5-7 minutes works if you want a crisper top.
FAQs
-
Can I use natural peanut butter in this recipe?
Natural peanut butter often has separated oils and thinner consistency, so it might not create the same gooey center as creamy peanut butter. If you use natural, be sure to stir it thoroughly before measuring, and chill it slightly so it holds shape better inside the cake.
-
Why did my lava cakes not have a molten center?
The most common reasons are overbaking or baking at too low a temperature. These cakes bake quickly, so keep a close eye during the 12-13 minute window and look for set edges with a slightly soft top. Also, make sure you added enough peanut butter in the center for that lava effect.
-
Can I make these gluten-free?
Yes! You can substitute the all-purpose flour with a 1-to-1 gluten-free baking flour blend. Just be mindful that texture might have a slight variation, but the peanut butter chocolate lava goodness will still shine through.
-
How do I prevent the cakes from sticking to the ramekins?
Make sure to spray generously and dust with cocoa powder before adding batter. This double layer creates a barrier that allows the cake to release easily when inverted. Also, allow the cakes to cool for about a minute before flipping for best results.
Final Thoughts
This Peanut Butter Chocolate Lava Cakes Recipe has become one of my go-to special treats because it’s simple, quick, and always a crowd-pleaser. Whether you’re baking for a holiday, a date night, or just because, these little molten wonders bring smiles and that “wow” moment with every bite. I hope you enjoy making them as much as I do and that they become a staple in your dessert rotation too!
Print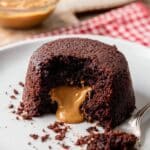
Peanut Butter Chocolate Lava Cakes Recipe
- Prep Time: 15 minutes
- Cook Time: 12 minutes
- Total Time: 27 minutes
- Yield: 4 cakes
- Category: Dessert
- Method: Baking
- Cuisine: American
Description
Indulge in the ultimate dessert decadence with these Peanut Butter Chocolate Lava Cakes. Featuring a rich, molten center of creamy peanut butter encased in a perfectly baked semi-sweet chocolate cake, this recipe delivers a luscious and satisfying treat ideal for special occasions or anytime a chocolate craving strikes. The cakes are quick to prepare and bake, with an impressive presentation that pairs beautifully with ice cream or drizzles of melted peanut butter and chocolate syrup.
Ingredients
Chocolate Base
- 6 ounces (170g) high quality semi-sweet chocolate, such as Ghirardelli or Lindt
- 1/2 cup (8 Tbsp; 113g) unsalted butter
- 1/4 cup (31g) all-purpose flour (spooned & leveled)
- 1/2 cup (60g) confectioners’ sugar
- 1/8 teaspoon salt
Egg Mixture
- 2 large eggs
- 2 large egg yolks
Filling
- 8 teaspoons (42g) creamy peanut butter (about 2 teaspoons per cake)
Optional for Serving
- Ice cream
- Melted peanut butter
- Chocolate syrup
Instructions
- Prepare Ramekins: Spray 4 6-ounce ramekins with nonstick cooking spray and dust with cocoa powder. This step ensures the cakes will come out of the ramekins cleanly once inverted after baking.
- Preheat Oven: Set the oven temperature to 425°F (218°C) to get the perfect baking environment for the lava cakes.
- Melt Chocolate and Butter: Coarsely chop the semi-sweet chocolate and place in a medium heat-proof bowl with the butter. Microwave on high in 10-second increments, stirring after each, until the mixture is completely smooth. Set aside to cool slightly.
- Mix Dry Ingredients: In a small bowl, whisk together the flour, confectioners’ sugar, and salt until well combined.
- Combine Eggs: In another small bowl, whisk the whole eggs and egg yolks together until fully blended.
- Combine Batter: Pour the dry ingredient mixture and the eggs into the melted chocolate and butter mixture. Slowly stir everything together with a silicone spatula or wooden spoon until smooth and slightly thick, gently whisking out any lumps.
- Fill Ramekins: Spoon the chocolate batter evenly into the prepared ramekins. Drop 2 teaspoons of creamy peanut butter into the center of each ramekin’s batter and gently press it down so it is slightly embedded but still somewhat exposed on top.
- Bake: Place the ramekins on a baking sheet and bake in the preheated oven for 12-13 minutes. The cake edges should look set and firm, while the centers remain slightly soft and molten.
- Cool and Unmold: Allow the cakes to cool for 1 minute. Then carefully cover each ramekin with an inverted plate and, using oven mitts to protect your hands, flip to release the cakes onto the plates. The lava cakes should come out easily.
- Serve: Immediately serve the cakes with optional accompaniments like ice cream, melted peanut butter, and/or chocolate syrup drizzled on top for extra indulgence.
Notes
- This recipe creates a decadent and rich dessert perfect for chocolate and peanut butter lovers.
- Using high quality chocolate significantly improves the depth of flavor in the cake.
- Dusting the ramekins with cocoa powder rather than flour keeps the chocolate flavor intact and helps with easy release.
- Serve immediately after unmolding to enjoy the warm, gooey lava center.
- Adjust peanut butter quantity or add toppings as per your preferences to customize sweetness and richness.
Nutrition
- Serving Size: 1 cake
- Calories: 430
- Sugar: 32g
- Sodium: 150mg
- Fat: 28g
- Saturated Fat: 14g
- Unsaturated Fat: 12g
- Trans Fat: 0g
- Carbohydrates: 37g
- Fiber: 3g
- Protein: 7g
- Cholesterol: 150mg


