
If you’re on the hunt for a cool, creamy treat that’s both indulgent and surprisingly wholesome, you’re going to want to stick around. This Chocolate Peanut Butter Cottage Cheese Ice Cream Bars Recipe is one of those unexpected delights that just hits the sweet spot without the guilt trip. I absolutely love how these bars blend the richness of peanut butter and chocolate with the tangy creaminess of cottage cheese—trust me, it’s a game changer you didn’t know you needed!
Why You’ll Love This Recipe
- No Ice Cream Maker Needed: You only need a blender and popsicle molds to create these creamy bars without any fancy gadgets.
- High Protein & Healthy Fats: Thanks to cottage cheese and natural peanut butter, these bars keep you full and satisfied.
- Customizable Crunch: The crunchy peanut and chocolate sprinkle coating adds that extra texture everyone loves.
- Perfect Balance of Flavors: The subtle sweetness of maple syrup blends beautifully with cocoa powder and vanilla for a dessert that doesn’t overpower.

Ingredients You’ll Need
All the ingredients in this Chocolate Peanut Butter Cottage Cheese Ice Cream Bars Recipe work harmoniously to create a smooth, creamy texture with just the right amount of sweetness and crunch. Here’s what I usually grab at the store and a few tips on choosing the best options for the job.

- Cottage cheese: I like using any variety you have on hand, but full-fat makes the bars creamier while low-fat keeps it lighter.
- Maple syrup: Using real maple syrup adds a deep, natural sweetness, but honey works great if that’s what you prefer or have at home.
- Vanilla: Pure vanilla extract is a must for that warm aroma and to bring all the flavors together.
- Salt: Just a dash to balance the sweetness and enhance the chocolate and peanut butter notes.
- Natural peanut butter: Opt for one with just peanuts and maybe a pinch of salt for the healthiest and most authentic taste.
- Cocoa powder: Unsweetened cocoa powder is the chocolate base—choose one that’s rich and flavorful.
- Peanuts: Chopped peanuts add that crunch we all adore in ice cream bars.
- Chocolate sprinkles: This little touch adds visual appeal and extra chocolatey fun.
- Chocolate chips: I swear by Hu No Added Sugar chocolate chips for a cleaner, less sweet chocolate dip.
Variations
I love that this Chocolate Peanut Butter Cottage Cheese Ice Cream Bars Recipe is so easy to make your own. Over time, I’ve played with different nut butters and toppings to keep things fresh. Don’t be afraid to experiment!
- Using almond butter instead of peanut butter: I tried this once on a whim, and the subtle sweetness of almond butter gave a really nice twist that my kids surprisingly enjoyed.
- Add a pinch of cinnamon or chili powder: For a hint of warmth or a gentle spicy kick that pairs beautifully with chocolate.
- Swap maple syrup with agave or date syrup: Great if you’re avoiding refined sugars or want a different flavor profile.
- Top with chopped dried fruit: I sometimes add cranberries or raisins to the coating plates for extra texture and bursts of sweetness.
How to Make Chocolate Peanut Butter Cottage Cheese Ice Cream Bars Recipe
Step 1: Blend the Base to Silky Smoothness
Start by combining your cottage cheese, cocoa powder, maple syrup, vanilla extract, and a dash of salt in a high-speed blender or a Nutribullet cup. I find that blending until completely smooth is key—no lumps! A regular blender or even an immersion blender works fine, just be patient and scrape down the sides as needed. The goal here is a creamy, chocolatey base that’s ready to freeze.
Step 2: Pour and Freeze Your Bars
Pour the ice cream mixture into your favorite popsicle molds. I’m a big fan of silicone molds because they make removing the bars so simple—no sticky struggles! Don’t forget to insert the sticks and cover the molds with the lids or foil to keep those flavors pure. Then pop them in the freezer for about 3 to 4 hours until fully set.
Step 3: Prepare the Chocolate Coating
While you wait for your bars to freeze solid, mix your favorite chocolate chips with a little coconut oil in a microwave-safe bowl. I recommend using Hu No Sugar Added Chocolate Chips because they melt just right without becoming super sweet. Heat for 30 seconds, stir gently, then heat again for another 30 seconds. Stir until silky smooth and glossy—this is going to give your bars that irresistible crunchy shell.
Step 4: Dip, Coat, and Set
When the bars are frozen solid, quickly dip each one into the melted chocolate, letting the excess drip off. Immediately press them into plates filled with chopped peanuts and chocolate sprinkles to coat while the chocolate is still soft. I like to place the finished bars on parchment paper to set. You can eat them now or pop them back in the freezer for later. Just remember that if you keep them frozen too long, they get icy—let them sit out for 5-10 minutes before enjoying for the best creamy texture.
Pro Tips for Making Chocolate Peanut Butter Cottage Cheese Ice Cream Bars Recipe
- Smooth Base is Key: If the cottage cheese isn’t blended well enough, you’ll get some gritty bits—so blend extra long for that perfect creamy texture.
- Quick Dipping: Work fast when dipping your pops; the chocolate cools and hardens quickly so you want to coat evenly before it sets.
- Silicone Molds are the MVP: They make unmolding bars a breeze without breaking or cracking your popsicles.
- Thaw a Little Before Serving: These bars taste best with a few minutes to soften outside the freezer—don’t skip this step to avoid icy bites.
How to Serve Chocolate Peanut Butter Cottage Cheese Ice Cream Bars Recipe

Garnishes
I typically stick with extra chopped peanuts and a sprinkle of sea salt on top for that salty-sweet combo. Sometimes I dust a little cocoa powder to give it a rustic touch. These garnishes are simple but really amplify the flavor and make the bars look irresistible.
Side Dishes
When serving these bars at a get-together, I like to pair them with fresh berries or a side of lightly sweetened Greek yogurt. The tartness of berries balances the rich chocolate and peanut butter, while the yogurt adds a creamy contrast without overwhelming the flavors.
Creative Ways to Present
For birthdays or parties, I’ve lined them up on a long platter, sprinkled with edible flowers and chopped nuts. You could even drizzle some warm peanut butter or ganache on top right before serving for a fancy touch. It never fails to impress guests and makes an outstanding Instagram-worthy dessert!
Make Ahead and Storage
Storing Leftovers
Leftover bars can be stored in an airtight container in the freezer. I recommend placing parchment paper between layers to prevent sticking. They keep well for up to a week, though in my house they rarely last that long!
Freezing
Freezing these bars is straightforward. Just make sure they’re completely set before coating and storing. I learned the hard way that dipping too soon can cause the pops to soften too much and lose their shape.
Reheating
This isn’t a recipe you reheat per se, but letting your Chocolate Peanut Butter Cottage Cheese Ice Cream Bars sit at room temperature for 5-10 minutes before eating really brings out that creamy texture so it’s worth the wait!
FAQs
-
Can I use regular cream cheese instead of cottage cheese?
You could try cream cheese, but the texture and protein content will be quite different. Cottage cheese adds a lighter tang and silkiness that cream cheese doesn’t provide, so your bars may turn out denser or less creamy.
-
What if I don’t have silicone molds?
Any popsicle mold will work, but silicone molds make it much easier to pop out the frozen bars without breaking. If not silicone, try lightly greasing plastic molds before pouring.
-
Can I make these bars vegan?
Since cottage cheese is dairy, this recipe isn’t vegan as is. However, you could experiment with non-dairy yogurts or silken tofu for creaminess, though the texture and flavor will differ from the original.
-
How long do these bars keep in the freezer?
They’re best eaten within a week for optimal texture and flavor. Over time, ice crystals can form and make them icy, so I recommend enjoying them sooner rather than later.
-
Why is my chocolate coating not hardening?
If the chocolate isn’t setting, it might be due to too much coconut oil or the room temperature being warm. Try chilling your bars first and use just enough coconut oil to melt the chocolate smoothly without thinning it too much.
Final Thoughts
I remember the first time I made this Chocolate Peanut Butter Cottage Cheese Ice Cream Bars Recipe—I wasn’t sure how cottage cheese would work in an ice cream, but it blew me away with its creamy texture and balanced flavor. It quickly became a favorite for hot days when I want something sweet but nourishing. Give it a try—you’ll be surprised at how easy it is and how your whole family will absolutely go crazy for these bars. Trust me, once you make them, you’ll be coming back for more every summer!
Print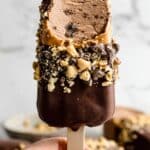
Chocolate Peanut Butter Cottage Cheese Ice Cream Bars Recipe
- Prep Time: 10 minutes
- Cook Time: 0 minutes
- Total Time: 4 hours 10 minutes
- Yield: 4 bars
- Category: Dessert
- Method: No-Cook
- Cuisine: American
- Diet: Low Salt
Description
Delicious and creamy Chocolate Peanut Butter Cottage Cheese Ice Cream Bars made with smooth cottage cheese blended with cocoa, peanut butter, and maple syrup. These no-churn frozen treats are dipped in a rich chocolate coating and topped with crunchy peanuts and chocolate sprinkles for an indulgent yet protein-packed dessert.
Ingredients
Main Ingredients
- 1-1/4 cup cottage cheese (any variety)
- 2 tablespoons maple syrup (or honey)
- 1 teaspoon vanilla
- dash salt
- 1 tablespoon natural peanut butter
- 1 tablespoon cocoa powder
Toppings & Coating
- 2 tablespoons peanuts (chopped)
- 1 tablespoon chocolate sprinkles
- 1/2 cup chocolate chips (Hu No Added Sugar recommended)
- 1 tablespoon coconut oil (for melting with chocolate chips)
Instructions
- Blend the Ice Cream Base: Combine the cottage cheese, cocoa powder, maple syrup, vanilla extract, and a dash of salt in a blender or food processor. Blend until completely smooth and creamy, ensuring there are no lumps.
- Pour and Freeze: Pour the blended mixture into silicone popsicle molds. Insert popsicle sticks and cover with the mold’s silicone lid. Freeze for 3-4 hours, or until fully set and firm to the touch.
- Melt the Chocolate Coating: In a microwave-safe bowl, combine the chocolate chips and coconut oil. Heat in 30-second increments, stirring gently between each until the mixture is smooth and fully melted.
- Dip and Decorate: Remove the frozen popsicles from the molds. Quickly dip each popsicle into the melted chocolate, shaking off excess. Immediately roll or sprinkle the popsicles in chopped peanuts and chocolate sprinkles to coat before the chocolate hardens.
- Set and Serve: Place the decorated popsicles on parchment paper to allow the chocolate coating to set. Enjoy immediately or return to the freezer for later. For a softer, creamier texture, allow to thaw for 5-10 minutes before eating.
Notes
- No ice cream maker required—just blend, freeze, dip, and enjoy.
- Silicone popsicle molds are recommended for easier removal of popsicles.
- These bars can become icy if frozen too long; thaw briefly before serving for best texture.
- Use natural peanut butter to keep the flavor rich and wholesome.
- Hu No Sugar Added Chocolate Chips are recommended for a healthier chocolate coating option.
Nutrition
- Serving Size: 1 bar
- Calories: 300
- Sugar: 18 g
- Sodium: 209 mg
- Fat: 16 g
- Saturated Fat: 8 g
- Unsaturated Fat: 3 g
- Trans Fat: 0 g
- Carbohydrates: 13 g
- Fiber: 5 g
- Protein: 11 g
- Cholesterol: 11 mg


