
If you’re craving a chocolate experience that’s a little out of the ordinary, you’re going to love this Homemade Dubai Chocolate Bar with Pistachio Recipe. It’s got this amazing crunch from kataifi, creamy pistachio goodness, and that smooth milk chocolate finish—seriously, it’s the kind of treat that makes you want to savor every bite. Trust me, once you try making it at home, you’ll see why it’s become such a sensation. Ready to impress your taste buds? Let’s dive in!
Why You’ll Love This Recipe
- Unique Texture: The kataifi adds a delicate crunch that contrasts beautifully with the creamy pistachio filling.
- Easy to Make at Home: Even if you’ve never worked with kataifi or pistachio paste, this recipe guides you step-by-step.
- Showstopper Presentation: The little pop of green-white chocolate drizzle gives it a refined, festive look.
- Perfect for Sharing: It’s rich and indulgent, making it a great choice to impress at gatherings.

Ingredients You’ll Need
Each ingredient in this Homemade Dubai Chocolate Bar with Pistachio Recipe plays a special role to bring that luxurious, layered flavor and texture we all crave. Most are pantry staples or easy-to-find specialty items. Grab good quality milk and white chocolate for the best melt and flavor!

- Kataifi dough: This shredded phyllo dough gives the bar a crisp, flaky texture—make sure it’s fresh or frozen, but thawed before use.
- Butter: Adds richness and helps toast the kataifi evenly without burning.
- Pistachio paste: Look for pure pistachio paste (no added sugars) for a natural, nutty flavor.
- Tahini: Balances the sweetness with a subtle sesame undertone—trust me, it elevates the pistachio mix.
- Milk chocolate: Choose one with at least 30% cocoa for smoothness and depth.
- White chocolate: Used for that pretty green drizzle—is also a great place for color customization if you want to get creative.
- Food coloring (green): Just three drops are enough to tint the white chocolate without overpowering taste.
Variations
I like to tweak this Homemade Dubai Chocolate Bar with Pistachio Recipe based on the season or occasion. It invites creativity, so don’t be shy about trying little changes that suit your taste buds or dietary needs.
- Nut substitution: Sometimes I swap pistachio paste for almond or hazelnut paste to change the flavor profile—it’s just as delicious and gives a new twist.
- Dark chocolate: For a richer taste, use dark chocolate instead of milk—it pairs wonderfully with the nutty filling if you prefer less sweetness.
- Vegan adaptation: Use dairy-free butter and vegan chocolate, and tahini keeps the recipe plant-based without losing that creamy texture.
- Flavor additions: Adding a pinch of cardamom or orange zest to the pistachio mixture is a trick I discovered that adds an exotic kick.
How to Make Homemade Dubai Chocolate Bar with Pistachio Recipe
Step 1: Toasting the Kataifi
Start by roughly chopping the kataifi dough—this makes it easier to handle and helps it toast evenly. Melt the butter in a nonstick skillet over medium-low heat to ensure it doesn’t burn. Add the chopped kataifi and stir occasionally, letting it turn a beautiful golden brown—usually takes 5 to 10 minutes. This step is crucial because that toasted kataifi adds a crispy, toasty depth you won’t get otherwise. Once toasted, remove from heat and transfer to a bowl to cool.
Step 2: Mixing the Pistachio Filling
In a large bowl, combine your toasted kataifi with the pistachio paste and tahini. Mix gently but thoroughly until everything is incorporated. The tahini smooths out the pistachio paste and blends beautifully with the kataifi’s crunch. Before you move on, set this mix aside—we’ll use it shortly inside the chocolate shell.
Step 3: Preparing the Chocolate Layers
I strongly recommend using a double boiler to melt your milk and white chocolates; it prevents scorching and gives you that silky smooth finish. Melt the milk chocolate first in one bowl and the white chocolate in another. When the white chocolate is completely melted, add your green food coloring drops and mix it in until it’s evenly tinted. This colored drizzle is what makes the bar look so gorgeous and special!
Step 4: Assembling the Bar
Drizzle the tinted white chocolate on the inside of your chocolate bar mold; think of this as your artist’s canvas. Then pour just enough milk chocolate to cover the bottom layer comfortably. Pop the mold into the freezer for about 10 minutes to let this first chocolate layer set solid—it helps keep the filling perfectly encapsulated.
Step 5: Filling and Sealing
Once the chocolate base is firm, spoon in the pistachio and kataifi mixture next. Use a palette knife or the back of a spoon to flatten it gently and make sure the filling touches the edges, so it’s sealed well. Pour over a gentle top layer of milk chocolate to enclose the filling, then return it to the freezer for another 10 minutes or until fully set. When it’s time to unmold, do it carefully—your homemade Dubai chocolate bar is ready to impress!
Pro Tips for Making Homemade Dubai Chocolate Bar with Pistachio Recipe
- Toast Kataifi Slowly: Take your time to toast it on medium-low heat so it crisps up without burning—watch closely near the end!
- Use a Silicone Mold: It makes unmolding so much easier and protects the bar’s delicate layers.
- Chill Between Layers: Freezing after each chocolate layer prevents fillings from mixing and keeps the bar neat and defined.
- Avoid Overmixing Filling: Keep the kataifi strands intact while stirring gently to retain that wonderful crunchy texture.
How to Serve Homemade Dubai Chocolate Bar with Pistachio Recipe

Garnishes
I usually sprinkle crushed pistachios on top of the bar before the final freeze for an extra pop of color and crunch. Sometimes, a light dusting of edible gold powder makes it look super festive and elegant—perfect for gift-giving or special occasions!
Side Dishes
This chocolate bar pairs beautifully with a warm cup of Arabic coffee or a fresh mint tea. I love combining it with light fruit salads or fresh berries to balance the richness when serving to friends.
Creative Ways to Present
I once made a dessert platter featuring this bar sliced into small squares, arranged in a spiral with pistachio dust and rose petals on the side—friends couldn’t stop talking about it! Little touches like edible flowers or pairing it with small bowls of nuts add charming flair.
Make Ahead and Storage
Storing Leftovers
Because of the chocolate, I store leftovers in an airtight container in the fridge to keep everything firm and fresh. It holds up well for about a week, but honestly, it rarely lasts that long around here.
Freezing
You can freeze extra bars wrapped tightly in parchment and foil, then placed in a sealed bag. Thaw in the fridge overnight before serving for the best texture—this is a great way to prep ahead if you’re making for a party.
Reheating
I usually enjoy this bar at room temperature or chilled. If you want to soften it a bit, leave it out for 15 minutes; avoid microwave reheating since it can cause the chocolate to bloom or lose its structure.
FAQs
-
Can I substitute the kataifi dough with something else?
While kataifi dough is key for that signature crispy, flaky texture, you could experiment with finely shredded phyllo sheets or even toasted shredded coconut for a completely different but tasty crunch. Just keep in mind, the authentic texture and flavor come from kataifi.
-
Is pistachio paste hard to find?
Pistachio paste is usually available in specialty grocery stores or online. If you can’t find it, you can make your own by blending shelled, unsalted pistachios with a little neutral oil to form a smooth paste.
-
What’s the best way to melt chocolate without ruining it?
I recommend using a double boiler or a heat-safe bowl over simmering water. Stir frequently and remove from heat as soon as the chocolate is mostly melted to avoid burning. You can always stir to finish melting with residual heat.
-
How long does the Homemade Dubai Chocolate Bar with Pistachio Recipe last?
Stored properly in the fridge, it stays fresh for up to 7 days. Freezing extends the shelf life to a month or more, making it a great make-ahead treat.
Final Thoughts
I absolutely love how this Homemade Dubai Chocolate Bar with Pistachio Recipe combines textures and flavors—once I made it, I couldn’t stop sharing it! There’s something magical about that crunchy kataifi paired with buttery pistachio richness inside a silky chocolate shell. Whether you’re treating yourself or impressing guests, this little project in your kitchen is totally worth the effort. Go ahead, give it a try—you’re going to be so proud when you take that first bite.
Print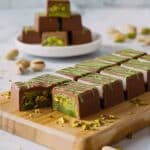
Homemade Dubai Chocolate Bar with Pistachio Recipe
- Prep Time: 25 minutes
- Cook Time: 5 minutes
- Total Time: 30 minutes
- Yield: 1 large Dubai Chocolate Bar
- Category: Dessert
- Method: Stovetop
- Cuisine: Middle Eastern
Description
This homemade Dubai Chocolate Bar, inspired by the viral dessert “Can’t Get Knafeh of It,” features a luxurious combination of crispy kataifi dough, buttery pistachio paste, tahini, and creamy milk and white chocolates. Layered and set in a mold, this indulgent treat delivers delightful textures and rich Middle Eastern flavors in every bite. Perfect for dessert lovers looking to recreate a unique and impressive chocolate bar at home.
Ingredients
Kataifi Mixture
- 2 cups kataifi
- 1 tablespoon butter
- 1 cup pistachio paste
- 2 tablespoons tahini
Chocolate Coating
- 2 cups milk chocolate
- ⅓ cup white chocolate
- 3 drops green food coloring
Instructions
- Prepare Kataifi: Roughly chop the kataifi dough to ensure even toasting and texture in the bar.
- Toast Kataifi: Melt butter in a nonstick skillet over medium-low heat, coating the pan evenly. Add the chopped kataifi threads and stir occasionally for 5-10 minutes until the kataifi turns golden brown and crispy. Remove from heat and set aside.
- Mix Filling: In a large bowl, combine the toasted kataifi with the pistachio paste and tahini. Mix well until fully integrated and set aside while melting the chocolates.
- Melt Chocolates: Melt the milk chocolate and white chocolate separately, preferably using a double boiler to avoid burning. Ensure both are smooth and fully melted.
- Color White Chocolate: Add 3 drops of green food coloring to the melted white chocolate and stir thoroughly to get an even green tint.
- Layer Chocolate in Mold: Drizzle the colored white chocolate inside the chocolate bar mold. Pour enough melted milk chocolate to cover the bottom of the mold comfortably. Place in the freezer for 10 minutes to set this base layer.
- Add Filling: Spoon the pistachio and kataifi mixture onto the set chocolate base in the mold. Use a palette knife to flatten the filling evenly and press it against the sides of the mold to create a uniform layer.
- Top with Chocolate: Gently pour a final layer of melted milk chocolate over the filling to seal the bar. Make sure to cover the filling completely and evenly.
- Set the Bar: Place the mold back in the freezer for at least 10 minutes, or until the chocolate is fully hardened and set.
- Unmold and Serve: Carefully remove the chocolate bar from the mold once fully set and enjoy this rich, textured dessert.
Notes
- Learn how to make the viral Dubai Chocolate Bar at home with this simple recipe.
- The combination of crispy kataifi and smooth pistachio cream inside rich chocolate offers a delightful texture contrast.
- Use a double boiler to melt chocolate gently and avoid burning.
- Freezing time is essential for the layers to set properly before unmolding.
- Green food coloring in the white chocolate adds an appealing traditional touch reminiscent of pistachio.
Nutrition
- Serving Size: 1/4 of a large bar
- Calories: 812
- Sugar: 54.2 g
- Sodium: 152.3 mg
- Fat: 51.1 g
- Saturated Fat: 22.7 g
- Unsaturated Fat: 28.4 g
- Trans Fat: 0 g
- Carbohydrates: 76.2 g
- Fiber: 6.9 g
- Protein: 15.8 g
- Cholesterol: 29.9 mg


