If you’re craving fresh, homemade bread but don’t want to wrestle with complicated kneading or fancy equipment, this Easy No-Knead Focaccia Bread Recipe is going to be your new best friend. I absolutely love how this focaccia turns out—airy, pillowy, and topped with golden, crispy edges that just beg to be dipped in olive oil. It’s surprisingly simple, forgiving for beginners, and perfect for making ahead. Stick with me, and I’ll share everything you need to nail it every single time.
Why You’ll Love This Recipe
- No Kneading Required: Saves you time and effort without sacrificing texture or flavor.
- Make-Ahead Friendly: The dough chills overnight, developing incredible flavor and ease of prep.
- Minimal Ingredients: Uses pantry staples, making it simple and budget-friendly.
- Deliciously Versatile: Fantastic on its own, with toppings, or as a sandwich base.

Ingredients You’ll Need
The beauty of this Easy No-Knead Focaccia Bread Recipe is in its simplicity. Each ingredient plays a crucial role, but don’t worry—most of these are probably already in your kitchen. Choosing the right flour and salt can make a noticeable difference, so I’ll share some tips on picking the best.

- All-purpose or bread flour: Bread flour gives a bit more chew and structure, especially in humid climates, but all-purpose works wonderfully too.
- Kosher salt: I prefer Diamond Crystal for its light, flaky texture; it flavors the dough perfectly without overwhelming.
- Instant yeast: I love SAF instant yeast for consistent rise and keeping it in the fridge extends its shelf life.
- Lukewarm water: Combining hot and cold water hits the perfect temp to activate the yeast without killing it.
- Olive oil: For moisture, texture, and flavor; plus it keeps the dough from drying out in the fridge.
- Butter or nonstick spray: For greasing pans—this little extra step means no sticky mess when you go to remove your focaccia.
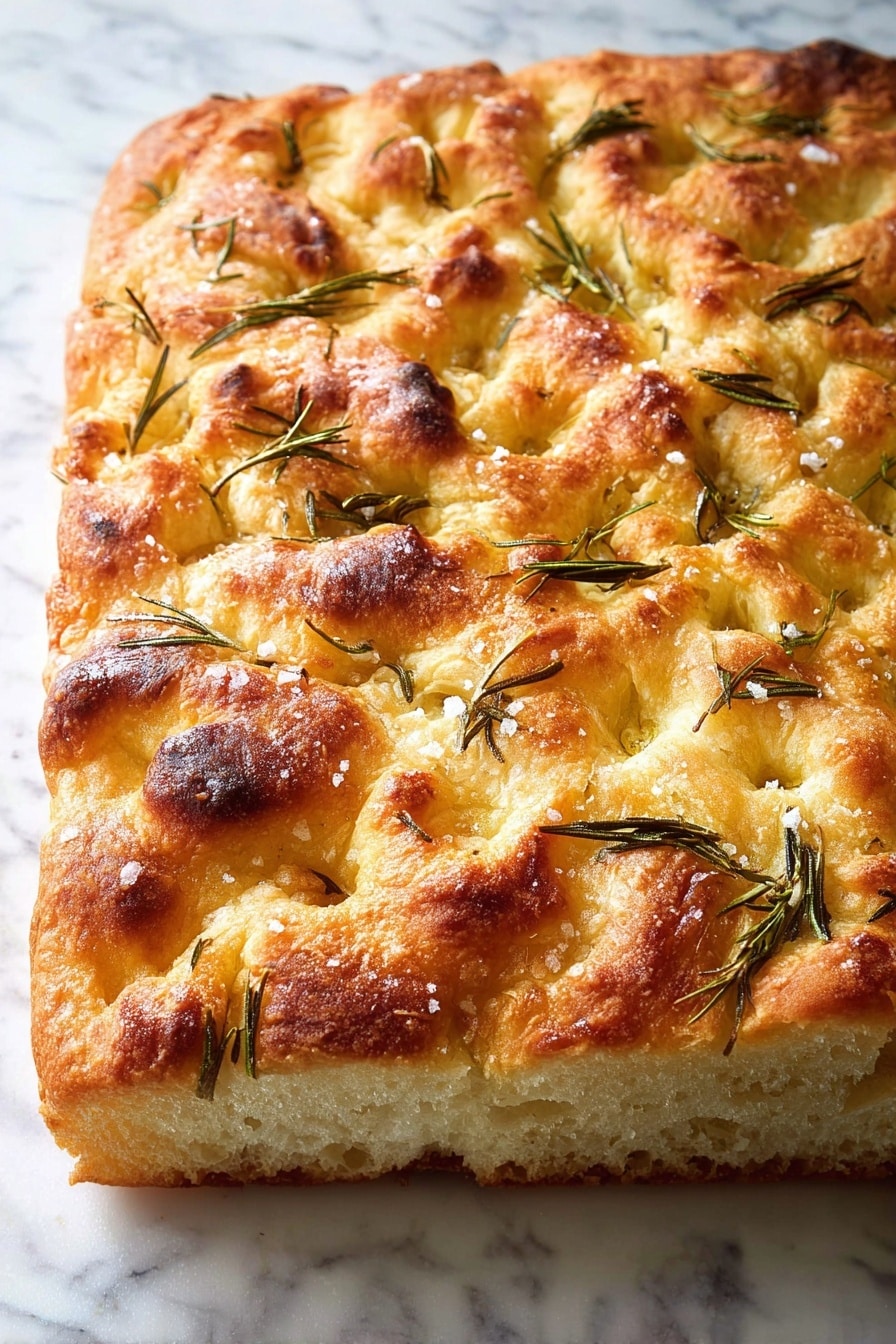
- Flaky sea salt: Sprinkled on top before baking, it gives a delightful crunch and bursts of salty flavor.
- Fresh rosemary leaves (optional): Adds an earthy, aromatic touch that pairs beautifully with olive oil and salt.
Variations
I love making this recipe my own by changing up toppings or adding different herbs, and I encourage you to experiment too! It’s such a blank canvas that you can easily make it savory, spicy, or even herby sweet, depending on your mood.
- Herbed focaccia: Adding fresh rosemary or thyme right before baking always wins at my house — the aroma fills the kitchen and guests can’t get enough.
- Olive and garlic: Press sliced olives and thin slivers of garlic into the dough before baking for a classic Italian twist.
- Cheese-topped: Sprinkle grated Parmesan or shredded mozzarella for a gooey, savory layer that melts beautifully.
- Seasonal veggies: Thin slices of cherry tomatoes, red onion, or zucchini work wonderfully and add color and flavor.
How to Make Easy No-Knead Focaccia Bread Recipe
Step 1: Mix and Rest the Dough
Start by whisking your flour, kosher salt, and instant yeast together in a large bowl. Then add your lukewarm water and stir everything with a rubber spatula until it forms a wet, sticky dough ball. This part is so satisfying—you’ll see it come together quickly without any fuss. Cover and let it rest for 30 minutes. If you have time, this is when I like to do a round of gentle stretching and folding to build bubbles; it’s optional but really worth it for texture. Just wet your hand, grab the dough edges, stretch towards the center, and repeat around the bowl.
Step 2: Oil and Refrigerate Overnight
After the initial rest, rub the dough’s surface generously with olive oil. This is important because the dough will sit in the fridge for at least 12 hours—sometimes up to three days. The oil keeps it from drying out and helps build that tender crust we all love. Transfer the bowl to your fridge and let the magic happen overnight. I promise, this slow rise develops incredible flavor and a pillowy crumb you just can’t get with quick breads.
Step 3: Shape and Second Rise
When you’re ready to bake, grease your pans well—either two 8- or 9-inch pie plates or one larger 9×13 pan—and drizzle olive oil into them. Turn the chilled dough out onto the pan, and gently press and stretch to fill the pan. Using oiled fingertips, create deep dimples across the dough—this is the signature look of focaccia and helps trap those flavorful olive oil pockets. If you want, sprinkle rosemary and flaky sea salt on top now. Let the dough rest at room temperature for 3 to 4 hours to puff up again. This step can feel like a test of patience, but it’s so worth waiting for!
Step 4: Bake to Golden Perfection
Preheat your oven to 425°F and pop the dough in for 25 to 30 minutes. Once golden and crisp on the bottom and edges, it’s ready! Transfer the focaccia to a cooling rack and let it rest a bit—this helps the crumb set and the crust remain crisp when cooled. Resist the urge to dive in immediately; you’ll enjoy it a lot more once it’s had a chance to breathe.
Pro Tips for Making Easy No-Knead Focaccia Bread Recipe
- Don’t Skip the Oil: I learned the hard way that rubbing olive oil over the dough before refrigerating prevents drying and tough crusts.
- Patience Matters: Giving your dough those long, slow rises makes all the difference in achieving airy texture.
- Use Wet Hands When Dimpling: This stops the dough from sticking and lets your fingers sink deep to create classic focaccia pockets.
- Adjust Salt to Taste: If you’re sensitive to sodium, stick to 10 grams of salt, but don’t skip the flaky sea salt topping—it adds an essential crunch.
How to Serve Easy No-Knead Focaccia Bread Recipe

Garnishes
I’m a simple girl when it comes to garnishes: a generous sprinkle of flaky sea salt and fresh rosemary is usually all I need. Sometimes, just a drizzle of high-quality olive oil right out of the oven elevates it to pure bliss. If I’m feeling fancy, I add a squeeze of lemon zest or cracked black pepper for a little kick.
Side Dishes
This focaccia steals the show, but I love pairing it with comforting sides like a rich tomato basil soup, a bright arugula salad tossed in lemon vinaigrette, or alongside Italian dishes like pasta or charcuterie boards. It’s perfect for dipping, stacking, or munching solo.
Creative Ways to Present
For special occasions, I’ve baked this focaccia in a large sheet pan then cut it into small squares, perfect for parties or grazing boards. Drizzling balsamic glaze over individual squares adds a sophisticated touch. Playing with colorful toppings like heirloom tomatoes or roasted garlic makes the presentation pop and impresses guests every time.
Make Ahead and Storage
Storing Leftovers
I usually wrap leftover focaccia tightly in plastic wrap or store it in an airtight container at room temperature. It stays fresh for about three days, perfect for quick snacks or sandwiches, but trust me—it barely lasts that long!
Freezing
If you want to prep ahead or save extra, I slice the focaccia and freeze it in a sealed bag, layering parchment paper between slices. It freezes beautifully for up to three months without losing its texture.
Reheating
To revive the crust and warm the inside, I pop leftovers in a 350°F oven for about 15 minutes. This method keeps it crispy outside and soft inside—way better than microwaving, which makes it chewy.
FAQs
-
Can I use active dry yeast instead of instant yeast?
Yes! Just sprinkle the active dry yeast over the lukewarm water and let it sit for about 15 minutes until it becomes foamy. Then proceed with the recipe. This step is key to waking up the yeast and ensuring a good rise.
-
Do I have to refrigerate the dough overnight?
While the slow, cold fermentation really amps up flavor and texture, you can make this focaccia from start to finish in about 3 hours if you’re short on time. Just let the dough rise at room temperature until doubled, then proceed with shaping and the second rise.
-
What’s the best pan to use for focaccia?
I’ve had great results with two 9-inch pie plates (butter and olive oil greased) for a thinner focaccia, or a 9×13 pan for a thicker, cozier loaf. Just make sure to grease well to prevent sticking.
-
How do I know when the focaccia is done baking?
You’re looking for a golden-brown top and bottom with crispy edges. The underside should feel firm and slightly crunchy. Then let it cool for at least 10 minutes—it finishes setting up and tastes best at that point.
Final Thoughts
This Easy No-Knead Focaccia Bread Recipe has become a staple in my kitchen because it’s so approachable and rewarding. It’s that perfect balance of simple ingredients and technique, resulting in a bread that’s fluffy, flavorful, and just a little bit magical. I can’t recommend it enough—whether you’re a beginner or simply want a foolproof focaccia to impress friends. So go ahead, make this recipe your own, and enjoy the warm, comforting taste of homemade bread with almost no effort.
Print
Easy No-Knead Focaccia Bread Recipe
- Prep Time: 18 hr
- Cook Time: 30 min
- Total Time: 18 hr 30 min
- Yield: 2 loaves (approximately 8 to 10 servings each)
- Category: Bread
- Method: Baking
- Cuisine: Italian
Description
This Best, Easiest Focaccia Bread Recipe yields a pillowy, airy, and flavorful Italian classic perfect for sandwiches or as a side. Made with simple ingredients like flour, yeast, salt, water, and olive oil, this recipe features a long cold fermentation for enhanced texture and taste, and is topped with fragrant rosemary and flaky sea salt before baking to golden perfection.
Ingredients
Dough
- 4 cups (512 g) all-purpose flour or bread flour
- 2 to 3 teaspoons (10 to 15 grams) kosher salt
- 2 teaspoons (8 g) instant yeast
- 2 cups (455 g) lukewarm water (made by combining 1/2 cup boiling water with 1 1/2 cups cold water)
To Prepare the Pan
- Butter for greasing
- 4 tablespoons olive oil, divided
Topping
- Flaky sea salt, such as Maldon
- 1 to 2 teaspoons whole rosemary leaves, optional
Instructions
- Mix Ingredients and Form Dough: In a large bowl, whisk together flour, salt, and instant yeast. Add lukewarm water. Using a rubber spatula, mix until liquid is absorbed and ingredients form a sticky dough ball.
- Rest and Stretch & Fold: Cover the bowl and let dough rest for 30 minutes. Then, with a wet hand, stretch and fold the dough 8 to 10 times around the edges to develop gluten, transforming it from sticky to smooth and cohesive.
- Oil and Refrigerate Dough: Lightly rub the surface of the dough with olive oil. Cover the bowl with a lid or plastic wrap and refrigerate immediately for at least 12 hours, ideally 18 to 24 hours, or up to 3 days to develop flavor and texture.
- Prepare Baking Pans: Line two 8- or 9-inch pie plates or a 9×13-inch pan with parchment or grease them with butter or nonstick spray. Pour a tablespoon of olive oil into each pan (or 2 tablespoons for the larger pan).
- Deflate and Portion Dough: Using two forks, deflate the dough by pulling it toward the center and turning the bowl in quarter turns. Divide dough into two equal pieces for smaller pans or keep whole for the larger pan. Roll each piece in oil-coated hands to form rough balls.
- Second Rise at Room Temperature: Place dough balls into prepared pans and let rest uncovered for 3 to 4 hours until risen and airy.
- Preheat Oven and Prepare Dough: Set oven rack in middle and preheat to 425°F (218°C). Optionally sprinkle rosemary leaves over dough. Pour a tablespoon or two of olive oil over dough, rub hands with oil, and using all fingers, press straight down to create deep dimples. Gently stretch dough as needed to fill the pans.
- Add Toppings: Sprinkle flaky sea salt evenly across the surface of the dough.
- Bake Focaccia: Transfer pans to the oven and bake for 25 to 30 minutes until the underside is golden brown and crisp.
- Cool and Store: Remove focaccia from pans to a cooling rack and cool for 10 minutes before serving or slicing. Once completely cooled, store in an airtight container at room temperature up to 3 days or freeze up to 3 months. Reheat at 350ºF (177ºC) for 15 minutes to restore the crust.
Notes
- Cold, refrigerated dough improves the focaccia’s texture—aim for 18 to 24 hours of fermentation for best results.
- If pressed for time, the dough can be fully made in about 3 hours by allowing a shorter room temperature rise.
- Various pans can be used: two 9-inch pie plates for thinner loaves, a 9×13-inch pan for a thicker focaccia, or a 13×18-inch rimmed sheet pan for very thin focaccia.
- Use a digital scale for accurate flour and water measurement.
- Adjust salt quantity based on preference; 10 grams for less salty, up to 15 grams for more pronounced flavor, keeping in mind additional sea salt topping.
- If using active dry yeast instead of instant yeast, proof the yeast in lukewarm water for 15 minutes before mixing.
- All-purpose or bread flour can be used. Bread flour is recommended in humid climates or for a chewier texture.
- Lightly oil the dough before refrigeration to prevent drying and crust formation on the surface.
- Reheating focaccia restores crust crispness—bake at 350ºF for 15 minutes before serving.
Nutrition
- Serving Size: 1 slice (approximately 85 g)
- Calories: 220 kcal
- Sugar: 0.3 g
- Sodium: 400 mg
- Fat: 7 g
- Saturated Fat: 1 g
- Unsaturated Fat: 6 g
- Trans Fat: 0 g
- Carbohydrates: 34 g
- Fiber: 2 g
- Protein: 6 g
- Cholesterol: 0 mg


