
If you love those cozy holiday flavors that warm your kitchen and heart, you’re going to adore this Gingerbread Thumbprint Cookies with White Chocolate Filling Recipe. I absolutely love how these cookies balance spicy gingerbread with a rich, creamy white chocolate filling—it’s like a little party in every bite! Whether you’re baking for the holidays or just craving something a bit special, this recipe will quickly become a favorite. Trust me: once you try making these, you’ll never look at thumbprint cookies the same way again.
Why You’ll Love This Recipe
- Perfect Spice Balance: The blend of ginger and cinnamon gives just the right warm kick without overpowering the sweetness.
- Gooey White Chocolate Filling: The creamy filling melts perfectly in the center, making each cookie so indulgent.
- Easy to Customize: You can tweak spices or swap out fillings, so it works for different tastes and occasions.
- Kid-Friendly and Crowd-Pleaser: My family goes crazy for these, and they’re a hit at parties—guaranteed smiles!

Ingredients You’ll Need
Each ingredient in this Gingerbread Thumbprint Cookies with White Chocolate Filling Recipe plays an important part in building that familiar gingerbread goodness combined with creamy white chocolate magic. I recommend fresh spices for the best aroma, and good quality white chocolate chips—they really make the filling shine.

- Unsalted Butter: Using softened butter helps create that tender, melt-in-your-mouth texture.
- Sugar (granulated and brown): The combination adds depth—brown sugar especially brings a subtle molasses flavor.
- Molasses: The heart of gingerbread flavor—don’t skip or substitute lightly, or the cookies won’t taste quite right.
- Egg: Binds the dough together and adds moisture.
- All-Purpose Flour: The sturdy base—make sure it’s measured properly for the right cookie consistency.
- Ground Ginger and Cinnamon: Key spices that define the recipe’s warm profile.
- Salt: Balances out sweetness and enhances flavors.
- Baking Soda: Helps the cookies rise just enough to stay soft, not cakey.
- Vanilla Extract: Adds a mellow, soothing note that rounds out the spices.
- White Chocolate Chips: Used both for the filling and a silky drizzle on top—go for good quality, it makes a difference.
- Milk: Softens the white chocolate mixture to the perfect smooth consistency for filling and drizzle.
Variations
I love how versatile this Gingerbread Thumbprint Cookies with White Chocolate Filling Recipe is, so don’t be shy about making it your own! Whether you want to spice things up more or swap out the filling, these tweaks make baking even more fun.
- Spice it Up: When I’m feeling adventurous, I add a pinch of cloves or nutmeg to the dough—deliciously aromatic.
- Dairy-Free Filling: I once swapped the white chocolate for a coconut-based white chocolate alternative and it worked great for a dairy-free version.
- Chocolate Twist: Adding a bit of dark cocoa powder to the dough makes a lovely gingerbread-chocolate mix.
- Festive Toppings: Sprinkling crushed peppermint or edible glitter on top adds a holiday sparkle that kids adore.
How to Make Gingerbread Thumbprint Cookies with White Chocolate Filling Recipe
Step 1: Mix Your Dry Ingredients
First, whisk together the flour, ground ginger, cinnamon, salt, and baking soda in a medium bowl. It’s super important to get these well combined, so every cookie has that perfect spice blend. I always set this bowl aside while I work on the wet ingredients.
Step 2: Cream Butter, Sugars, and Molasses
Grab your mixer and beat the softened butter with granulated and brown sugar for about 3 to 4 minutes until it’s light and fluffy. Then, beat in the molasses until it’s fully mixed—this part always excites me because the kitchen smells like gingerbread heaven already!
Step 3: Add Eggs and Vanilla
Next, beat in one egg and the vanilla extract. I like to scrape down the sides of my bowl with a spatula here to make sure everything blends evenly. This step adds moisture and richness, so don’t rush it.
Step 4: Incorporate Dry Ingredients and Chill Dough
With the mixer on low, gradually add your dry flour mixture to the wet ingredients. It looks stiff at first but that’s exactly what you want—a sturdy dough that won’t spread too much. Once combined, wrap the dough tightly in plastic wrap and pop it in the fridge for about an hour. I find chilling really helps with easier handling and better cookie shape.
Step 5: Shape the Cookies and Create Thumbprints
Preheat your oven to 350°F (175°C) and line a baking sheet with parchment paper. Using a cookie scoop or ice cream scoop, roll about a tablespoon of dough into balls and space them an inch apart on the sheet. Here’s a trick I learned: spray the bottom of a ½ teaspoon measuring spoon with non-stick spray before pressing it into the center of each ball to make the thumbprint indentation. Don’t press all the way through to the tray, just gently—if it sticks, you can use your knuckle instead. Then, sprinkle sugar over the tops for a little sparkle.
Step 6: Bake and Re-Indent the Centers
Bake the cookies for 8 to 10 minutes until edges are just set but cookies remain soft. Right after baking, while they’re still warm but not hot, press the centers again with your tablespoon measure to deepen the indentations for the filling. Let them cool completely before filling—this keeps the centers nicely shaped.
Step 7: Make the White Chocolate Filling
While the cookies cool, gently melt the white chocolate chips over low heat with milk, molasses, ground ginger, and cinnamon in a small saucepan. Stir constantly until smooth. If it starts to harden, just warm it again gently. The spices in the filling echo the dough beautifully—your kitchen will smell amazing!
Step 8: Fill the Cookies and Bake Again
Spoon about two teaspoons of that luscious white chocolate mixture into each cookie’s indentation. Pop them back in the oven for around 10 minutes to set the filling. It’s tempting to sample one right now, but the wait is so worth it!
Step 9: Drizzle with More White Chocolate
Once baked and cooled a bit, melt the remaining white chocolate chips and milk to make a smooth drizzle. Carefully spoon it over the cookies to give that finishing glossy white chocolate touch. Let the whole batch cool completely before enjoying or storing.
Pro Tips for Making Gingerbread Thumbprint Cookies with White Chocolate Filling Recipe
- Chill That Dough: This is a game changer. Chilling helps the dough firm up, so your cookies won’t spread too much while baking.
- Non-Stick Trick: Spraying your measuring spoon before making thumbprints prevents dough from sticking and keeps the indentations clean.
- Gentle Heat for Chocolate: Always melt white chocolate slowly over low heat to avoid cracking or seizing—it’s delicate!
- Don’t Overfill: Too much filling can spill out and burn in the oven; stick to about 2 teaspoons per cookie.
How to Serve Gingerbread Thumbprint Cookies with White Chocolate Filling Recipe

Garnishes
I usually finish my cookies with a gentle dusting of powdered sugar or a sprinkle of crushed candied ginger on top for a subtle contrast in flavor and texture. Sometimes for the holidays, I’ll add a tiny piece of edible gold leaf or colored sprinkles just to jazz up the presentation for guests.
Side Dishes
These cookies pair beautifully with a cup of spiced tea, hot chocolate, or even a smooth latte. One of my favorite combos is serving them alongside some spiced mulled cider—it really brings out the ginger and cinnamon notes in the cookies.
Creative Ways to Present
For gift-giving or special occasions, I like to arrange these cookies in a decorative tin lined with parchment paper, adding a sprig of fresh rosemary or pine for that extra festive touch. You could also stack them with parchment sheets in between and tie with a pretty ribbon for a charming homemade gift. For parties, placing them on a beautiful platter surrounded by fresh cranberries really makes the presentation pop.
Make Ahead and Storage
Storing Leftovers
I usually keep leftover Gingerbread Thumbprint Cookies with White Chocolate Filling in an airtight container at room temperature, but to keep the white chocolate drizzle pristine, make sure they’re completely cooled first. They stay fresh and soft for about 3-4 days this way—perfect for indulging little by little.
Freezing
Freezing is totally doable! I freeze the baked and cooled cookies in a single layer on a sheet tray, then transfer them to a ziplock bag or freezer-safe container. When you’re ready, thaw them at room temperature. The filling stays creamy, and they taste almost as fresh as the day you baked them. I’ve found freezing before baking messes with the thumbprint shape, so I avoid that.
Reheating
If you want to warm them up, pop a couple of cookies in the microwave for about 10 seconds or in a low oven (300°F) for 3-4 minutes. Warming gently brings out the gooey white chocolate center without melting the drizzle too much. Just keep an eye so they don’t get too soft.
FAQs
-
Can I use dark chocolate instead of white chocolate for the filling?
Absolutely! Swapping in dark chocolate chips works well, though it will change the flavor profile to be less sweet and more bittersweet, which some people prefer. Just melt the dark chocolate the same way with the milk and spices.
-
Why is the dough chilled for an hour?
Chilling firms up the dough, which helps prevent the cookies from spreading too much during baking—and it intensifies the flavors. It also makes shaping and pressing the thumbprint easier!
-
Can I make these cookies gluten-free?
You can try using a 1-to-1 gluten-free flour blend, but be aware the texture might be a little different since gluten contributes to chewiness. Adding a bit of xanthan gum can help mimic that structure.
-
How do I prevent the white chocolate filling from hardening too fast?
Keep your filling warm over low heat while you spoon it into the cookies, reheating gently if needed. Also, adding a small amount of milk as the recipe suggests helps keep it smooth and pourable.
Final Thoughts
This Gingerbread Thumbprint Cookies with White Chocolate Filling Recipe has become my go-to when I want to impress friends without stress. It’s that perfect cozy treat that feels both homemade and special. Every time I bake this, the warm spicy aroma fills the air, and the gooey white chocolate center pulls everyone into the kitchen. I hope you enjoy baking—and more importantly, eating—these as much as I do. Go ahead, grab your apron, make a batch, and share that sweet gingerbread love!
Print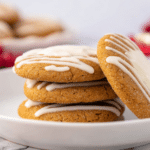
Gingerbread Thumbprint Cookies with White Chocolate Filling Recipe
- Prep Time: 15 minutes
- Cook Time: 10 minutes
- Total Time: 1 hour 25 minutes
- Yield: 24 cookies
- Category: Baking
- Method: Baking
- Cuisine: American
Description
These Gingerbread Thumbprint Cookies are a festive holiday treat combining the warm spices of ginger and cinnamon with a rich molasses-infused dough and a luscious white chocolate filling. Topped with a smooth white chocolate drizzle, these cookies offer a perfect blend of spicy and sweet flavors that are sure to delight your seasonal celebrations.
Ingredients
Cookie Dough
- 3/4 cup unsalted butter (softened to room temperature)
- 3/4 cup sugar
- 2 tablespoons light brown sugar
- 1/2 cup molasses
- 1 egg
- 3 cups all purpose flour
- 2 teaspoons ground ginger
- 1 teaspoon ground cinnamon
- 1/2 teaspoon salt
- 1 teaspoon baking soda
- 1 teaspoon vanilla extract
Cookie Tops
- 1/3 cup sugar
Filling
- 1 cup white chocolate chips
- 4 1/2 teaspoons milk
- 1 teaspoon molasses
- 1/8 teaspoon ground ginger
- 1/8 teaspoon ground cinnamon
Topping
- 1/3 cup white chocolate chips
- 2 teaspoons milk
Instructions
- Mix Dry Ingredients: In a medium-sized bowl, whisk together the all-purpose flour, ground ginger, ground cinnamon, salt, and baking soda. Set aside for use later.
- Beat Butter and Sugars: In another medium-sized bowl, use a hand mixer to beat the softened butter, sugar, and light brown sugar on medium speed for 3-4 minutes until light and fluffy.
- Add Wet Ingredients: Beat in the molasses until fully incorporated, then mix in the egg and vanilla extract. Use a spatula to scrape down the sides of the bowl and mix again to ensure even blending.
- Combine Mixtures: With the mixer on low speed, gradually add the dry flour mixture into the wet ingredients, mixing little by little until fully combined. Cover the dough with plastic wrap and refrigerate for about 1 hour to firm up.
- Prepare Oven and Baking Sheet: Preheat the oven to 350°F (175°C). Line a large baking sheet with parchment paper to prevent sticking.
- Shape Cookies: Using a cookie scoop or ice cream scoop, portion out about 1 tablespoon of dough each. Roll into balls and place on the prepared baking sheet about one inch apart.
- Create Indentations: Using a 1/2 teaspoon measuring spoon sprayed with non-stick spray, gently press into the center of each dough ball to create small dips, being careful not to press through to the baking sheet. If sticking occurs, a knuckle can be used to make the indentations.
- Add Sugar Coating and Bake: Sprinkle the 1/3 cup sugar over the tops and sides of each cookie dough ball. Bake in the preheated oven for 8-10 minutes.
- Re-Press Indentations: When the cookies come out of the oven, use a 1 tablespoon measuring cup to gently press into the center of each cookie again to maintain the thumbprint dips. Let them cool before filling.
- Make Filling: In a small saucepan over medium-low heat, melt 1 cup white chocolate chips with 4 1/2 teaspoons milk, 1 teaspoon molasses, 1/8 teaspoon ground ginger, and 1/8 teaspoon ground cinnamon. Stir continuously until smooth. If the chocolate thickens, reheat gently as needed.
- Fill Cookies: Spoon approximately 2 teaspoons of the warm white chocolate filling into the indentations of each cooled cookie. Allow the cookies with filling to cook/set for about 10 minutes.
- Make Topping: In another small saucepan over medium-low heat, melt 1/3 cup white chocolate chips with 2 teaspoons milk, stirring until smooth and melted.
- Drizzle Topping: Spoon and carefully drizzle the melted white chocolate topping over the filled cookies. Let the cookies cool completely before serving to allow the topping to set.
Notes
- These Gingerbread Thumbprint Cookies combine the warmth of classic Christmas spices with a sweet white chocolate filling, making them a festive holiday favorite.
- The dough needs chilling to make it easier to handle and to preserve the cookie shape during baking.
- Using non-stick spray on the measuring spoon helps prevent sticking while making the thumbprint indentations.
- Re-pressing the indentations after baking ensures they remain deep enough to hold the filling.
- If the white chocolate filling thickens too much while filling, gently reheat it to keep it pourable.
- Allow the topping to cool and set fully before serving for the best presentation and texture.
- These cookies store well in an airtight container for several days, perfect for holiday gifting.
Nutrition
- Serving Size: 1 cookie
- Calories: 226 kcal
- Sugar: 21 g
- Sodium: 110 mg
- Fat: 9 g
- Saturated Fat: 6 g
- Unsaturated Fat: 2.4 g
- Trans Fat: 0.2 g
- Carbohydrates: 34 g
- Fiber: 0.5 g
- Protein: 3 g
- Cholesterol: 24 mg


