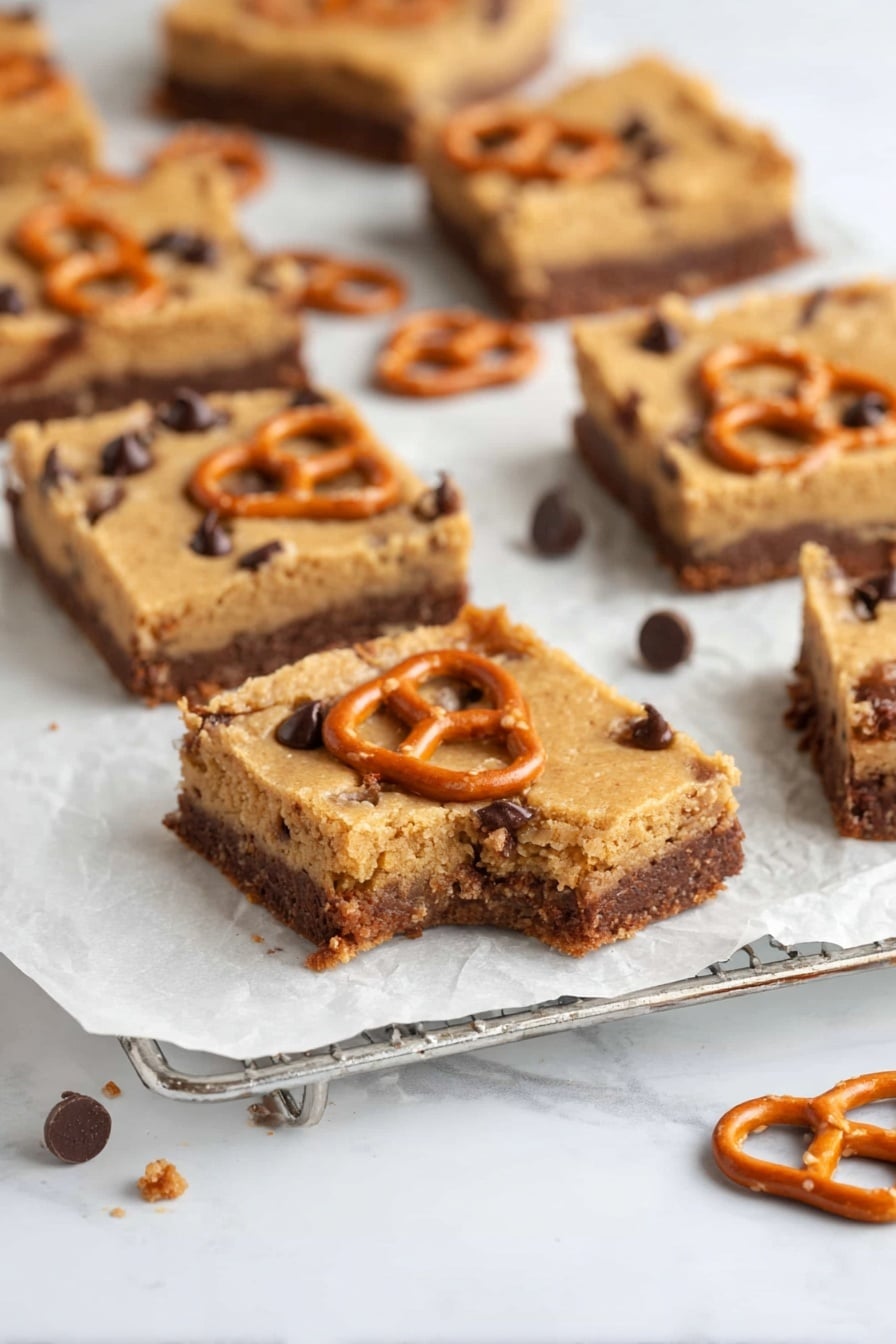
When I first discovered this Kitchen Sink Cookie Bars Recipe, it instantly became my go-to dessert for any gathering or cozy night in. What I love about this recipe is how it throws in a little bit of everything—chocolate, pretzels, caramel—all those delicious “extras” you’d find in your kitchen sink! If you enjoy a cookie bar that’s thick, gooey, and loaded with mix-ins, you’re going to adore this. Trust me, once you try it, you’ll see why these bars are an absolute crowd-pleaser.
Why You’ll Love This Recipe
- No-fuss mixing: You just stir everything by hand—no fancy equipment or complicated steps.
- Loaded with mix-ins: The crunchy pretzels, melty caramels, and two kinds of chocolate chips create a perfect balance of textures and flavors.
- Quick bake time: Ready in about 30 minutes, which makes it great for last-minute treats.
- Kid and adult approved: My family goes crazy for these bars, and they’re perfect for sharing at parties or as after-school snacks.

Ingredients You’ll Need
The magic of this Kitchen Sink Cookie Bars Recipe is in the ingredients that come together perfectly without fuss. The key is using real unsalted butter for the best flavor, and mixing in a variety of sweet and salty goodies that add that special “kitchen sink” fun.

- Unsalted butter: I always use real butter, and melt it gently; this adds richness and the right texture.
- Light brown sugar: Gives the bars moisture and a slight caramel flavor.
- Granulated sugar: Balances sweetness and helps create that slight crispness on top.
- Large egg + extra yolk: Makes the bars chewy and tender—don’t skip the extra yolk!
- Vanilla extract: Enhances the flavors and adds warmth.
- Baking soda and baking powder: Give just a little lift so the bars aren’t dense.
- Salt: Balances all the sweetness—especially important with all those mix-ins.
- All-purpose flour: The base—watch the dough’s consistency and add a bit more if it seems too wet.
- Semi-sweet chocolate chips: Classic chocolate flavor everyone loves.
- Milk chocolate chips: Adds a sweeter, creamier chocolate note.
- Pretzels: Broken pieces add a salty crunch that offsets the sweetness beautifully.
- Chewy caramels: I like Kraft or Werther’s brand for their perfect chew and melt-in-your-mouth gooeyness.
Variations
One of the best things about this Kitchen Sink Cookie Bars Recipe is how easy it is to make it your own. I love swapping in seasonal mix-ins or dietary tweaks, and it always turns out great—so don’t be shy about customizing!
- Holiday twist: I swap the milk chocolate chips for colorful M&M’s, then add a couple extra tablespoons of candy inside the dough for festive fun.
- Nutty version: Toss in chopped walnuts or pecans for an extra crunch; my family enjoys this variation especially at Thanksgiving.
- Gluten-free option: Use a cup of your favorite gluten-free flour blend instead of part or all of the all-purpose flour, just watch the dough moisture and adjust with a little extra flour if needed.
- Salted caramel: Drizzle some caramel sauce on top after baking and sprinkle flaky sea salt for a fancy dessert vibe without extra work.
How to Make Kitchen Sink Cookie Bars Recipe
Step 1: Melt the butter the right way
Start by melting the unsalted butter gently in the microwave for about 20-30 seconds. You want it just melted—not hot or bubbling—because too much heat will make your bars greasy or cook the eggs later on. Let it cool a bit if it’s steaming, then stir in your sugars by hand until everything is combined but not whipped.
Step 2: Mix in eggs and vanilla
Add the whole egg plus the extra yolk and vanilla extract straight into your butter and sugar mixture. I always mix this gently with a spatula—remember, no electric mixers—and watch the batter come together. It should be slightly glossy and smooth but not super runny.
Step 3: Add leavening, salt, and flour
Sprinkle in the baking soda, baking powder, and salt. Then add the all-purpose flour all at once. Stir slowly and carefully until the flour vanishes into the dough. If your dough feels too wet and runs off the spatula, don’t worry—adding an extra 1/4 cup of flour will help it firm up just right.
Step 4: Fold in the mix-ins
This is the fun part—toss in your semi-sweet and milk chocolate chips, broken pretzels, and chewy caramel pieces. Fold them evenly through the dough, making sure each bite will have a little bit of everything. If you want the bars to look extra festive, press a few extra pieces on top before baking.
Step 5: Bake to perfection
Transfer your dough to a greased or parchment-lined 9×13-inch metal pan, spreading it out until smooth. Pop it into your preheated oven at 350°F. Bake the bars for 16-18 minutes; keep an eye on them—they should be golden brown on the edges and top, with the center no longer looking wet but still soft and gooey. Some ovens might need a couple extra minutes.
Step 6: Cool and slice
Here’s something I learned the hard way: don’t try to cut into these bars while they’re warm! Let them cool completely in the pan on a wire rack. Once cooled, slice into 24 squares and get ready for some serious snacking joy.
Pro Tips for Making Kitchen Sink Cookie Bars Recipe
- Butter temperature matters: Melt your butter until just melted, never hot or bubbling to avoid greasy or weirdly textured bars.
- Mix by hand, not mixer: Stir gently with a spatula to keep the texture just right—overmixing makes bars tough.
- Watch your oven time: Every oven is different; check bars at 16 minutes and add time gradually for soft, chewy centers.
- Cool completely before slicing: Cutting warm bars can lead to crumbly or gooey messes—patience pays off!
How to Serve Kitchen Sink Cookie Bars Recipe

Garnishes
I love sprinkling a pinch of flaky sea salt on top of freshly cut bars—it elevates the sweet and salty mix brilliantly. Sometimes I add a drizzle of melted caramel or a quick dusting of powdered sugar if I’m feeling fancy.
Side Dishes
These bars are rich and filling on their own, but if you’re serving at a party, pairing them with a scoop of vanilla ice cream or a simple glass of cold milk really takes them over the edge.
Creative Ways to Present
For birthdays or holidays, I arrange these cookie bars on a pretty platter, then add some mini colorful candies or edible flowers around for a festive look. You can also cut them into fun shapes using cookie cutters if you want to get creative with presentation.
Make Ahead and Storage
Storing Leftovers
After cooling, I cover the pan tightly with plastic wrap or transfer the bars to an airtight container. They stay soft and fresh for about three days at room temperature, which is usually just enough time in my house before they vanish!
Freezing
If you want to prepare ahead or save some for later, these bars freeze beautifully. I wrap individual bars in parchment paper and then place them in a freezer-safe bag. They keep well for up to two months.
Reheating
To enjoy frozen bars later, I let them thaw at room temperature or reheat briefly in the microwave for about 15-20 seconds to get that soft, gooey texture back without drying them out.
FAQs
-
Can I use margarine instead of butter in this Kitchen Sink Cookie Bars Recipe?
For the best taste and texture, I highly recommend using unsalted real butter. Margarine tends to produce a greasier dough and less flavorful bars. Butter melts differently and provides the richness that’s key to these bars’ chewy and gooey perfection.
-
What can I do if my dough is too runny?
The dough should be thick but not dry. If it feels too loose or wet, I usually add an extra 1/4 cup of all-purpose flour until I reach the right consistency. You want it to hold its shape somewhat so the cookie bars bake evenly.
-
Can I substitute the mix-ins in the recipe?
Absolutely! The “kitchen sink” idea is really about using whatever you love or have on hand. You can swap pretzels for nuts, caramel for butterscotch chips, or add dried fruit. Just keep the total volume similar so the bars hold together well.
-
How do I know when the cookie bars are done?
Look for lightly golden edges and a set top that doesn’t jiggle like raw batter. The center should appear moist but not wet, usually 16-18 minutes, but ovens vary. It’s better to check early and add time if needed than to overbake and lose softness.
Final Thoughts
This Kitchen Sink Cookie Bars Recipe holds a special place in my heart because it’s the kind of treat that turns any moment into something memorable. I’m always amazed at how a simple mixing bowl and a handful of ingredients from the pantry can turn into gooey, chewy bars that everyone raves about. If you’re looking to impress your family or friends with a delightful, fuss-free dessert, I wholeheartedly recommend giving this recipe a try—you might just end up making it as often as I do!
Print
Kitchen Sink Cookie Bars Recipe
- Prep Time: 10 minutes
- Cook Time: 16-18 minutes
- Total Time: 30 minutes
- Yield: 24 squares
- Category: Dessert
- Method: Baking
- Cuisine: American
Description
These Kitchen Sink Cookie Bars are thick, soft, gooey, and chewy treats loaded with chocolate chips, pretzels, and caramel pieces. Made in one bowl with no mixers required, they bake up perfectly golden and are easy to make for a crowd-pleasing dessert.
Ingredients
Wet Ingredients
- ¾ cup unsalted butter (1 ½ sticks), melted
- 1 large egg + 1 egg yolk
- 2 teaspoons vanilla extract
Dry Ingredients
- ¾ cup light brown sugar
- ½ cup granulated sugar
- 1 teaspoon baking soda
- ¼ teaspoon baking powder
- ½ teaspoon salt
- 2 cups all-purpose flour (add 1/4 cup more if dough is too runny)
Mix-ins
- ½ cup semi-sweet chocolate chips
- ½ cup milk chocolate chips (or swap for M&M’s and add 2 tablespoons extra inside dough for holiday version)
- ½ cup broken pretzels
- ½ cup chewy caramels, chopped (e.g. Kraft or Werther’s Soft)
Instructions
- Preheat Oven: Preheat your oven to 350°F (175°C) to ensure it reaches the ideal baking temperature for perfect cookie bars.
- Melt Butter: In a medium microwave-safe bowl, melt ¾ cup unsalted butter for 20-30 seconds until just melted. Allow it to cool slightly to avoid cooking the eggs and to prevent greasy bars.
- Mix Sugars and Eggs: Stir in ¾ cup light brown sugar and ½ cup granulated sugar using a spatula, combining well without a mixer. Add 1 whole egg, 1 extra yolk, and 2 teaspoons vanilla extract. Mix until smooth and combined.
- Add Leavening and Salt: Stir in 1 teaspoon baking soda, ¼ teaspoon baking powder, and ½ teaspoon salt evenly throughout the mixture.
- Incorporate Flour: Add 2 cups all-purpose flour and mix just until no flour remains visible, forming a thick cookie dough. If the dough is too runny, add an extra 1/4 cup flour to achieve proper consistency.
- Add Mix-ins: Fold in ½ cup semi-sweet chocolate chips, ½ cup milk chocolate chips, ½ cup broken pretzels, and ½ cup chopped caramel pieces, distributing them evenly throughout the dough.
- Prepare Pan and Press Dough: Grease or line a 9×13-inch metal baking pan with parchment paper. Press the dough evenly into the pan, smoothing the surface. Optionally, sprinkle a few extra mix-ins on top for a decorative finish.
- Bake: Place the pan in the preheated oven and bake for 16-18 minutes, or up to 20 minutes depending on your oven, until the edges and top are lightly golden and the center no longer looks wet.
- Cool and Slice: Remove from oven and set the pan on a cooling rack. Let cookie bars cool completely before slicing into 24 squares to allow them to set perfectly.
- Storage: Store cookie bars covered with plastic wrap or in an airtight container for up to 3 days to keep fresh. For longer storage, see freezing tips in notes.
Notes
- These cookie bars are thick, soft, gooey, and chewy, making them ideal for sharing with a crowd.
- All mixing is done by hand in one bowl with a spatula—no electric mixers needed.
- If dough is too runny, add an extra 1/4 cup all-purpose flour to achieve proper consistency.
- For a holiday twist, swap the milk chocolate chips for M&M’s and add 2 tablespoons inside the dough.
- Cookie bars keep well for up to 3 days at room temperature when stored airtight; they might dry out after that.
- For freezing, wrap the bars tightly in plastic wrap and then foil. Freeze for up to 3 months. Thaw at room temperature before serving.
Nutrition
- Serving Size: 1 square
- Calories: 200 kcal
- Sugar: 18 g
- Sodium: 180 mg
- Fat: 9 g
- Saturated Fat: 5 g
- Unsaturated Fat: 3 g
- Trans Fat: 0.2 g
- Carbohydrates: 29 g
- Fiber: 1 g
- Protein: 2 g
- Cholesterol: 23 mg


