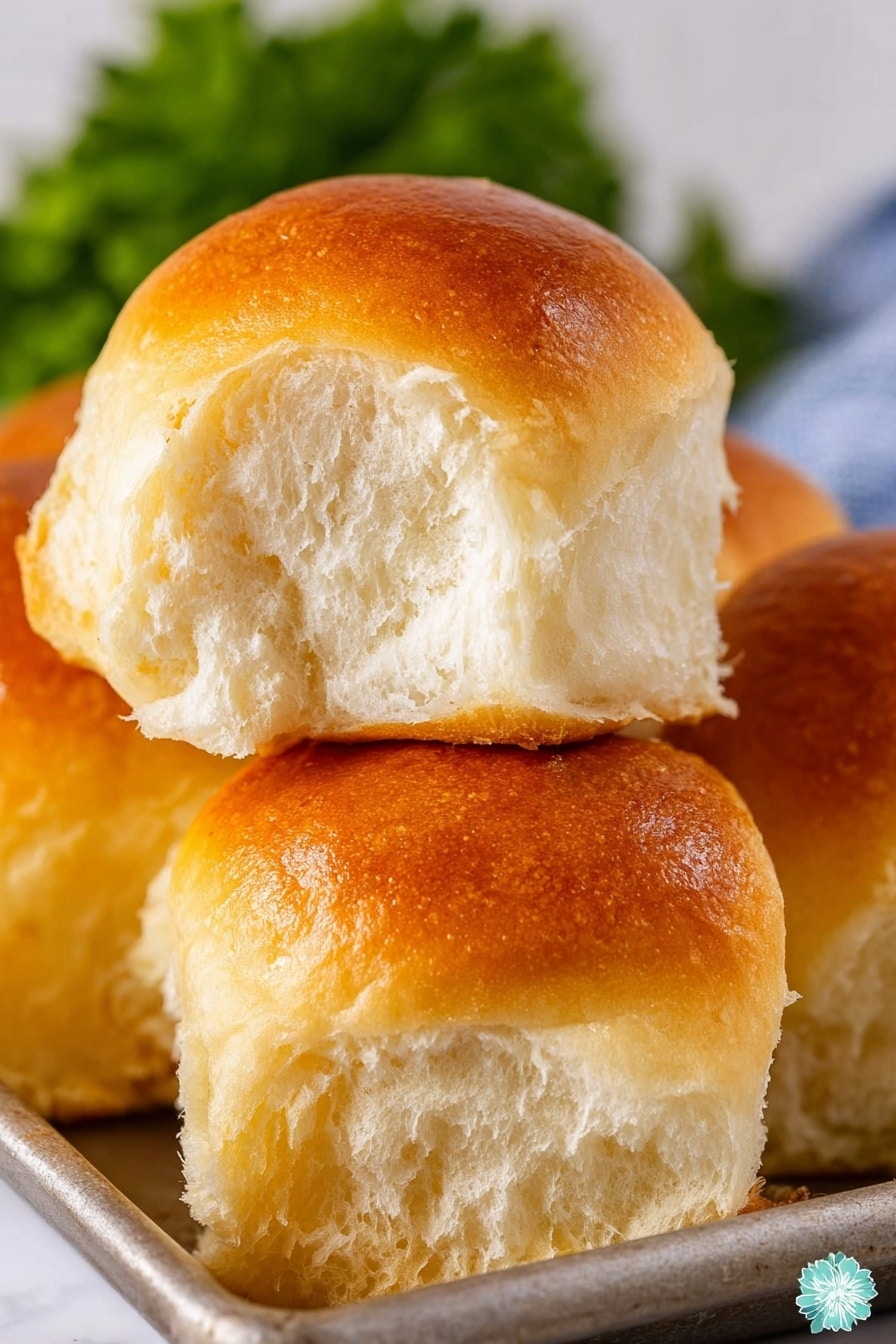
If you’ve ever dreamed of pulling warm, pillowy soft rolls fresh from your oven, this Homemade Fluffy Dinner Rolls Recipe is going to be your new best friend. I absolutely love how these rolls come out light and buttery every single time, making them perfect to serve alongside any meal or even as little sliders for a cozy gathering. Stick with me through this recipe, and I promise you’ll be whipping up bakery-quality rolls at home that have your family going crazy!
Why You’ll Love This Recipe
- Soft and Fluffy Every Time: Thanks to the careful balance of ingredients and kneading, these rolls come out with the perfect airy crumb.
- Buttery Flavor That Wows: Brushing melted butter right after baking locks in that rich, melt-in-your-mouth quality.
- Simple Ingredients You Probably Have: Nothing fancy needed – just good pantry staples and a bit of love.
- Perfect for Any Occasion: From holiday dinners to casual family meals, they steal the show.

Ingredients You’ll Need
The magic of these rolls starts with straightforward ingredients that work together beautifully. Using whole milk gives that tender crumb, while real butter boosts richness. Here’s a quick tour through what you’ll need before we get rolling!
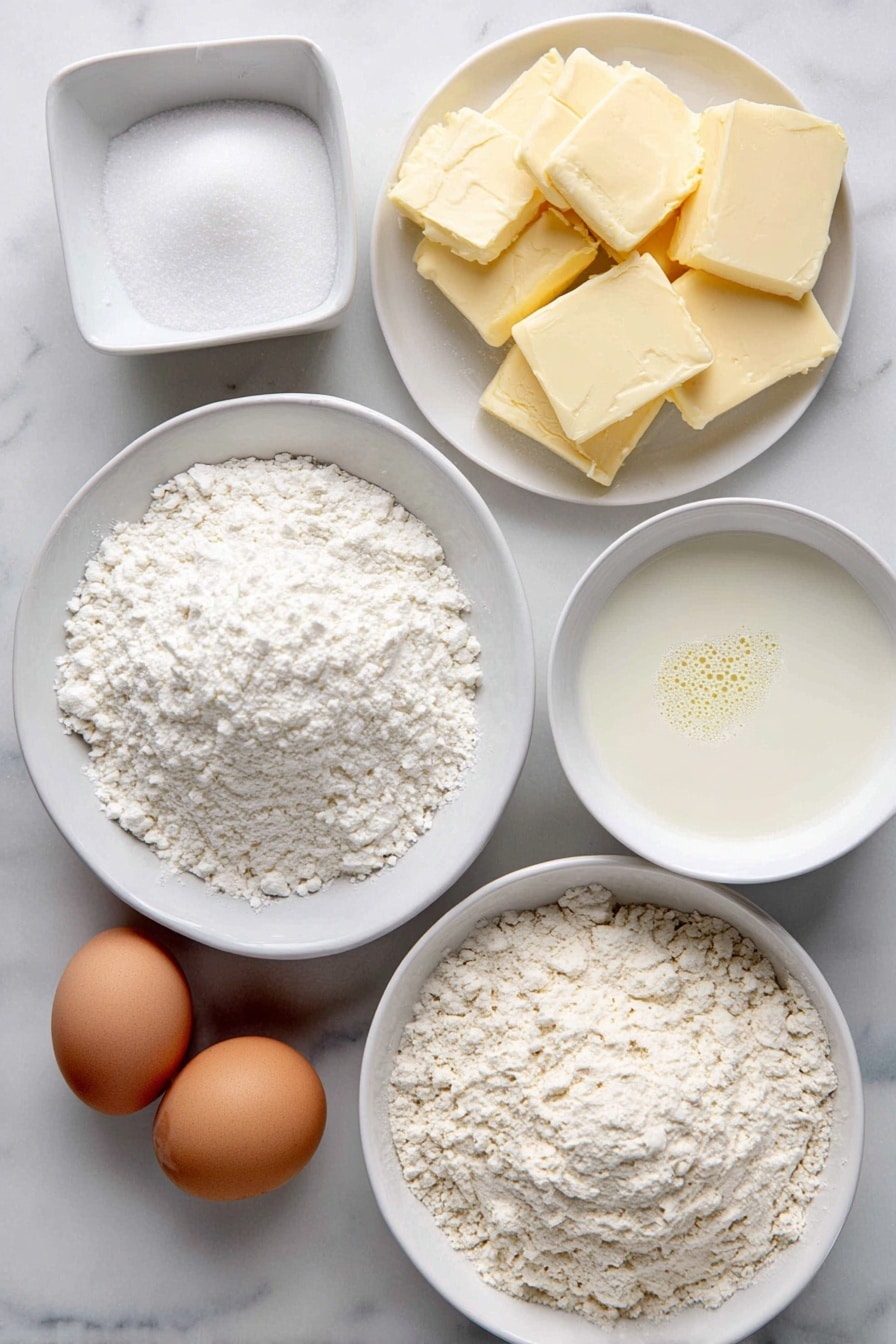
- Unsalted Butter: Slice it thin for easy melting, and save some melted butter for brushing the tops—trust me, it makes a huge difference.
- Granulated Sugar: Just enough to lightly sweeten and feed the yeast.
- Kosher Salt: Adds flavor depth without overpowering the rolls.
- Whole Milk: Warmed gently for yeast activation and tender texture.
- Active Dry Yeast: Your rising agent — make sure it’s fresh and stored properly.
- Large Egg: Gives structure and a subtle richness.
- All-Purpose Flour: The foundation of your dough, with a little extra on hand, just in case.
- Vegetable Oil: For coating the dough to keep it moist during rising.
Variations
One of my favorite things about this Homemade Fluffy Dinner Rolls Recipe is how you can tweak it to suit your taste or mood. Whether you want to make them a little more exciting or adapt for dietary needs, it’s super flexible.
- Whole Wheat Twist: I’ve swapped half the all-purpose flour with whole wheat for a nuttier flavor and a bit more fiber—just add a little extra milk if the dough feels too stiff.
- Herb-Infused Rolls: Adding fresh chopped rosemary or thyme to the dough brings a lovely aroma that pairs perfectly with soups.
- Dairy-Free Version: I’ve successfully replaced the milk with almond milk and used vegan butter, which keeps them just as fluffy but dairy-free.
- Cheesy Rolls: Sprinkle some shredded cheddar inside or on top before baking; my family loves this as a game-day snack.
How to Make Homemade Fluffy Dinner Rolls Recipe
Step 1: Prepare Your Ingredients and Activate the Yeast
Start by slicing that 1/4 cup of unsalted butter as thin as you can—this helps it melt quicker and mix evenly. Place it at the bottom of your stand mixer bowl. Then add the sugar and kosher salt right on top. Next, warm your whole milk gently in the microwave in short bursts of 15–30 seconds. You want it comfortably warm—between 105–110°F—so it’s perfect for yeast activation but won’t kill the yeast. Pour 1 cup of this warm milk over the butter in the bowl, no stirring needed just yet.
Step 2: Proof Your Yeast
Take the remaining 1/4 cup warm milk and stir in your 2 1/4 teaspoons of active dry yeast. Let it sit for about 5 minutes. You’ll notice it’ll get frothy and bubbly—that means the yeast is alive and kicking. This step is crucial because it ensures your dough will rise nicely later on.
Step 3: Mix and Combine Ingredients
Pour that foamy yeast mixture into the mixer along with one beaten large egg. Use your mixer’s hook attachment and start slowly combining everything. Then, add 3 ½ cups of all-purpose flour in about one cup at a time, scraping the bowl’s sides as you go. I’ve learned that patience here pays off because adding too much flour at once makes the dough heavy.
Step 4: Knead the Dough to Perfection
Once the dough starts coming together, bump up the mixer speed to medium-high and knead for about 3 minutes. A good test is to see if the dough pulls away from the sides of the bowl cleanly; if not, add small pinches of flour until it does. But keep in mind, it’s okay if it sticks a little at the bottom—it should still be soft and slightly tacky. This step really develops that beautiful chewy, fluffy texture.
Step 5: First Rise in an Oiled Bowl
Oil a large bowl with a teaspoon of vegetable oil. Transfer your dough into the bowl and roll it around so every surface is lightly coated with oil. Cover with plastic wrap and place it somewhere warm—my oven with just the light on works wonders—for about 1 to 2 hours, until it doubles in size. You’ll know it’s ready when you poke it lightly and the indentation stays.
Step 6: Shape the Rolls
After the first rise, melt 1/4 cup butter and use a bit of it to brush the bottom of a 9″x13″ baking dish—just a thin layer is enough. Punch down your dough gently to release all those lovely air bubbles. Then divide it into 15 equal pieces. I like to stretch each piece gently, fold the ends under for a smooth top, and roll it between my palms to get that perfect round shape.
Step 7: Second Rise and Bake
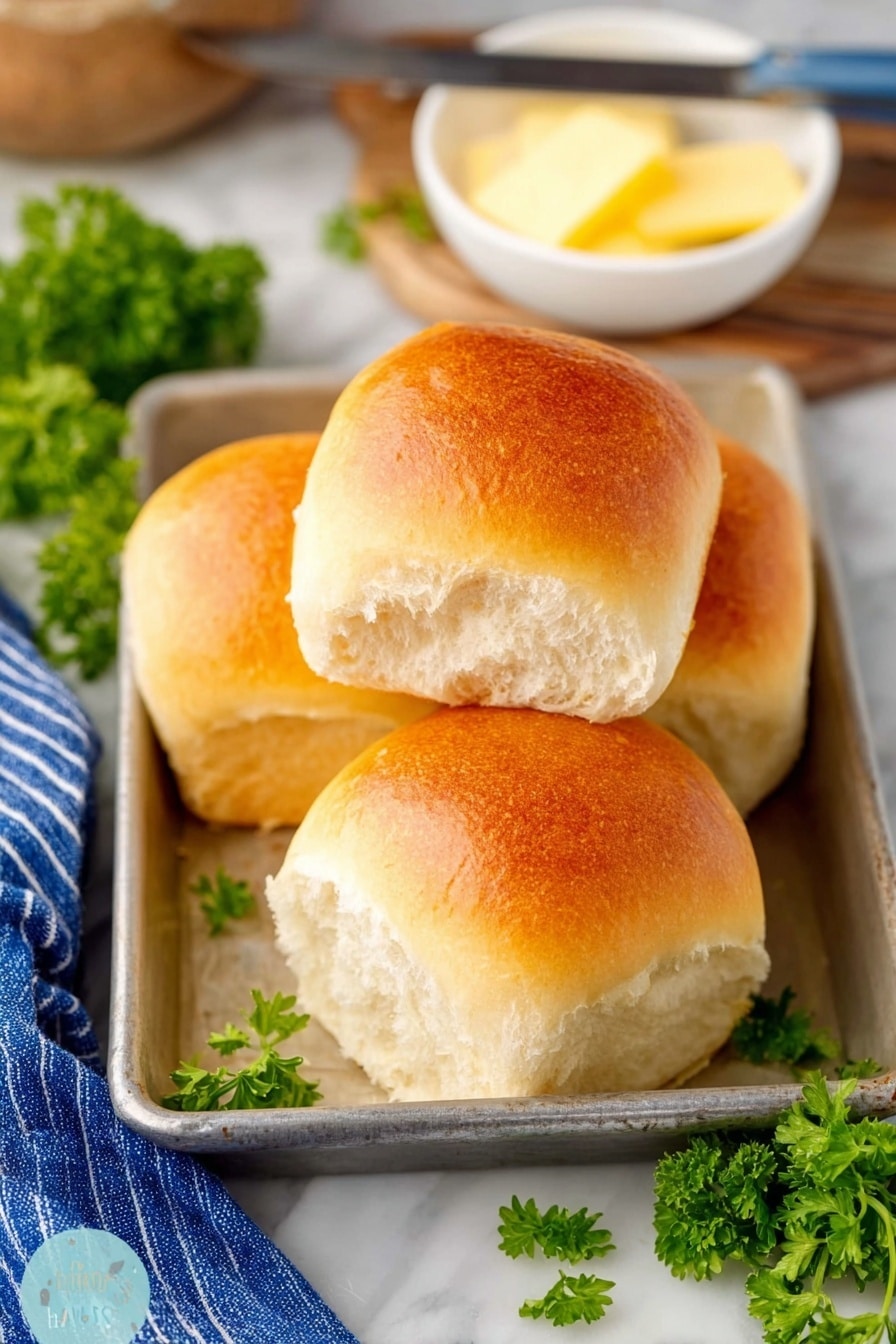
Place your rolls seam-side down in the prepared baking dish in 5 rows of 3. Cover again with plastic wrap and let them rise for one more hour until they’re puffed and almost touching each other. Preheat your oven to 350°F. Remove the plastic wrap and bake your rolls for 20–25 minutes until they’re golden brown and sound hollow when tapped.
Step 8: Final Touch of Butter and Serve
As soon as the rolls come out of the oven, brush all over with the rest of the melted butter. This keeps their crust soft and adds that irresistible buttery sheen. Grab one right away—you’ll love the warmth and fluffiness!
Pro Tips for Making Homemade Fluffy Dinner Rolls Recipe
- Milk Temperature Matters: I learned the hard way that overheating milk kills yeast, so always check it’s between 105-110°F.
- Don’t Rush the Rise: Giving the dough enough time to double ensures your rolls will be soft and airy instead of dense.
- Butter Brushing Is Key: Brushing melted butter right after baking keeps the crust tender and flavorful—it’s my favorite finishing touch!
- Use a Light Hand with Flour: Adding too much flour during kneading makes the rolls heavy—add only as much as needed for the dough to pull away cleanly.
How to Serve Homemade Fluffy Dinner Rolls Recipe
Garnishes
I usually keep it simple with these rolls—just a generous brush of butter, maybe a sprinkle of flaky sea salt if I want a subtle flavor boost. Sometimes I’ll add a little garlic herb butter on top if we’re having a big dinner; my family loves that extra oomph!
Side Dishes
These rolls pair beautifully with almost everything—comforting soups like tomato basil or chicken noodle, hearty stews, or classic holiday roasts. I’ve also served them alongside BBQ pulled pork, and they soaked up the sauce perfectly.
Creative Ways to Present
For holiday dinners, I love arranging these rolls in a braided shape or bundling them close together in a round baking pan, then topping with fresh herbs like rosemary to make them extra festive. It’s a simple twist that gets lots of compliments!
Make Ahead and Storage
Storing Leftovers
I keep leftover rolls in an airtight container at room temperature for up to 2 days. To keep them soft, I usually wrap them in a clean kitchen towel inside the container — it keeps the moisture in without making them soggy.
Freezing
Freezing works like a charm for these rolls! I freeze them individually wrapped in plastic and then all together in a freezer bag. When I’m ready to enjoy, I take a roll or two out the night before and let them thaw on the counter.
Reheating
To reheat, I like to pop the rolls in a 300°F oven for about 10 minutes wrapped in foil to keep the moisture. You get that just-baked warmth and softness back — almost like fresh from the oven!
FAQs
-
Can I make these rolls without a stand mixer?
Absolutely! You can mix and knead the dough by hand. It just takes a bit more elbow grease—about 8 to 10 minutes of kneading on a lightly floured surface until the dough is smooth and elastic.
-
What if my dough doesn’t rise?
If your dough isn’t rising, double-check your yeast is fresh and that the milk wasn’t too hot or too cold. Also, your rising spot should be warm but not hot. Using the oven light or a warm corner usually works well.
-
Can I make these rolls gluten-free?
Gluten-free rolls are tricky because gluten helps give structure and fluffiness, but you can use a gluten-free flour blend designed for bread and add xanthan gum. Expect slightly different texture, but it’s doable with some tweaks.
-
How do I know when the rolls are fully baked?
Look for golden brown tops and a hollow sound when you tap on one of the rolls. If they’re pale or dense, they likely need a few more minutes.
Final Thoughts
Making these Homemade Fluffy Dinner Rolls Recipe has been a joy for me both in taste and in the process. There’s something so satisfying about watching the dough rise, shaping the rolls by hand, and then filling your kitchen with that buttery aroma. I hope you give this recipe a try and that it becomes a family favorite for you, just like it did for mine. Nothing beats fresh-baked bread straight from your oven—especially when it’s this soft and flavorful!
Print
Homemade Fluffy Dinner Rolls Recipe
- Prep Time: 20 minutes
- Cook Time: 25 minutes
- Total Time: 3 hours 45 minutes
- Yield: 15 rolls
- Category: Bread
- Method: Baking
- Cuisine: American
Description
These homemade dinner rolls are soft, fluffy, and buttery with a golden-brown crust. Perfect as a side to complement any dinner, this easy bread recipe uses simple ingredients and a classic technique to deliver delicious, pull-apart rolls that everyone will love.
Ingredients
Wet Ingredients
- 1/4 cup unsalted butter (sliced)
- 1 1/4 cups whole milk (divided use)
- 1 large egg, beaten
- 1/4 cup unsalted butter (melted for brushing)
- 1 teaspoon vegetable oil
Dry Ingredients
- 1/4 cup granulated sugar
- 1 teaspoon kosher salt
- 2 1/4 teaspoons (1 packet) active dry yeast
- 3 1/2 cups all-purpose flour (more may be needed)
Instructions
- Prepare Butter and Dry Ingredients: Slice 1/4 cup unsalted butter as thin as possible and place it in the bottom of a stand mixer bowl. Add 1/4 cup granulated sugar and 1 teaspoon kosher salt on top of the butter.
- Heat Milk: Warm 1 1/4 cups whole milk in the microwave using 15-30 second intervals until the temperature reaches between 105-110°F. Pour 1 cup of the warm milk into the mixer bowl with the butter, do not stir, just let it sit.
- Activate Yeast: In the remaining 1/4 cup milk, stir in 2 1/4 teaspoons active dry yeast. Let it rest for about 5 minutes until the mixture becomes foamy, then add it to the mixer bowl.
- Add Egg and Combine: Add the beaten large egg to the mixer bowl with other ingredients and mix gently to combine.
- Add Flour and Knead: Attach the dough hook and gradually add 3 1/2 cups all-purpose flour, about one cup at a time, scraping down the sides as needed. Once a dough forms, increase the speed to medium-high and knead for 3 minutes. If the dough sticks to the bowl sides, add up to 1/2 cup more flour a little at a time until it pulls away cleanly (some stickiness at the bottom is okay).
- First Rise: Transfer the dough to a large bowl coated with 1 teaspoon vegetable oil. Turn the dough in the oil to coat all sides. Cover the bowl with plastic wrap and let the dough rise in a warm place for 1-2 hours until doubled in size.
- Prepare Baking Dish: Melt 1/4 cup unsalted butter. Lightly brush a 9×13 inch baking dish with some of the melted butter and set aside.
- Shape Rolls: Punch down the risen dough to release air bubbles. Divide the dough into 15 equal portions. Shape each portion into a smooth ball by stretching the dough and tucking ends underneath. Pinch seams and gently roll between hands to smooth out.
- Second Rise: Place the dough balls seam-side down in the prepared baking dish in 3 rows of 5. Cover with plastic wrap and let rise again for about 1 hour until doubled in size.
- Bake Rolls: Preheat the oven to 350°F (175°C). Remove plastic wrap from the dish and bake the rolls for 20-25 minutes until golden brown and the tops sound hollow when tapped.
- Brush with Butter and Serve: Immediately brush the hot rolls with the remaining melted butter to keep them moist and flavorful. Serve warm.
Notes
- These dinner rolls are incredibly light, fluffy, and buttery, making them a perfect accompaniment for any meal.
- If the dough feels too sticky, add flour gradually but avoid making it too dry.
- Make sure not to overheat the milk, as temperatures above 110°F can kill the yeast.
- You can store leftover rolls in an airtight container at room temperature for up to 2 days or freeze for longer storage.
- For extra flavor, try brushing the tops with garlic butter before serving.
Nutrition
- Serving Size: 1 roll
- Calories: 193
- Sugar: 4 g
- Sodium: 169 mg
- Fat: 8 g
- Saturated Fat: 4 g
- Unsaturated Fat: 3 g
- Trans Fat: 1 g
- Carbohydrates: 27 g
- Fiber: 1 g
- Protein: 4 g
- Cholesterol: 29 mg


