
If you’ve ever bitten into a peanut butter cookie topped with a melty chocolate kiss, you know the magic of the classic Peanut Butter Blossoms Recipe. This cookie strikes the perfect balance between soft, chewy peanut butter goodness and a rich chocolatey finish that melts in your mouth. I absolutely love this recipe because it’s straightforward to make, and the results are consistently delicious—perfect for holiday gatherings, cookie exchanges, or whenever you want a sweet, nostalgic treat that always impresses.
Why You’ll Love This Recipe
- Easy to Make: Even if you’re new to baking, this recipe comes together quickly and smoothly.
- Classic Flavor Combo: The peanut butter and chocolate pairing is timeless and crowd-pleasing every time.
- Soft & Chewy Texture: These cookies stay tender but firm enough to hold their shape beautifully.
- Perfect for Any Occasion: Whether it’s a holiday party or an afternoon snack, these blossoms shine.

Ingredients You’ll Need
The ingredients for this Peanut Butter Blossoms Recipe are simple pantry staples that work together perfectly. A couple of tips: use creamy peanut butter for the smoothest cookie texture, and make sure your unsalted butter is softened—not melted! It helps achieve a fluffy batter that bakes up just right.
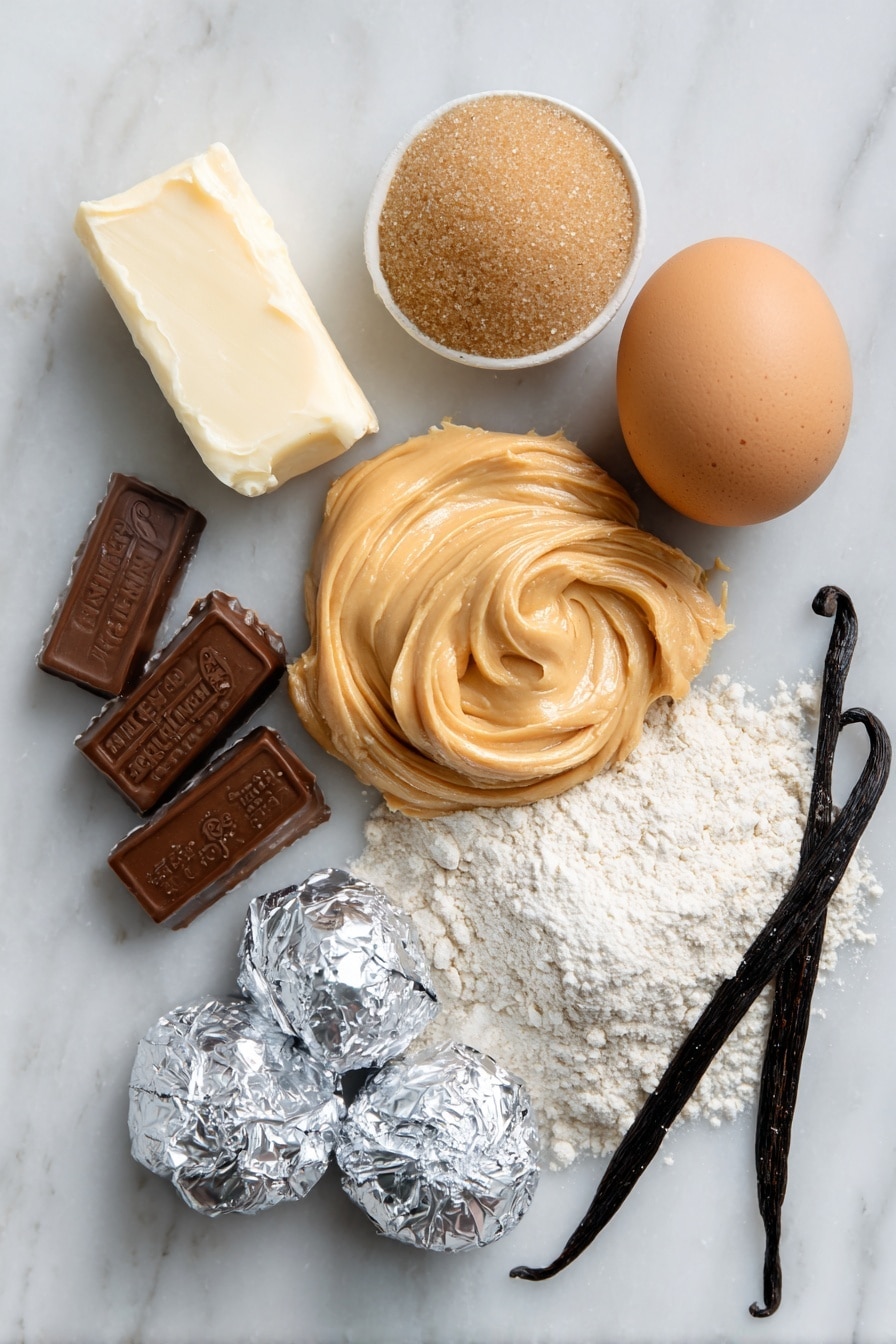
- Creamy peanut butter: Gives the cookie its star nutty flavor and smooth texture.
- Unsalted butter: Softened butter helps everything cream together nicely without making the dough greasy.
- Granulated sugar: Adds sweetness and gives a slight crunch when rolled on top.
- Light brown sugar: Brings moisture and a hint of caramel depth.
- Salt: Enhances the sweet and nutty flavors.
- Large egg: Binds the dough and gives the cookies structure—bring it to room temp for best mixing.
- Vanilla extract: Adds warmth and complexity.
- All-purpose flour: The backbone of our cookie, providing the right chewy texture.
- Baking soda: Helps the cookies rise and develop those signature cracks.
- Hershey’s chocolate kisses: The iconic finishing touch—the chocolate melts perfectly on top.
Variations
One of the things I love about this Peanut Butter Blossoms Recipe is how easy it is to personalize. I’ve tried a few fun twists over the years, and you’ll enjoy experimenting with these little changes to suit your taste or dietary needs.
- Crunchy Peanut Butter: I swapped creamy for crunchy once, and it added a fun texture contrast. Just make sure your peanut butter isn’t too oily.
- Natural Peanut Butter: For a healthier spin, natural peanut butter works great but may require chilling the dough as it can be softer.
- Chocolate Variations: Instead of Hershey’s kisses, try mini peanut butter cups or dark chocolate chips to change up the flavor.
- Nut-Free Version: Using sunflower seed butter can be a good alternative if you need to avoid peanuts.
- Flavor Boost: Adding a pinch of cinnamon or a little espresso powder to the dough really enhances the chocolate notes.
How to Make Peanut Butter Blossoms Recipe
Step 1: Cream Together the Peanut Butter and Sugars
Start by preheating your oven to 375°F and lining cookie sheets with parchment paper. In a large bowl or your stand mixer, beat together the creamy peanut butter, softened unsalted butter, granulated sugar, light brown sugar, and salt until light and fluffy. I find that creaming these ingredients well at medium speed really helps the cookies turn out soft and tender. Don’t rush this—take about 2-3 minutes to get a smooth, creamy mixture.
Step 2: Add the Egg and Vanilla
Next, add the large egg (make sure it’s at room temperature for better mixing) and the vanilla extract. Beat again until everything is combined evenly. This step helps the dough bind properly and sets the stage for those classic cracks you want in your peanut butter blossoms cookies.
Step 3: Mix in Flour and Baking Soda
Scrape down the sides of your bowl, then add the all-purpose flour and baking soda. Beat on low speed just until the dough comes together—overmixing can make your cookies tough, so keep it gentle. The dough should be soft but hold together nicely.
Step 4: Roll, Coat, and Bake
Scoop the dough into 1-inch balls—an easy way is to use a small cookie scoop. Roll each ball in a bit more granulated sugar if you like that extra sparkle and crunch on top. Arrange the balls on your prepared baking sheet, spacing them about 2 inches apart so they have room to spread.
Bake for 8 to 10 minutes. You’ll know they’re done when the cookies look puffy and cracked, with lightly browned edges. Don’t wait for them to brown too much on top—they should stay soft.
Step 5: Add the Chocolate Kiss
Immediately after removing the cookies from the oven, press an unwrapped Hershey’s chocolate kiss gently into the center of each cookie. The warm cookie will crack around it, and that’s exactly what you want! Let the cookies cool completely on the baking sheet so the chocolate sets nicely without melting all over.
Pro Tips for Making Peanut Butter Blossoms Recipe
- Softened Butter Matters: I’ve learned that too warm butter leads to flat cookies, so let it sit on the counter for about 30 minutes before mixing.
- Don’t Skip Rolling in Sugar: This step adds that delightful slight crunch and a pretty sparkly finish, making your cookies more festive.
- Use Room Temperature Eggs: It helps everything mix smoothly and prevents the dough from seizing up.
- Add Kisses While Warm: Waiting too long makes it hard to press the chocolate in, and you lose that classic “blossom” look.
How to Serve Peanut Butter Blossoms Recipe

Garnishes
For garnishes, I usually keep it simple because the chocolate kiss is the star. Sometimes, I dust a little powdered sugar over the cookies for a pretty, snowy look during the holidays. If you want an extra touch, consider sprinkling chopped peanuts or a tiny sprinkle of sea salt on the cookies right after pushing in the kisses—it creates an irresistible sweet-salty combo.
Side Dishes
These cookies go wonderfully with a cold glass of milk or a cup of hot coffee or tea—one of my favorite simple combinations. At parties, I like pairing them with other classic cookies like sugar cookies or thumbprint cookies for a festive platter.
Creative Ways to Present
For gift-giving or parties, I’ve arranged Peanut Butter Blossoms on a rustic wooden board with fresh rosemary sprigs and red ribbon for a cozy winter vibe. You can also stack them in little cookie towers tied with twine for a cute homemade gift presentation—everyone loves the adorable “blossom” look!
Make Ahead and Storage
Storing Leftovers
I store leftover Peanut Butter Blossoms in an airtight container at room temperature to keep them soft and chewy. They usually last about a week that way, but honestly, they disappear faster in my house! I like to layer them between parchment paper so the chocolate kisses don’t stick together.
Freezing
You can freeze the cookie dough balls before baking—just roll them in sugar, place on a tray to freeze individually, then transfer to a freezer bag. When you’re ready, bake from frozen, adding a couple of minutes to the baking time. I’ve also frozen baked cookies; just thaw them at room temp for a few hours. The texture holds up quite well!
Reheating
If you want to warm up leftover cookies, pop one or two in the microwave for about 10 seconds to soften the chocolate kiss and bring back that fresh-baked feel. Be careful not to overheat so they don’t get greasy or dry.
FAQs
-
Can I use natural peanut butter in Peanut Butter Blossoms Recipe?
Yes, you can! Natural peanut butter tends to be oilier and softer, so you might want to chill the dough before baking to help it hold its shape better. The flavor will be just as delicious but slightly less sweet and more nutty.
-
Why do my Peanut Butter Blossoms crack too much or too little?
The cracking comes from the baking soda and the creaming process. If your butter is too warm or you overmix the dough, cookies might spread too much and crack excessively or not crack enough. Use softened (not melted) butter, and mix until just combined for the best texture.
-
Can I make these cookies gluten-free?
Absolutely! Swap all-purpose flour for a 1:1 gluten-free baking flour blend. Because gluten-free flours behave differently, let the dough chill for about 30 minutes before baking to improve texture and prevent spreading.
-
How should I store Peanut Butter Blossoms?
Store them in an airtight container at room temperature for up to a week. Layer parchment paper between cookies to prevent sticking, especially around the chocolate kiss.
-
Can I substitute the chocolate kisses with other chocolates?
For sure! Mini peanut butter cups, dark chocolate chips, or even your favorite chocolate candy pieces can work well. Just press them gently on warm cookies right after baking to get that classic look.
Final Thoughts
This Peanut Butter Blossoms Recipe has been a staple in my baking repertoire for years—and for good reason. It’s the kind of cookie that brings back warm memories and never fails to deliver on flavor and texture. Whether you’re baking with kids, preparing for a holiday cookie swap, or just craving that cozy peanut butter and chocolate combo, these cookies won’t disappoint. Trust me, once you try this recipe, it’ll become one of your favorites too, perfect for sharing and savoring any time of year.
Print
Peanut Butter Blossoms Recipe
- Prep Time: 20 minutes
- Cook Time: 10 minutes
- Total Time: 30 minutes
- Yield: 36 cookies
- Category: Dessert
- Method: Baking
- Cuisine: American
Description
Peanut Butter Blossoms are classic, tender, and moist cookies made with creamy peanut butter and topped with a Hershey’s chocolate kiss. These sweet treats are easy to make, perfect for holidays or any occasion, and feature a delightful combination of rich peanut butter flavor and melty chocolate in every bite.
Ingredients
Cookie Dough
- ¾ cup creamy peanut butter (188g)
- ½ cup unsalted butter, softened (113g)
- ½ cup granulated sugar (100g), plus more for rolling
- ½ cup packed light brown sugar (110g)
- ¼ teaspoon salt
- 1 large egg, room temperature
- 1 teaspoon vanilla extract
- 1½ cups all-purpose flour (180g)
- ½ teaspoon baking soda
Topping
- 36 Hershey’s chocolate kisses, unwrapped
Instructions
- Preheat Oven and Prepare Baking Sheets: Heat your oven to 375°F (190°C). Line cookie sheets with parchment paper to prevent sticking and ensure even baking.
- Cream the Butter and Sugars: In a large mixing bowl or the bowl of a stand mixer fitted with the paddle attachment, combine the creamy peanut butter, softened unsalted butter, granulated sugar, light brown sugar, and salt. Beat on medium speed until the mixture is well combined, creamy, and smooth.
- Add Egg and Vanilla: Add the egg and vanilla extract to the creamed mixture. Beat again until fully incorporated, scraping down the sides of the bowl as needed to ensure even mixing.
- Incorporate Dry Ingredients: Add the all-purpose flour and baking soda to the wet ingredients. Beat on low speed just until combined, being careful not to overmix the dough.
- Form and Sugar the Dough Balls: Scoop the dough and roll into 1-inch balls. Optionally, roll each ball in additional granulated sugar to add a slight crunch and sparkle to the exterior of the cookies. Place them 2 inches apart on the prepared baking sheets.
- Bake the Cookies: Bake the cookies in the preheated oven for 8 to 10 minutes, or until they look puffy and cracked and the bottoms are just starting to turn golden brown.
- Add Chocolate Kisses: Immediately after removing the cookies from the oven, press one unwrapped Hershey’s chocolate kiss into the center of each cookie. The cookies will crack around the chocolate, which is normal and adds to their characteristic look.
- Cool and Set: Allow the cookies to cool completely on the baking sheet. This cooling step lets the chocolate set firmly in place. Once cooled, serve or store in an airtight container for up to one week.
Notes
- This recipe yields tender, moist, and sweet peanut butter blossoms that look as beautiful as they taste.
- The cracking of the cookies around the chocolate kiss is a signature look and expected for this classic cookie.
- Ensure the butter is softened but not melted to achieve the best dough texture.
- Using parchment paper helps prevent cookies from sticking and makes cleanup easier.
- Store baked cookies in an airtight container at room temperature to keep them fresh up to one week.
Nutrition
- Serving Size: 1 cookie
- Calories: 121 kcal
- Sugar: 9 g
- Sodium: 62 mg
- Fat: 7 g
- Saturated Fat: 3 g
- Unsaturated Fat: 3 g
- Trans Fat: 0.1 g
- Carbohydrates: 14 g
- Fiber: 1 g
- Protein: 2 g
- Cholesterol: 13 mg


