
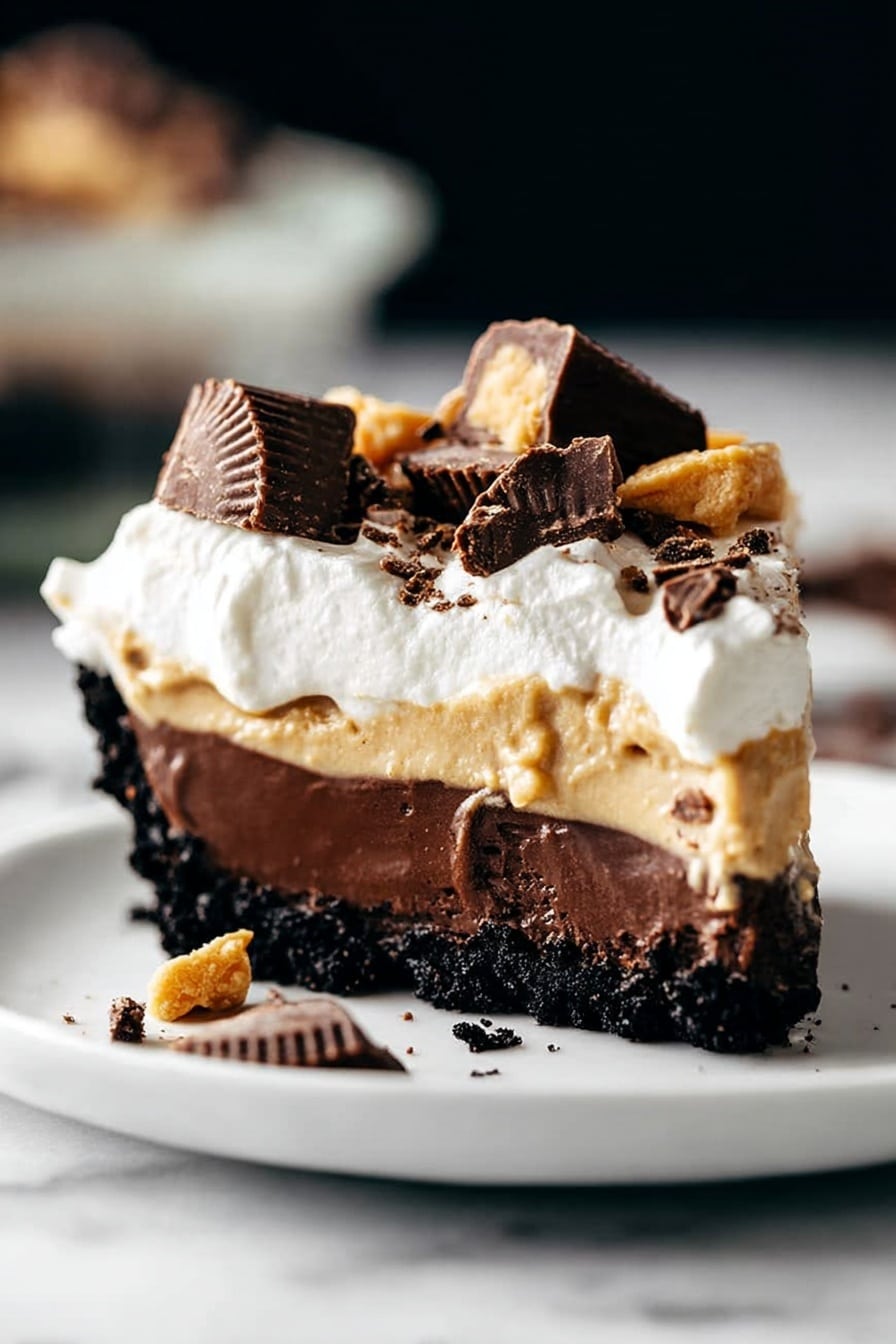
If you’re into that heavenly combo of chocolate and peanut butter, then you’re absolutely going to fall in love with this Chocolate Peanut Butter Pie Recipe. I promise, it’s one of those desserts that looks fancy but actually comes together pretty easily—and the flavor? Oh wow, it’s a total crowd-pleaser every single time. This pie is rich, smooth, and has just the right balance of sweetness with that luscious peanut butter punch.
Why You’ll Love This Recipe
- Decadent Yet Balanced: The chocolate pudding and peanut butter mousse layers keep it rich but not overly sweet—just the way I love it.
- No-Bake Convenience: The crust is a simple Oreo base with no baking required, saving you time and effort.
- Family-Approved: My family goes crazy for this; it’s always the first thing to disappear at gatherings.
- Versatile and Fun: You can easily swap ingredients or add toppings for customization.

Ingredients You’ll Need
Each ingredient in this Chocolate Peanut Butter Pie Recipe plays a special role—whether it’s the Oreo crust giving crunch and flavor or the peanut butter mousse bringing creamy indulgence. Shopping tip: grab good quality chocolate and creamy peanut butter for the best flavor punch.

- Oreo sandwich cookies: These form the delicious cookie crust—use gluten-free if you need to.
- Unsalted butter: Melts into the crushed Oreos to create the perfect crust texture.
- Granulated sugar: Sweetens the chocolate pudding without overpowering it.
- Cornstarch: Thickens the pudding beautifully for that silky texture.
- Unsweetened cocoa powder: Adds rich chocolate flavor to the pudding base.
- Instant espresso powder (optional): Enhances the chocolate depth—don’t skip if you want an extra flavor boost.
- Kosher salt: Balances the sweetness and highlights the chocolate.
- Whole milk: Essential for that creamy pudding consistency.
- Egg yolks: Give the pudding its silky smoothness and help it set.
- Dark chocolate (or milk chocolate): Melted into the pudding—it’s the star of the pie!
- Vanilla extract: Brings warmth and depth to both the pudding and mousse.
- Cream cheese: Adds tanginess and richness to the peanut butter mousse.
- Heavy whipping cream: Whipped for fluffiness in both mousse and pie topping.
- Powdered sugar: Sweetens the whipped cream without any grit.
- Creamy peanut butter: The key to that peanut buttery goodness in the mousse.
- Peanut butter cups (for topping): Chopped generously for the best finishing touch and texture.
Variations
I absolutely encourage you to make this Chocolate Peanut Butter Pie Recipe your own! Over time, I’ve played with it to match different occasions and cravings—and it never disappoints. Feel free to swap things up and discover what works best for you.
- Gluten-Free Version: Using gluten-free Oreos worked perfectly for me with no compromise in taste or texture, making it accessible for everyone.
- Milk Chocolate Swap: I tried milk chocolate instead of dark for a sweeter pie, and my kids loved it—just remember the flavors become creamier and sweeter.
- Natural Peanut Butter: Using natural, no-sugar peanut butter creates a less sweet version that’s still intensely peanut buttery.
- Extra Crunch: Adding chopped roasted peanuts in the mousse gives a fun surprise crunch that my guests rave about.
How to Make Chocolate Peanut Butter Pie Recipe
Step 1: Crafting that Perfect Oreo Crust
Start by pulsing your Oreo cookies in a food processor until they’re finely ground—no big chunks, but a little texture is okay if you prefer some crunch. Toss in melted unsalted butter and granulated sugar, then mix until the crumbs hold together when pressed. I like to press the mixture firmly into a 9-inch pie pan’s bottom and sides—it helps the crust stay intact and gives every bite that rich cookie flavor. Pop it in the fridge to chill while you move on to the pudding.
Step 2: Making the Silky Chocolate Pudding Layer
Whisk together sugar, cornstarch, cocoa powder, espresso powder, and salt in a medium saucepan—this little mix is crucial for that lush pudding base. Slowly pour in whole milk while whisking to avoid lumps. Then, add those egg yolks and cook over medium heat, stirring constantly (no wandering off here!) until it thickens and coats the back of a spoon. Stir in chopped dark chocolate, butter, and vanilla until glossy smooth. Being patient with this step is key—I learned the hard way that rushing can cause curdling. Pour the pudding into your chilled crust and let it cool completely in the fridge.
Step 3: Whipping Up the Dreamy Peanut Butter Mousse
In a mixing bowl, beat softened cream cheese until super smooth. Add creamy peanut butter and vanilla extract, then gradually beat in powdered sugar for sweetness. Separately, whip the heavy cream until stiff peaks form, then gently fold it into the peanut butter mixture. This folding keeps the mousse airy and light—I always remind myself to be gentle here to avoid deflating those fluffy bubbles. Spread the mousse layer over your chilled chocolate pudding evenly, then refrigerate again for a few hours so it sets just right.
Step 4: Final Touch — Whipped Cream and Peanut Butter Cups
Whip up another batch of heavy cream with powdered sugar and vanilla to create a light, fluffy topping. Spread or pipe it over the peanut butter mousse layer for that beautiful, cloud-like finish. Then, generously sprinkle chopped peanut butter cups on top—this step is the ultimate crowd-pleaser and adds a joyous texture contrast. Chill the pie for at least an hour before cutting, allowing all the delicious layers to meld. Beware—this is the hardest part, because it takes so much willpower not to dig in right away!
Pro Tips for Making Chocolate Peanut Butter Pie Recipe
- Perfect Pudding Consistency: Keep stirring the pudding constantly over medium heat—it should thicken gradually and not boil vigorously to avoid lumps.
- Chilling Time Is Key: I used to rush chilling, but letting each layer firm up well really helps the pie slice neatly and layers stay distinct.
- Folding Technique: When combining whipped cream into the mousse, fold gently and slowly using a spatula to keep it light and fluffy.
- Cutting Slices Cleanly: Dip your knife in hot water before slicing, wipe between cuts for perfect clean edges every time.
How to Serve Chocolate Peanut Butter Pie Recipe
Garnishes
I love topping this pie with extra chopped peanut butter cups for texture and a bit of saltiness. Sometimes I add a drizzle of melted chocolate or a sprinkle of sea salt flakes to deepen the flavor contrast. Fresh raspberries or strawberries also make a lovely bright garnish and cut through the richness.
Side Dishes
This pie stands strong as a showstopper dessert, but I sometimes serve it alongside a simple cup of black coffee or a glass of cold milk to balance the sweetness. For special occasions, vanilla ice cream or a light berry compote works beautifully too.
Creative Ways to Present
For parties, I love making individual mini versions in dessert glasses layered with crushed Oreos, pudding, mousse, and whipped cream for a stylish twist. Or you can pipe the whipped cream decoratively and add peanut butter cup halves arranged like petals around the edge for a stunning centerpiece pie.
Make Ahead and Storage
Storing Leftovers
After making this Chocolate Peanut Butter Pie Recipe, store any leftovers tightly covered in the fridge. It stays fresh and creamy for up to 3 days, though honestly, ours never last that long! Just keep it chilled to maintain those luscious textures and flavors.
Freezing
I’ve frozen this pie wrapped well in plastic wrap and then foil, and it still tastes great—just thaw overnight in the fridge before serving. The texture softens slightly but remains indulgent and satisfying, which is perfect if you want to prep ahead for a big event.
Reheating
This dessert is best enjoyed cold or at room temperature, so no reheating needed. If the pie feels too firm from chilling, let it sit out for 10-15 minutes before serving to bring out those silky layers.
FAQs
-
Can I make this Chocolate Peanut Butter Pie Recipe vegan or dairy-free?
While the traditional recipe uses dairy-rich ingredients like heavy cream and cream cheese, you can swap in coconut cream for whipping and a vegan cream cheese alternative to make a dairy-free version. For the crust, use vegan Oreo cookies or another vegan cookie base. Just keep in mind that the texture and flavor will be slightly different but still delicious!
-
Is instant espresso powder necessary in the recipe?
The espresso powder isn’t essential, but it really amps up the chocolate flavor and makes it taste richer and deeper. If you don’t have any, you can skip it and still end up with a fantastic pie.
-
How long can I store the pie before it goes bad?
Store your pie in the refrigerator covered tightly for up to 3 days. After that, the texture and freshness start to decline, so it’s best enjoyed sooner rather than later.
-
Can I use crunchy peanut butter instead of creamy?
Sure! Using crunchy peanut butter will give the mousse extra texture. I’ve tried it, and it adds a fun little surprise crunch, but the mousse won’t be quite as smooth.
-
What’s the best way to slice the pie cleanly?
For neat slices, dip a sharp knife in hot water, wipe it dry, then cut. Repeat between slices. This keeps the layers intact and the chocolate from sticking to the blade.
Final Thoughts
This Chocolate Peanut Butter Pie Recipe has become my go-to for celebrations and simple weekend indulgences alike. It’s the kind of dessert that feels special but doesn’t stress you out in the kitchen. I love how the textures come together—the creamy pudding, fluffy peanut butter mousse, fluffy whipped cream, and that decadent Oreo crust. Honestly, once you make it, you’ll find yourself reaching for it whenever you want to impress guests or treat yourself without fuss. Try it once, and I’m betting it’ll be your new favorite too.
Print
Chocolate Peanut Butter Pie Recipe
- Prep Time: 3 hr 30 min
- Cook Time: 15 min
- Total Time: 3 hr 45 min
- Yield: 10 slices
- Category: Dessert
- Method: Stovetop
- Cuisine: American
- Diet: Gluten Free
Description
A decadent Chocolate Peanut Butter Pie featuring a crunchy Oreo cookie crust, rich homemade chocolate pudding, creamy peanut butter mousse, and a fluffy whipped cream topping adorned with chopped peanut butter cups. This indulgent dessert balances deep chocolate and nutty flavors without being overly sweet.
Ingredients
Crust
- 20 Oreo sandwich cookies, finely ground (regular or gluten free)
- 1/4 cup (55g) unsalted butter, melted
- 1/4 cup (50g) granulated sugar
Chocolate Pudding Layer
- 2 tbsp cornstarch
- 2 tbsp unsweetened cocoa powder
- 1/2 tsp instant espresso powder (optional)
- 1/4 tsp kosher salt
- 1 cup (240g) whole milk
- 2 large egg yolks
- 3.5 oz dark chocolate, chopped (or use milk chocolate for a sweeter flavor)
- 1 tbsp unsalted butter
- 1 tsp vanilla extract
Peanut Butter Mousse
- 4 oz cream cheese, room temperature
- 1 cup (250g) creamy peanut butter
- 2 cups (480g) heavy whipping cream
- 1/4 cup (45g) powdered sugar
- 1 tsp vanilla extract
Topping
- Peanut butter cups, chopped for topping (gluten free if needed)
Instructions
- Prepare the crust: Combine the finely ground Oreo cookies, melted unsalted butter, and granulated sugar in a bowl. Mix until the crumbs are evenly coated and the mixture resembles wet sand. Press the crust mixture firmly and evenly into the bottom and sides of a 9-inch pie pan. Chill in the refrigerator while preparing the filling.
- Make the chocolate pudding layer: In a medium saucepan, whisk together cornstarch, cocoa powder, instant espresso powder (if using), kosher salt, and sugar. Whisk in whole milk and egg yolks until smooth. Cook over medium heat, stirring constantly, until the mixture thickens and just comes to a boil. Remove from heat, then stir in chopped dark chocolate, unsalted butter, and vanilla extract until melted and smooth. Allow the pudding to cool slightly before pouring over the chilled crust. Refrigerate to set while preparing the mousse.
- Prepare the peanut butter mousse: In a large mixing bowl, beat room temperature cream cheese and creamy peanut butter until smooth and creamy. In a separate chilled bowl, whip heavy cream with powdered sugar and vanilla extract until stiff peaks form. Gently fold the whipped cream into the peanut butter mixture until fully incorporated and fluffy.
- Assemble the pie: Spread the peanut butter mousse evenly over the set chocolate pudding layer. Smooth the top with a spatula. Cover the pie with plastic wrap and refrigerate for at least 3 hours or until fully set and chilled.
- Garnish and serve: Just before serving, sprinkle chopped peanut butter cups generously over the top of the pie. Slice into 10 pieces and serve chilled. Enjoy the rich, layered flavors and indulgent textures!
Notes
- This chocolate peanut butter pie recipe is layered with homemade chocolate pudding, peanut butter mousse, and topped with fluffy whipped cream and a pile of peanut butter cups!
- The textures are indulgent, but the pie isn’t overly sweet, making it a balanced dessert for chocolate and peanut butter lovers.
- For a gluten-free version, use gluten-free Oreo cookies and gluten-free peanut butter cups.
- Instant espresso powder enhances the chocolate flavor but is optional.
- Chilling times are important to let layers set properly—plan ahead for at least 3 hours chilling time.
Nutrition
- Serving Size: 1 slice (1/10th of pie)
- Calories: 480
- Sugar: 28g
- Sodium: 180mg
- Fat: 36g
- Saturated Fat: 15g
- Unsaturated Fat: 18g
- Trans Fat: 0g
- Carbohydrates: 35g
- Fiber: 2g
- Protein: 7g
- Cholesterol: 105mg


