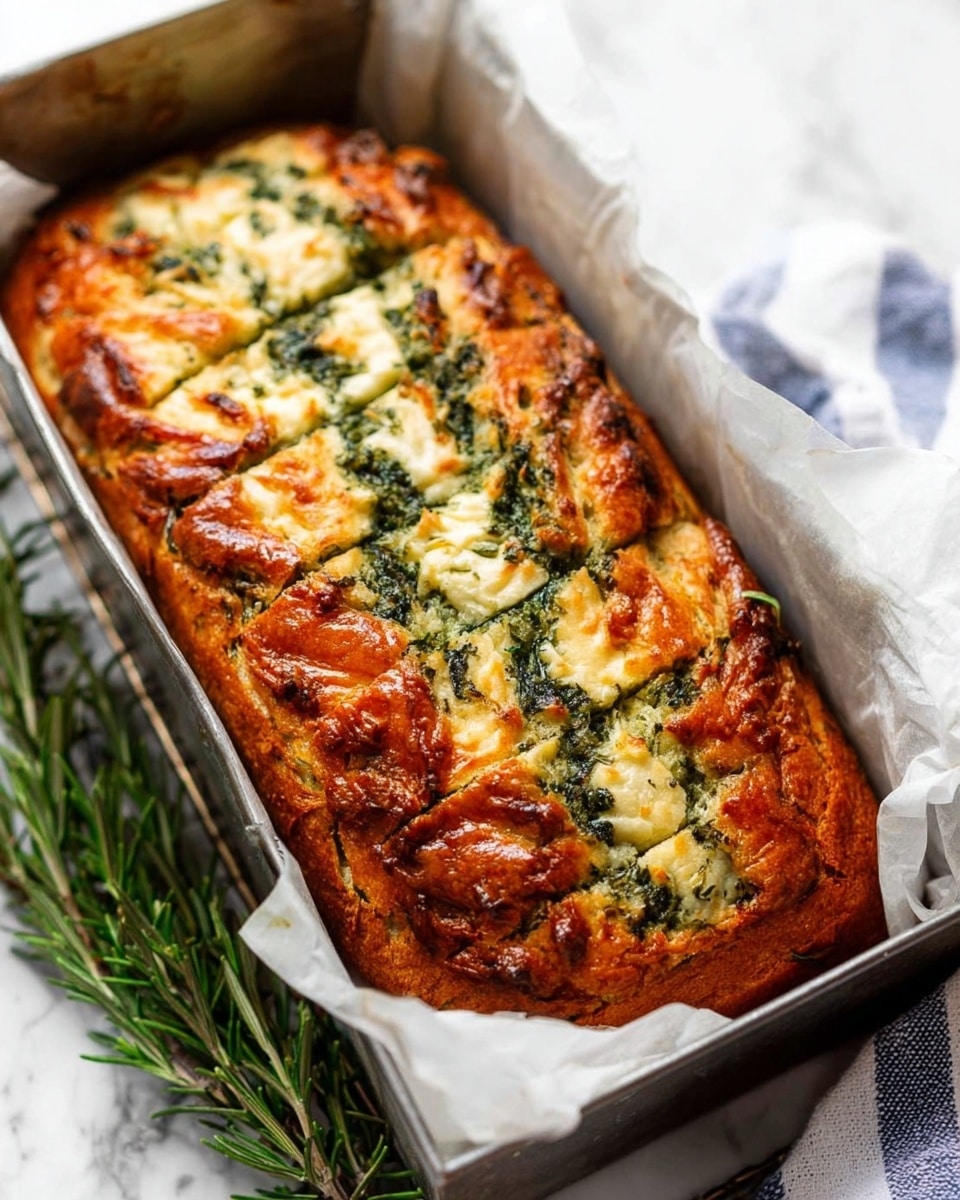
If you’re craving something warm, flavorful, and wonderfully comforting but don’t have the time or patience to wait for yeast to do its thing, I’ve got just the recipe for you. This Cheese, Garlic and Herb Quick Bread (No Yeast) Recipe is exactly what I turn to when I want a gorgeous, savory loaf on the table without hours of fuss or fussing over dough rising. It’s packed with melted cheese ribbons, fragrant herbs, and punchy garlic swirls — basically everything that makes bread taste like a hug. Stick around, and I’ll walk you through everything you need to know to make this fan-freaking-tastic bread come out perfectly every time.
Why You’ll Love This Recipe
- Fast and Easy: No yeast means no waiting — just mix, swirl, and bake for under an hour.
- Incredibly Flavorful: The garlic, fresh herbs, and cheese ribbons create incredible layers of taste throughout.
- Perfect Texture: Moist crumb with crispy, cheesy edges — impressive but foolproof.
- Customizable: You can easily tweak herbs and cheeses to suit your pantry or mood.

Ingredients You’ll Need
Every ingredient in this Cheese, Garlic and Herb Quick Bread (No Yeast) Recipe works together to build a loaf that’s bursting with savory notes and delightful textures. Here’s a little insight into why these ingredients are key and a few shopping tips that helped me the most over the years.
- Cheddar or tasty cheese block: I love cutting this into various thicknesses for those random melty ribbons that peek out of the bread. It’s all about that cheesy pull!
- Fresh rosemary and parsley: Fresh herbs punch up the aroma and flavor; if you only have dried, I’ll share how to adjust in the notes.
- Dried oregano and thyme: These add a deep, earthy herby base that pairs beautifully with the fresh herbs.
- Garlic cloves: Crushing or grating ensures that lovely garlic flavor spreads evenly through the bread without overpowering.
- Extra virgin olive oil: Adds richness and carries the herbs to immerse every bite with flavor.
- Plain flour (all-purpose): The backbone of your bread; I stick to plain flour here for structure without being too dense.
- Baking soda and salt: These are your leavening and seasoning agents — key to that quick rise and perfect taste.
- Plain yogurt: It keeps the bread moist and tender — Greek or regular works great.
- Milk: Full fat gives the best richness, but low fat works if that’s what you have.
- Eggs: They bind everything together and add to the bread’s structure.
- Unsalted butter and olive oil: I love combining both for butter’s depth and olive oil’s fruity notes.
- Additional garlic cloves for the wet ingredients: Adding a bit more soft garlic flavor straight into the batter.
Variations
I’ve played around with this Cheese, Garlic and Herb Quick Bread (No Yeast) Recipe quite a bit, and sometimes I swap or add ingredients to make it my own — and you absolutely should feel free to do the same! This bread is forgiving and flexible, making it a perfect canvas for your favorite flavors.
- Cheese Swap: I’ve tried sharp Colby and even smoked cheddar for a twist — each brings a different personality to the bread. Avoid mozzarella though; it tends to get too gooey and bland.
- Herb Variations: If you don’t have fresh herbs, using 1 tablespoon of dried herbs works well too. Sometimes I toss in a spoonful of pesto instead of chopping fresh herbs, which gives a vibrant green swirl and bonus flavor!
- Gluten-Free Version: I once made this with a blend of gluten-free flours (rice and tapioca) and xanthan gum, and while it’s not quite as fluffy, it’s a good alternative for special diets.
- Spicy Kick: I’ve added red chili flakes to the herb swirl for a subtle heat that my family loved.
How to Make Cheese, Garlic and Herb Quick Bread (No Yeast) Recipe
Step 1: Get your loaf pan ready and preheat the oven
First things first: preheat your oven to 180°C (350°F). Whether you have a fan or standard oven, this temp works like a charm for a perfect bake. Grease your loaf tin lightly with butter or oil spray, then line it with baking paper — this helps the bread come out effortlessly. I use a 21 x 11 x 7 cm loaf pan (about 8.3 x 4.5 x 2.75 inches), but if yours is bigger or smaller, just note your bread might be a little flatter or taller.
Step 2: Whip up the magical herb and garlic swirl
Mix the fresh rosemary, parsley, dried herbs, crushed garlic, olive oil, and salt in a small bowl until you get a thick, dollop-able mixture. This herb swirl is the secret to those gorgeous ribbons of flavor you’ll see as you slice into the bread. I discovered that crushing the garlic well helps distribute its flavor evenly without overpowering.
Step 3: Combine dry and wet ingredients separately
In a big bowl, whisk together the flour, baking soda, and salt — this makes sure your leavening is evenly spread and that you don’t get salty clumps. In another bowl, whisk the yogurt, milk, eggs, melted butter, olive oil, and the additional crushed garlic cloves. When I do this, I get a smooth batter that’s rich and fluffy thanks to the eggs and yogurt.
Step 4: Gently mix wet into dry and create the layers
Make a well in your dry ingredients and pour in the wet mixture. Stir until just combined — don’t overmix or your bread might turn out dense. Then, pour one third of the batter into your loaf tin. Dollop one third of the herb mixture evenly on top and use a knife to swirl it up and down, turning some of the batter over for a nice marbled effect. Next, lay down one third of your cheese slices randomly — some pushed in, some poking out. Repeat these layers two more times. Trust me, the rustic look of herbs and cheese poking out makes this bread look irresistible.
Step 5: Bake and enjoy the aroma
Pop your loaf into the oven for 30 minutes until the top is a beautiful golden brown. Then cover loosely with foil and bake for another 20 minutes to ensure the center is cooked through. Use a skewer to test—if it comes out clean, you’re good. Let the bread cool in the pan for about 5 minutes before turning it out onto a rack to cool for another 10. Cutting into it while warm with a bit of butter is heaven — but it’s delicious even plain!
Pro Tips for Making Cheese, Garlic and Herb Quick Bread (No Yeast) Recipe
- Don’t Overmix the Batter: I used to get impatient and stir too much, but I learned that gentle folding keeps the bread light and airy.
- Cut Cheese in Varied Widths: Mixing wider and narrower slices gives those beautiful random cheese ribbons that melt in patches for a rustic feel.
- Use Fresh Herbs When Possible: Fresh rosemary and parsley really brighten the flavor; if you only have dried, reduce the amount to one tablespoon.
- Cover with Foil Mid-Bake: Prevents the top from burning while allowing the bread to cook all the way through perfectly.
How to Serve Cheese, Garlic and Herb Quick Bread (No Yeast) Recipe

Garnishes
I usually sprinkle a little flaky sea salt on top of buttered slices right before serving to amplify the flavors. Fresh herb sprigs like parsley or rosemary can also brighten the presentation and fragrance. Another personal favorite is a light drizzle of good olive oil—so simple but so effective!
Side Dishes
This bread is a stunner with soups — think creamy tomato or roasted pumpkin — and equally at home alongside a fresh salad for a lighter meal. My family often pairs it with a big bowl of chili or a grilled veggie platter for dinner parties, and honestly, it holds up beautifully.
Creative Ways to Present
For special occasions, I slice it thick and arrange it on a wooden board with bowls of flavored butters, herb dips, and roasted garlic aioli. The contrasting textures and colors make it a showstopper appetizer. You can also slice it into smaller squares and serve warm with a sprinkle of fresh herbs for great party finger food.
Make Ahead and Storage
Storing Leftovers
I keep leftover quick bread in an airtight container at room temperature, and it stays good for up to 4 days, which is perfect for snackers like me who nibble over time. After that, I move it to the fridge to keep it fresher.
Freezing
This bread freezes wonderfully. I slice it first, then wrap individual slices in plastic wrap and store them in a freezer bag. That way, I can pop out just what I need without any waste.
Reheating
For reheating, I toast the frozen slices straight from the freezer or warm in a 160°C (320°F) oven for about 10 minutes wrapped in foil. This keeps the bread moist and brings back that fresh-baked aroma and texture you want.
FAQs
-
Can I make this Cheese, Garlic and Herb Quick Bread without fresh herbs?
Absolutely! If fresh herbs aren’t available, you can substitute them with about 1 tablespoon of dried herbs. Just mix them in with the dry ingredients. The flavor will be a bit more subtle, but still delicious. For an extra punch, adding a bit of pesto to the herb swirl is a great idea too.
-
What types of cheese work best for this recipe?
I recommend sharper, flavorful cheeses like cheddar, tasty cheese, or Colby. These melt nicely and add that savory punch. I steer clear of mozzarella because it lacks strong flavor and doesn’t complement the herbs as well.
-
How do I know when the bread is fully baked?
Use a skewer or toothpick to test the center — it should come out clean when inserted. If you see wet batter sticking to it, bake a little longer, covering the top with foil if it starts to brown too much before the center is done.
-
Can I prepare the batter ahead of time?
It’s best to bake the batter right after mixing because the baking soda begins working immediately. If necessary, you can prepare the herb swirl and cheese slices ahead, but mix the batter just before baking for best rise and texture.
Final Thoughts
Honestly, this Cheese, Garlic and Herb Quick Bread (No Yeast) Recipe has become a little treasure in my kitchen. It’s quick enough for busy days but special enough to impress guests — plus, the layers of cheese and herbs make it a real crowd-pleaser. If you try it, I’d love to hear which cheese or herb combo became your favorite. Trust me, once you make this, you’ll find yourself craving it again and again. It’s bread, but better — and that’s exactly why I’m excited for you to make it!
Print
Cheese, Garlic and Herb Quick Bread (No Yeast) Recipe
- Prep Time: 15 minutes
- Cook Time: 50 minutes
- Total Time: 1 hour 20 minutes
- Yield: 8-10 servings
- Category: Bread
- Method: Baking
- Cuisine: Western
- Diet: Vegetarian
Description
This Cheese, Garlic and Herb Quick Bread is a delicious no-yeast bread bursting with savory flavors from fresh herbs, garlic, and cheddar cheese. It’s a quick and simple recipe that combines a moist, tender crumb with cheesy ribbons and aromatic herb swirls, perfect for a flavorful snack or side dish. The layered herb and cheese swirls create an inviting texture and taste, baked to golden perfection in under an hour.
Ingredients
Cheese
- 7 oz / 200g block of cheese (cheddar or tasty), cut into 3mm / 0.1″ thick slices, varied widths for random ribbons throughout
Herb and Garlic Swirl
- 2 tbsp fresh rosemary, finely chopped
- 2 tbsp fresh parsley leaves, finely chopped
- 1 tsp dried oregano
- 1/2 tsp dried thyme
- 2 garlic cloves, crushed using garlic press or finely grated
- 3 tbsp extra virgin olive oil
- 1/2 tsp cooking salt / kosher salt (halve for fine table salt)
Dry Ingredients
- 2 1/4 cups plain flour (all-purpose flour)
- 1 tsp baking soda (bi-carbonate soda), substitute 3 1/2 tsp baking powder
- 3/4 tsp cooking salt / kosher salt (halve for table salt)
Wet Ingredients
- 1/2 cup plain yogurt, Greek or regular (full fat, unsweetened)
- 3/4 cup milk, full fat best, low fat okay
- 2 large eggs (~50-55g/2oz each)
- 3 1/2 tbsp (50g) unsalted butter, melted
- 2 tbsp olive oil
- 2 small garlic cloves, crushed with garlic crusher or grated
Instructions
- Preheat Oven: Preheat the oven to 180°C/350°F (both fan and standard ovens) to prepare for baking the quick bread evenly.
- Prepare Loaf Pan: Lightly grease a 21 x 11 x 7 cm (8.3 x 4.5 x 2.75″) loaf pan with butter or oil spray, then line it with baking paper to prevent sticking.
- Make Herb and Garlic Swirl: In a small bowl, combine fresh rosemary, parsley, dried oregano, thyme, crushed garlic, 3 tbsp olive oil, and 1/2 tsp salt to create a thick, dollop-able herb and garlic mixture.
- Mix Dry Ingredients: In a separate bowl, whisk together the plain flour, baking soda, and 3/4 tsp salt to ensure they are evenly distributed.
- Mix Wet Ingredients: In another bowl, whisk the yogurt, milk, eggs, melted butter, olive oil, and crushed garlic until smooth and combined.
- Combine Batter: Make a well in the center of the dry ingredients, then pour in the wet ingredients. Mix gently until just combined to avoid overmixing and ensure a tender crumb.
- First Layer of Swirls and Cheese: Pour one-third of the batter into the loaf tin. Dollop one-third of the herb and garlic mixture across the batter’s surface. Using a knife, swirl the herbs through the batter with up-and-down and twisting motions. Add one-third of the sliced cheese, pushing some slices deep into the batter and leaving some partially exposed.
- Repeat Layers: Repeat the swirling and cheese layering process two more times with the remaining batter, herbs, and cheese slices to build beautiful layers throughout the bread.
- Bake Bread: Bake in the preheated oven for 30 minutes or until the top is golden brown. Remove the bread from the oven, cover it loosely with foil, and bake for an additional 20 minutes. The total baking time is about 50 minutes. Check doneness by inserting a skewer into the center; it should come out clean.
- Cool Bread: Allow the bread to cool in the loaf tin for 5 minutes before carefully turning it out onto a cooling rack. Let it cool for at least another 10 minutes before slicing into thick pieces. Serve warm with optional butter for extra richness.
Notes
- Cheese: Using sliced cheese cut into varying widths creates visually appealing cheese ribbons. Shredded cheese can be substituted with 2 cups (200g), added after mixing wet and dry ingredients.
- Herbs: Feel free to experiment with herb combinations or substitute fresh herbs with 1 tbsp dried herbs. You can blend herbs with a stick blender for a finer mixture, adding more oil if needed.
- Loaf Pan Size: A larger pan will yield a flatter loaf but works fine for the recipe.
- Storage: Bread keeps for 4 days in an airtight container at room temperature and longer in the refrigerator. Refresh by toasting before serving.
- Do not use mozzarella cheese as it lacks sufficient salt and flavor for this recipe.
- The recipe was updated on June 6, 2025, with improvements and includes a recipe video and new photos.
Nutrition
- Serving Size: 1 slice (approx. 1/10th of loaf)
- Calories: 220 kcal
- Sugar: 2 g
- Sodium: 370 mg
- Fat: 12 g
- Saturated Fat: 6 g
- Unsaturated Fat: 5 g
- Trans Fat: 0 g
- Carbohydrates: 20 g
- Fiber: 1.2 g
- Protein: 8 g
- Cholesterol: 65 mg


