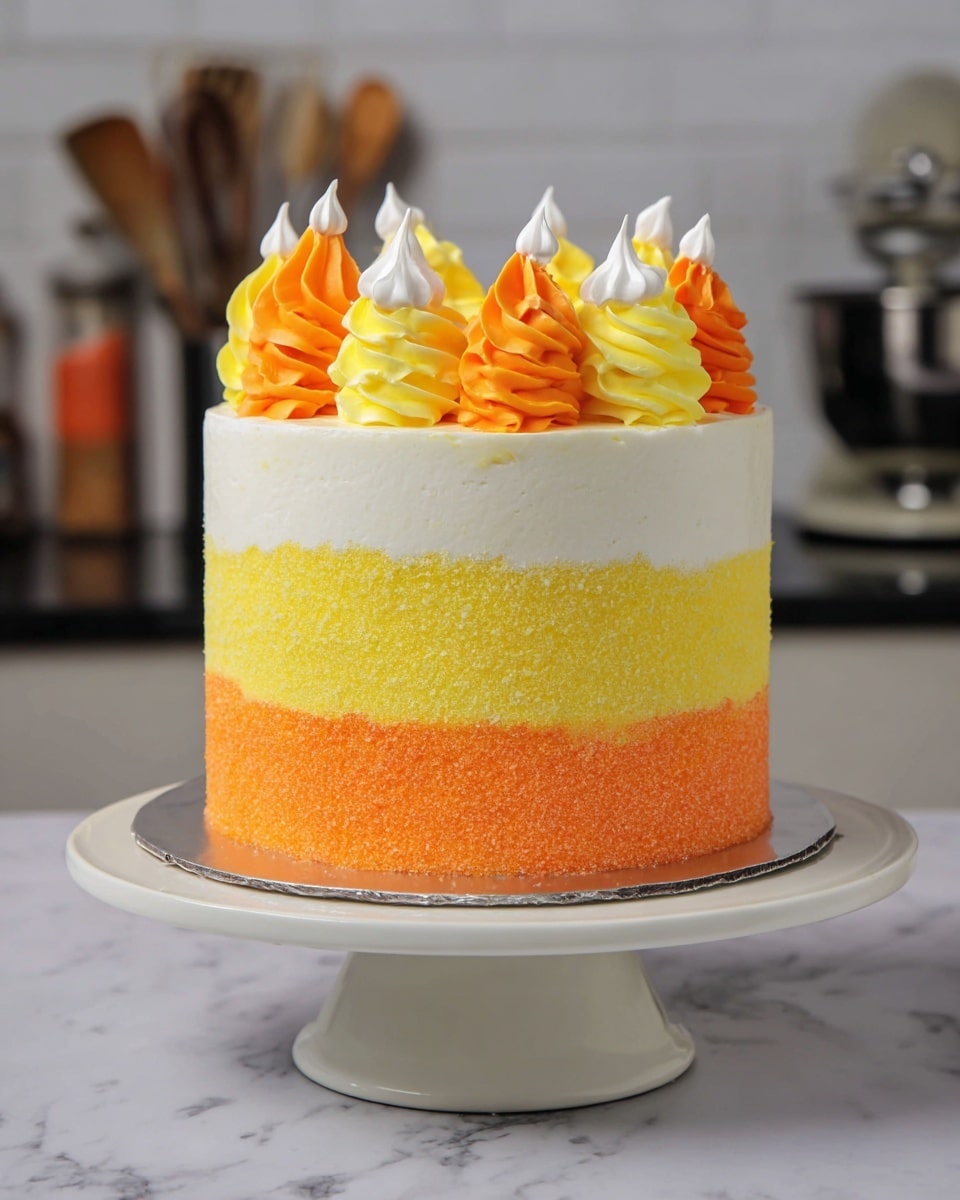
If you’re searching for a show-stopping dessert that captures the spirit of fall and Halloween with a fun, festive twist, you’re going to adore this Candy Corn Cake Recipe. It’s colorful, delicious, and honestly, a total crowd-pleaser! I love how the layers mimic the candy corn’s classic hues, and the marshmallow buttercream frosting adds a creamy, dreamy touch that makes every bite pure bliss. Stick with me here because I’m walking you through every step so you nail this cake perfectly at home.
Why You’ll Love This Recipe
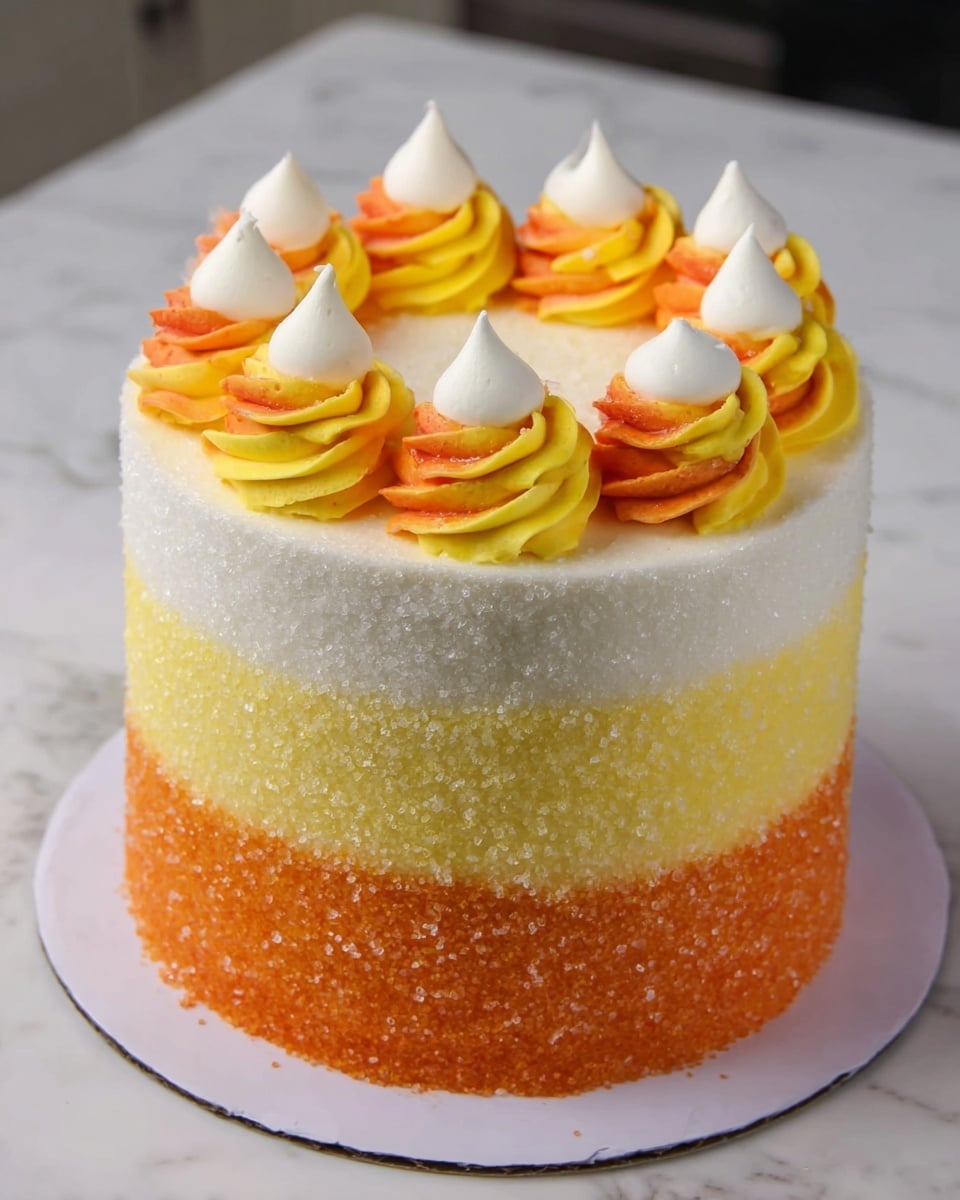
- Vibrant and Festive: The tri-color layers look just like classic candy corn, making it a perfect centerpiece for holiday celebrations.
- Smooth, Fluffy Texture: The combination of sour cream and egg whites creates a moist, tender crumb that you’ll notice with the very first bite.
- Marshmallow Buttercream Magic: This frosting is so creamy and light, with just the right amount of sweetness and a subtle marshmallow flavor that’s irresistible.
- Fun to Make and Customize: Coloring the batter and frosting lets you get playful, making it a fun activity for both beginner and experienced bakers alike.

Ingredients You’ll Need
Each ingredient in this Candy Corn Cake Recipe plays its part in creating the perfect balance of flavor and texture. I love using room temperature butter and egg whites because it helps everything mix together seamlessly, and the gel food coloring gives such vibrant, true-to-candy colors without watering down the batter.
- All-purpose flour: Provides the perfect structure and crumb for the cake without being too dense.
- Granulated sugar: Sweetens the cake evenly and helps with that tender texture.
- Baking powder: Your secret weapon for a nice, light rise in each layer.
- Fine salt: Balances the sweetness and enhances the other flavors.
- Unsalted butter: Adds richness; make sure it’s softened for easy mixing.
- Vanilla extract or vanilla bean paste: Classic flavor that complements the candy corn theme perfectly.
- Large egg whites: Lighten the batter and create airiness – using whites only keeps the crumb delicate.
- Full-fat sour cream: This ingredient is golden for moisture and a subtle tanginess to balance the sweetness.
- Vegetable or canola oil: Keeps the cake moist and tender without affecting flavor.
- Yellow and orange gel food coloring: For those bright, authentic candy corn colors that stand out.
- Marshmallow fluff: The star of the buttercream, creating that fluffy, marshmallow-y taste that ties the cake together.
- Powdered sugar: The base for the frosting’s sweetness and structure.
- Heavy whipping cream: Adds creaminess and helps you adjust the frosting’s texture perfectly.
- Wilton 1M frosting tip and piping bags: Essential for decorating the cake with those pretty swirls.
- Sanding sugar in orange, yellow, and white (optional): Adds a nice sparkle that mimics candy corn crystals and ups the fun factor.
Variations
I love making this Candy Corn Cake Recipe as is, but over time I’ve definitely played around with a few tweaks to suit different occasions or dietary needs. Feel free to adjust the colors, swap out some ingredients, or even add extra flavors—it’s a very forgiving recipe!
- Gluten-Free Option: I once swapped the flour for a gluten-free blend with great success—just be sure to check your blend includes xanthan gum for structure.
- Dairy-Free Version: Replace butter and sour cream with vegan butter and a dairy-free sour cream alternative; I found coconut-based options work best.
- Flavor Twists: Adding a teaspoon of almond extract or a touch of pumpkin spice to the batter is a fun way to switch things up for fall parties!
- Mini Cake Pops: I’ve turned this cake into bite-sized cake pops for easy serving at kids’ Halloween parties—the coloring is just as bright and they’re super cute.
How to Make Candy Corn Cake Recipe
Step 1: Prepping and Mixing the Batter
Start by preheating your oven to 350°F and lining three 6-inch cake pans with parchment rounds. Give them a quick spray with non-stick cooking spray so your cake won’t stick later—trust me, this step saves heartbreak! In your mixer, whisk together the flour, sugar, baking powder, and salt until fully combined. Next, add softened butter in chunks, mixing slowly so it breaks down and your mixture becomes crumbly but even. This little technique helps create those tender layers you love. Then, carefully mix in the egg whites on low speed so you keep all that air in the batter. Follow that with sour cream, vanilla, and oil—scraping down the sides to make sure everything’s smooth. The batter should be thick, creamy, and ready for some colorful fun!
Step 2: Coloring and Baking Your Layers
Divide your batter evenly into three bowls—that’s about 400 grams per bowl if you’re weighing it out—and leave one plain, color one yellow, and the last bowl orange using gel food coloring. Gel is best because it won’t mess with the batter’s texture or make it runny. Pour each differently colored batter into your prepared pans and slide them into the oven. Bake for about 32 to 34 minutes, but definitely start checking at 30 minutes with a toothpick or skewer. Once it comes out clean, you’re golden! Let the cakes cool for 10 minutes in their pans before running an offset spatula around each edge to loosen. Here’s a trick: pop those pans in the freezer for 30 minutes to speed up cooling—it really helps if you’re in a hurry. Once cool, flip them out onto a wire rack or board and use a serrated knife to level off any domes for even stacking.
Step 3: Crafting the Marshmallow Buttercream Frosting
While your layers bake and cool, it’s frosting time! Beat room temperature butter until smooth—I always use my stand mixer’s whisk attachment here. Slowly add powdered sugar, about a cup at a time, alternating with little splashes of heavy cream so the texture stays silky and doesn’t get dust-cloud heavy. Once fully incorporated, mix in your marshmallow fluff, vanilla, and salt, whipping things together until you hit that luscious, spreadable fluffiness. If the frosting feels too thick, add cream teaspoon by teaspoon until perfect; too thin? More powdered sugar in small doses is the answer. Now for the fun part: color 1 1/2 cups of frosting yellow, 1 cup orange, and leave 1 cup white. Pipe them into separate bags without tips yet—save those for decorating later.
Step 4: Assembling Your Candy Corn Cake
Place a dab of frosting on one of your greaseproof cake boards and set your first cake layer on top to anchor it. Spread an even layer of the marshmallow buttercream between each layer, stacking yellow, orange, and then white. Then, slather a thin crumb coat all over the outside and smooth it using a bench scraper. Chill the cake for about 10 minutes in the fridge or 5 in the freezer so the crumb coat firms up. This makes your next frosting layers easier to spread and gives you those smooth sides bakers dream about. Using the colored frosting bags, frost the bottom third of the cake yellow, the middle third orange, and the top third white, leaving the top of the cake unfrosted for now. Smooth again with your bench scraper—this step makes a huge difference in the final look!
Step 5: Adding the Finishing Touches
Put another greaseproof board on top of the cake, then pour sanding sugar into a baking sheet in stripes—yellow, orange, and white—matched to your frosting bands. The trick: carefully turn the cake on its side and roll it gently in the sandings to coat the sides with sparkle just like candy corn crystals. Place the cake upright back on your stand, remove the top board, and sprinkle white sanding sugar over the top for that extra glimmer. Fit your colored frosting bags with a Wilton 1M tip and pipe swirls on the top—you’ll be amazed at how these simple swirls add such a professional finish. I always find this step so rewarding; your cake will look stunning and taste even better!
Pro Tips for Making Candy Corn Cake Recipe
- Room Temperature Ingredients Matter: Using room temp butter, egg whites, and sour cream ensures your batter mixes evenly and gets that perfect texture.
- Freezing Cake Layers Helps: I discovered that chilling cake layers in the freezer for 30 minutes before frosting makes them easier to handle and assemble without crumbling.
- Gel Food Coloring is Your Friend: It keeps your batter thick and vibrant without diluting the mix like liquid colors can.
- Avoid Airy Buttercream Issues: Mix your frosting on low speed at the end or stir gently with a spatula to remove air bubbles, giving you a smoother finish.
How to Serve Candy Corn Cake Recipe
Garnishes
I usually top the cake with those classic piped swirls using the Wilton 1M tip because they’re elegant and simple to do, plus they add a pretty texture contrast. Adding sanding sugar is optional, but it really makes the cake sparkle and looks just like candy corn crystals. Sometimes I toss in a few whole candy corns around the base or on top for a playful touch, especially when serving kids.
Side Dishes
This cake is a star, so I like to keep sides light and simple—think fresh fruit platters or a vanilla bean ice cream on the side for those who want an extra indulgence. For fall parties, a warm spiced cider or hot chocolate pairs perfectly with the sweet, rich flavors of this cake.
Creative Ways to Present
For Halloween, I’ve displayed this cake surrounded by mini pumpkins and fall leaves for an eye-catching centerpiece. Another fun idea is to serve this cake as mini layered cupcakes using the same colored batters and piped marshmallow frosting—guests love the individual portion size. Wrapping the cake in a clear cake box tied with an orange and yellow ribbon makes a festive gift as well!
Make Ahead and Storage
Storing Leftovers
I store leftover Candy Corn Cake wrapped loosely in plastic wrap or in an airtight container in the fridge. It keeps well for up to 4 days, though I always recommend bringing it to room temperature before serving to soften the frosting and the cake layers.
Freezing
I’ve frozen individual unfrosted cake layers before by wrapping them tightly in plastic wrap and foil. When ready to use, thaw them overnight in the fridge, then frost as usual. The fully assembled and frosted cake is a bit more delicate to freeze, but wrapping tightly and freezing for up to a month can work if handled with care.
Reheating
If you want to warm up a slice, I recommend microwaving it gently in 10-second increments so the buttercream softens without melting completely. This brings out the rich flavors and makes the texture even more enjoyable.
FAQs
-
Can I make this Candy Corn Cake Recipe ahead of time?
Absolutely! You can bake the cake layers up to 3 days in advance—just wrap them tightly and store in the fridge or freeze them for longer storage. Assemble and frost the cake on the day you plan to serve it for the freshest taste and best texture.
-
What if I don’t have a 6-inch pan?
You can absolutely use 8- or 9-inch pans, but keep in mind the cake layers will be thinner, so adjust the baking time accordingly—start checking for doneness around 20-25 minutes. You may also want to double the recipe to get the same height.
-
Can I use liquid food coloring instead of gel?
Gel food coloring is best here because it gives you vibrant color without adding extra liquid, which can affect batter consistency. If you must use liquid, use it sparingly and adjust flour slightly if batter becomes too thin.
-
How long will leftovers keep?
Stored properly in the fridge, this cake stays delicious for up to 4 days. Just be sure to keep it covered well to prevent drying out.
-
Is the marshmallow buttercream very sweet?
It’s sweet, but balanced perfectly by the sour cream in the cake and the slight salt in the frosting. If you prefer a less sweet frosting, you can reduce powdered sugar slightly or use less marshmallow fluff, but I find this ratio just right.
Final Thoughts
This Candy Corn Cake Recipe holds a special place in my heart because it brings so much joy every time I bake it—it’s colorful, fun, and truly delicious. I started making this cake for Halloween gatherings, but my family loved it so much it became a fall staple. I hope you’ll give it a try and enjoy the process as much as the final product. Trust me, once you taste this moist cake layered with fluffy marshmallow buttercream, you’ll be hooked just like I am. Happy baking!
Print
Candy Corn Cake Recipe
- Prep Time: 20 minutes
- Cook Time: 34 minutes
- Total Time: 1 hour 24 minutes
- Yield: 16 servings
- Category: Cakes
- Method: Baking
- Cuisine: American
Description
This vibrant Candy Corn Cake is a colorful celebration of fall flavors and festive fun. Featuring moist vanilla cake layers tinted in classic candy corn colors and enveloped in a luscious marshmallow buttercream frosting, this cake is perfect for Halloween or any autumn gathering. The cake layers are perfectly tender, while the marshmallow buttercream adds a creamy, fluffy sweetness with a hint of vanilla. Finished with sanding sugar and beautiful piped swirls, this cake is as delightful to look at as it is to eat.
Ingredients
Vanilla Cake
- 2 cups + 2 Tbsp all-purpose flour (276 grams)
- 2 cups granulated sugar (400 grams)
- 1 1/2 tsp baking powder (6 grams)
- 1/2 tsp fine salt (3 grams)
- 2/3 cup unsalted butter, room temperature (150 grams – 1 and 1/3 sticks)
- 1 tsp vanilla extract or vanilla bean paste (4 grams)
- 2/3 cup large egg whites, room temperature or about 5 egg whites (155 grams)
- 1 cup full-fat sour cream, room temperature (228 grams)
- 1 Tbsp vegetable or canola oil (14 grams)
- Yellow and orange gel food coloring
Marshmallow Buttercream Frosting
- 2 cups unsalted butter, room temperature (434 grams)
- 7 cups powdered sugar (907 grams)
- 1 small jar marshmallow fluff (7.5 oz or 213 grams)
- 1/2 tsp fine salt (3 grams)
- 1/3 cup heavy whipping cream, room temperature (80 grams)
- 1 Tbsp vanilla extract or vanilla bean paste (12 grams)
- Yellow and orange gel food coloring
Additional Decorations
- Large piping bags
- Wilton 1M frosting tip
- Orange, yellow, and white sanding sugar (optional)
- 2 6-inch greaseproof cake boards
Instructions
- Prepare Cake Pans: Preheat the oven to 350°F (177°C). Line three 6-inch cake pans with parchment paper rounds and grease them using non-stick cooking spray to ensure easy removal of the cake layers.
- Mix Dry Ingredients: In a stand mixer fitted with the paddle attachment, combine flour, baking powder, sugar, and salt. Mix until fully combined for an even distribution of dry ingredients.
- Add Butter: Slowly add chunks of room-temperature butter to the dry mixture on low speed. Continue mixing until no visible chunks remain and the mixture turns crumbly, mimicking a sandy texture.
- Incorporate Wet Ingredients: Pour in the egg whites and mix on low until just combined. Next, add the sour cream, mixing gently at low speed. Add vanilla extract and vegetable oil, blending until fully incorporated. Scrape down the bowl’s sides with a spatula, then beat on medium speed for 30 seconds for a smooth batter.
- Color the Batter: Divide the batter evenly into three bowls. Tint one portion yellow, one orange, and leave the last uncolored using gel food coloring. Carefully mix each color to ensure even distribution without overmixing.
- Bake Cake Layers: Pour each color batter into the prepared pans. Bake for 32-34 minutes or until a toothpick inserted in the center comes out clean. After baking, allow pans to cool for 10 minutes.
- Cool and Level: Run an offset spatula around pans to loosen edges, then transfer pans to the freezer for 30 minutes to speed cooling. Once cooled, flip pans to release cakes and use a serrated knife to level tops for even stacking.
- Make Marshmallow Buttercream: While cakes bake and cool, beat butter on medium speed with a whisk attachment until smooth, about 30 seconds. Gradually add powdered sugar in 1 cup increments, alternating with small splashes of heavy cream, mixing thoroughly after each addition. Incorporate marshmallow fluff, vanilla, and salt, beating until smooth and desired consistency is achieved. Adjust thickness with additional cream or powdered sugar as needed.
- Color Frosting: Tint 1 1/2 cups of frosting yellow, 1 cup orange, and leave 1 cup white. Place each color into separate piping bags without tips initially.
- Assemble the Cake: Place a dab of frosting on a 6-inch greaseproof cake board to secure the first layer. Stack and spread an even layer of marshmallow buttercream between each cake layer. Apply a thin crumb coat of frosting around the assembled cake. Smooth the coat with a bench scraper and chill in fridge for 10 minutes or freezer for 5 minutes until firm.
- Decorate the Cake: Apply a thick second layer of frosting. Cover the bottom third of the cake with yellow buttercream, the middle third with orange, and the top third with white. Smooth with a bench scraper, then place the second cake board on top.
- Add Sanding Sugar: Layer sanding sugars in a baking pan in the same order (yellow, orange, white). Tilt and roll the chilled cake sideways through the sugar to coat the outside. Return cake to stand, remove top board, and cover the top with white sanding sugar.
- Final Piping: Fit each piping bag with a Wilton 1M tip using a coupler. Pipe buttercream swirls on top of the cake for an elegant finish.
Notes
- One batch of batter weighs about 1200 grams; divide evenly with approximately 400 grams per 6-inch pan for consistent layers.
- Once cooled, trimming caramelized edges with a serrated knife can produce cleaner cake layers.
- Cake layers can be made ahead and wrapped properly; consult advance preparation techniques for best results.
- Mix buttercream on the lowest speed for a few minutes at the end to remove excess air and ensure a smooth finish suitable for decorating.
- Alternatively, use a rubber spatula to manually stir the frosting, pushing it side to side to eliminate air bubbles and get ultra-smooth cake sides.
Nutrition
- Serving Size: 1 slice (approx. 1/16th cake)
- Calories: 450 kcal
- Sugar: 45 g
- Sodium: 150 mg
- Fat: 25 g
- Saturated Fat: 15 g
- Unsaturated Fat: 8 g
- Trans Fat: 0.2 g
- Carbohydrates: 55 g
- Fiber: 1 g
- Protein: 4 g
- Cholesterol: 65 mg


