
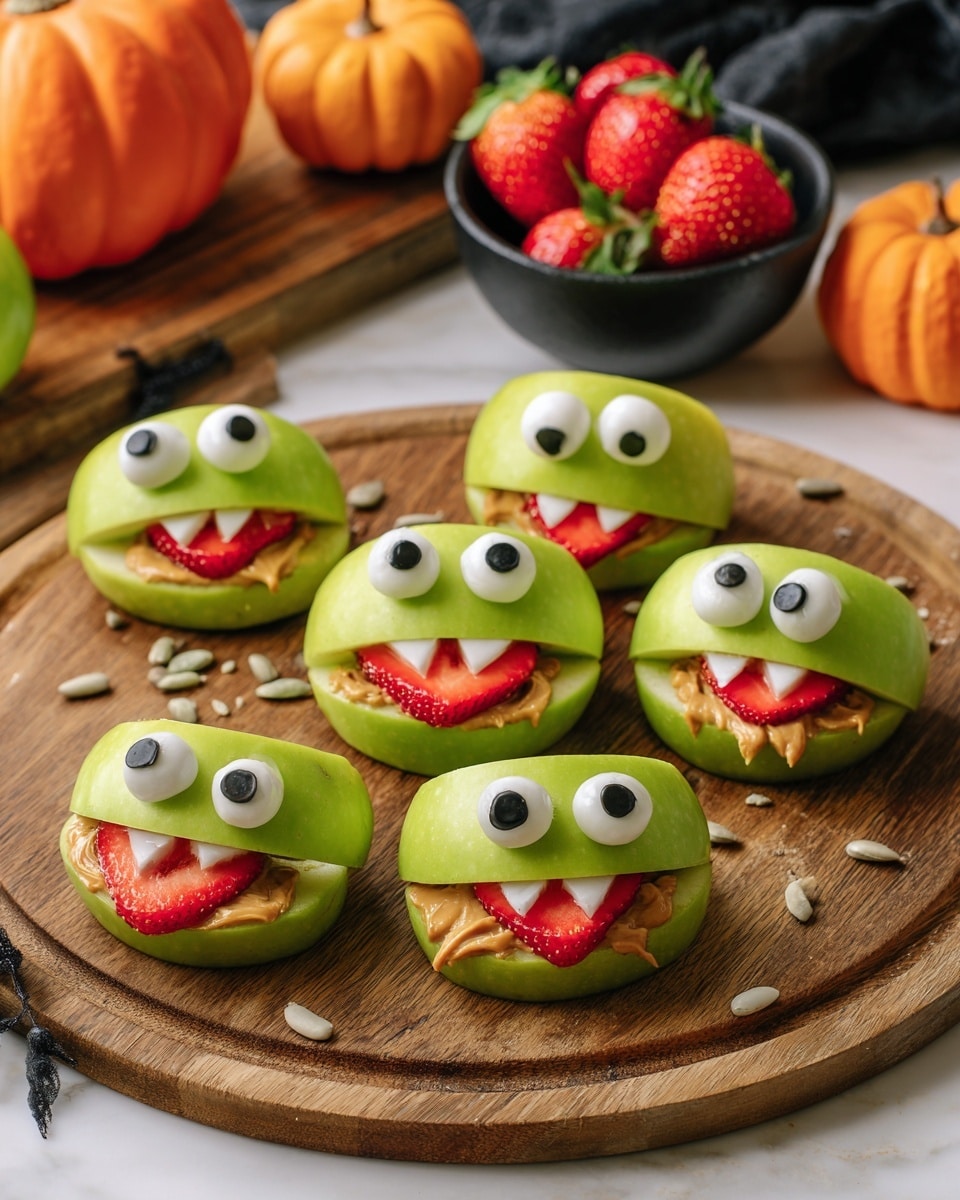
If you’re looking for a fun and spooky treat that’s as easy as it is adorable, you’ve got to try my Halloween: Apple Monster Mouths Recipe. This playful snack combines fresh crisp apples with creamy peanut butter and some quirky little teeth made from candy or almonds — it’s perfect for Halloween parties or just a silly afternoon surprise. I absolutely love how this turns out and can’t wait for you to make it too!
Why You’ll Love This Recipe
- Super Easy to Make: No need for baking or special equipment, just quick prep and you’re done.
- Healthy Yet Tasty: Apples provide a fresh crunch while peanut butter adds protein and richness.
- Fun for Kids and Adults: My family goes crazy for the chance to customize their monster mouths!
- Perfect Halloween Snack: It’s festive, creative, and a great way to sneak in some fruit during spooky season.

Ingredients You’ll Need
These ingredients come together so well because the crisp apples and creamy peanut butter balance each other perfectly, while the candy “teeth” add visual fun and texture. When shopping, pick apples that are firm and not too sweet — Granny Smiths or Honeycrisps work beautifully here.
- Apples: Use fresh, firm apples—slicing them just right makes all the difference for the “mouths.”
- Creamy peanut butter: I prefer creamy for easy spreading and sticking the layers together.
- Mini marshmallows, candy corn, or almond slivers: These become your monster teeth—choose depending on your texture and flavor preference.
- Lemon juice or Sprite: To dip apple slices and prevent browning (trust me, this little trick keeps them looking fresh).
- Candy eyes: Adding candy eyes really brings the monster mouths to life and makes them extra cute.
Variations
I love mixing things up with this Halloween: Apple Monster Mouths Recipe because it keeps my kids excited and lets you tailor the snack to what you have on hand or dietary needs. Feel free to get creative!
- Nut-Free Version: Swap out peanut butter for sunflower seed butter or cream cheese to accommodate allergies while keeping the same fun texture.
- Vegan Option: Use a plant-based nut or seed butter and try vegan mini marshmallows (or skip marshmallows entirely) to keep it vegan-friendly.
- Sweet Tooth Boost: Add a drizzle of honey or chocolate spread inside the “mouth” to up the indulgence for Halloween parties.
- Extra Crunch: Toss in some crushed pretzels or granola along with the “teeth” to add a salty, crunchy contrast that’s surprisingly delicious.
How to Make Halloween: Apple Monster Mouths Recipe
Step 1: Prepare Your Apples Like a Pro
Start by coring your apples and slicing them into wedges. I like to use a trusty apple slicer because it makes the pieces uniform and keeps things neat. Once sliced, dip the apple wedges in lemon juice or a little Sprite to prevent browning — I discovered this trick when my apples turned unappetizingly brown last time. It really keeps them looking fresh and crisp!
Step 2: Build Your Monster Mouths
Take two apple slices and spread creamy peanut butter on one side of each slice. Then, sandwich them together so it looks like a little mouth. If you find the peanut butter isn’t holding them well enough, toothpicks work like a charm to keep everything in place. This step is when the magic happens, and your apple monsters start to take shape.
Step 3: Add the Teeth and Eyes
Stick your mini marshmallows, candy corn, or almond slivers into the peanut butter to form the monster’s teeth. I usually mix these up for a spooky, mismatched effect that looks more monster than perfect. Finally, press candy eyes onto the top slice or set them nearby for the ultimate spook factor. This step is hands-down my favorite because the monsters really come alive now.
Pro Tips for Making Halloween: Apple Monster Mouths Recipe
- Prevent Browning: Dipping apple slices in lemon juice or Sprite right after slicing keeps them fresh longer without altering flavor.
- Peanut Butter as Glue: Use a good layer of creamy peanut butter to ensure slices stick well; if needed, toothpicks save the day.
- Teeth Placement: For a more natural monster look, alternate between mini marshmallows and almond slivers for varied sizes.
- Work Quickly: Apples brown fast, so prep and assemble in one go, or keep slices dipped until ready to build.
How to Serve Halloween: Apple Monster Mouths Recipe
Garnishes
On the day I make these, I love adding extra candy eyes around the platter and a sprinkle of cinnamon or pumpkin spice on the peanut butter for a seasonal touch. Sometimes a few extra mini marshmallows scattered nearby make for fun “monster drool” effect—kids get such a kick out of it!
Side Dishes
This Halloween: Apple Monster Mouths Recipe pairs wonderfully with fresh veggie sticks or a small cup of caramel dip if you’re feeling indulgent. For a party, I like setting out some popcorn or pumpkin-shaped cookies alongside for a full spooky snack spread.
Creative Ways to Present
One year, I arranged these apple mouths in a circle on a dark platter with gummy worms crawling in between—it was totally creepy and adorable. You can also serve them on skewers or place them on a bed of lettuce with “blood” (raspberry sauce) for a spooky effect that guests remember.
Make Ahead and Storage
Storing Leftovers
Leftover apple monster mouths are best stored in an airtight container in the fridge, preferably with a little lemon juice on the apples to keep browning at bay. From my experience, they stay fresh for a day, but after that the apples start losing their crunch and the peanut butter can get a bit dry.
Freezing
I don’t recommend freezing this Halloween: Apple Monster Mouths Recipe because the texture of the apples changes when frozen and thaws, turning mushy. Freshness is key here, so it’s best to make them fresh for each occasion.
Reheating
There’s no reheating needed or recommended here since it’s a cold snack. Just build and eat immediately for the best crunch and flavor, or let them chill a bit in the fridge if you prefer cooler treats on a warm day.
FAQs
-
Can I use other fruits instead of apples for this recipe?
Absolutely! While apples are ideal for their firmness and crisp texture, pears or firm slices of melon can work as alternatives. Just make sure the fruit is sturdy enough to hold the peanut butter and “teeth” without becoming mushy.
-
What if someone in my family has a peanut allergy?
You can swap out peanut butter for sunflower seed butter, soy nut butter, or even cream cheese to keep the sticky “mouth” effect without the allergen. Just make sure the replacement spreads well and can hold the apple slices together.
-
How do I keep the apple slices from browning quickly?
Dipping sliced apples in lemon juice or Sprite immediately after cutting will slow down oxidation and prevent browning. Remember, working quickly and assembling soon after slicing helps maintain that fresh look.
-
Can I prepare these ahead of time for a party?
While you can prep apple slices and keep them in lemon juice for a short time, it’s best to assemble the monster mouths shortly before serving to keep the apples crisp and peanut butter fresh. If you must prep ahead, keep everything chilled and wrapped tightly.
Final Thoughts
This Halloween: Apple Monster Mouths Recipe is one of those special, simple ideas that brings smiles every time I make it. It’s perfect for a quick snack, a fun family activity, or a Halloween gathering centerpiece that’s both festive and healthy. I hope you have as much fun putting these together as I do and that they add a little spooky joy to your celebrations!
Print
Halloween: Apple Monster Mouths Recipe
- Prep Time: 15 minutes
- Cook Time: 0 minutes
- Total Time: 15 minutes
- Yield: Approximately 12 monster mouths (assuming 6 apples with 2 slices per mouth)
- Category: Snack
- Method: No-Cook
- Cuisine: American
- Diet: Vegetarian
Description
These Halloween Apple Monster Mouths are a fun, spooky snack perfect for kids and parties. Crisp apple slices are paired with creamy peanut butter and decorated with candy teeth and eyes to create monstrous smiles. Quick to prepare and visually entertaining, they make a healthy and festive treat for the Halloween season.
Ingredients
Fruits
- 3 large apples
Fillings & Decorations
- 3/4 cup creamy peanut butter
- Mini marshmallows, candy corn, or almond slivers (to make teeth)
- Candy eyes
Other
- Sprite or lemon juice (to keep apples from browning)
Instructions
- Prepare apples: Remove the core from the apples and slice them into wedges, ideally using an apple slicer for even pieces.
- Prevent browning: Dip the apple slices in lemon juice or Sprite to keep them from turning brown while assembling.
- Assemble monster mouths: Take two apple slices and spread creamy peanut butter on one side of a slice. Use the peanut butter to stick the two slices together, forming a mouth shape. If needed, secure with toothpicks for stability.
- Add the teeth: Stick mini marshmallows, candy corn, or almond slivers into the peanut butter between the apple slices to resemble monster teeth.
- Decorate eyes: Attach candy eyes on the top of the assembled apple mouths to complete the monster look.
Notes
- You can substitute peanut butter with other nut or seed butters if allergies are a concern.
- Use lemon juice rather than Sprite for a less sweet option to prevent browning.
- To make it easier for kids, pre-assemble the monster mouths and allow them to decorate with candy eyes.
- Keep the apple slices refrigerated until serving to maintain freshness.
- Adjust the amount of peanut butter for easier spreading and sticking as needed.
Nutrition
- Serving Size: 1 monster mouth
- Calories: 150
- Sugar: 12g
- Sodium: 70mg
- Fat: 8g
- Saturated Fat: 1.5g
- Unsaturated Fat: 6g
- Trans Fat: 0g
- Carbohydrates: 20g
- Fiber: 3g
- Protein: 4g
- Cholesterol: 0mg


