
If you’re looking for a fun, festive, and absolutely delicious treat this season, you’ve got to try my Halloween Apple Slices Recipe. I remember the first time I made it — my family went crazy for these cute little spooky snacks that are as much fun to make as they are to eat. Whether you want a healthy-ish treat or a party showstopper, this recipe hits all the right notes with crunchy apples, rich chocolate, and playful decorations that’ll have everyone asking for more.
Why You’ll Love This Recipe
- Playful and Festive: These apple slices turn into spooky little characters that kiddos and adults both adore.
- Quick and Easy: The whole recipe takes about 30 minutes, perfect for last-minute Halloween fun.
- Balanced Treat: You get the crisp sweetness of fresh apples balanced with luscious chocolate and candy decorations.
- Customizable: There’s plenty of room to get creative with different toppings and decorations to suit your tastes.

Ingredients You’ll Need
The beauty of this Halloween Apple Slices Recipe is in its simple, approachable ingredients that come to life with fun assembly and chocolate magic. When shopping, pick firm, crisp apples because they hold up best when dipped and decorated.
- Large apples: Choose crisp varieties like Honeycrisp or Granny Smith for that perfect sweet-tart crunch.
- Dark chocolate melting wafers: These melt smoothly and give a rich chocolate coating.
- White chocolate melting wafers: Great for drizzling and contrast decorating.
- Oreo cookies: One gets crushed for spider bodies, others get used as bat wings — so creative!
- Almond slivers: Perfect to mimic bat wings or sharp details.
- Mini and large googly candy eyes: These bring your spooky creatures to life — I love how they add personality.
- Chocolate chips: Adds dimension, especially for bats’ ears or other details.
- Black lace licorice: Use as spider legs for a fun chewy addition.
Variations
I’m all about putting your personal spin on this Halloween Apple Slices Recipe. Over time, I’ve discovered that swapping out decorations or even trying different fruits can make this treat work for all sorts of preferences and occasions.
- Variation: My kids sometimes prefer using dried cranberries or raisins instead of candy eyes for a less sweet, natural look. It still looks spooky but gives a different texture.
- Variation: For a nut-allergy friendly version, skip the almonds and use small pretzel sticks as bat wings — it adds a salty crunch I adore.
- Variation: If you’re going gluten-free, just double-check your cookies—a gluten-free wafer cookie works just as well.
- Variation: To switch things up, I’ve even swapped the apple slices for pear slices, which hold up nicely and add a mellow sweetness.
How to Make Halloween Apple Slices Recipe
Step 1: Prep Your Apple Slices Like a Pro
Start by slicing your apples into about 12 rings—each apple gives you roughly 4-6 slices depending on size. Sandwich these apple rings between paper towels and gently pat them dry. This step is super important because removing excess moisture helps the chocolate stick better and prevents sogginess. I learned this the hard way after noticing my first batch’s chocolate slid right off!
Step 2: Create Your Cookie Monster Magic
Crush one Oreo cookie into fine crumbs for the spider bodies, and from the other two cookies, remove the creamy filling and cut the sandwich cookies in half to make bat wings. I like to keep everything organized in little bowls so when I’m ready to decorate, I’m not scrambling around looking for supplies.
Step 3: Insert Popsicle Sticks and Melt Chocolate
Use a small knife to cut a slit at the bottom of each apple ring and gently slide in a lollipop or popsicle stick. This makes handling the slices so much easier. Melt your dark chocolate wafers following the package directions—make sure to stir frequently for a smooth, lump-free finish.
Step 4: Decorate Your Spooky Creatures
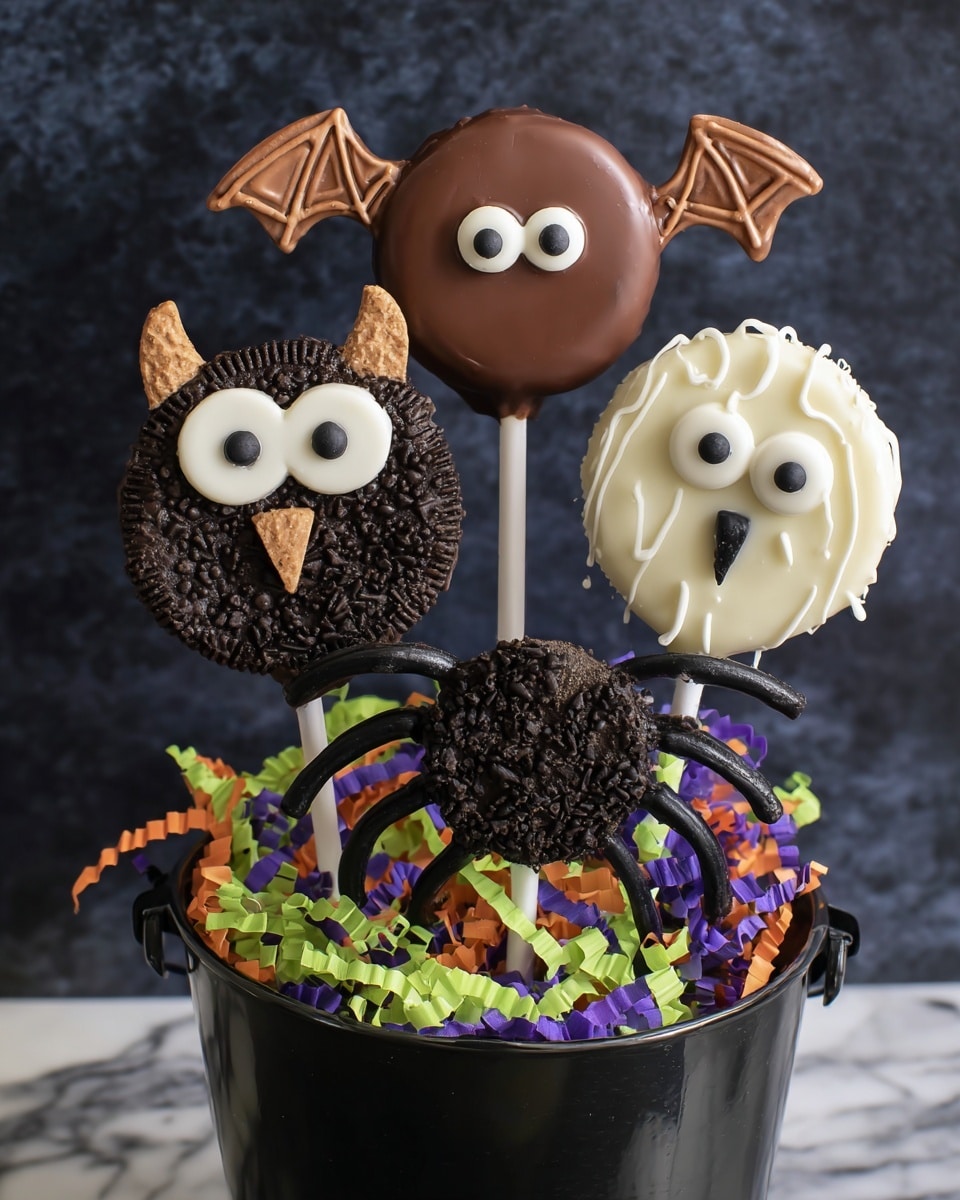
While the dark chocolate is still wet on the apple slices, add the googly candy eyes and crushed Oreo crumbs to form spider bodies. For the spider legs, dip the ends of licorice strings in chocolate and attach them around the spider body on the apple ring. One trick I discovered is letting the chocolate set just enough so it’s tacky but not hard before adding licorice legs — then hold each leg for a few seconds until it stands by itself. Sprinkle a little more crushed Oreo over the dipped ends to help them blend in beautifully.
For the bats, add eyes and wings while the chocolate’s wet but wait for the chocolate to set a bit before you attach the almonds and chocolate chips for wings and ears. I like dipping the tips of almonds and bottoms of chocolate chips in chocolate before pressing them on — it really helps them stick firmly.
Step 5: Make Your Mummies With White Chocolate
Melt your white chocolate wafers next. When the dipped apple rings are ready, press the eyeballs into the wet white chocolate. After placing all your mummy eyes, spoon the white chocolate into a small baggie, cut off a tiny corner, and drizzle randomly over the apple rings to create the signature mummy strips. This step is where your creativity shines—no two mummies are exactly alike!
Step 6: Display and Serve
Stick your finished apple slices into a styrofoam block or pop them into plastic baggies tied with bright string. It’s such a cute presentation and makes for easy serving at Halloween parties or classroom treats.
Pro Tips for Making Halloween Apple Slices Recipe
- Keep Apples Dry: Patting your apple slices thoroughly dry is a game changer to keep the chocolate sticking perfectly without sliding off.
- Use a Baggie for Drizzling: When making mummy strips with white chocolate, piping bags are your best friend for a clean and controlled drizzle effect.
- Chocolate Temperature Matters: Make sure chocolate isn’t too hot or too cool — if it’s too hot, it’ll be runny and drip everywhere; if too cool, decorations won’t stick well.
- Hold Legs in Place: For licorice spider legs, hold each on the apple slice for a few seconds to ensure they set well rather than falling off.
How to Serve Halloween Apple Slices Recipe
Garnishes
I like to sprinkle a little extra crushed Oreo over the plate for a spooky “dirt” effect or scatter some edible glitter stars for a magical touch. Sometimes I add a tiny dash of red food coloring around the edges of the apple slices for a bloody Halloween vibe — it’s super simple but adds so much flair!
Side Dishes
These apple slices pair beautifully with a warm pumpkin spice latte or a creamy hot chocolate. For parties, I like to serve them alongside caramel popcorn or pumpkin-shaped sugar cookies — all the pumpkin and fall vibes!
Creative Ways to Present
One of my favorite presentations was at my kid’s Halloween party: I filled a large cauldron or bowl with dry ice (safely!), then stuck the apple slices into Styrofoam blocks hidden beneath. The smoky effect was a real show-stopper! You can also line them up on a decorated platter with faux spider webs and mini pumpkins for a cute seasonal vibe.
Make Ahead and Storage
Storing Leftovers
I store leftover Halloween apple slices in an airtight container in the fridge, placing a sheet of parchment paper between layers so they don’t stick to one another. They keep well for about 2 days, but I recommend eating them sooner for the best crispness.
Freezing
Freezing the decorated apple slices isn’t something I recommend because the texture of the apple changes and the chocolate can crack upon thawing. If you want to prep ahead, pre-slice the apples and keep those refrigerated, then assemble and decorate on the day of your event.
Reheating
Since these treats are best served cold or room temperature, I don’t usually reheat them. But if you want to soften the chocolate a bit, just let them sit at room temperature for 10-15 minutes before serving.
FAQs
-
Can I use a different type of apple for this recipe?
Absolutely! While I recommend firm, crisp apples like Honeycrisp or Granny Smith for the best texture, you can use any apple you prefer. Just remember that softer apples might not hold up as well when dipped and decorated.
-
How do I prevent the apple slices from browning?
To slow browning, you can briefly dip the apple slices in lemon water right after slicing, then dry them thoroughly before decorating. This helps keep them looking fresh and bright for your Halloween display.
-
Can I make these apple slices ahead of time?
You can prep the apple slices and melt the chocolate a day ahead, but I recommend assembling and decorating the characters on the day you plan to serve to keep the apples crisp and chocolate fresh.
-
What if I don’t have melting wafers?
You can use regular chocolate chips, but add a little vegetable oil when melting to achieve a smoother consistency. Just melt gently to avoid burning the chocolate.
-
Are there any substitutions for the licorice spider legs?
Yes! You can use thin pretzel sticks or black string licorice twists if you prefer something less chewy. Just make sure whatever you use sticks well to the chocolate base.
Final Thoughts
I absolutely love how this Halloween Apple Slices Recipe marries simplicity with whimsy — it’s become my go-to for adding a little magic and crunch to Halloween celebrations. Whenever I make these, I feel like I’m making more than just a snack; it’s a memory in the making with everyone gathered around the kitchen, giggling over spider legs and mummy drizzles. I hope you’ll give this recipe a try and see just how much fun (and yummy!) Halloween treats can be! Don’t forget to share your creations — I bet your little monsters will enjoy helping out as much as eating these!
Print
Halloween Apple Slices Recipe
- Prep Time: 30 minutes
- Cook Time: 0 minutes
- Total Time: 30 minutes
- Yield: 12 apple slices
- Category: Dessert
- Method: No-Cook
- Cuisine: American
- Diet: Vegetarian
Description
Halloween Apple Slices are a fun and spooky treat perfect for festive celebrations. Crisp apple slices are dipped in dark and white chocolate, then decorated with candy eyes, licorice legs, Oreo cookie crumbs, and almond slivers to create adorable spiders, bats, and mummies. This no-bake recipe is quick to prepare and a delightful way to enjoy a healthy fruit snack with a Halloween twist.
Ingredients
Apple Base
- 2-3 large apples, cut into 12 slices
- Paper towels (for drying)
- 12 lollipop or popsicle sticks
Chocolate
- 1 ½ cups dark chocolate melting wafers
- ¾ cup white chocolate melting wafers
Decorations
- 3 Oreo cookies (1 crushed into fine crumbs, 2 with filling removed and halved for wings)
- 8 almond slivers
- 8 mini googly candy eyes
- 16 large googly candy eyes
- 8 chocolate chips
- Black lace licorice, cut into 48 pieces, each 2 inches long
Instructions
- Dry the Apple Slices: Sandwich the apple rings between paper towels and pat them dry thoroughly to reduce moisture and help the chocolate stick better.
- Prepare Cookie Decorations: Crush one Oreo cookie into fine crumbs for spider decoration. Remove the filling from the other two Oreo cookies and cut each into halves to create bat wings.
- Insert Sticks: Cut a small slit in the bottom of each apple slice and insert a lollipop or popsicle stick, then use paper towels to dry any juice to prevent sogginess.
- Melt Dark Chocolate: Melt the dark chocolate wafers according to the package instructions, making sure it’s smooth and pourable.
- Decorate Spiders: While the dark chocolate is still wet on the apple slices, add the large googly candy eyes and sprinkle crushed Oreo cookie crumbs. Dip the ends of licorice strings in chocolate and attach them as spider legs to the top of the apple rings. Wait for the chocolate to set slightly before positioning the legs firmly, and dust a bit of crushed cookie over the chocolate ends to blend.
- Decorate Bats: On other apple slices with wet dark chocolate, add the mini googly eyes and the Oreo cookie halves as wings. After the chocolate has set, dip tips of almond slivers and chocolate chips in chocolate and press them onto the bat slices for ears and accents.
- Melt White Chocolate: Melt the white chocolate wafers according to the package instructions until smooth.
- Decorate Mummies: Dip remaining apple slices in the white chocolate, place on a tray, and press googly eyes into the wet chocolate. After dipping all mummy slices, put the leftover white chocolate in a baggie with a small cut tip and drizzle randomly over the rings to create a mummy bandage effect.
- Serve: Press the sticks into a pot filled with styrofoam for serving or wrap each stick in plastic baggies tied with brightly colored string for a festive presentation.
Notes
- Ensure apple slices are thoroughly dried to help chocolate adhere and prevent sogginess.
- Use dark and white chocolate melting wafers for easy melting and smooth coverage.
- Hold licorice legs in place briefly after attaching to help them set.
- Store finished apple slices in the refrigerator until serving to keep chocolate firm and apples fresh.
- Customize decorations with other candy or edible markers for additional fun themes.
Nutrition
- Serving Size: 1 apple slice
- Calories: 110
- Sugar: 15g
- Sodium: 20mg
- Fat: 5g
- Saturated Fat: 3g
- Unsaturated Fat: 2g
- Trans Fat: 0g
- Carbohydrates: 18g
- Fiber: 2g
- Protein: 1g
- Cholesterol: 0mg


